Advising Alterations in J1 Web
This page is a list of all the alterations that have been made to student aims. Use the page to review and approve alterations. The alterations are listed according to date and time, with the most recent first. You can also sort the list by the column headings, and you can use the Alterations Filter to narrow down the list.
Tip
Alterations are sometimes called waivers, overrides, or substitutions.
An advising alteration is an adjustment made to an advising requirement for an individual student. Alterations are necessary anytime an advising requirement won't be met through registration and successful completion of coursework. (And sometimes the coursework really is done, but it isn't being counted for all the requirements it satisfies.) Alterations help you ensure that degree audits accurately reflect a student's progress towards program completion.
Alteration types are the categories of alterations. They're also called requirement-met-by types.
These are the most common types of advising alterations:
Course substitutions: To allow another course, with its credits and grade, to fulfill the requirement of the required course.
Waivers: To not require a required course. For example, you may waive the course because of the student's life experience or test scores. A waiver does not give the student credit hours or a grade; it merely overlooks the requirement.
Other: To alter the hours or count needed, the maximum hours or count, the quality points or GPA needed, the Grade Scale/Credit Type/Grade needed, the priority 1 or 2 values, or to enter a bypass. This is a catchall type. You can refine it over time or make more specific types.
For more information on double-counting, see the Reuse and Priority in Advising Trees topic.
Here are a few possible scenarios.
A Transfer Course from a Quarter Term School to a Semester Term School
Rachel Green transferred from a school on the quarter calendar to your school on the semester calendar. She has a COM 101 transfer course, but it has only 2.67 earned hours. The requirement for COM 101 is 3 hours.
To make her transfer course meet the hours requirement, you'll make an "Other" alteration on Rachel Green's COM 101 requirement wherein you change Hours Needed for to 2.67.
A Bypass
Saquon Amhran is a history major who took HIST 3233, History of the Precolumbian Mesoamerica . That course can fill either of two requirements: History Major or GENED - Social Science. But your school allows it to meet only one of them for any given student.
Your school's reuse schema looks to meet requirements in the major first, and GENED second. So HIST 3233 will be used for Saquon's history major.
But Saquon has more than enough for his major. He wants it to meet his GENED requirement. So you'll enter an "Other" alteration for the course in its History Major requirement, and mark it as a Bypass. Thus, the system won't use the course for the major, but will apply it to the GENED requirement. See the Specific Steps for Entering a Bypass below.
Tip
If there were three requirements that the course could meet, and the requirement you want it to meet is third in line, then you'd apply a bypass to both of the requirements you don't want it to meet.
Before you work with alterations, there are some decisions to make and items to set up.
You need to define the types of alterations your school will use. Do this on the Requirement Met By Type Definitions page. See the detailed steps in the How To section of this topic.
Tip
"Requirement-met-by types" and "alteration types" are interchangeable terms, but "alteration types" is easier to say and to enter on a keyboard.

The Use Approval Track for Alterations setting on the Advising Settings page determines whether the system does or doesn't track alterations as approved and unapproved, as well as who approved them. See the detailed steps in the How To section of this topic.
If you set approval tracking to Y (Yes):
The Student Advising Alterations window becomes available. There you can view, edit, and generate reports on students' alterations.
The Approved By field appears in the following places:
Advising Alterations page, on the list (under the Expand icon
 )
)Student Aims page, in the Alterations panel (for students who have alterations) and in the Create Alteration panel
The Unapproved Alteration notation appears on those pages, too, and on the following:
Student Course Needs Letter report
Graduation report
Advising Worksheet report
If set approval tracking to N (No), the system won't track whether an alteration is approved.
Tip
What's a reason to set approval tracking to N? If at your school only one person is authorized to approve alterations, and nobody enters an alteration unless it's been approved, you probably don't need to use approval tracking. Setting it to N will keep you from having to enter an approver each time.
The following don't have settings in J1; rather, they're policy decisions for your school make and train your users to follow.
Should alterations should be approved before or after a user enters it?
Who should approve alterations? The system allows you to enter any J1 ID in Approved By column, but you'll want clear guidelines for consistency in reporting. We recommend using the ID of the person who has final say on approval.
At many schools, the student's primary advisor submits and approves substitutions and waivers.
At other schools, the primary advisor initiates the process, but approval is left to the department chair, dean, or registrar.
Some schools make sure that "Other" alterations (hours or counts needed, for example) are approved by the registrar.
Determine your policy for whether an alteration made for a requirement in one program will apply to the same requirement in another program, if the student were to change their program.
Develop a report and a process for reviewing previously approved alterations for students who have changed programs.
Administrators view and approve alterations on the Advising Alterations page. They can also download the list of alterations to an Excel spreadsheet.
Alterations are notated on the Student Aims page, and administrators create them on that page, too.
After you enter an alteration, the student's aims are updated the next time the Compute Student Progress process runs. You can wait till it runs automatically, or you can run it manually. See the Compute Student Progress topic for details.
Alterations generally require these two steps on the Student Aims page:
Enter the alteration (from the Actions drop-down on a requirement).
Run the Compute Student Progress process from the Reporting and Processes drop-down.
See the detailed steps later in this topic for more information.
Advisee / ID: Each advisee's name and ID is a link to their Summary page.
Requirement Being Altered: This is the altered advising requirement (ARC). It includes the requirement's Code, Description, and ARC Type.
Met By: These are the types of alterations. They're defined on the Requirement Met By Type Definitions page.
Submitted Date: The date the alteration was created.
Substitution Requirement: The requirement that substitutes for the requirement being altered. This field appears only if the Met By type is a substitution.
Aim Label / Requirement: The aim label (such as CORE, GENED, or MAJOR) listed with its Code, its tree ARC Code, and its tree ARC Description.
Parent Requirement: The immediate parent ARC for the requirement being altered. It includes the parent ARC Code and the parent ARC Description.
Expiration Date: An optional date for the alteration to expire.
Applied Date: The date the alteration takes effect. In Desktop, this is called Alteration Date.
Submitted By: The advisor who submitted the request.
Approved By: The admin who approved the request. Visible only when the Approval Track for Alterations setting is set to On.
Approved Date: Date an admin approved the request. Visible only when the Approval Track for Alterations setting is set to On.
Note: Note left by the advisor when they created the alteration. Up to 30 characters. (In Desktop, this is the Comment field.)
Status: Approved or Pending.
An information alert at the top of the Advising Alterations page tells you whether the Use Approval Track for Alterations setting is set to On. It provides a link to that setting so you can turn it on or off.
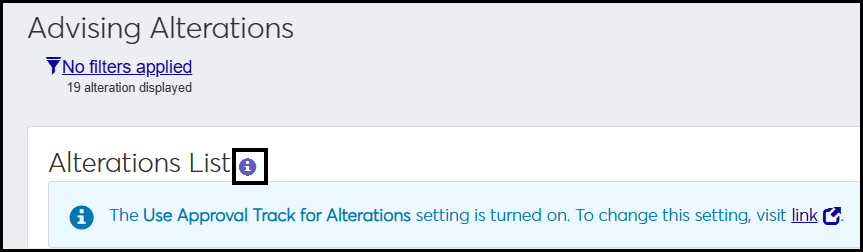
When the setting is on, unapproved alterations are marked as unapproved. When the setting is off, unapproved alterations look just like approved alterations.
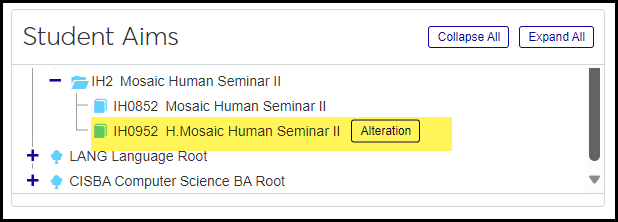
On the Student Aims pages, altered aims have a tag labeled "Alteration".

When the Use Approval Track for Alterations setting is set to On, the alteration tag for an aim with unapproved alterations is amber with a caution triangle, and the tag for an approved alteration is blue. When the Use Approval Track for Alterations setting is set to Off, the alteration tag is always blue."

Each alteration has an Actions drop-down. These are the actions available:
Advising team: View a list of the student's advisors. You can send a communication to the advisors you select.
Approve: If the alteration isn't already approved, you can approve it and add optional Approval Date and Expiration Date.
View Details: See all the details of the alteration including the needed hours, quality points, grade scale, credit type, and grade.
When you select one or more alterations, the Options drop-down becomes available. The options operate on all the selected alterations. These are the options:
Download to Excel: Download the selected alterations to a spreadsheet.
Delete: Permanently delete the selected alterations.
Caution
If students have met requirements because of the alteration, the requirements will no longer be met when the alteration is deleted.
The Create alteration button opens the Student Aims page. From there, administrators can select a requirement and create an alteration for it.
You can manage advising alterations in Desktop, too, on the Student Advising Alterations Report window.
Information is stored on the Student Advising Alterations table (stud_adv_alter). The Met By field value is stored in the stud_adv_alter.req_met_by_cde column.
The permission needed is "Can manage alterations." It's available in the Academic Advising Module Manager role and in roles copied from it.
From the Advising Administration hub, click the Hub options drop-down.
Click Advisees, and select Alterations. The Advising Alterations page opens.
Use the Alterations Filter to find the alterations you're looking for. To find alterations awaiting approval, select Status and Pending. Click Apply.
Click a column heading to sort the list by that column.
Each row is an alteration. Click the Expand icon
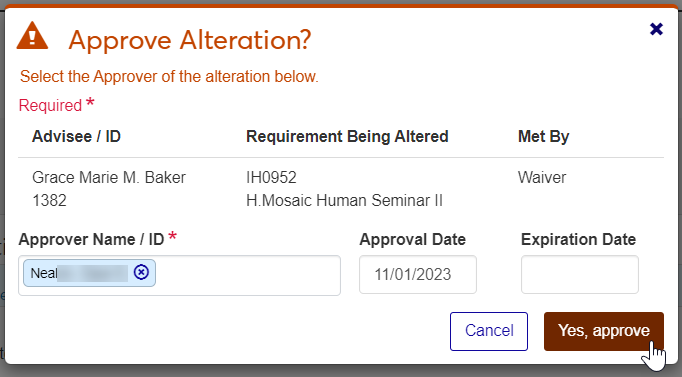
on a row to see all the fields for that alteration.To approve an alteration, click Actions, and select Approve. The Approve Alteration? pop-up opens.
In the Approver Name / ID field, begin typing a name or ID, and select from the list.
You can click in the optional Approval Date and Expiration Date fields to select dates with the date picker.
Click Yes, approve.
To view the student's list of advisors, click Actions, and select Advising team. The list of the student's advisors pops up.
To send a communication, select any or all of the student's advisors.
Click Options, and select Send communication. The Create New Communication pop-up opens.
Fill in the fields, and click Send.
To view all the details of the alteration, click Actions, and select View details.
From the Advising Administration hub, click the Hub options drop-down.
Click Admin options, and select Advising alterations. The Advising Alterations page opens.
Click the Create alteration button. The Student Aims page opens in a new tab.
In Student / ID, begin typing a name or ID number, and select from the list. The student's name and ID appears.
Next to the student's name, click Apply. The student's aims appear.
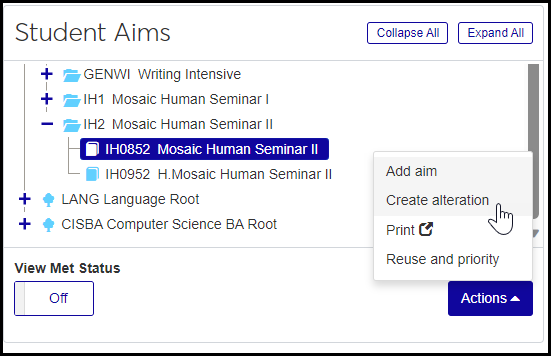
On any aim, click the Expand icon
to drill down to a requirement.Select a requirement, and click Actions.
Select Create alteration. The Create alteration panel opens.
In Met By, select a Requirement Met By Type.
If your Met By selection is a substitution, then in the Substitution Requirement, select a requirement.
For substitutions, the Show all course requirements checkbox is enabled. Select it to display all possible course and cumulative ARCs in the drop-down.
If you leave Approved By blank, an administrator can approve your alteration on the Advising Alterations page. To approve it now, start typing a name or ID, and select from the list.
In the optional Applied Date, Expiration Date, and Approved Date fields, you can click to open the date picker.
In the Note field, you can enter up to 30 characters.
In the Overrides section, select values for each of the fields as needed.
Click Save.
Use a bypass when the reuse schema would mark a requirement as met, but you want it to remain unmet (because you want a duplicate requirement further in the chainto be marked unmet).
From the Advising Administration hub, click the Hub options drop-down.
Click Admin options, and select Advising alterations. The Advising Alterations page opens.
Click the Create alteration button. The Student Aims page opens in a new tab.
In Student / ID, begin typing a name or ID number, and select from the list. The student's name and ID appears.
Next to the student's name, click Apply. The student's aims appear.
On any aim, click the Expand icon
to drill down to a requirement.Select a requirement, and click Actions.
Select Create alteration. The Create alteration panel opens.
In Met By, select a Requirement Met By Type. (We recommend "Other".)
If you leave Approved By blank, an administrator can approve your alteration on the Advising Alterations page. To approve it now, start typing a name or ID, and select from the list.
In the optional Applied Date, Expiration Date, and Approved Date fields, you can click to open the date picker.
In the Note field, you can enter up to 30 characters.
In the Overrides section, in the Met drop-down, select Bypass.
Click Save.
Select the checkboxes next to the rows you want to export.
From the Options drop-down, select Download to Excel. The Download to Excel pop-up opens.
Select options for the Excel format and data columns.
Click Download. Your .xlsx or .zip file is saved in the file location that you have set in your browser settings.
Select one or more alterations.
In the Options drop-down, click Delete.
The Delete Alterations? pop-up opens and lists the selected alterations.
If there are any definitions listed that you decide you don't want to delete, click their Remove icon
 to remove them from the list of items to delete.
When you're sure you want to delete all the rows listed, click Yes, delete.
All previous alterations will be annotated as Unapproved (after Compute Student Progress is run). Unapproved alterations are still applied to student aims and still appear on the Graduation Report and Advising Worksheet reports, but they'll be annotated as unapproved. This may cause questions or confusion. So you'll need to manually enter an Approved By ID on each historic alteration (or ask your database administrator to run a SQL update script to do it).