Batches
Important
Information and features vary according to the roles to which you belong and the permissions associated with those roles. For more information, contact your module manager or your campus support team.
This page will allow you to quickly manage all transaction groups, or batches. Depending upon the configurations and your personal permissions in General Ledger, you may be able to view, edit, print edit, summarize, reverse, unlock, delete, and post transactions.
Tip
Fields and columns will update automatically based on the selected source code.
Jenzabar provides several roles for managing batches, and each role can be associated with different source codes.
You'll need to add users to the appropriate batch access roles for each type of batch you want your user to be able to work with. Each batch role will have similar permission options for how users can work with a particular type of batch.
General Ledger Accounting Accounts Payable Batches
General Ledger Accounting Adjustment Batches
General Ledger Accounting Charge Batches
General Ledger Accounting Conversion Batches
General Ledger Accounting Customized Batches
General Ledger Accounting Development Batches
General Ledger Accounting Disbursement Batches
General Ledger Accounting Financial Aid Batches
General Ledger Accounting Fixed Asset Batches
General Ledger Accounting GST Credits Batches
General Ledger Accounting Miscellaneous Batches
General Ledger Accounting Payroll Batches
General Ledger Accounting Preliminary Batches
General Ledger Accounting Receipt Batches
Tip
With a few exceptions, the permissions and associations apply to each batch access role.
Each batch role has similar permission options for how users can work with a particular type of batch. Each batch role includes all or most of the following permissions:
Can view batches
Can edit batches and generate Print Edit reports
Can create and import batches
Can delete batches
Can download to Excel
Can post batches and generate Post reports
Can post batches they created
Can unlock batches
Can summarize batches
Can reverse batches
This tab allows you to enable/disable access to different interactions and workflows. Codes are associated with interactions and workflows when they are defined and created. Jenzabar provides access codes based on Jenzabar modules; you can also create custom codes on the Access Codes page. If a user belongs to multiple roles, they’ll have access to the interactions and workflows available with each.
Use this tab to see a list of the users assigned to this role. You can add or remove users and view user details.
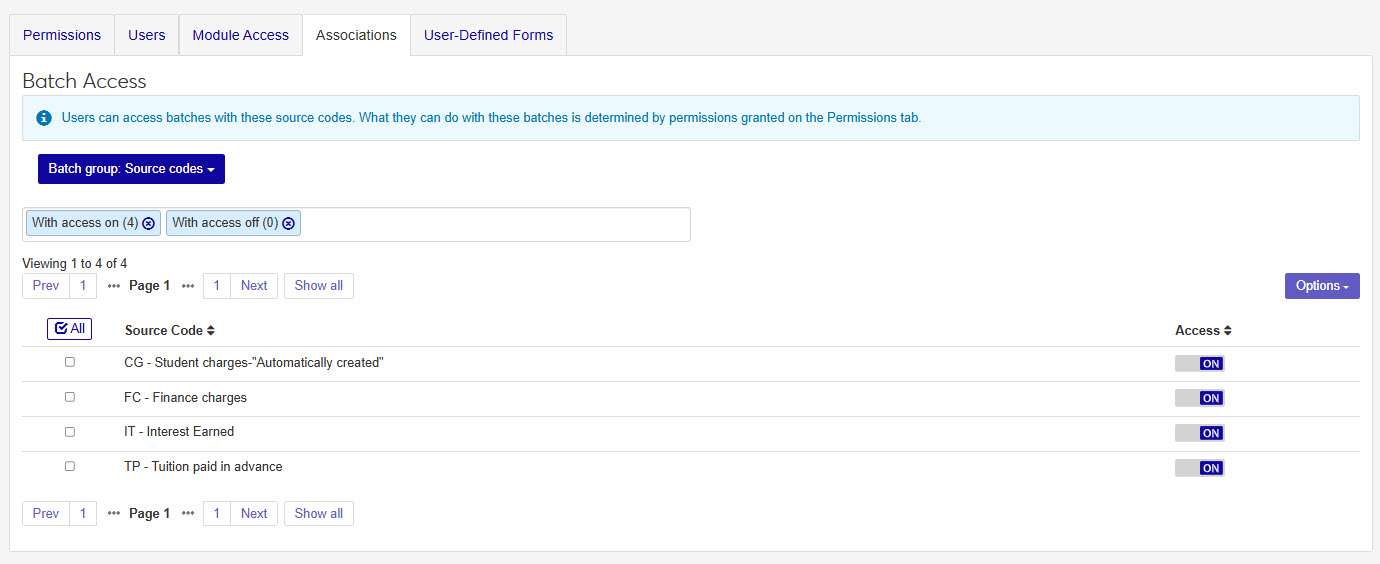
The Associations tab is only available for certain roles, and options vary by role. It lets you control access to constituents and information in the system based on the user's relationship to them. Source codes are enabled for what the user should have access to.
The User-Defined Fields tab controls permissions for viewing, editing, and configuring user-defined fields (UDEF) across the system. Users who belong to multiple roles will have access to the user-defined features enabled with each. Use the levels of permissions to determine what users can do with user-defined fields.
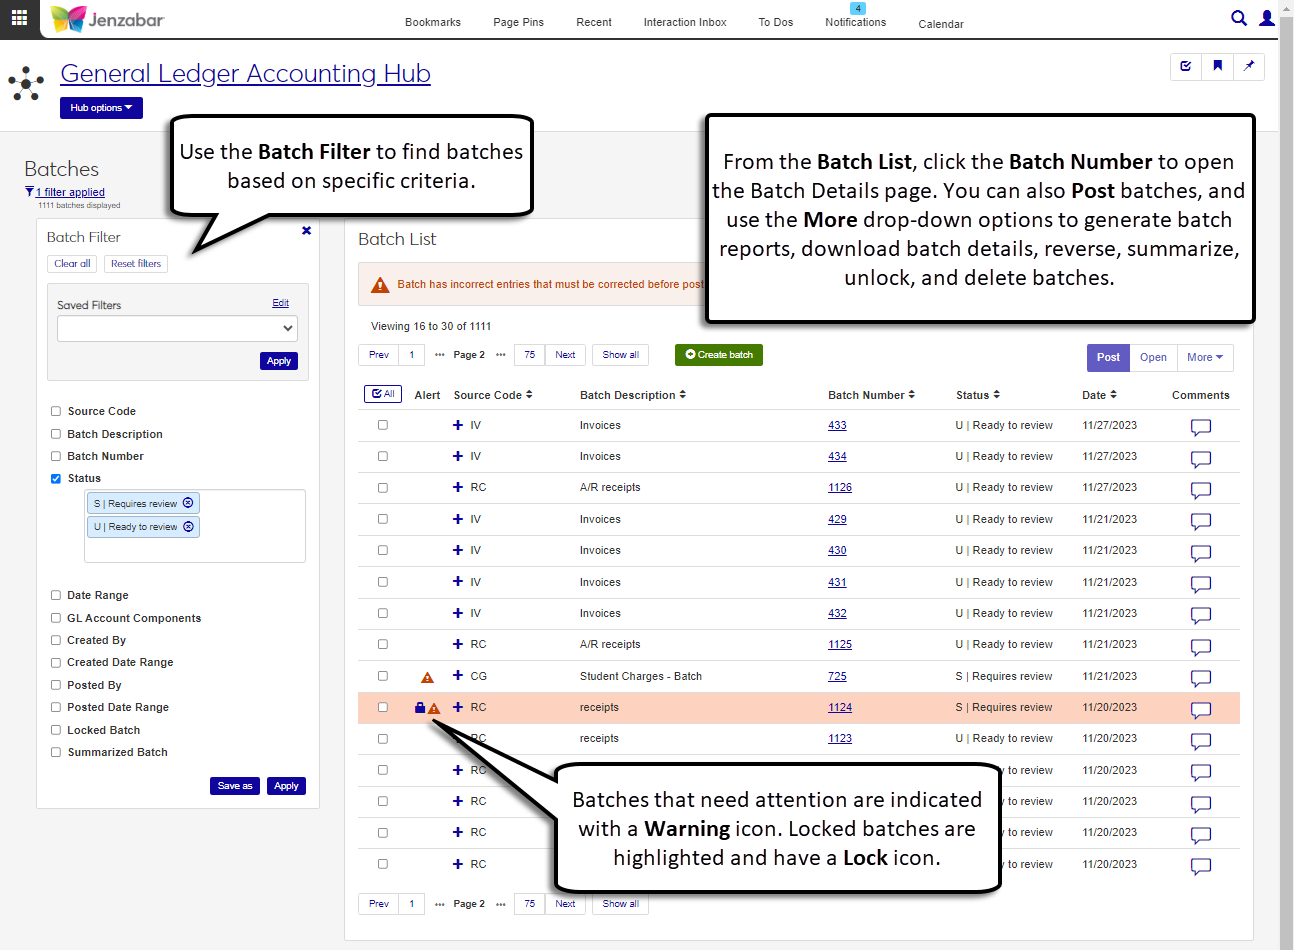
Use the filter to expand or limit the batches displayed in the list section. You can also use the filter options to search for a specific batch. Filter options include:
Source Code
Batch Description
Batch Number
Status
Date Range
GL Account Components
Created By
Created Date Range
Posted By
Posted Date Range
Locked Batch
Summarized Batch
The Batch List page allows you to view an manage all the batches you have permission to access. A row exists in the Batch List for each batch of transactions entered into the system and monitors the status of the batch (i.e., posted, unposted, and suspended).
Note
By default, the list is filtered to include batches with statuses of Ready to review (U) and Requires review (S).
There are several batch related roles in General Ledger Accounting that your users may need to assigned to:
Accounts Payable Batches: includes permissions and access to accounts payable batches (IM, IV, MN, RF, and VD source codes) on batch pages with the General Ledger Accounting hub.
Adjustment Batches: includes permissions and access to adjustment batches (JL and MA source codes) on batch pages with the General Ledger Accounting hub.
Charge Batches: includes permissions and access to charge batches (CG, FC, IT, and TP source codes) on batch pages with the General Ledger Accounting hub.
Conversion Batches: includes permissions and access to conversion batches (CV source code) on batch pages with the General Ledger Accounting hub.
Customized Batches: includes permissions and access to customized batches as assigned on the Associations tab.
Development Batches: includes permissions and access to development batches (GF source code) on batch pages with the General Ledger Accounting hub.
Disbursement Batches: includes permissions and access to disbursement batches (DB source code) on batch pages with the General Ledger Accounting hub.
Financial Aid Batches: includes permissions and access to financial aid batches (FA, LD, and LO source codes) on batch pages as assigned via the Associations tab.
Fixed Asset Batches: includes permissions and access to fixed asset batches on batch pages with the General Ledger Accounting hub.
GST Credits Batches: includes permissions and access to GST (Goods and Service Tax) credit batches (TX source code).
Miscellaneous Batches: includes permissions and access to miscellaneous batches (MS source code) throughout the General Ledger Accounting hub.
Payroll Batches: includes permissions and access to payroll batches (FR and LB source codes) on batch pages as assigned via the Associations tab.
Preliminary Batches: includes permissions and access to preliminary batches (@C and @F source codes) assigned via the Associations tab.
Receipt Batches: includes permissions and access to receipt batches (RC source code) on batch pages with the General Ledger Accounting hub.
Note
Users will also need to be in a General Ledger Accounting GL Account access role with access to the GL accounts associated with batch transactions.
The table below provides a brief definition of the type of batch and any associated source codes.
Batch Type | Associated Source Codes | Additional Details |
|---|---|---|
Accounts Payable | IM - Immediate check invoices IV - Regular check invoices MN - Manual check invoices RF - Refunds to vendors VD - Void check invoices | NoteThese batches are generated in Finance > Procurement hub > Invoice and Vendors pages. Check invoices that need to be printed outside of your institution's normal check writing cycle can be done using the IM source code. Once an invoice is entered and saved, the check will print immediately. Check invoices that are generated on a periodic basis are tagged with the IV source code as regular check invoices. Checks that are written or typed up as needed, can be entered into the system at a later date. Those invoices are tagged with the MN source code and will not be processed by the system. The RF source code is used when issuing a refund check to individuals or vendors with a credit balance on their account. If a check is printed and found to be incorrect, you can void the transactions with the source code VD. |
Adjustment | JL - Journal entries MA - Monthly adjustments | You can manually enter non-repeating transactions with the JL source code to provide an audit trail in general ledger, or if the transaction will repeat monthly, you can create a monthly adjustment (MA) to automate repeating transactions and adjustments. |
Charge | CG - Student charges (automatically created) FC - Finance charges IT - Interest earned TP - Tuition paid in advance | NoteThese batches are generated in hubs, such as the Receivables Management, Student Conduct, and Vehicle Administration. Student charges (CG) are an institutions main source for revenue, created during student billing, they appear on a student's account and are reflected in their account balances. Some charges include tuition, room/board, tech fees, payment fees. Finance charges (FC) can be generated by your institution annually and/or monthly for unpaid finance charges on a student's account. They can also be used for late fees or credit card payments. After setting up the rates/percentages these batches are created when generating finance charges, typically on a monthly or annual basis. Interest earned (IT) batches are generated during the collection of payment when your institution has defined interest fees on a student payment plan. You can also generate a batch manually for all students with payment plans containing interest. The TP source code is generated for third party transfers, transfer subsidiary balances, and advance deposit transfers. Typically, TP is used before the student is actually in the system and before they have an AR account. This type of batch will hold the an amount in a non-AR account until the student has an account. |
Conversion | CV - Conversion necessary | Conversion (CV) batches are used to bring historical financial data into a new or ungraded accounting system. When a CV batch is created, the transactions will be grouped for processing and reconciliation, linked to source data providing an audit trail, and posted after the review and validation. |
Customized | Any custom source codes your school creates. | If your institution needs additional source codes to help categorize and track transaction batches, you can create a new one and assign a unique 2 letter code. This could help separate transactions from specific departments or campuses. |
Development | GF - Development gifts | Development gifts are generally donations made to your institution. When a donation is made, and entered into the system, they will appear with the GF Source code. |
Disbursement | DB - Disbursements | NoteThese batches are generated in the Procurement hub. A disbursement batch is created at the end of the Create Payment process. A DB batch will be generated for each check and included transactions. |
Financial Aid | FA - Financial Aid LD - In-House Disbursement LO - Financial Aid Loan | Financial aid batches are transactions for the actual financial aid funds credited to the student’s account receivable. While similar to @F batches, these batches are authorized and disbursed to the student. The amounts may not match the preliminary aid amounts. In-house loan batches occur when your institution has set funds aside for internal loans that can be assigned to students. When loan transactions are processed as a loan disbursement that the student will be responsible for paying off. The financial aid loan batches are generated by the CommonLine Loan Disbursements process. Usually granted via private banks, LO batches help when there are fees and when net amount is different from the award amount. |
Fixed Asset | FX - Fixed assets | NoteThese batches are generated from the Asset Management hub. The fixed asset batches are created generated when depreciation (expense) transactions are run. The depreciation process can be run on a schedule or manually. Depreciation can be run monthly or annually. When run monthly, you will have 12 FX batches at the end of the year. |
GST Credits | TX - Goods and services tax credits | This batch is used to report any expenditures paid for goods or services. This type of batch is not required but is important if your institution needs to complete IRS 1099 forms annually. |
Miscellaneous | MS - Miscellaneous transactions | NoteThese batches are generated in the Receivables Management hub. This source code is used for less frequent, non-recurring types of student charges and for correcting student accounts. This source code is the default for charges related to room and board, disciplinary violations, and other manual or automated entries initiated by Student Life. |
Payroll | FR - Fringe benefits LB - Labor distribution | NoteThese batches are generated in the Human Capital Management (HCM) hub. A Fringe benefits (FR) batch shows expenses generated during the payroll run that are part of the labor distribution for employees. They may include taxes, medical plans, or disability, unemployment, retirement, etc. The labor distribution batch shows an employee's earnings including fringe benefit, liability, and expense transactions. |
Preliminary | @C - Preliminary student charges @F - Preliminary financial aid | NotePreliminary batches are created from the Student hubs. @C charges appear on the student's account, but as suspended transactions, they are not reflected in their account balances This source code provides a preliminary view of what they will owe for a particular billing period (year/term). When used, @F charges appear on a student's account showing all anticipated financial aid for a student removed from the final balance. These batches are temporary and will need to be cleared after financial aid disbursement. TipPreliminary transactions and batches cannot be posted. |
Receipt | RC - A/R Receipts IX - Income Transfer | NoteThese batches are generated in Finance > Receivables Management > Receipts. Transactions with the RC source code are created on the Receipts page. One or more receipts can be included in an RC batch and may include debit cash and credit entries. This source code can also be created from revenue accounts and online student payments. When an RC batch is posted for cash-based or open item transaction the system will automatically move the money from deferred accounts to revenue accounts in the form of an IX batch. IX batches are automatically posted and can be viewed on the Batches page in the General Ledger Accounting hub. |
There are several ways to interact with batches. Depending on what needs to be done, you can select one or more batches from the list to perform the following options:
Post: After transactions have been edited, they can be posted. All transactions must be edited (checked for accuracy) prior to posting them into the General Ledger system. Once a transaction has been posted, it cannot be changed. In order to correct any problems, you must perform a reversing transaction to cancel out the incorrect transaction and then replace it with the correct information.
Open: To open a batch and view the batch details, click on the Batch Number. You can also select one or more batch from the list using the checkbox at the beginning of a row, then click the Open button at the top of the list.
Download to Excel: This option will allow you to export the selected batches to an Excel spreadsheet. You can keep the spreadsheet as records, to review the batch details, and if you make changes you can upload the edited rows on the Batch Details page.
Generate Post Report: This report will display the batches and transaction details that have been posted for the selected batches.
Generate Print Edit Report: This report will show you batches and transaction details that you can review to help you make sure all details are correct and ready for posting. If you make changes, be sure to run this report again before the actual posting takes place.
Reverse: In order to correct any problems within a posted batch, you must perform a reversing transaction to cancel out the incorrect transaction. This process creates a new batch containing all of the Transaction History rows and cancels out the posted transaction. You will need to replace the incorrect batch with the a new batch that has the correct transactions.
Warning
This process cannot be undone.
Summarize: This process compiles all transactions within the batch that have the same source code, group number, transaction date, and account code, and summarizes them into one transaction. Summarizing a batch will combine a large number of similar transactions to be reduced in size without impacting accounting results. It provides fewer unnecessary details and better batch processing time. In order for this to be possible, the account cannot be a subsidiary account and the Summarize checkbox must be selected on the GL Account.
Notice
Some General Ledger accounts, such as Accounts Receivable or Tuition Income, contain many student transactions. These transactions can be summarized on reports and windows by group and date. Summarized accounts often share department, such as tuition accounts that often use the same department code.
Unlock: When a batch is being used, a temporary lock in the database is created, keeping other people from accessing a batch while it is in use. When the transaction group is successfully finished being used, the lock in the database is released. This option allows you to manually unlock a batch.
Tip
This process is mostly used if a process ends abnormally leaving the batch locked. Be careful when unlocking batches. Any unsaved changes by the other user will be lost or may overwrite any changes you make.
Delete: If the batch hasn't been posted, you are able to delete the entire batch; however, once posted, the batch cannot be deleted. This process cannot be undone, so be sure you don't need the batch transactions before deleting.
Warning
This process cannot be undone.
Batches for certain source codes are generated by processes in the Procurement and Receivables Management hubs. In most cases, batches for these source codes cannot be created in the General Ledge Accounting hub.
Accounts Payable batches. Invoice batches (IM, IV, MN) are created when invoices are created or imported from the Procurement Hub. RF and VD batches are created when invoices are refunded or voided. These batches cannot be created in the General Ledger Accounting hub.
Charge batches. CG, FC, and TP batches are created when the generate charges, generate finance charges, and transfer student deposits processes are run in the Receivables Management hub. These batches can be created in the General Ledger Accounting hub.
Disbursement batches. DB batches are generated when the Create Payment process is run from the Procurement hub. These batches can be created in the General Ledger Accounting hub.
Miscellaneous charge batches. MS batches are generated during the Create Miscellaneous Charges process in the Receivables Management hub. These batches cannot be created in the General Ledger Accounting hub.
Receipt batches. RC batches are created when receipts are created or imported. These batches cannot be created in the General Ledger Accounting hub.
To create a new general ledger batch, select Create batch from the General Ledger Accounting Hub options drop-down or click the Create batch button on the Batches page. An empty spreadsheet displays.
At the top of the page, you'll need to enter the basic information for your new batch:
Tip
You will only see the source codes you have been given permissions/associations to.
Select a source code from the Source Code drop-down.
If you want to label the batch, enter a batch Description.
Enter the batch Date.
Now it's time to enter batch transactions into the batch spreadsheet. You can enter transactions manually into the spreadsheet, or if you have an existing spreadsheet (such as Excel) you can use Ctrl + C and Ctrl + V to paste transactions into the batch spreadsheet. Be sure to validate your data.
Note
Data is validated immediately in the spreadsheet. If the content you entered into a cell is invalid or has an error, the cell will be highlighted red with an Alert
 icon that will explain why the data entered cannot be validated.
 The batch spreadsheet offers many columns where you can add details.
Click Create batch.
Tip
After a batch is created, the batch details page opens. From there you can edit and maintain the batch information. To create another batch, go to Batch options and click Create.
The summarize option is typically used with large batches where there are many transactions from the same account listed on the batch detail spreadsheet. Summarizing will take multiple transactions from one account, merge the individual transactions into a single transaction, and update the Transaction Amount to show the cumulative total.
Tip
For the summary option to work, the included accounts cannot be subsidiary accounts and the Summarize checkbox must be selected on the GL Accounts page.
From the Batch List, select the checkboxes next to the row(s) of batches you want to summarize.
Click the More drop-down and select Summarize.
In the Summarize Batches pop-up window, you will see the selected batches listed in one of two sections:
Ready to Summarize: Batches listed in this section will be summarized into a single transaction. You may notice a warning icon at the end of a batch row, which indicates that only part of the batch will be summarized.
Unable to Summarize: Batches listed in this section could not be summarized. An alert icon at the beginning of the batch row lists the reasons why the batch couldn't be summarized.
Click Yes, summarize.
Tip
If none of the selected batches can be summarized, you will see an OK button instead of the Yes, summarize.
Tip
You can also summarize a batch from the Batch Details page. When you open a batch, you will see the Batch options drop-down where you can click the Summarize option and follow the same steps as above.
From the Batches page, select the checkboxes next to the rows of the batches you want to view details for.
Click the Open button.
When the Batch Details page opens, you will see the Select a Batch switcher at the top of the page. This switcher will allow you to move through the Batch Details pages for the batches you selected.

The Edit
 icon will allow you to add or remove batch numbers that are included in the switcher. You can search for new batches to add by source code, group number, and batch description.
The arrows will allow you to move between the included batches.
The text in the switcher will let you know which batch you're viewing and how many batches are included.
Move through the batches as needed. When you're finished, you can close the Batch Details page.
On the Batches page, in the Batch List, select the checkboxes next to the row of the batch or batches you want to delete.
Tip
Posted batches cannot be deleted or edited. To remove a posted batch, you will need to follow the Reverse process and re-create a batch to make your changes.
Click the More drop-down and select Delete.
In the Delete Batches pop-up window, review the list of selected batches.
If a batch is in the Ready to Delete section, clicking Yes, delete will remove the batch or batches from the system.
Warning
The delete process cannot be undone. Review the selected batches carefully before completing the process.
If there are any batches in the Unable to Delete section, continuing with the delete process will have no effect on the batches listed.
Click Yes, delete.
Tip
You can also delete a batch from the Batch Details page by opening the Batch Options drop-down and clicking Delete.
Select the checkboxes next to the rows you want to export.
From the Options drop-down, select Download to Excel. The Download to Excel pop-up opens.
Select options for the Excel format and data columns.
Click Download. Your .xlsx or .zip file is saved in the file location that you have set in your browser settings.
Select the checkboxes next to any rows you want to include in the Print Edit report.
Click the More drop-down and select Generate Print Edit report.
In the Generate Print Edit Report pop-up window, you will see the selected batches listed in one of two sections:
Ready to Generate: batches listed in this section will be included in the Print Edit report.
Unable to Generate: batches listed in this section will not be included in the Print Edit report.
Click Yes, generate.
Danger
When an approved user is working in a batch, it is locked. If you choose to unlock a batch, changes made by the other user, or yourself could be lost. Jenzabar recommends NOT using this feature unless you contact the other person working in the same batch.
You can unlock a batch from the Batch List or the Batch Details page. Select the batch you want to unlock.
From the Batch List, click the More drop-down and select Unlock , or, from the Batch Details page, click the Unlock button in the alert bar.
Tip
The warnings and alerts that appear when a batch is locked by another user will give you the name of the individual currently working in the batch. Please contact the person before unlocking.
In the Unlock Batches pop-up window, you will see the selected batches listed in one of two sections:
Ready to Unlock: Batches listed here will be unlocked and made available to yourself and others. Be sure to check the User column and communicate with the user currently using the batch so they won't lose work or overwrite your content.
Unable to Unlock: Batches listed in this section could not be unlocked.
Click Yes, unlock.
Post a Batch
Tip
If you selected the Generate the Post Report checkbox, the report will open or save in whichever format(s) you select.
On the Batches page > Batch List, search for the batch you want to post.
Click the linked Batch Number to open the Batch Details page.
Review and verify information about the batch and included transactions.
Make sure the batch status is U| Ready to Post.
Click the Batch options drop-down.
Select Post.
On the Post Batch? pop-up, review the batch details in the Ready to Post section. Decide if you want to include the Post Report by selecting or deselecting the checkbox and choosing a layout and format.
Tip
If you select a batch that has validation issues, or is already posted, the Batch Options button will not allow you to select Post. However, while you can select an invalid or posted batch from the Batch List and click the Post button on the main Batches page, you will simply see an Unable to Post pop-up that will provide the reason the system cannot post the batch. If this happens, click OK.
Click Yes, post.
On the Batches page, Batch List, search for and select the batches you want to post.
Click Post.
A pop-up will appear with one or two sections: Ready to Post and Unable to Post. You will need to review the selected batches and confirm if you want to continue posting.
Ready to Post:
The list of batches in this section have passed all validation and can be posted to GL. Check your batch details before continuing, and if you see a batch that shouldn't be posted yet you can click the Remove icon
 .
. Under the list of batches ready to be posted, there is a checkbox option to Generate Post Report. Selecting the checkbox will allow the system to produce a post report in the layout and format you select. Deselecting the checkbox will post the batches but will not create a Post report.
Tip
If you choose not to generate a report at posting, you can always go back to the Batch Details page and select Generate report from the Batch Options drop-down.
Unable to Post:
If there are any validation errors or issues causing the selected batches to fail verification, they will be listed here with their current status and the reason they cannot be posted. All issues must be fixed before the batch can be posted to GL.
Tip
Batches with a C or S status cannot be posted.
Click Yes, post.
Warning
When you're ready to Generate Post Report for selected batches, be sure you're including no more than 30 batches at a time to prevent system errors.
Select the checkboxes next to any rows you want to include in the Post report.
Click the More drop-down and select Generate Post Report.
In the Generate Post Report pop-up window, you will see the selected batches listed in one of two sections:
Ready to Generate: batches listed in this section will be included in the Post report.
Unable to Generate: batches listed in this section will not be included in the Post report.
Click Yes, generate.
Note
Only posted batches can be reversed in J1 Web.
Select the checkbox next to the row of the batch you want to reverse.
Tip
You can only reverse one batch at a time.
Click the More drop-down and select Reverse.
Tip
If a batch cannot be reversed, the Reverse option will be inactive in the drop-down list.
In the Reverse Batch? pop-up window, select a new source code, write a brief description, and enter a date for the batch.
Tip
The original source code and batch number values will be entered by default. The new batch number is auto-generated by the system.
Click Yes, reverse.
A journal entry records financial data for business transactions. It provides an audit trail and helps determine the effects of a transaction on an institution's financial position when it is posted to the General Ledger. A journal entry consists of at least one credit and one debit transaction. It can include multiple transactions, and the number of credit transactions does not have to match the number of debit transactions; however, the total debit amount must equal the total credit amount (i.e., the entry must have a zero net balance).
Batches (also called "transaction groups") are collections of one or more journal entries that encompass a specific time period (e.g., week or month) and are processed at one time. The net total of debit and credit transactions in a group must equal zero.
Each batch is assigned a source code. The source code identifies the office in which the transactions were generated and/or the type of transactions within the group (e.g., financial aid or purchase orders). Jenzabar provides several source codes, and the one needed for this process is "JL", which is used for journal entries entered in the general ledger.
Different status codes indicate the stage each transaction or transaction group is in. The status code updates automatically when certain system actions or processes are performed.
When batches are posted, the following occurs:
The amount of the transaction is applied to its account balance and is reflected in the General Ledger Account Master table.
The Post Transactions report is printed listing each transaction in the group.
The transaction status becomes current (C), no longer appears on the window, and becomes part of the month in which it was posted.
Some functions in the General Ledger system create transactions for each student. For example, when you generate tuition charges for a student, the system creates one debit to the Accounts Receivable account and one credit to the Tuition Income account. While these transactions are necessary, they often provide more detail than required. For this reason, you can choose to summarize entries for selected accounts
Yes, Created By and Posted By fields are populated and displayed on the Batch List page as well as within the Batch as you view the details. They are also clickable links that open that person's Summary page so you could send them a communication if needed.
You can't. Miscellaneous batches are created in Receivables Management. With the proper permissions, you can create and manage a MS batch from the Miscellaneous Charges page. MS batches can also be viewed and edited on the Batches page in the General Ledger Accounting hub.
When you create or edit a batch, be sure all the required fields are correct and there is at least one transaction in the batch.
A batch will be locked when an approved user selects one or more batches from the Batch List and clicks one of the following options:
Post
Summarize
Reverse
Delete
Any batches that appear in the Ready to... section will be locked to other users until the action is complete. If the user becomes inactive before the action is complete, the batches will be locked for 30 minutes, then become unlocked for use.
While both Student and Miscellaneous charges are assigned to students, the difference is that Student Charges (CG) are created by a process and Miscellaneous Charges (MS) are created manually.