Student Housing Check-In and Check-Out
Important
Information and features vary according to the roles to which you belong and the permissions associated with those roles. For more information, contact your module manager or your campus support team.
Set up specific instructions based on criteria such as when certain groups of residents are checking in. Choose whether RAs and RDs can check in any resident, or only the ones in their assignment or on-call zone. Create custom check-in agreements, generate check-in and check-out room condition reports for walk-throughs, and even see what room items have changed condition during the session.
For links to detailed help about completing each of these steps, see the Related Links at the bottom of this page.
The session must be created, with residence spaces activated in the session.
Staff assignments should be set up and permissions applied.
Residents should have a room assigned to them.
To use room condition reports, room items must have been created and room condition report templates must be applied to the residence spaces you will be using.
The Check-In and Check-Out block appears on the session summary page before the check-in process has been broadcast.
Caution
Don't broadcast the check-in process until you are sure that all of the residents for this session have been assigned to a check-in group. You won't be able to change or add residents to the check-in groups once the process is broadcast.
Set RA and RD Check-In Authority
Create Check-In Groups
Assign Residents to Check-In Groups
Broadcast the Check-In Process
From the Check-In and Check-Out block on the session summary page, click the Edit icon next to Residents Checked In by On-Call Zone. The Resident Check-In Setup window opens.
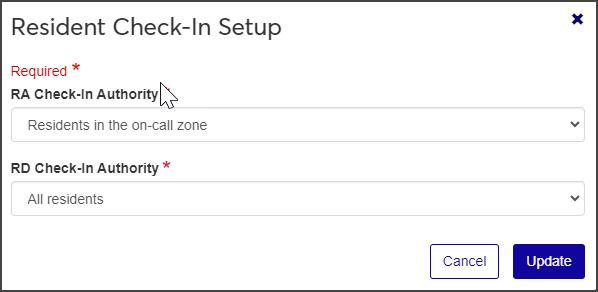
Under RA Check-In Authority and RD Check-In Authority, select the groups you want RAs and RDs to be able to check in. RAs can check in all residents, only residents in the on-call zone, or only residents in the assignment zone; RDs can check in all residents or only residents in the on-call zone.
Click Update to save your choices.
In the Check-In and Check-Out block on the session summary page, click the link next to Number of Check-In Groups. If you haven't created any check-in groups, the link will say "0 groups". The Manage Check-In Groups page opens.
Click the Create check-in group button. The Create Check-In Group window opens.
Add a name for the group and set the start and end dates and times. These fields are required.
When Active is set to Yes, this group will be available to assign students to. If you do not want it to be available, select No; otherwise leave it set to Yes.
In the Group Check-In Instructions field, enter any information you want residents to receive with the notification of their check-in times. This field is optional.
Tip
For example, you might include something like: "Check in at May Hall. Bring your student ID and insurance information. If you have any questions, contact Emily Henderson, Residence Director at (555) 222-3333. We look forward to a great fall session."
When you are done, click Save and create another or Create and close.
In the Check-In and Check-Out block on the session summary page, click the link next to Residents Check-In Arrangement. The Resident Roster page opens.
Tip
If the link says "0 residents," then no residents have been assigned to rooms. Residents must be assigned a room before you can add them to a check-in group. If there is a triangular red warning icon beside the link, it means that there are residents who are not assigned to a check-in group. Make sure that all residents for this session are assigned rooms and in a check-in group before you broadcast the check-in process. You won't be able to change this later.
Select the checkboxes next to the residents you want to add to a check-in group.
From the Options drop-down menu, select Update check-in group. The Update Check-In Group window opens.
From the drop-down menu, select the check-in group you want to add the selected residents to.
Click Update.
Caution
Do not broadcast the check-in process until you are sure that all residents for this session are included and room condition report templates are finalized and ready to go. Once you broadcast this process, two things happen:
Residents will see their check-in date and time range in the Campus Portal.
A Communications Management event will be fired.
On the Check-In and Check-Out block on the session summary page, click the Broadcast check-in process button, or select Check-in options > Broadcast check-in options from the Session options drop-down menu. The Broadcast Check-In Process pop-up window opens.
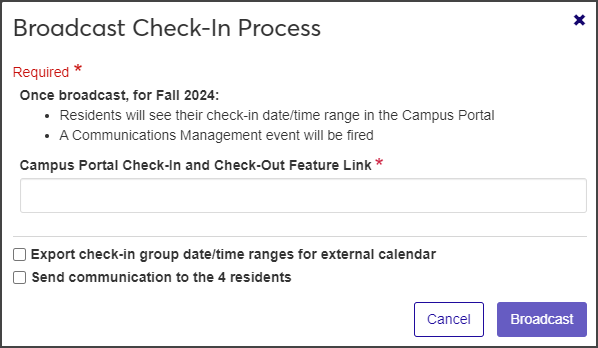
Read the warnings carefully. After you broadcast the check-in process, residents will see their check-in date and time range in the Campus Portal, and a communication will be sent to all residents in the check-in group.
Copy and paste the link to the check-in and check-out feature that has been set up in the Campus Portal. This is required.
To add the date ranges to a calendar feed, check Export check-in group date/time ranges for external calendar.
To notify residents about their check-in times, check Send communication to the [#] residents.
When all the check-in process pieces are in place, click Broadcast.
When the process has been broadcast, a communication will be sent to any resident in the session that has a room assignment, as well as any hired staff member (RA or RD) in the session.
Resident check-in is completed in J1 Web on the Residence Life or Residence Life Administration hub.
Important
Some of the steps below depend on permissions and how the settings have been configured. Emergency contact information and student keys will not appear if they have not been turned on, or if the user doesn't have permission to view that information.
Go to the Session summary page.
From the Session options drop-down menu, select Check-in options > Resident Roster. The Resident Roster page opens.
Find the student you want to check in. Use the sorting or filter functions as needed.
From the Actions drop-down menu on the student's row, select Check in resident. The Resident Check-In wizard page opens on step one, Check-in Basics.
Note
Your school may have customized some of the following steps, making them required or turning them off completely.
Tip
After you complete a step, you can return to that page by clicking the relevant link on the left side of the page.
Enter the resident's phone number and any relevant notes and click Save & continue. The Emergency Contact Information step opens.
If the resident already has emergency contact information entered, it appears here. You can create a new emergency contact or edit an existing one from this page.
When you have finished entering or editing emergency contact information, click Save & continue. The Student Keys step opens, if your school has included it.
If the resident has already been issued keys, that information will be displayed on this page.
If you are not assigning a key at this point, click Save & continue to move to the next step. To assign a key as part of check-in, click the Assign a key button at the bottom of the page. The Assign Key pop-up opens.
Begin typing the Key Number and select the appropriate key.
Choose the appropriate status from the Key Status drop-down (e.g., Issued or Assigned).
The Building and Room fields are pre-populated with the room this resident is being checked in to and cannot be changed. The Status Date is automatically set to the current date.
Add any relevant comments.
If you need to assign the student another key, select Save and assign another key. When you are finished assigning keys to this resident, select Assign key and close.
Click Save & continue. The Room Condition Report step opens.
The Room Condition Report page shows all items associated with the room and their condition at check-in. This page allows you to review the items and their condition with the resident during a walk-through inspection prior to signing the check-in agreement.
For each room item, click the Update button to open the Update Item Check-In Condition window.
From the Check-In Condition drop-down menu, select the item's condition as it is now. Add any notes about the item, then click Update.
When you have finished recording item conditions, click Save & continue. The Sign Report step opens.
Enter the resident's full name and student ID in the fields.
Select the check box at the bottom of the page to indicate that you agree on the recorded room condition.
Click Save & finish to save the check-in and room condition information.
If you would like to generate a PDF of the room condition report, click the Review PDF button.
If you need to edit any of the information at a later date, click one of the steps linked on the left side of the window to open that step and make the needed changes. You cannot edit the Sign Report page.
On the Emergency Contact Information step of the Resident Check-In wizard, click Create definition. The Create Contact Definition pop-up form opens.
Under Contact Type, select whether this is someone to be contacted in case of emergency, in case of a missing person, or both.
If the contact you are adding already exists in the Jenzabar One system, select the Name / ID radio button to search for their information. If you are adding a new person, select Manual Entry.
If the contact you are adding is already set up in Jenzabar One, enter their name or ID. Some information may pre-populate. If you are manually adding a contact, enter their information in the appropriate fields.
When you have finished entering information for this contact, you may choose to Save and create another contact, or Create and close this form.
On the Emergency Contact Information step of the Resident Check-In wizard, click the Edit icon at the end of the row you need to edit.
Edit fields as needed.
Click Update.
Resident check-out is completed in J1 Web on the Residence Life or Residence Life Administration hub. You can also check residents out from the Resident Housing block on the student's summary page.
From the Session options drop-down menu, select Check-in options > Resident Roster. The Resident Roster page opens.
From the Actions drop-down menu on the student's row, select Check out resident. The Resident Check-Out wizard page opens on step one, Check-out Basics.
Enter the resident's Mobile Phone number if it did not autofill.
Enter optional comments in the Notes field.
Click Save & continue to continue to the Student Keys step.
Note
The Student Keys step is included only if Enable Student Keys at Check-Out is selected in the Resident Check-Out section of the Residence Life Settings page.
To retrieve keys individually:
Click the pencil icon for the relevant row. The Edit Key pop-up opens.
Select a new status from the Key Status drop-down.
Add optional comments.
Click Update to return to the check-out wizard page.
To update multiple keys at once (for example, if the student was issued more than one set of keys):
Select the checkbox next to the keys you need to update.
Select Edit keys from the Options drop-down. The Edit Keys pop-up opens.
Under Select a Detail to Update, select Key Status or Comment from the drop-down.
If you are updating key status, select a new status from the drop-down.
If you are updating a comment, enter your comment in the text box.
Click Save & continue to move to the next step, Room Condition Report. This page lists all items associated with the room and their condition when the resident checked in. You should review the items and their condition with the resident during a walk-through inspection prior to signing the check-out agreement.
Note
There is a room condition report for each bedroom in the space.
To change the condition of a room item, click the Update button for the item. The Update Item Check-Out Condition pop-up opens.
Select an option from the Check-Out Condition drop-down.
To add the name of the resident responsible for the item, click in the Responsible Resident field and select the correct name when it appears. This field is optional.
Add optional Check-Out Notes as needed.
To add supporting documentation, such as a photo of the item, click Choose file under Add Supporting Documentation and upload the file.
When you are done, click Update. The condition of the item is updated in the list. If you selected Damaged, Dirty, or Needs to be replaced, the value in the Check-Out Condition column is in red text and flagged with a warning icon.
After you update the room items, click Save & continue to continue to the Sign Report step.
Enter the Resident Full Name and Student ID in the fields. This information is required.
The Date field autofills with the current date. If you need to change it, click in the field and use the pop-up calendar to select a new date.
Select the checkbox at the bottom of the page to indicate that you agree to the recorded room condition.
Click Save & finish to complete the process.
To generate a PDF of the Check-Out Report, click the Review PDF button.