Receipt Details
Important
Information and features vary according to the roles to which you belong and the permissions associated with those roles. For more information, contact your module manager or your campus support team.
Warning
J1 Web does not currently support the Open Items configuration. If your school is configured for Open Items in the Desktop A/R Configuration window, continue working in J1 Desktop as you will not be able to use J1 Web Finance at this time.
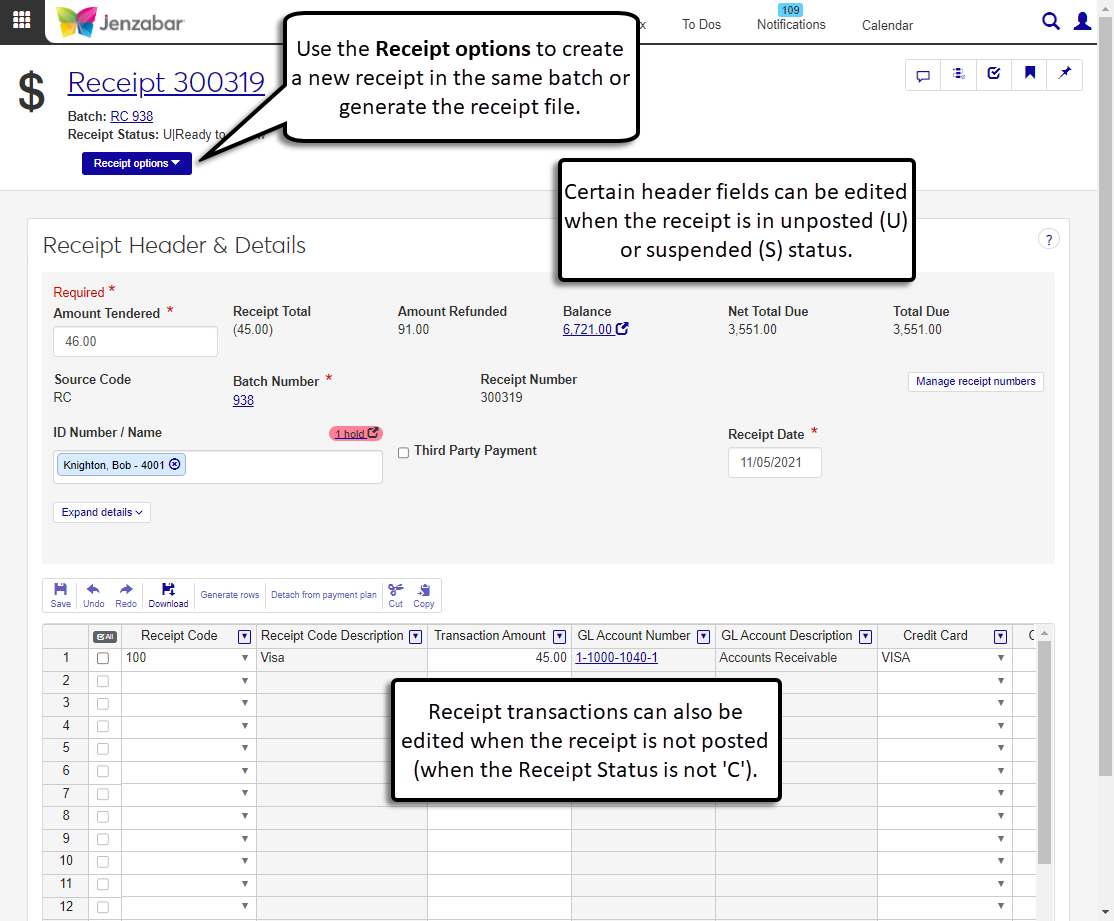
The Receipt Header & Details page lets you review and update header and transaction details for payments. From this page, you can view and update receipt header and transaction details, as well as delete, create, and generate receipt files. Additionally, you can access balance and batch details by clicking the links in the header. Most actions can only be done for receipts in the suspended (S) or unposted (U) status.
To access the receipt details page, you must be in a Receivables Management role with "Can view receipts" permission. Additional permissions are required to edit and delete receipts. For additional information, see Receivables Management Permissions
You can also view details for unposted (U) and suspended (S) receipts in the Desktop Receipt Entry Detail window (accessed from the Receipt Entry window > Edit Detail button).
A receipt batch (RC) is automatically created when a new receipt is entered, and multiple receipts can be included in the same batch. When an RC batch is locked by another user, all the receipts in that batch are locked and cannot be edited, regardless of their status. If you have unlock permissions for receipts, you can unlock the receipt from the Receipt List page and make edits on the receipt details page as needed.
Note
Access to batches is granted in the General Ledger Accounting hub via the General Ledger Accounting Receipt Batches role (and roles copied from it). Permission to unlock receipts is granted in the Receivables Management role (and roles copied from it).
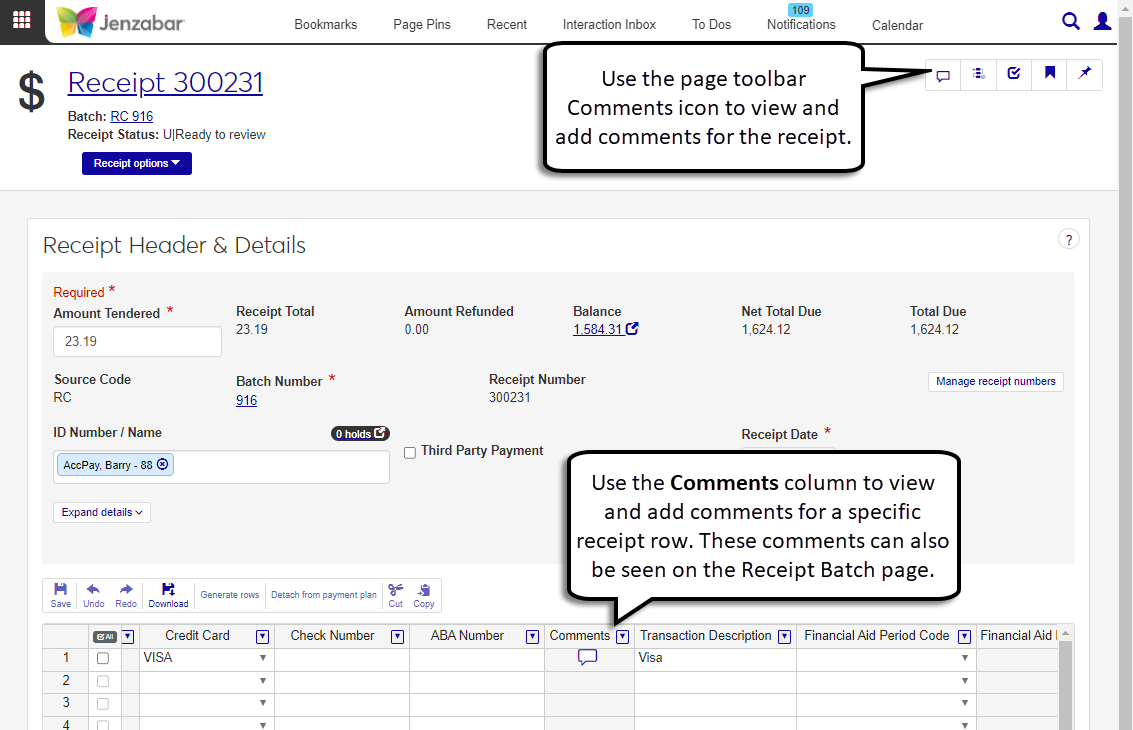
You can view and add comments to the receipt and for individual receipt rows with the Comment icon  . Comments added to the receipt are accessible from the page toolbar, and comments for receipt rows can be accessed from the Comments column.
Tip
Comments for receipt rows are also available on the receipt batch page.
Tip
The system updates the ID Number / Name field when you enter a full ID number and press Tab to move to the next field.
Note
Edits can be made when the Receipt Status is either S|Requires Review or U|Ready for Review.
From the Receipt List page, click the Receipt Number to open the receipt details page.
Make updates to the editable fields in the header:
Amount Tendered
ID Number / Name
Receipt Date
Name on Receipt
Project Code
Deposit Number
Notation 1 & 2
In the spreadsheet, add additional transactions or update editable columns for existing transactions.
To generate receipt rows:
Click the Generate rows button below the ID Number / Name field or select a receipt row and click Generate rows in the spreadsheet toolbar.
Complete the steps to Generate Detail Rows for Receipts.
To detach receipt rows from a payment plan:
Select a receipt row that is attached to a payment plan.
Click the Detach from payment plan button in the toolbar.
In the Detach from Payment Plan pop-up, review rows in the Ready to Detach and Unable to Detach sections.
Click Yes, detach. The pop-up closes and the spreadsheet updates and removes the payment plan details from the selected rows.
Use the spreadsheet toolbar to Undo, Redo, Download, Cut, or Copy your changes.
Click Save in the spreadsheet toolbar to preserve your changes.
Note
When you save changes to a receipt, the receipt number updates to the next number in the selected receipt number group. This number is also updated on the RC batch the receipt is associated with.
Warning
J1 Web does not currently support the Open Items configuration. If your school is configured for Open Items in the Desktop A/R Configuration window, continue working in J1 Desktop as you will not be able to use J1 Web Finance at this time.
On the receipt details page, click the Receipt options button and select Create new receipt. The Create Receipt page opens.
Complete the steps to create a receipt.
Note
This report can be generated for posted (C) receipts.
On the receipt details page, click the Receipt options button and select Generate report. The Generate Report? pop-up opens.
Select a Receipt Layout. The default layout is <Original>. If you've customized the report for J1 Web, those options are available for selection.
Note
Customizations made to the Desktop version of the report are not available for selection. For additional information about creating customized reports for the J1 Web version of the report, see Working with Reports in J1 Web.
Select a File Format. The default selection is PDF, and you can select multiple formats.
Click Yes, generate. If only the PDF file format is selected, the receipt opens in a new browser tab. If another file format is selected, the receipt downloads as a zip file.
Note
Posted (C) receipts cannot be deleted.
On the receipt details page, click the Receipt options button and select Delete.
In the Delete Receipt? pop-up, select Yes, delete.
Tip
Depending on the charges associated with the selected student, there may be several options available for generating receipt detail rows. If needed, you can click the Generate rows button multiple times to create rows for the receipt.
From the Create Receipt page, enter the Amount Tendered.
In the ID Number / Name, enter an ID Number, name, SSN, or birthdate and select from the drop-down options. This is typically the name of the student, but for schools set up for third-party payments, this can be the ID number of the third party making the payment.
An informational alert lets you know receipt detail rows can be generated automatically. Click the Generate rows button.
To generate rows for Payment Plans:
In the Generate Receipt Detail Rows pop-up, select "Payment Plan" from the Type of Payment drop-down.
In the Auto Distribute field, select "Yes" or "No". The Payment Plan Detail Rows section appears.
If Yes is selected:
Note
The system automatically distributes the payment amount across unpaid payment detail rows until the payment amount is fully distributed. The payment is distributed to the oldest payment due date first, then up to most recent due date. You can manually adjust the Distribution Amount for each row if needed.
Enter the Payment Amount. The Payment Plan Detail Rows section appears.
In the Select Payment Plan Payment field, the self-service payment plan payment with the next or past due date is automatically selected. Required.
If the Payment Amount is less than the plan payment due, the Distribution Amount autofills with the payment amount. If the Payment Amount is more than the plan payment due, the Distribution Amount autofills with the plan payment amount and generates additional detail rows to distribute the remaining amount across the plan payments. Required.
Notice
Ann makes a $500 payment towards her Fall 2023 payment plan. Her plan has 4 payments of $300. When Yes, Auto Distribute is selected, the system automatically applies the first $300 to Payment 1 and the remaining $200 is applied to Payment 2.
If there are any fees associated with the plan, select or deselect the checkboxes to add the fee to the distribution amount. A note with the distribution amount, including fees, appears beneath the Distribution Amount field. Fee checkbox options can be one or more of the following:
Collect sign-up fee
Collect convenience fee
Enter the Receipt Code for each row. Required.
Click Add another row to distribute the payment amount to additional payments in the plan, and enter or select the required information.
Click the Remove icon to remove payment detail rows.
If No is selected:
The Payment Plan Detail Rows section appears.
In the Select Payment Plan Payment drop-down, select the appropriate plan payment. Required.
If there are any fees associated with the plan, select or deselect the checkboxes to add the fee to the distribution amount. A note with the distribution amount, including fees, appears beneath the Distribution Amount field. Fee checkbox options can be one or more of the following:
Collect sign-up fee
Collect convenience fee
Select a Receipt Code. Required.
Enter the Distribution Amount. Required.
Click Add another row to distribute the payment amount to additional payments.
Click the Remove icon to remove payment detail rows.
Review and update information as needed, then click Continue to generate rows. The pop-up closes and the receipt details spreadsheet is updated with transaction details for each payment row.
To generate rows for Must Pay Sections:
In the Generate Receipt Detail Rows pop-up, select Must pay sections from the Type of Payment drop-down.
Select an option from the Select Must Pay Sections drop-down.
Select the Receipt Code.
Click Add another row to enter additional information, or click the Remove icon to remove a row.
Click Continue to generate rows. The transaction details spreadsheet updates based on the entered information.
To generate rows for Student Life Charges:
In the Generate Receipt Detail Rows pop-up, select Student life charges from the Type of Payment drop-down.
Select an option from the Select Student Life Charge drop-down.
Select the Receipt Code.
Click Add another row to enter additional information, or click the Remove icon to remove a row.
Click Continue to generate rows. The transaction details spreadsheet updates based on the entered information.
To auto-generate rows based on the student's total account balance:
Note
This option is available when your school is configured for the Balance Forward accounting method.
In the Generate Receipt Detail Rows pop-up, select From account balance from the Type of Payment drop-down.
Enter the Payment Amount.
Click Continue to generate rows. The transaction details spreadsheet updates based on the entered information.
On the receipt details page, click the Comment icon in the toolbar or in the receipt spreadsheet. The Comment pop-up opens.
To add a comment, click New comment.
Enter comment text.
Click Attach to include attachments with the comment.
Click Add.
Receipt details can only be updated when the receipt status is either U (Ready for review) or S (Requires review). Additionally, some columns like Receipt Code Description and GL Account Description are always read-only. Rows generated by the Generate rows process (e.g., payment plan payments) cannot be edited.
Receipts cannot be deleted if any of the following conditions are met:
The receipt contains posted miscellaneous charges.
The receipt has been posted.
The receipt is in a batch that has been summarized or is locked by another user.
The receipt has transactions that were applied to a reversed payment plan payment.
The receipt has transactions related to an allocation transaction.
The GL Account is populated based on the selected Receipt Code, so to update the GL Account number, you'll need to change the Receipt Code. In the Desktop application, the GL Account could be updated for receipt codes that weren't associated with a subsidiary code. In J1 Web, the GL Account is always read-only.
The receipt report used in J1 Web is different from the one used in the Desktop application, and any customizations made in the Desktop version of the report are not available for J1 Web. You'll need to recustomize the latest version of the d_ar_receipt report in InfoMaker and copy it to the J1 Web server to make it available from the Report Layout drop-down. For additional details about customizing reports for J1 Web, see Working with Reports in J1 Web.