Violation Type Definitions
Important
Information and features vary according to the roles to which you belong and the permissions associated with those roles. For more information, contact your module manager or your campus support team.
The Violation Type describes the violation or crime being committed, specific to your institution's policies. The violation type is associated with a violation category, which helps determine whether or not it will appear on the Campus Crime Report.
To define and edit Violation Type Definitions, you must be in the Student Life Module Manager or Student Conduct Administrator role (or a role copied from one of those roles) with the "Can manage violation type definitions" permission enabled.
You can also manage these definitions in Desktop on the Violation Types window (found under Settings - Student Life). Definitions edited in J1 Web are changed in Desktop and vice versa.
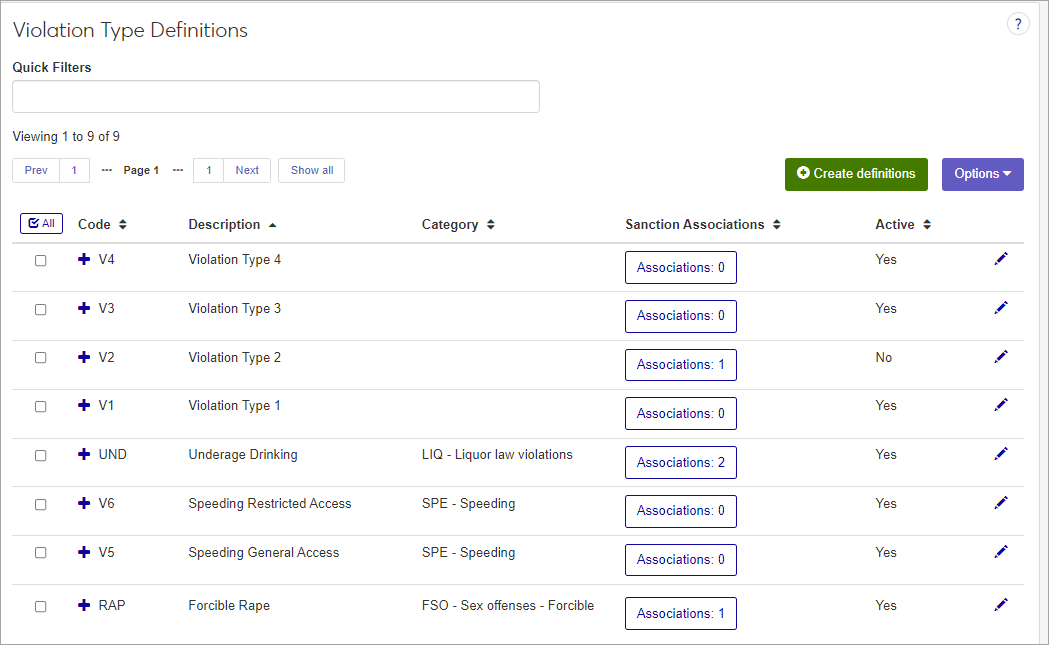
On the Student Conduct Administration Hub page, click the Hub options drop-down and select Manage definitions > Violation Type Definitions. The Violation Type Definitions page opens.
Click the plus sign beside any definition to expand the row and see more information.
To narrow the list, enter keywords or other identifying text in the Quick Filters field and select Add '[your search term]' when it appears. You can use only one filter at a time.
To sort the list by a particular column, click the column heading.
Tip
You can also use the page search in the upper right corner of J1 Web. Just start typing the name of the definition page you want, and select it in the results.
On the Violation Type Definitions page, click the Create definitions button. The Create Violation Type Definitions pop-up opens.
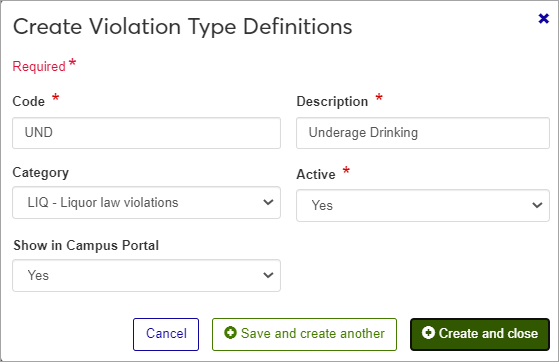
Required fields are marked by a red asterisk.
Enter a unique Code. This code can have up to 3 characters. Once it is saved, it cannot be changed.
Enter a Description that explains what this violation type is. Be sure to make it easily understandable for other users. The description can contain a maximum of 45 characters.
Select a Category from the drop-down menu. The category is used to group violations into broad categories, such as violent crimes or minor offenses. The Violation Category determines whether or not this violation will appear on the Campus Crime Report.
Select Yes or No from the Active drop-down. Codes set as inactive will not be available as options in drop-down menus for users entering violation incidents.
Select Yes or No from the Show in Campus Portal drop-down to indicate whether or not you want this violation type to be displayed in certain features in Campus Portal.
Click Save and create another to save the definition and clear the fields so you can create another. Click Create and close to save the definition, close the window, and return to the Violation Type Definitions page.
All fields except the Code can be edited.
Click the Edit icon
 for the definition you need to edit. The Edit Violation Type Definition pop-up opens.
Edit the available fields as needed.
Click Update to save your changes.
On the Violation Type Definitions page, click the Associations button in the Sanction Associations column for the row you want to work with. The Associations window opens.
The top section of the pop-up window displays sanctions currently associated with the violation type (if there are any).
To remove currently associated sanctions, click the Remove icon
 for the sanction you need to remove.
To add a new sanction association, click the Add associations link and begin typing the name of the sanction in the Sanction field, then select the sanction you want when it appears in the list.
When you are finished making changes, click Update.