Involvement Type Definitions
Important
Information and features vary according to the roles to which you belong and the permissions associated with those roles. For more information, contact your module manager or your campus support team.
The Involvement Type refers to the person who is involved in an incident in some way. This could be the person reporting the incident, security personnel who respond to the incident, or a witness. There may be other roles as well, which you can define on this page.
To define and edit Involvement Type definitions, you must be in a Student Life Module Manager or Student Conduct Administrator role (or a role copied from one of them) with the "Can manage involvement type definitions" permission enabled.
You can also manage involvement type definitions in Desktop on the Involvement Types window (found under Settings - Student Life). Definitions edited in J1 Web are changed in Desktop and vice versa.
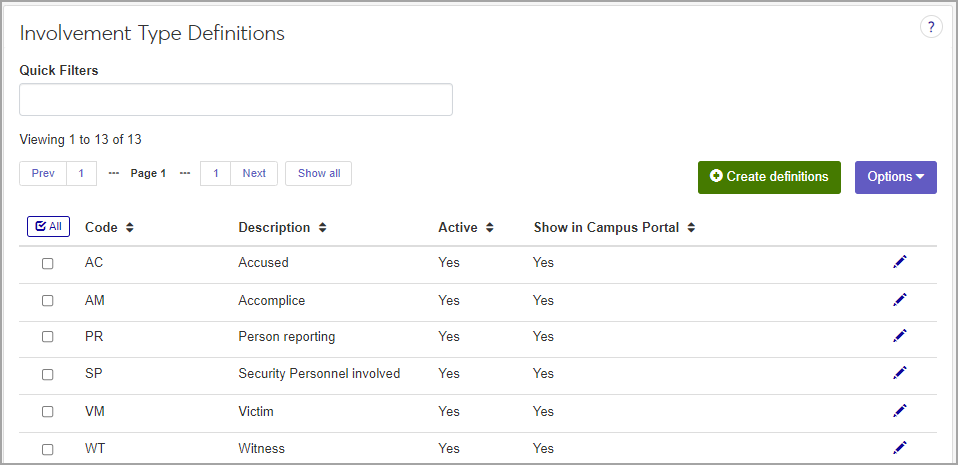
On the Student Conduct Administration Hub page, click Hub options and select Manage definitions > Involvement Type Definitions.
To narrow the list, enter characters, words, or phrases in the Quick Filters field and select Add '[your search term]' when it appears. The list now displays only the definitions with a code, description, or status that contains the word or phrase you entered in the filter. You can enter more than one filter term.
To sort the list by a particular column, click the column heading.
Tip
You can also use the page search in the upper right corner of J1 Web. Just start typing the name of the definition page you want, and select it in the results.
Click the Create definitions button. The Create Involvement Type Definitions pop-up opens.
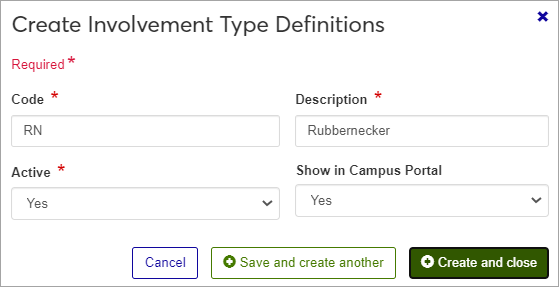
Required fields are indicated by a red asterisk.
Enter a unique Code. This required 2-character code identifies the Involvement Type. Once saved, this code cannot be changed.
Examples of codes you might create:
PR: Person Reporting
SP: Security Personnel Involved
VM: Victim
WT: Witness
Enter a brief Description of the involvement type. Be sure to use something that will be easily understood by those entering an incident. The description is displayed when users select an Involvement Type from a drop-down menu; it also appears on relevant reports.
This field can contain a maximum of 45 characters.
Select Yes or No from the Active drop-down. Codes set as not active will not appear as options in drop-down menus when users enter incident reports.
Select Yes or No from the Show in Campus Portal drop-down to indicate if you want this code to be displayed in relevant features in Campus Portal.
Click Save and create another to save the new definition and clear the fields so you can create another definition. Click Create and close to close the window and return to the Involvement Type Definitions page.
Click the Edit icon for the definition you need to edit. The Edit Involvement Type Definition pop-up opens.
Edit the available fields as needed. All fields can be edited except the code.
Click Update to save the changes.