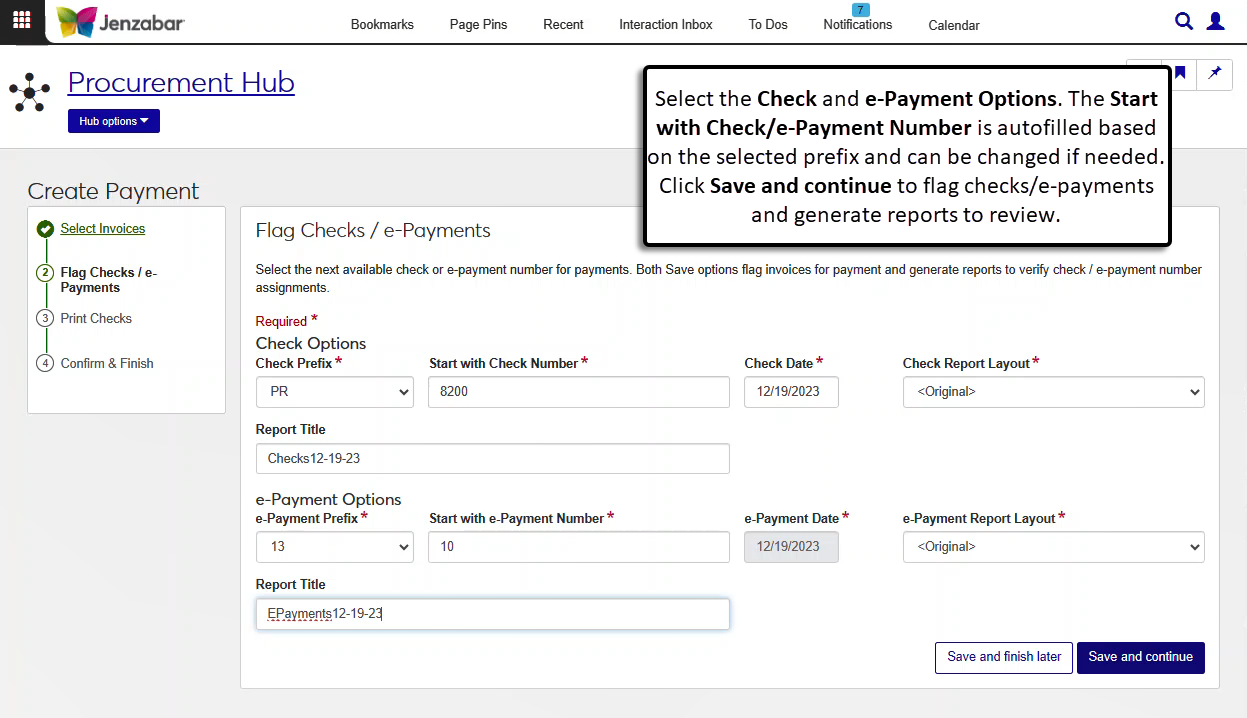
Step 2: Flag Checks / e-Payments
After invoices have been selected for payment, Step 2 assigns check and e-payment numbers as well as the payment date for each payment type. When this step is saved, separate Payments to be Issued reports are generated for checks and e-payments.
When the selected invoice transactions are flagged for payment, the system checks for credit memo invoice transactions that may zero out the transactions on another invoice. There are three possible scenarios.
If the net amount for the credit memo and the associated invoice is greater than 0, both invoices are flagged for payment. For example, the invoice amount for credit memo 1C is -$25. Invoice 1C is applied against invoice 2R, which has an amount of $50. When transactions from both invoices are selected for payment, the net amount is $25, so the transactions for both invoices are flagged for payment.
If the net amount for the credit memo and the associated invoice is less than 0, none of the transactions from either invoice are flagged for payment. For example, the invoice amount for credit memo 2C is -$100. Invoice 2C is applied against invoice 3R, which has an amount of $75. When transactions from both invoices are selected for payment, the net amount is -$25, so neither invoice is flagged for payment.
If the net amount for the credit memo and the associated invoice equals 0, the credit and debit transactions for both invoices are flagged with '0' for the payment prefix and payment number (00). These transactions are included on the Checks/Electronic Payments to be Issued reports.
Enter information in the Check Options and e-Payment Options section. If the selected invoices don't include one of the payment types, those options are disabled.
In the Check Options:
Select the Check Prefix. Required. Available options are maintained on the Desktop Payment Prefix - Setup Bank Accounts window.
The Start with Check Number field autofills with the next available number for the selected prefix and can be changed if needed. Required.
Enter the Check Date. Required.
Select the Checks to be Issued Report Layout. Required. The Jenzabar-provided layout is the default, and any customizations for the J1 Web version of the report are available for selection.
Enter an optional Report Title.
In the e-Payment Options:
Select the e-Payment Prefix. Required. Available options are maintained on the Desktop Payment Prefix - Setup Bank Accounts window (rows with the "Allow Electronic Pmts?" checkbox selected).
The Start with e-Payment Number field autofills with the next available number for the selected prefix and can be changed if needed. Required.
The e-Payment Date is defined in Step 1, and cannot be updated in this step.
Select the e-Payments to be Issued Report Layout. Required. The Jenzabar-provided layout is the default, and any customizations of the report are available for selection.
Enter an optional Report Title.
Click a Save button.
Click Save and finish later to save and flag payments, generate the Payments to be Issued reports, and return to the Payments List.
Click Save and continue to save and flag payments, generate the Payments to be Issued reports, and move to Step 3.
When you save the invoices flagged for payment and return to the Create Payment process, you can use the Reselect invoices button at the top of Step 3 to clear the flags from the selected invoices and restart the process.