GL Campus Portal Migration
The Campus Portal Migration section on the General Ledger Administration Settings page lets you enable general ledger features for campus users and disable the corresponding features in the Campus Portal. Some setup is required before making the switch.
Danger
Migrating the budget features from the Campus Portal to J1 Web Finance is permanent and cannot be undone.
Enabling the Campus Portal functionality in J1 Web requires a large number of users to be added to roles and granted permissions. Jenzabar advises clients to follow the steps below to prepare for implementing J1 Web Finance and migrating users from the Campus Portal to J1 Web.
Danger
Enabling J1 Web Finance features for your campus users cannot be undone; once the features are active, users can no longer perform those tasks in the Campus Portal. Be sure that you've set up your system properly and adequately prepared your users before completing the migration.
Verify license information. You must have the J1 Web Financials license to migrate J1 Web features from the Campus Portal. Work with Jenzabar Support to ensure you have the appropriate license.
Plan your migration. Identify the J1 Web product areas you want to prioritize as you transition users from the Campus Portal to J1 Web. This will position you to seamlessly adopt additional functionality when it is ready.
Note
Open items, state reporting, and foreign currency features are not yet available with J1 Web and cannot be run in parallel with the Desktop application due to data issues. Clients using those features should not upgrade to J1 Web Finance until the features are available. Open Items, State Reporting, and Foreign Currency features are scheduled for a future release.
Familiarize users with J1 Web standard features and navigation. If your school isn't already using J1 Web, gain familiarity with the system's standard features including navigation, search, blocks, bookmarks and pins, and user preferences. The MyJenzabar Common Module Resource Center provides access to guides, YouTube videos, and eLearning courses about these features.
Familiarize users with Jenzabar Communications. J1 Web uses the Communication Management hub to send and view emails, comments, and notifications (collectively called "interactions"). The MyJenzabar Communications Module Resource Center provides access to guides, YouTube videos, and eLearning courses about these features.
Learn about permissions in J1 Web.
Review Common J1 Web roles that impact users' ability to use standard features, especially if you are just starting with J1 Web. See the User Management online help for information.
Review Finance permissions available in J1 Web and consider how your Finance department wants to set up a new permission structure. Desktop and Campus Portal Finance permissions are not migrated into J1 Web. J1 Web uses unique roles and permissions, and this new model provides additional flexibility as well as an opportunity to re-imagine and improve existing permission structures. See the J1 Web Finance Permissions and Setup Admin Guide on MyJenzabar for more information.
Note
Remember that working in J1 Web and Desktop at the same time will require managing dual permissions. The Desktop groups and permissions for campus users are not honored in J1 Web.
Jenzabar provides default roles for each Finance hub. Because permissions work differently between Desktop and J1 Web, your campus users will need to be added to J1 Web roles and granted permission to work with the J1 Web features that replace the Campus Portal features.
Review the Desktop and Campus Portal groups, permissions, and access for your campus users. It's helpful to make a list of what each campus user has access to and which tasks they'll need to accomplish.
Tip
You can use the J1 Web Core, Campus Portal Security: Users page to filter users based on their portal role.
Review the default roles and permissions for the finance modules you are licensed to use. Each module in J1 Web Finance has it's own hub, roles, and permissions. Review each role to determine the tasks users can accomplish with the appropriate permissions.
Note
In addition to the finance roles, users will also need to be in Common roles to access certain features in J1 Web. For more details on these roles, see Common Roles and Permissions.
Create new roles based on the default roles that align with the tasks your users need to accomplish. Jenzabar recommends creating new roles based on the default finance roles and permissions for your campus users. This practice preserves the default role and gives you the flexibility to customize roles to fit your needs.
Review GL account security for all your finance users. Verify the new J1 Web roles for campus users are associated with the correct GL accounts and that users have access only to accounts they work with.
Associate positions with your custom roles. Jenzabar provides an onboarding tool that let you use positions (e.g. department head) to streamline the process of adding users to roles in J1 Web. After a position is created, you can associate it with one or more roles. Users added to the position are automatically added to the associated roles.
Enable campus user features in J1 Web. After you've added your campus users to the appropriate roles, use the J1 Web Finance Settings in the General Ledger Administration hub to enable the J1 Web features and permanently disable the Campus Portal features.
General Ledger Accounting Roles
The J1 Web GL Account Activity page replaces the Campus Portal GL Account Lookup feature and lets campus users review transactions, account balances, and budget information. To access this page, users must be in one of the General Ledger Accounting GL Account Access roles. They'll need permission to view GL account activity and have associations enabled for the accounts they can work with.
Note
All your campus users need to be in at least one of the General Ledger Accounting roles that grants them access to view GL accounts.
GL Account Permissions for Campus Users
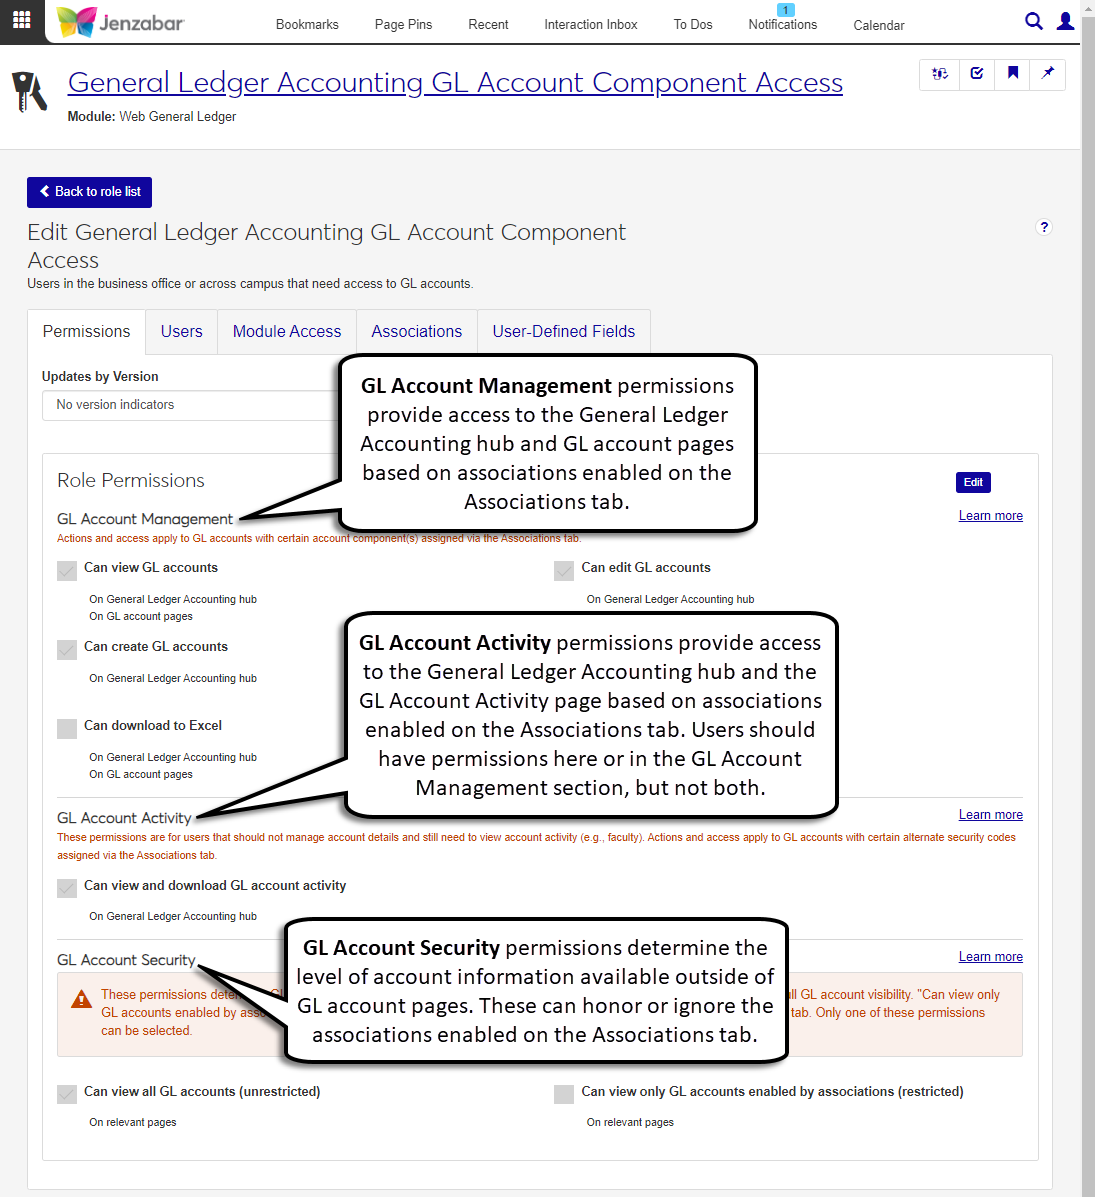
Both the General Ledger Accounting GL Account Component Access and General Ledger Accounting GL Account Alternate Code Access roles grant permission to access the GL Account Activity page. The "Can view and download account activity" permission is located in the GL Account Activity section on the Permissions tab.
Warning
Campus users should only be granted permissions from the GL Account Activity section of the page, as the GL Account Management section is for administrative users.
In the GL Account Security section, campus users should have the "Can view only GL account enabled by associations (restricted)" permission. This ensures that users see only the specific accounts identified on the Associations tab if they are in other page in the Finance product.
 |
Associations
The Associations tab identifies which accounts the role has access to. Role permissions are applied to all of the associations enabled on this tab. The enabled accounts are the only ones visible when users work in the J1 Web Finance product.
GL Account Component Access Role
When account access is granted via account components, the Associations tab lists the available options and combinations for the components defined on the General Ledger Settings page (e.g., Component 2 and Component 3). (The General Ledger Settings page mirrors the Desktop General Configuration window, G/L tab.) The module manager can enable one or more of the components your school has defined. If your school has defined two security components, you can also define which combination of account components users can access.
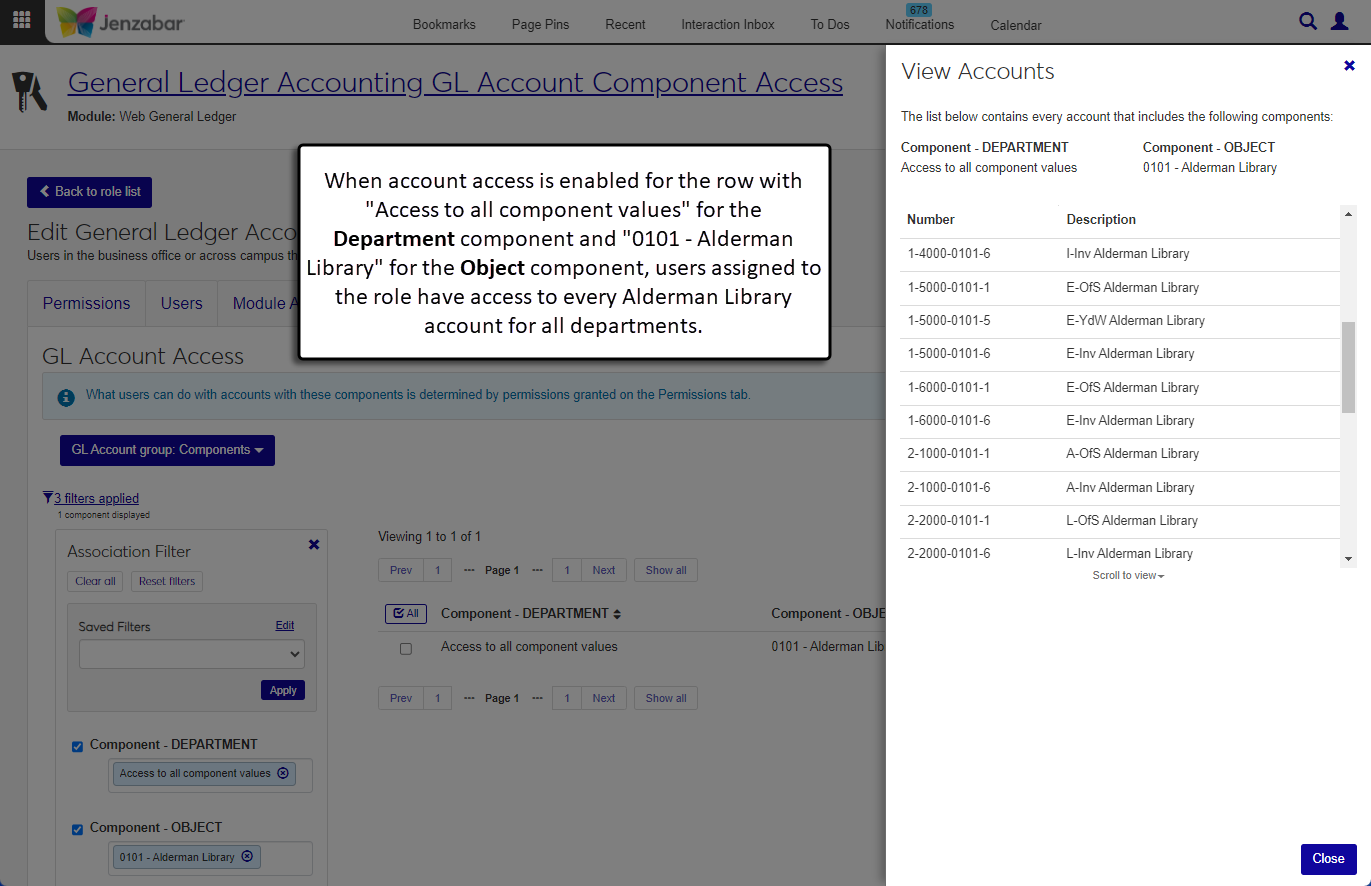
You can use the Access to all component values filter options to enable access for all accounts or just for accounts associated with the specified component.
Notice
To grant access to all accounts associated with the Alderman Library (Object component 0101), enable access for the row with "Access to all component values" in the Department column.
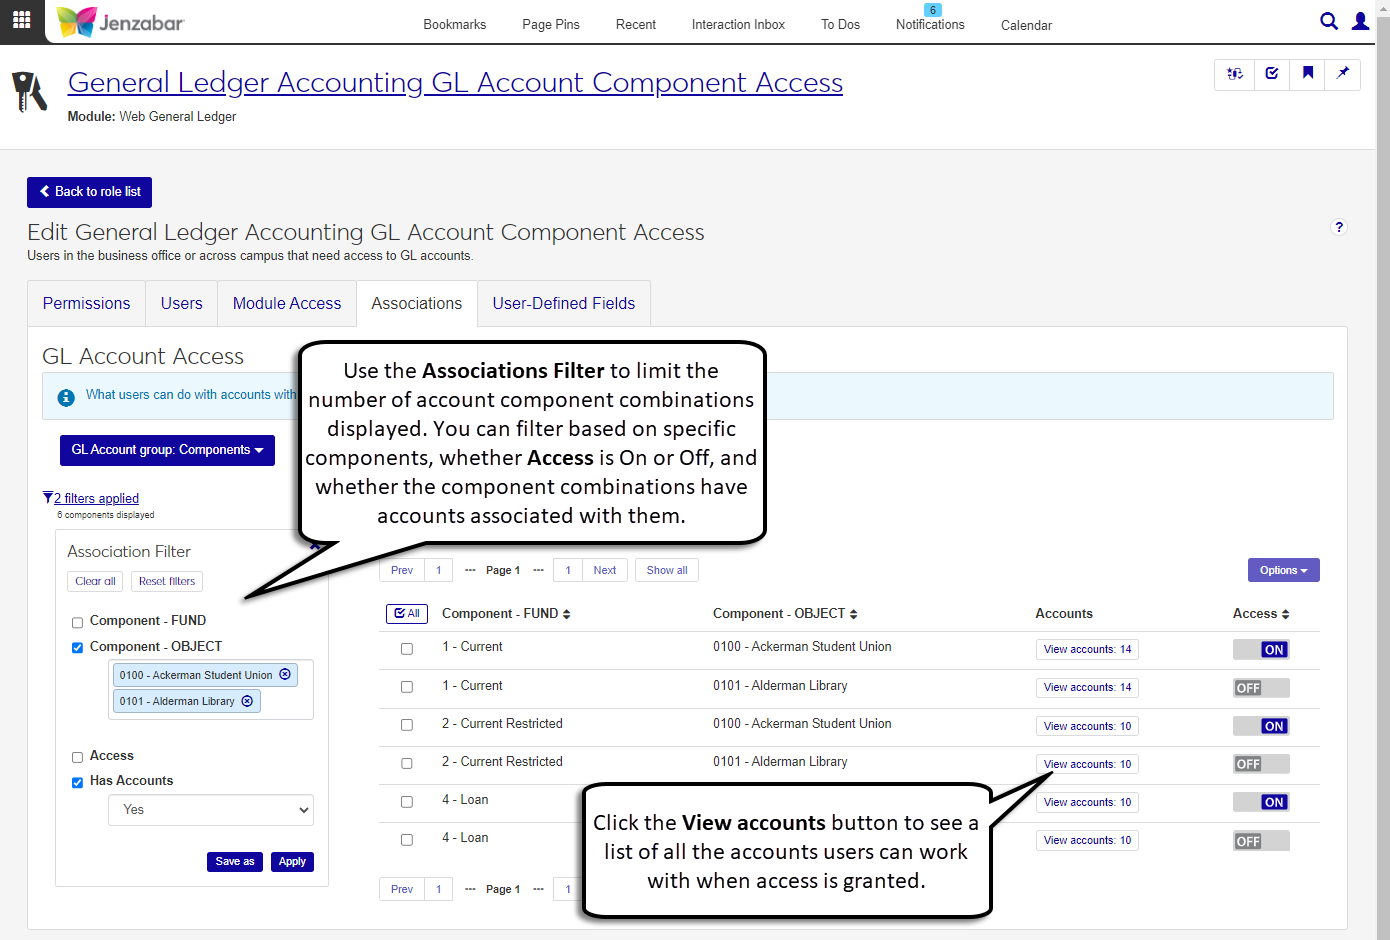
The Association Filter can narrow down the list of component combinations. The Has accounts filter is particularly helpful for viewing component combinations that have GL accounts associated with them. Use the View accounts button to see which accounts are tied to a component combination.
Notice
Jenzabar University has set Component 3 (Department) as Account Security Component 1. Stacey is a module manager who grants access to the school's accounts. She wants to give Jeff access to accounts in the math, biology, and physics departments. When Account Security Component 1 is selected on the General Ledger Accounting GL Account Component Access role, Associations tab, a list of the school's departments displays (e.g., 2000 - Math, 3000 - Biology, 4000 - Physics, etc.). For Jeff's access, Stacey enables the 2000, 3000, and 4000 components. When Jeff works in the GL module, he'll be able to see account information for GL accounts where the value for Component 3 is either 2000, 3000, or 4000.
GL Account Alternate Code Access Role
When account access is granted via alternate security codes, the Associations tab lists the alternate codes that are defined on the Desktop Define Alternate Account Security Groups window. Module managers can enable the appropriate codes for each role.
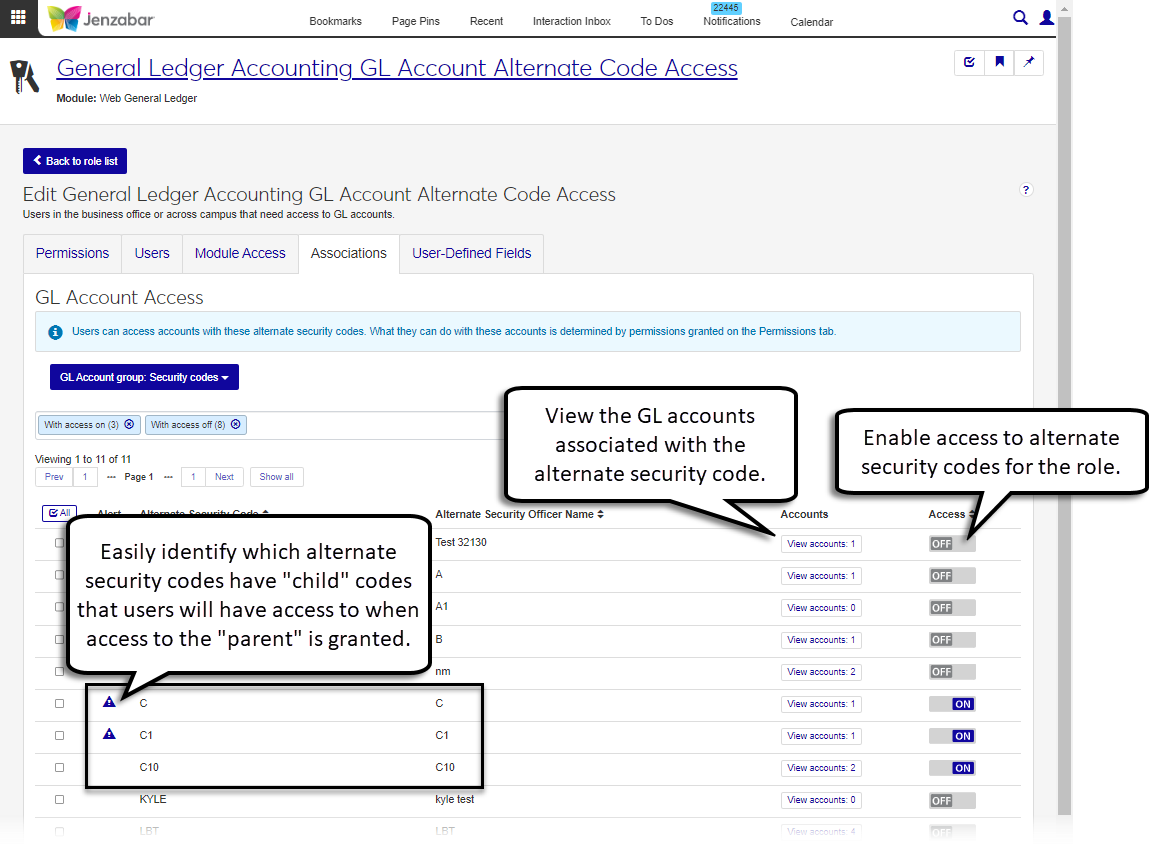
GL accounts can also be associated with an alternate security code when they are created or edited. Each alternate security code on the role's Associations tab lets you view the associated accounts to help you determine who should have access.
Alternate codes honor an alphanumeric hierarchy. Codes that are based on an existing code are considered children of the existing code. For example, a parent code 'A' has children codes of "A1', 'A2', and 'A3'. When users are granted access to the parent code, they are also granted access to all the child codes.
Tip
You can use the Association Filter to narrow down the list of alternate security codes displayed. The Has accounts filter is particularly helpful for viewing alternate security codes that have GL accounts. Use the View accounts button to see which accounts are tied to an alternate security code.
Notice
The school has defined security codes A, A1, and A11. The account for the baseball team is associated with code A, the account for the basketball team is associated with code A1, and the account for the volleyball team is associated with code A11. Kyle has access turned on for code A1, so he can see accounts for the basketball and volleyball teams.
Working with Project Codes
Campus users that work with specific projects may also need to be in a General Ledger Accounting Project Access role. In the Project Security section, the "Can view only projects enabled by associations (restricted)" permission ensures campus users only see the project codes that are enabled on the Associations tab when they work in the Finance product.
Associations
Permissions are only applicable to the project codes enabled on the Associations tab. When new projects are created, the project codes are added to the project code list on the Associations tab. In most cases, campus users will have access to a limited number of codes on this tab.
Note
Project codes created in Desktop are visible on the Associations tab.
Update General Ledger Migration Settings
Update settings for the J1 Web page (replaces the Campus Portal Budget feature).
From the Finance, General Ledger Administration drop-down, select Settings. The General Ledger Settings page opens.
Scroll down or click the Campus Portal Migration link to navigate to that section.
Click Edit this section.
Select the Use J1 Web to manage general ledger account lookup option.
Click Save this section.
In the Migrate to J1 Web? pop-up, click Yes, save and migrate. The section updates and can no longer be edited. In the Campus Portal, the GL Lookup feature is deactivated, and users see an alert to use the J1 Web feature.
Yes, campus users can continue to work in the Campus Portal while the features are disabled in J1 Web. When the J1 Web features for campus users are enabled in J1 Web, the Campus Portal will display an alert that functionality has been moved to J1 Web.
The Core, Campus Portal Hub lets you view and manage user information for the Campus Portal. Specifically, you can use the Campus Portal Security: Users page to filter the list of campus users based on their Portal Role. For more information, see Campus Portal Security: Users.
No. Commenting is a standard feature in J1 Web, and users don't need to be in a Communication Management Role to use that functionality.