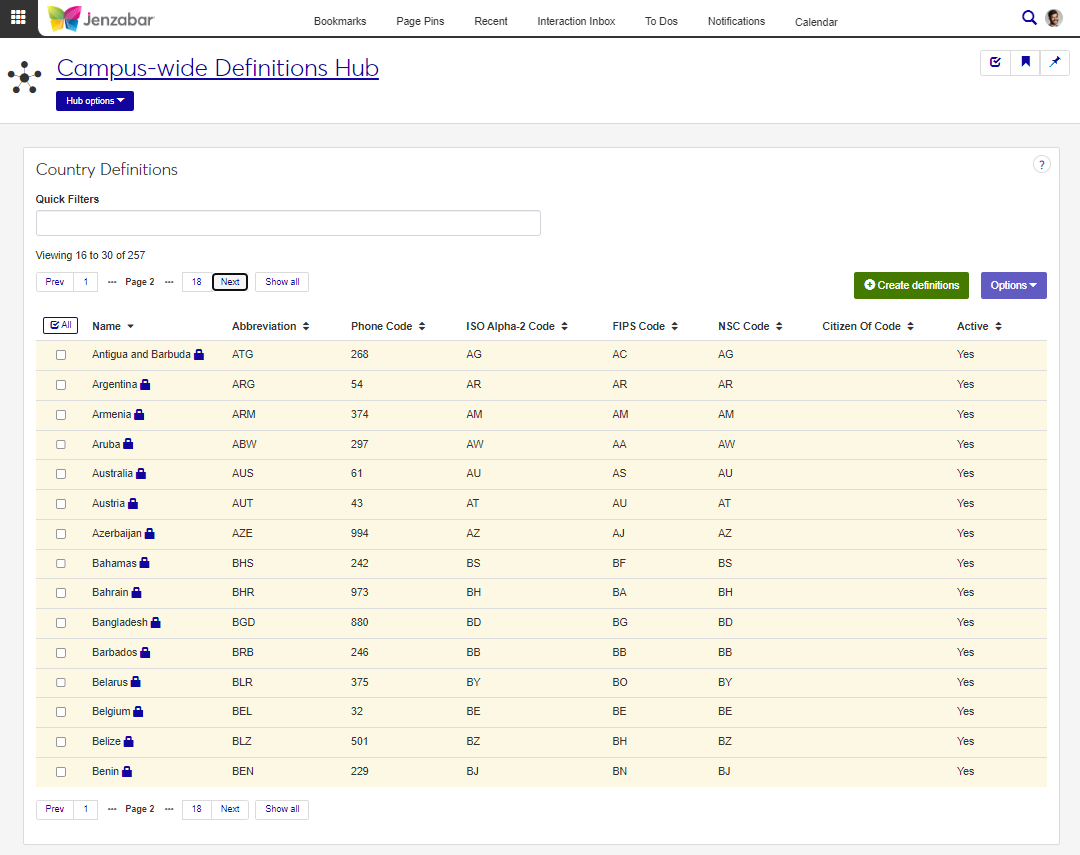
Country Definitions
Important
Information and features vary according to the roles to which you belong and the permissions associated with those roles. For more information, contact your module manager or your campus support team.
The Country Definitions page lets you manage countries that can be associated with addresses throughout the system. Countries can be associated with FIPS (Federal Information Processing Standards) and NSC (National Student Clearinghouse) codes for certain types of reporting.
Jenzabar provides several country definitions as default data. These definitions are are marked with a lock icon and are updated in accordance with ISO (International Organization for Standardization) standards.
Note
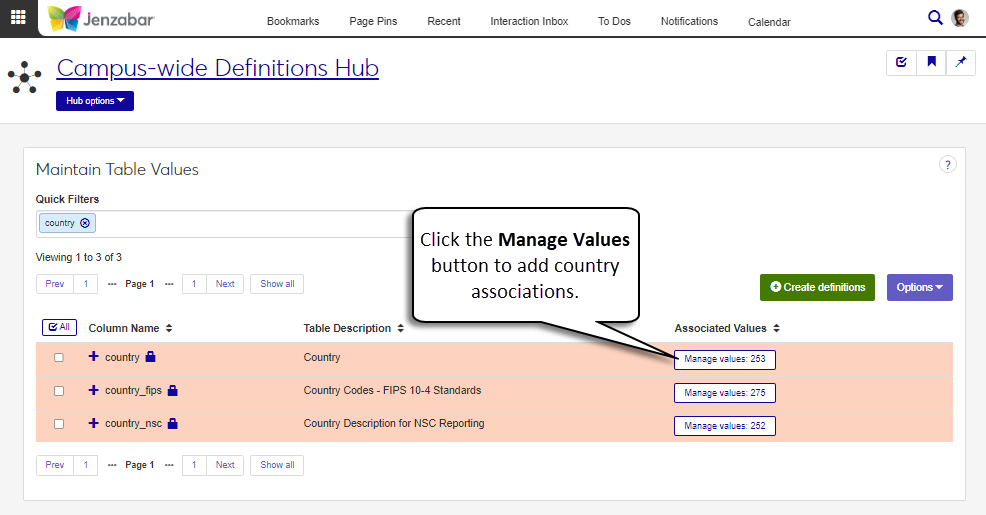
Definitions can be entered and managed from this page, but at this time they are not used in the system or for reporting purposes. They may be used in the future. For now, use the Maintain Tables Values page, and the country, country_fips, and country_nsc Column Names to manage country definitions.
Country definitions are saved to the CountryDefinition table.
To access and work with country definitions, you must be in a Campus-wide Definitions role with the "Can manage country definitions" permission enabled.
From the Core Campus-wide Definitions Hub options, select Country Definitions or use the global search in the top right hand corner of the system.
To search for a definition, enter a phrase or characters in the Quick Filters field and press the Enter key.
To sort definitions, click on a column heading to sort in ascending or descending alphabetical order.
From the Country Definitions page, click Create definitions. The Create Country pop-up opens.
Enter a unique Name (up to 63 characters). Required.
Enter an Abbreviation for the country name (up to 31 characters). Required.
Enter the country's Phone Code (up to 4 digits).
Enter a unique ISO Alpha-2 Code (up to 2 characters). Required. For more information about ISO codes, see https://www.iso.org/iso-3166-country-codes.html.
Enter the country's FIPS Code (up to 2 characters). For additional information about FIPS codes, see https://nvlpubs.nist.gov/nistpubs/Legacy/FIPS/fipspub10-4.pdf.
Enter the country's NSC Code (up to 2 characters). For additional information about NSC codes, see https://studentclearinghouse.info/onestop/wp-content/uploads/EnrollRept_ProgrammingandTestingGuide.pdf (pg. 52).
Enter a Citizen Of Code (up to 3 characters). This code is used to denote that a student is a citizen of the selected country.
Note
Jenzabar recommends using the first two or three characters of the Abbreviation for the Citizen Of Code. This code is used in various reports and must also be added to the Maintain Table Values page, 'citizen_of' Column Name to be available for selection throughout the system.
The default value for Active is Yes. Select No if you do not want the country code to be active. Required.
Click Save and create another or Create and close.
Note
After Country definitions are created, remember to associate each country to the appropriate Column Name (country, country_fips, and country_nsc) on the Maintain Table Values page so the country can be selected from address drop-downs throughout the system.
Jenzabar-provided country definitions cannot be edited.
On the Country Definitions page, click the Edit icon
 for a country definition you want to update. The Edit Country pop-up opens.
Make changes to fields as needed.
Click the Update button.
Jenzabar-provided country definitions cannot be deleted.
Select the checkboxes next to the rows you want to export.
From the Options drop-down, select Download to Excel. The Download to Excel pop-up opens.
Select options for the Excel format and data columns.
Click Download. Your .xlsx or .zip file is saved in the file location that you have set in your browser settings.
For more information about ISO codes, see the International Organization for Standardization's (ISO) website: https://www.iso.org/iso-3166-country-codes.html.
Country definitions created on the Country Definitions page are not available in the Desktop because the CountryDefinition table is primarily used in J1 Web. However, countries added to the Maintain Table Values page are available in both Desktop and J1 Web.
When a new country is created, you'll also need to add it to the Maintain Table Values page to make the country selectable in drop-downs throughout the system. To access the Maintain Table Values page and work with table values, you must be in a Campus-wide Definitions role with the following permissions:
Can view table values
Can manage table values
Can manage associated values
Use the following steps to add countries.
Use the global "System page" search to open the Maintain Table Values page.
Type 'country' in the Quick Filters field to filter the Column Names.
Click the Manage values button for the appropriate Column Name.
Column Name
When to Add Associated Values
country
For every new country definition.
country_fips
For new country definitions that have an FIPS code.
country_nsc
For new country definitions that have an NSC code.
In the Manage Associations pop-up, click the Add another table value link.
In the Table Value field, enter the country's ISO Alpha-2 Code. Required.
In the Table Value Description field, enter the country's name.
Repeat steps 4 - 6 for each country that needs to be added.
Click theUpdate button. The number of associations refreshes, and the new countries are available for selection in drop-downs throughout the system.
When a new country is created, you'll also need to add the Citizen Of Codes to the Maintain Table Values page to make them selectable in drop-downs throughout the system and for reports. To access the Maintain Table Values page and work with table values, you must be in a Campus-wide Definitions role with the following permissions:
Can view table values
Can manage table values
Can manage associated values
Use the following steps to add Citizen Of Codes.
Use the global "System page" search to open the Maintain Table Values page.
Type 'citizen_of' in the Quick Filters field to view the appropriate Column Name.
Click the Manage values button.
In the Manage Associations pop-up, click the Add another table value link.
In the Table Value field, enter the country's Citizen Of Code. Required.
In the Table Value Description field, enter the country's name.
Repeat steps 4 - 6 for each code that needs to be added.
Click the Update button. The number of associations refreshes, and the new citizen of codes are available for selection throughout the system.
You can remove countries from drop-down menus by removing the association in the Manage Table Values page. Removing the association does not delete the country from the Country Definitions page.
Use the global "System page" search to open the Maintain Table Values page.
Type 'country' in the Quick Filters field to view the appropriate Column Names.
Click the Manage values button for the appropriate Column Name.
In the Manage Associations pop-up, use the Quick Filters to find the country you want to remove.
Click the Remove icon
 for the table value.
Click Update. The number of associations refreshes and the removed country no longer appears in country drop-downs.