Incident Reports
Important
Information and features vary according to the roles to which you belong and the permissions associated with those roles. For more information, contact your module manager or your campus support team.
On the Incident Reports page, depending on your role and permissions, you can view the full list of incident reports; create and edit incident reports; create a new case from one or more incident reports; merge incident reports into a single report; reassign an incident report to a different staff person; view incident history; download the list of incident reports to an Excel file; and manage user-defined fields.
What you can see and do with incident reports depends on your role and the permissions enabled for that role. The table below outlines the system-provided Student Conduct roles and the permissions related to incident reports that are enabled for each role by default.
Role | Incident Report Permissions Available |
|---|---|
Student Conduct - Assistant Director Access by Department | Can view assigned incident reports Can view my incident reports |
Student Conduct - Director Access by Department | Can view all incident reports |
Student Conduct - Legacy Incident Access | Can view general incidents Can view restricted incidents |
Student Conduct - Incident Reports | Can view my incident reports |
Student Life Module Manager | Can view my incident reports |
Residence Life Administrator | Can view my incident reports |
Student Life Resident Assistant/Advisor (RA) | Can view my incident reports |
Student Life Residence Director (RD) | Can view my incident reports |
You can access the Incident Reports page in several ways:
From the main navigation menu, select Student > Student Conduct > Incident Reports.
From anywhere in the Student Conduct Hub, select Incident Reports from the Hub options drop-down.
Click the global search icon in the top right-hand corner of the window, select System Page from the drop-down, and type "Incident Report" in the search field.
The Incident Reports page lists all incident reports ordered by incident number. To sort by a different column, click on the column header.
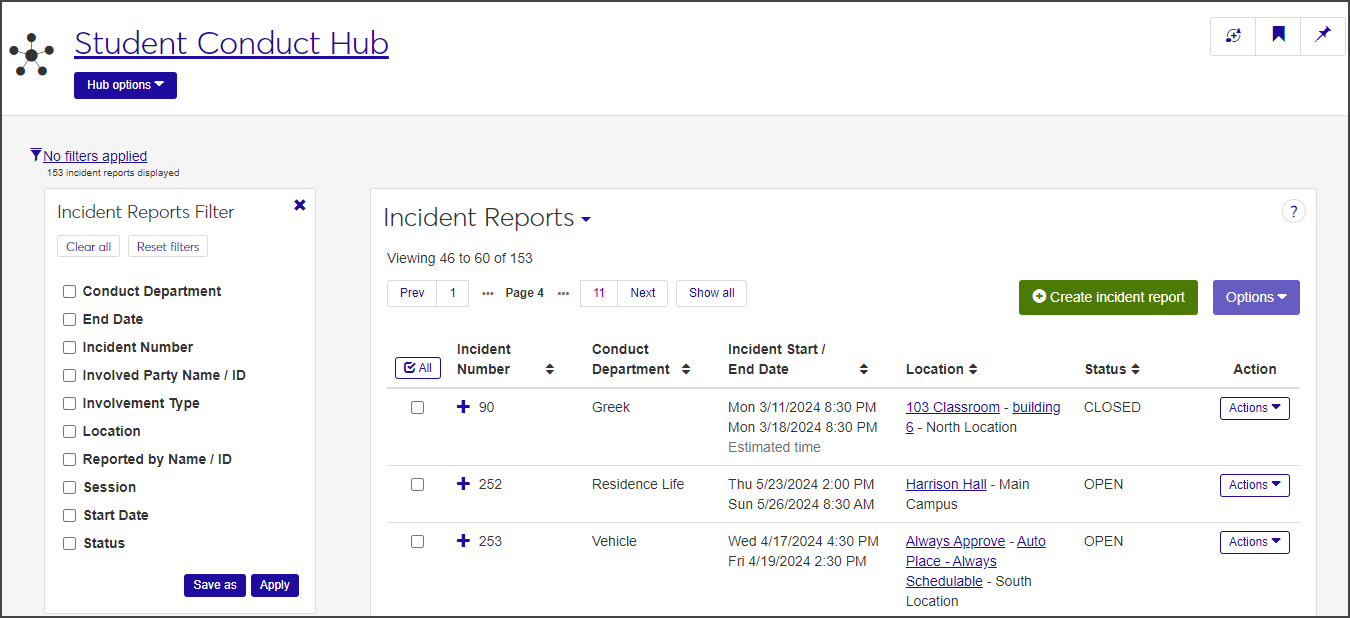
To see additional information about an incident, click the plus icon to expand the row.
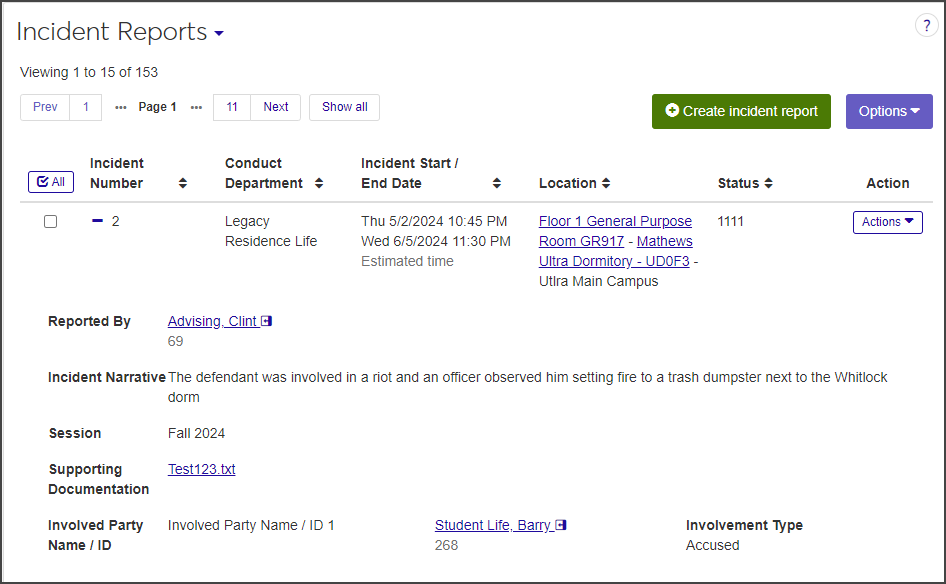
For each incident report, the list displays the following information. Click the plus icon for a row to see all columns.
Column | Description |
|---|---|
Incident Number | The incident number is generated by the system when an incident report is created. It cannot be changed. |
Conduct Department | The conduct department the incident is assigned to (for example, Greek Life or Title IX). "Legacy" refers to incident reports created in Desktop. |
Incident Start/End Date | The start and end date and time of the incident. |
Location | The location where the incident occurred (e.g., a specific residence hall or an area on campus). If the location has a summary page in J1 Web, the name links to that page. |
Status | The status of the incident (e.g., open, closed, sanction assigned). |
Action | Depending on your role and permissions, the Actions drop-down includes options that enable you to add an incident report to an existing case; create a new case from the incident report; edit the incident report or its status; reassign the incident report to another conduct department; manage user-defined fields; and view the incident history. |
Reported By | The name and ID (if applicable) of the person who reported the incident. If the reporter is in your school's database (that is, a student or someone on the staff or faculty), the name links to that person's summary page. |
Incident Summary | A brief summary of the incident |
Incident Narrative | A more detailed description of the incident. The narrative is entered when the incident report is created. If the description has been edited, the most recent version is displayed. |
Session | The session in which the incident occurred. |
Supporting Documentation | If any supporting documents are included in the incident report, the files are listed here. Click a file name to open it in the appropriate app. |
Involved Party Name/ID | The name and ID number (if applicable) of the involved party. If the involved party is in your school's database, the name is linked to the person's summary page. |
Involvement Type | How the involved party is involved in this incident (e.g., accused, witness, victim, etc.). |
On the Student Conduct Hub page, select Incident reports from the Hub options drop-down. The Incident Reports page opens, listing all the incident reports you have access to.
Click the plus icon next to a row to see all available information about that incident.
To filter the list:
In the Incident Reports Filter, select the checkbox next to the filter category you want to filter the list by. You can select more than one filter.
Enter or select a value for the category you chose.
When you have selected your filters, click Apply.
If you know you'll use a particular filter often, you can save it and set it as your default filter. After you create the filter, click Save as and enter a name for the filter in the Save the Current Filter As ... field. Select the Set as default checkbox to make this your default filter.
On the the Incident Reports page, select the +Create incident report button, or select Create incident report from the Hub options drop-down. The Create Incident Report window opens.
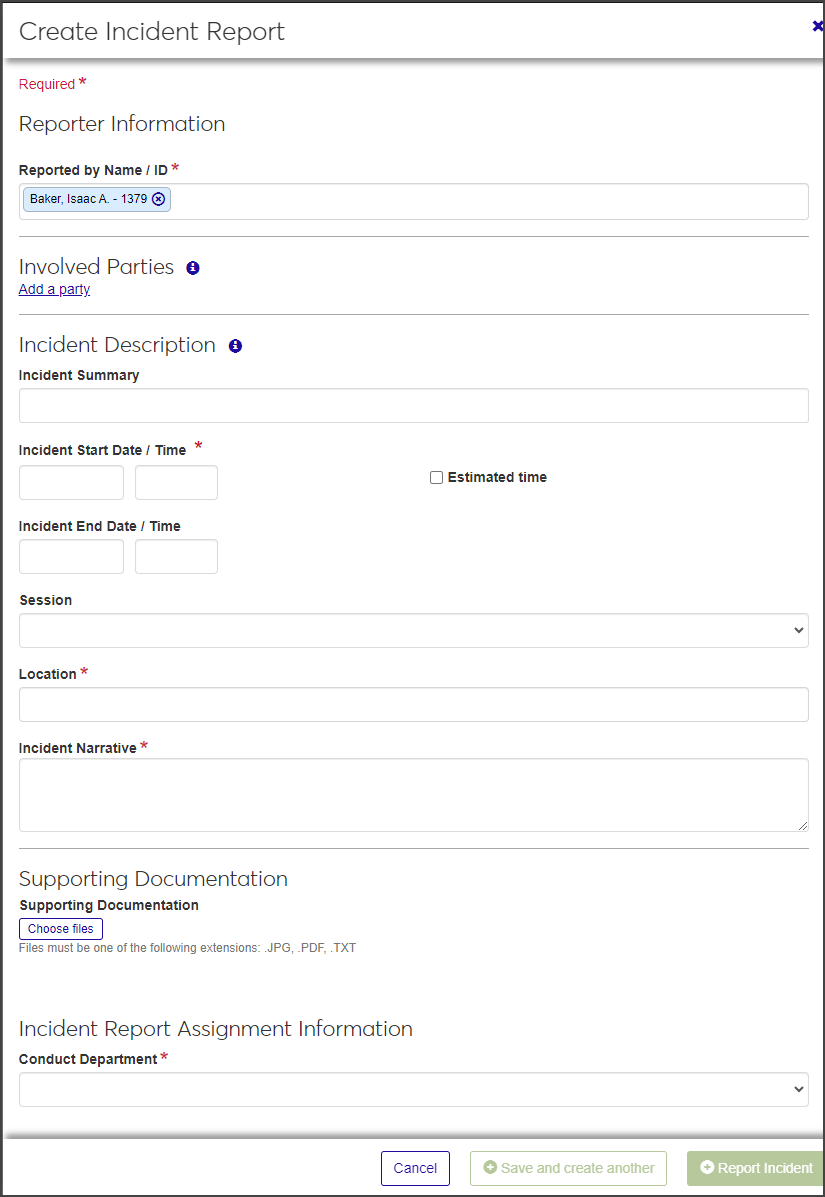
The window is divided into sections: Reporter Information, Involved Parties, Incident Description, Supporting Documentation, and Incident Report Assignment Information.
Required fields are indicated by a red asterisk.
Note
If an incident involved fire, users with edit permissions will add that information after the report is created and saved.
Even if you don't have all the information about the incident, complete the sections to the best of your knowledge. The incident report can be edited at a later date.
In the Reporter Information section, the Reported by Name/ID field autofills with the name and ID of the logged-in user. To change it:
Click the Remove icon to delete the autofilled name.
Begin typing the name or ID number of the reporter in the field and select the correct name when it appears. You can select only one reporter.
In the Involved Parties section, click Add a party. The section expands to show a series of fields:
If the involved party is in your system's database (e.g., a faculty member or student), begin typing the name or ID number of the party in the Involved Party Name / ID field and select the correct name when it appears in the list. Since the person's information is already in the system, the other fields are removed when you select the name.
If the involved party is not in the database (e.g., an external party), complete the name, phone number, email address, and address fields to the best of your knowledge. Only the first and last name are required, but the more information you can include, the better.
To upload a photo of the involved party's ID card, click Choose file under Identification Card Photo, locate the file, and select it. The user configures the file types that are allowed. You can only upload one file.
Repeat steps 2 and 3 for each additional involved party.
In the Incident Description section, enter a brief summary of the incident in the Incident Summary field. The summary should be easily identifiable and searchable.
Click in the Incident Start Date/Time fields and select the start date and time of the incident.
Click in the Incident End Date/Time fields and select the end date and time of the incident.
Select the Session from the drop-down. All currently active sessions are listed as options.
In the Location field, begin typing the name of the location, place, or space (e.g., a residence hall or outdoor area) and select the correct location when it appears in the list.
Enter a detailed description of the incident in the Incident Narrative text field. This field has no character limit.
To add supporting photos or documentation, click the Choose files button in the Supporting Documentation section.
Navigate to the file you want to upload and select it.
In the Incident Report Assignment Information section, select the Conduct Department you are assigning the incident report to.
When you have completed all the required fields, click Save and create another to save the report and clear the fields so you can enter another one. Click Report incident to save the report and close the window.
If you need to add an incident report to a case—for instance, if a student with an existing case is involved in another incident—you can do so from the Incident Reports page. You can add one incident report at a time or add several in a batch.
To add an incident report to an existing case, you must have the "Can create case" permission enabled and the incident must have at least one involved party.
On the Incident Reports page, select Add incident report to an existing case from the Actions drop-down for the incident you want to add. The Add Incident Report to an Existing Case window opens, showing the involved party's name and ID, the incident number, the involvement type, and the conduct department assigned to the incident.
Note
If the involved party already has a case assigned for the selected incidents, you cannot assign them to another case.
If the involved party does not have an existing case assigned to them, you'll need to create a new case first and then add the incident.
Click in the Add to Case field and select the case number you are adding the incident report to. You can only select one case. This field is required.
Click Add incident report to add the incident report to the selected case.
On the Incident Reports page, select the checkbox next to each incident report you want to add to a case.
From the Options drop-down, select Add incident reports to an existing case. The Add Incident Reports to an Existing Case window opens. The window lists all the incident reports you selected.
Note
If any of the involved parties for the selected incident reports does not have an existing case assigned, those incident reports are listed in a separate section. You will need to create new cases to add these incident reports to.
If any of the involved parties for the selected incident reports already has cases assigned for the selected incidents, those incident reports will be listed in a separate section. You cannot assign them to another case.
Click in the Add to Case field for each incident report listed and select the case you want to add it to. You can only select one case for each incident report. This field is required.
When you are done, click Add incident reports to add the incident report to the selected case.
If you need to create a new case for a student, you can create it from one or more existing incident reports.
To create a new case, you must be in the Student Conduct - Director Access by Department role with the permissions "Can create cases" enabled.
Click the Actions drop-down for the incident report you want to use to create a new case and select Create new cases from incident report. The Create New Cases from Incident Report window opens, listing the involved parties for the incident.
Note
If any of the involved parties are associated with an existing case, you cannot create a new case from this incident report. When that is the case, you see a section labeled Unable to Create New Cases and a list of the involved parties. Click Cancel to close the window.
Likewise, if there are no involved parties associated with the selected incident report, you cannot create the case. Click Cancel to close the window.
Select the appropriate conduct department from the Conduct Department drop-down. This field is required.
Select a Conduct Administrator from the drop-down. The list includes users that are in either the Student Conduct - Assistant Director Access by Department or Student Conduct - Director Access by Department role. This field is optional.
Click Create case. A case is created for every remaining involved party listed in the window.
Note
A conduct department must be assigned for each involved party on the list before you can create the case. Until then, the Create case button is disabled.
On the Incident Reports page, select the checkbox next to each incident report you want to include in the case.
From the Options drop-down, select Create new cases from incident reports. The Create New Cases from Incident Reports window opens., listing all the involved parties for the selected incidents.
If any of the involved parties are already assigned to an existing case, those parties are listed under the Unable to Create New Cases section. These involved parties cannot be added to the new case.
For each row, select the appropriate Conduct Department from the drop-down. This field is required.
For each row, select a Conduct Administrator from the drop-down. The list includes users that are in either the Student Conduct - Assistant Director Access by Department or Student Conduct - Director Access by Department role or roles copied from them. This field is optional.
When you have assigned a conduct department to each row, click Create case.
Note
A conduct department must be assigned for each row before you can create the case. Until then, the Create case button is disabled.
You can edit the details of an incident report as long as the report does not have any cases associated with it and you are in one of the following roles (or in a role copied from one of these roles) and have the necessary permissions:
Role | Permissions required |
|---|---|
Residence Life Administrator | Can edit my incident reports |
Student Conduct - Incident Reports | Can edit my incident reports |
Student Life Module Manager | Can edit my incident reports |
Student Life Residence Assistant/ Advisor (RA) | Can edit my incident reports |
Student Life Residence Director (RD) | Can edit my incident reports |
Student Conduct - Assistant Director Access by Department | Can edit my incident reports Can edit assigned incident reports |
Student Conduct - Director Access by Department | Can edit all incident reports |
You can edit all details but the report status, which is a separate option on the Actions drop-down menu.
On the Incident Reports page, select Edit incident report from the Actions drop-down for the report you need to edit. The Edit Incident Report window opens. The incident report number is included in the window title.
Make changes as necessary. If you edit the Reported by Name/ID or Location, you must first delete the current value, then begin typing in the field and select the correct name when it appears on the list.
Note
You can update the Incident Narrative and supporting documentation after the report has been submitted. Deleted documents can be found in the incident history.
If the incident involved a fire, select the Fire Tracking checkbox and enter the necessary information. See Add Fire Tracking Information below for details.
When you finish editing the report, click Update incident report to save the changes and close the window.
If the incident involved a fire, users with the required permissions can enter details about the fire when they edit the incident report.
Only users in one of the following roles can enter fire tracking information:
Student Conduct - Assistant Director Access by Department role with the "Can edit my incident reports" and "Can edit assigned incident reports" permissions enabled.
Student Conduct - Director Access by Department role with the "Can edit all incident reports" permission enabled.
On the Incident Reports page, select Edit incident report from the Actions drop-down for the incident you need to edit. The Edit Incident Report window opens.
Select the Fire Tracking checkbox beneath the Incident Narrative field. The Fire Tracking sub-section opens.
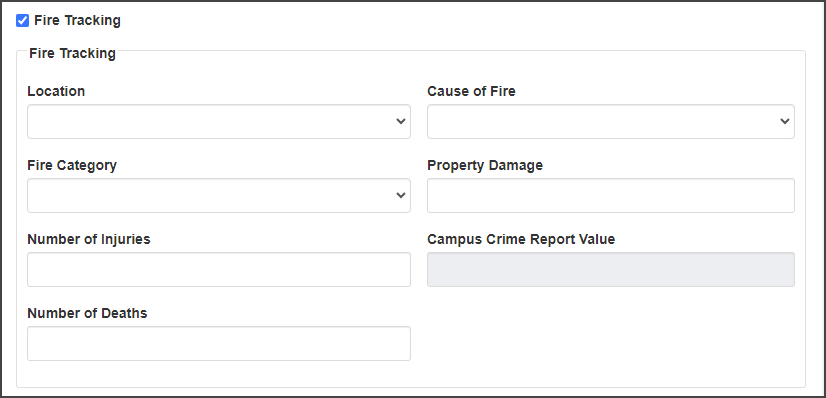
Required fields are indicated by a red asterisk.
Select the location of the fire incident from the Location drop-down.
Select the Cause of Fire (e.g., Open Flames or Smoking Materials) from the drop-down.
Select the Fire Category (Unintentional, Intentional, or Undetermined) from the drop-down.
If property damage resulted from the fire, enter the cost (estimated or actual) in the Property Damage field. Decimals are allowed.
When you enter the amount, the Campus Crime Report Value field auto-populates with a range of damages based on CCR guidelines.
If any injuries resulted from the fire, enter the number in the Number of Injuries field. The field allows integers between 0 and 99,999.
If any deaths resulted from the fire, enter the number in the Number of Deaths field. The field allows integers between 0 and 99,999.
Click Update incident report to save the changes.
The report status is updated separately from the report details. You can update a report's status individually or in a batch.
To update an incident report's status, you must be in the Student Conduct - Assistant Director Access by Department role with the "Can edit assigned incident reports" permission, or the Student Conduct - Director Access by Department role with the "Can edit all incident reports" permission.
Select Edit incident report status from the Actions drop-down for the report you need to update. The Edit Incident Report Status pop-up opens.
The Select a Detail to Update field defaults to Status and cannot be edited.
Select the new status from the drop-down next to the Select a Detail to Update field.
Click Update to save the change and close the pop-up. The new status is now reflected in the Incident Reports list.
Select the checkbox next to the reports you need to edit and select Edit incident reports status from the Options drop-down. The Edit incident Reports Status pop-up opens, listing the reports you selected.
The Select a Detail to Update field defaults to Status and cannot be edited.
If you need to remove an incident report from the list, click the Remove icon next to the report.
Select the new status from the drop-down next to the Select a Detail to Update field.
Click Update to save the changes and close the pop-up. The new statuses are now reflected in the list.
Depending on your role and permissions, you can merge individual incident reports into a single report. If two RAs submit reports about the same incident, but one report contains details that the other one does not, merging those reports allows you to consolidate the information from both reports.
Note
Incidents that have sanctions applied cannot be merged.
When you merge incident reports, you must designate one incident as the Key Incident. After the reports are merged, the Key Incident becomes the primary incident; the incident narratives and supporting documents from the reports you merge are now included under the Key Incident. The merged incident reports no longer appear on the Incident Reports list—only the Key Incident appears on the list. The data from the merged reports is not lost, however; it has simply moved to the Key Incident.
Note
Example: Mark and Jenna are RAs in the same residence hall. A student on Mark's floor, Rex, was caught breaking a window, so Mark submits an incident report citing Rex as an involved party. Jenna submits a separate incident report citing Margo, who was with Rex when he broke the window, as an involved party. Mark's report contains some details that Jenna's does not. The Residence Life Administrator merges the reports, designating Mark's report as the Key Incident because Rex was the one who actually broke the window. After the two reports are merged, the information from both reports is contained in the new report.
To merge incident reports, you must be in the Student Conduct - Assistant Director Access by Department or Student Conduct - Director Access by Department role (or a role copied from one of those roles) with the "Can merge incident reports into a single report" permission enabled.
Note
If an incident report is associated with a case or has had sanctions applied, it cannot be merged.
On the Incident Reports page, select the checkbox next to each incident report you want to merge. You must select at least two reports.
Select Merge incident reports from the Options drop-down. The Merge Incident Reports wizard opens to the first step, Select Key Incident.
The incident reports you selected for merging are listed in the window. If any of the selected reports cannot be merged, a note at the top of the page lists the incident numbers of those reports.
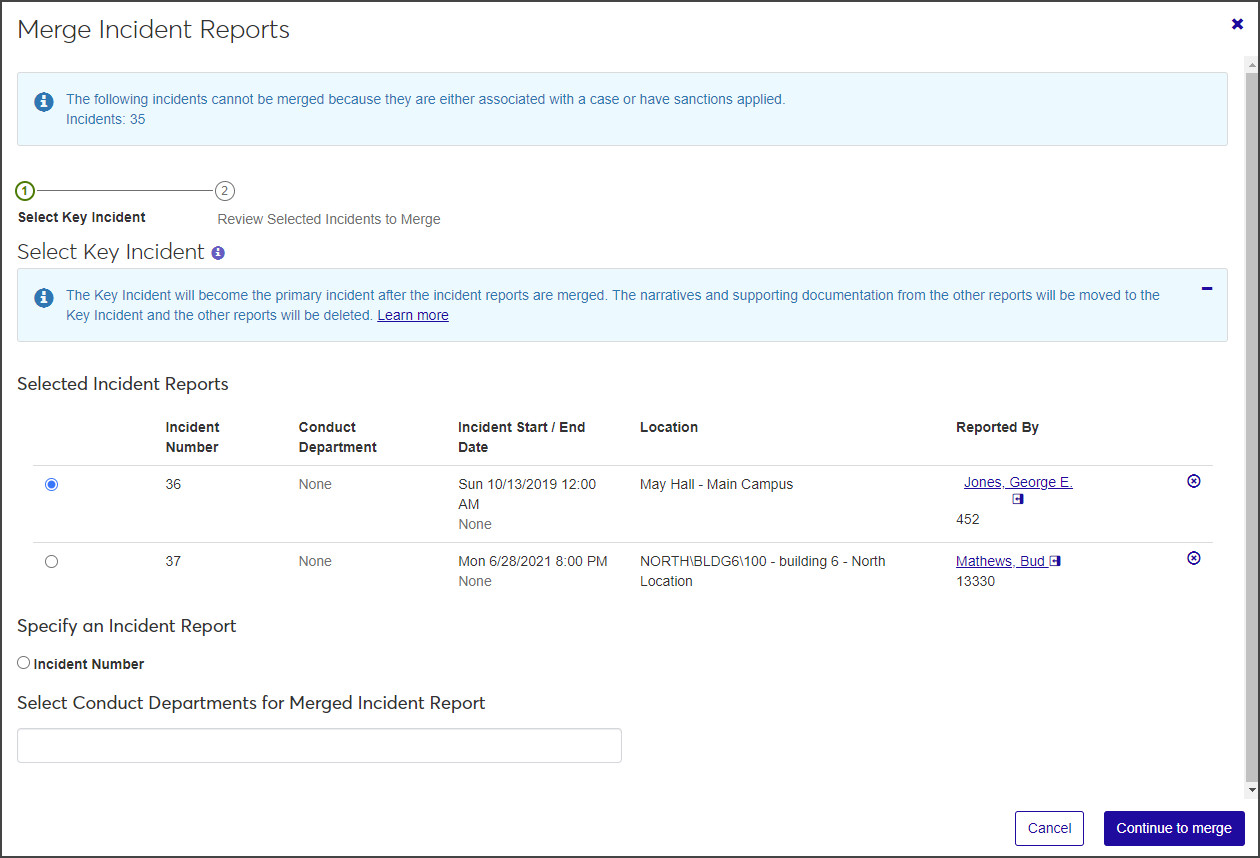
Select the Key Incident:
If the incident you want to designate as the Key Incident is listed under Selected Incident Reports, select the radio button next to that report.
If you want to specify a different incident report as the Key Incident, select the radio button next to Incident Number under Specify an Incident Report. A new field appears.
Click in the field, begin typing the incident number, and select the correct number when it appears.
Click in the Select Conduct Departments for Merged Incident Report field and select the conduct department you want the merged report to be assigned to. You can select more than one department.
Click Continue to merge to continue to the next step, Review Selected Incidents to Merge.
The top section of the review window, Selected Key Incident, displays a read-only summary of the incident designated as the Key incident. The reports that will be merged into the Key incident are listed under Selected Incident Reports Ready to Merge into Key Incident. Click the plus icon next to an incident to view additional information.
Review the merge information. To remove a report so it's not included in the merge, click the Remove icon next to it.
Under Preview Merged Incident Report, click the plus icon to see how the merged report will appear in the list of incident reports.
If you are satisfied with the merge, click Merge incident reports.
If you are in a role with the necessary permissions, you can reassign an incident report to a new conduct department (for example, from "Residence Life" to "Title IX"). You can reassign reports individually or in a batch. If an incident report is already associated with a case, it cannot be reassigned.
To reassign incident reports, you must be in a Student Conduct - Assistant Director Access by Department or Student Conduct - Director Access by Department role (or a role copied from one of those roles) with the "Can reassign incident reports" permission enabled.
Select Reassign incident report from the Actions drop-down for the report you need to reassign. The Reassign Incident Report pop-up opens.
Note
Reassign incident report only appears as an option in the drop-down if the incident report is not associated with a case.
The Select a Detail to Update field defaults to Conduct Department and cannot be edited.
Click in the field next to the Select a Detail to Update field and select the new conduct department.
Click Update to save the change and close the window.
When you reassign incident reports in a batch, they are all reassigned to the same conduct department. If an incident report is already associated to a case, it cannot be reassigned.
Select the checkbox next to each incident you need to reassign.
Select Reassign incident reports from the Options drop-down. The Reassign Incident Reports pop-up opens, listing all the selected incidents.
The Select a Detail to Update field defaults to Conduct Department and cannot be edited.
Click in the field next to the Select a Detail to Update field and select the new conduct department from the list.
Click Update to save the change and close the window.
From the Incident Reports page, you can track updates that have been made to the incident narrative or supporting documents for an incident report. Each update is saved and dated so you can compare versions and see exactly what changes were made, when they were made, and who made them. For instance, if you deleted the original incident narrative and wrote a new one, you can still view the original narrative. The same is true for supporting documentation; you can see which documents were added and when.
The incident history only shows updates made to the incident narrative and supporting documentation. The information is view-only; it cannot be edited.
To view incident history, select View incident history from the Actions drop-down for the incident you want to review. The View Incident History window for the report opens. The window title includes the incident number.
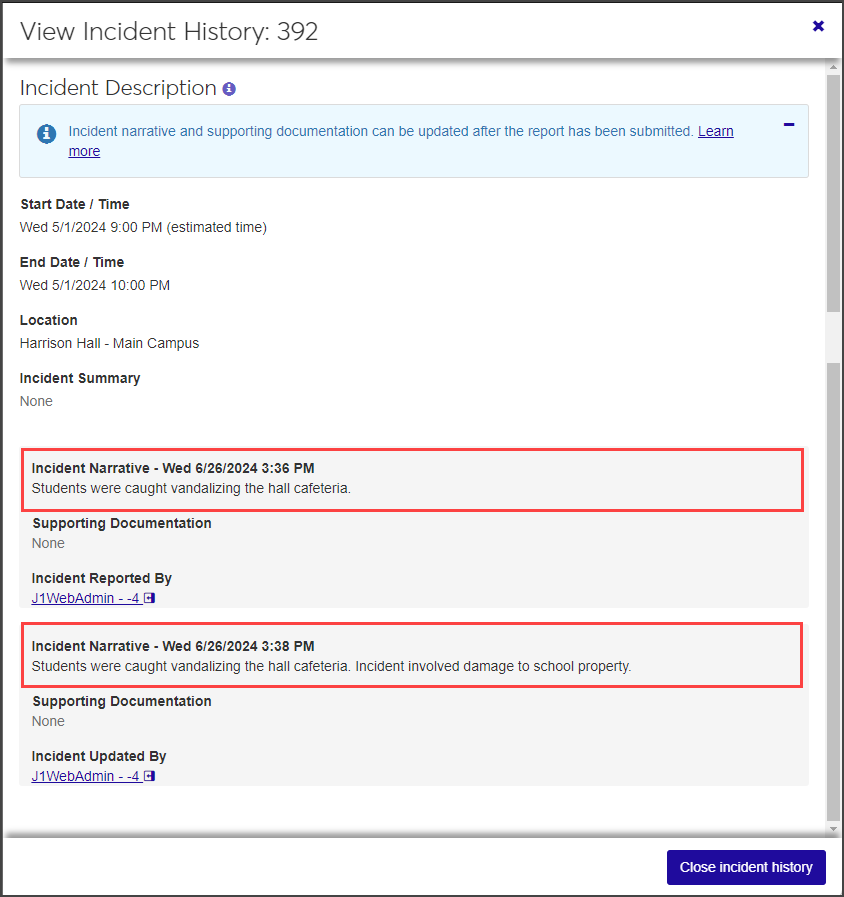
The top section of the window displays the start and end date and time and the location of the incident.
The next section displays the Incident Narrative, links to any supporting documentation that has been uploaded, and the user name and ID of the person who updated the incident. The name is linked to that person's summary page.
If the incident report has been updated, each update has its own section, listed in order from oldest to most recent update. For each update you can see the date and time the update was made, the most recent incident narrative, any supporting documentation that was added for this update, and the user who made the updates.
In the example above, the incident narrative notes that the involved parties were caught vandalizing the hall cafeteria. Later, the person who created the report needs to add that there was property damage, so he edits the report to include that information in the narrative. After he saves the updates, both iterations of the incident narrative are displayed in the incident history.
If fire tracking information was included in the incident report, the last section in the View Incident History window displays the fire-related information.
On the Incident Reports page, select User-Defined Fields from the Actions drop-down for the relevant incident. The User-Defined Fields window opens.
Edit the existing user-defined fields as needed.
When you are done, click Save.