Generate Charges
Important
Information and features vary according to the roles to which you belong and the permissions associated with those roles. For more information, contact your module manager or your campus support team.

The Generate Charges page lets you generate preliminary or actual charges and refunds for selected billing periods. You can add students to the list individually or use a data set to retrieve multiple students based on pre-defined criteria.
Warning
Before generating charges, charges and refunds must be defined properly in the Desktop Charges/Refunds Definition window.
Selecting Students
Students can be added to the list individually or with a data set. Data sets use InfoMaker to query the database and determine which students to include. Jenzabar provides three default data sets.
Student Master Original: Includes all students in the STUDENT_MASTER table
Student Course History Original: Includes all students in the STUDENT_CRS_HIST table
Student Division Master Original: Includes all students in the STUDENT_DIV_MAST table
Tip
Jenzabar recommends creating customized data sets to reduce the number of students selected and reduce processing time. If you created customized queries in Desktop, those options should be available from the Data Set drop-down. You can also use InfoMaker to create customized data sets for J1 Web and add them to the Data Sets page. For more information, see Data Sets.
Permissions Required
To access the Generate Charges page, you must be in a Receivables Management role with "Can generate charges" permission. For more information about permissions, see Roles and Permissions to Work with Student Charges.
Desktop Location
Charges can also be generated in Desktop from the Student Billing window.
Note
The J1 Web report page does not include "Immediate" and "Preview" options. After the process is complete, a notification appears that lets you open the PDF report to review batch details.
The "Query" drop-down in Desktop is similar to the "Data Set" drop-down in J1 Web. Data sets use InfoMaker to query the database and determine which students to include. The default options for queries and data sets are available in both systems, but customized queries in Desktop are not available in J1 Web unless they've been copied to the appropriate location on the J1 Web server. See How To Customize Reports and Data Sets in J1 Web for more information.
Tip
The system updates the ID Number / Name field when you enter a full ID number and press Tab to move to the next field.
From the Receivables Management Hub options, select Generate charges. The Generate Charges page opens.
Select students to add to the list.
To select students individually:
Select the Student Name / ID option.
Enter the name, ID number, SSN, or birthdate of a student and select their name from the drop-down.
Add more students as needed. The Add students button updates to show the number of students.
To select multiple students with a data set:
Select the Data Set option. This option is selected by default.
Select from the options in the Data Set drop-down. Options are the default data set and any customized data sets you've added to the system. The Add students button updates to show the number of students.
Click the Add students button to populate the Student List.
Review the list of students and use the Remove column to delete students from the list.
Tip
To clear the list and select a different group of students, select all students. Click the More button and select Remove all.
Click the Select All button
 or select students one by one.
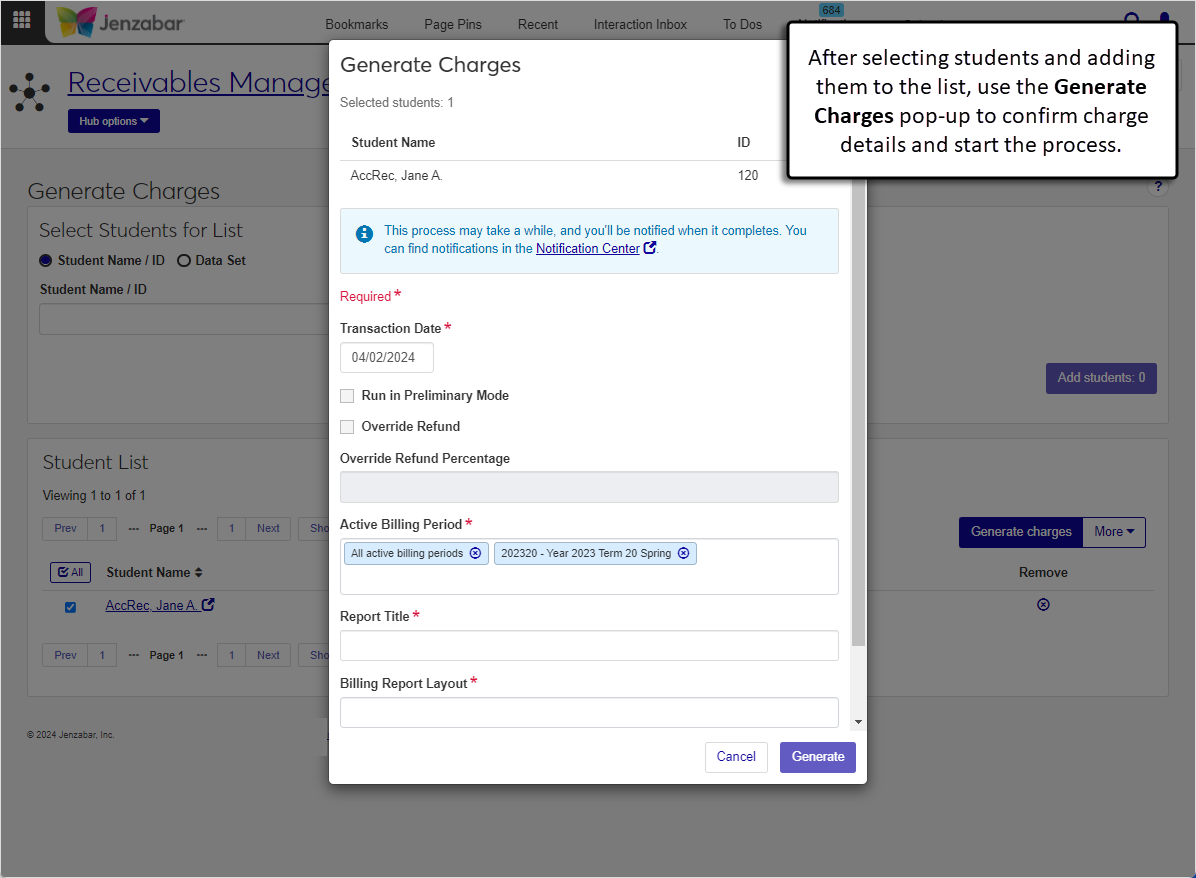
Click the Generate charges button. The Generate Charges pop-up opens.
Review the students at the top of the pop-up and click the Remove icon
 to remove those you don't want to generate charges for.
Verify the Transaction Date, which is used to select the active billing periods to process. Today's date is the default. This date appears as the "Charge Date" on the report.
Select the Run in Preliminary Mode checkbox to create preliminary transactions based on the settings in the Desktop Billing Periods window. Leave the checkbox unselected to generate actual charges.
Tip
Running charges and refunds in preliminary mode is helpful when you are setting up new billing periods because you can ensure billing periods are set up correctly without making updates to the Fees table. Reviewing preliminary charges/refunds and printing preliminary statements gives you and the student an idea of upcoming charges.
Select the Override Refund checkbox to override the refund percentages defined on the Desktop Charges/Refunds Definition window. Leave the checkbox unselected to use the defined refund percentages.
The Override Refund Percentage field is editable only when the Override Refund checkbox is selected. Enter the decimal percentage that will calculate the refund amount (e.g., 0.20 for a 20% refund).
Select the Active Billing Period. "All active billing periods" is selected by default. Required.
Enter the Report Title. Required.
Select one or more Billing Report Layout options.
Individual / Billing Period: Sorted by student with billing periods listed per student
Account / Billing Period: Sorted by account number with billing periods listed per account
Billing Period / Individual: Sorted by billing period with students listed per billing period
Billing Period / Account: Sorted by billing period with accounts listed per billing period
Select the File Format. PDF is the default, and you can select one or more additional formats.
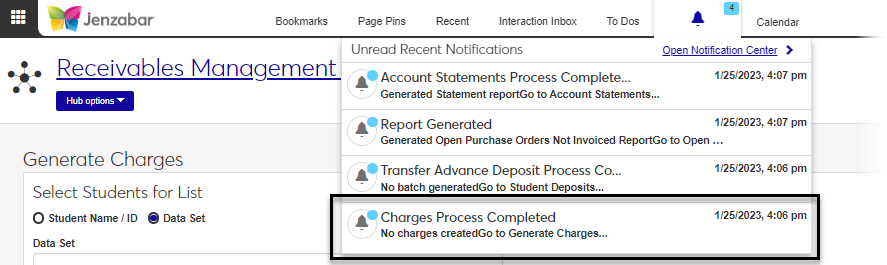
Click Generate. A notification that the process has started appears. You can continue working in J1 Web while the report is generated. You'll receive a notification pop-up when the report is finished.
To view the report:
Click the Charges Process Completed notification link from the Notifications drop-down in the global toolbar. You can also navigate to the Notification Center, select the notification titled "Charges Process Completes", and click the View Details icon.
In the Charges Process Completed pop-up, click the report link to open the report in a new browser tab. The report name will vary depending on the selected billing report layout.
Note
Depending on your role and permissions, one or more of the pages listed below are available.
From the Receivables Management Hub options, select Generate charges. The Generate Charges page opens.
Select students to add to the list.
To select students individually:
Select the Student Name / ID option.
Enter the name, ID number, SSN, or birthdate of a student and select their name from the drop-down.
Add more students as needed. The Add students button updates to show the number of students.
To select multiple students with a data set:
Select the Data Set option. This option is selected by default.
Select from the options in the Data Set drop-down. Options are the default data set and any customized data sets you've added to the system. The Add students button updates to show the number of students.
Click the Add students button to populate the Student List.
Review the list of students and use the Remove column to delete students from the list.
Click the Select All button
or select students one by one.Click the More drop-down and select from the following options to open the page in a new tab.
Person information details
Student account details
Student information details
Important
Access to the folders where Jenzabar-provided original reports are stored is controlled by your institution. For more information, contact your campus support team or see Working with Reports in J1 Web.
Open InfoMaker.
Click File > Select Library.
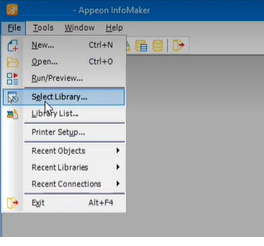
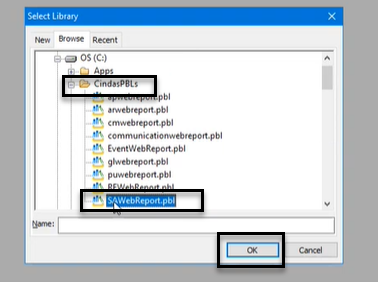
On the Select Library pop-up, navigate to the shared folder where Jenzabar-provided original reports and queries are stored.
Select the PBL (PowerBuilder Library) file that contains the report or query you want to customize.
Click OK.
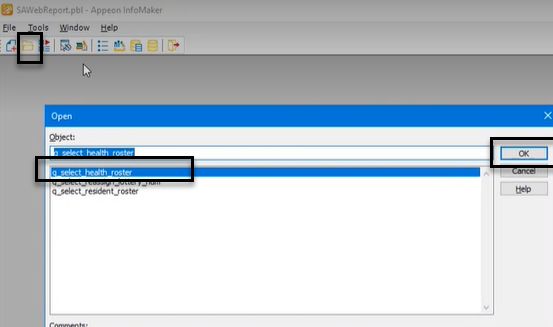
Click the Open icon.
On the Open pop-up, in the Object section, select the report or query you want to customize.
Click OK.
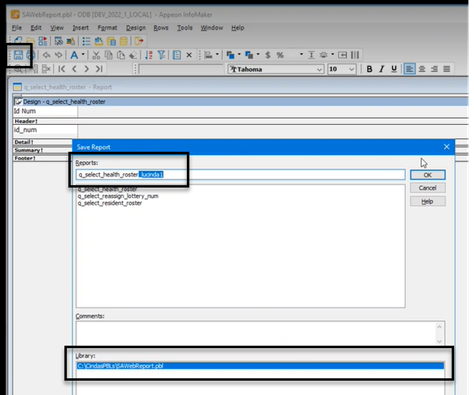
Customize the report or query as needed.
Save the customized version in the shared folder by adding a unique, easily identifiable extension to the file name.
Tip
By default, InfoMaker saves the customized version in the same folder that you opened the original version from. Confirm the file path is correct in the Library section.
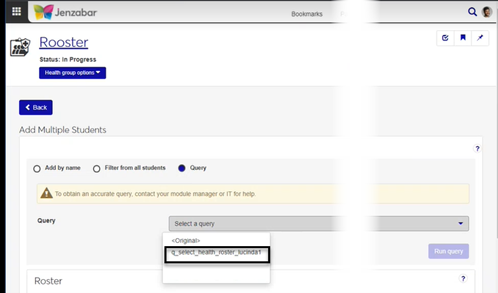
On the corresponding report page in J1 Web:
Customized versions of queries will display in the Query or Data Set drop-down.
Customized versions of reports will display in the Report Layout drop-down.
The queries customized in Desktop should have been brought over to the J1 Web server as part of the installation process. Customized queries that were created in Desktop before the J1 Web installation should be in the drop-down when you start working in J1 Web. Any queries that were customized in Desktop after the J1 Web installation are not available unless they have been copied over to the appropriate location on the J1 Web server. For additional information about customized queries, see Working with Reports in J1 Web.
Follow the steps to Customize Reports and Data Sets in J1 Web. Jenzabar provides the following queries in the ARWebReports.pbl.
q_student_master
q_stud_crs_hist
q_stud_div_mast
Tip
You can also download the query syntax from the Data Sets page for the default queries. You'll still need to save the customized queries with the appropriate naming convention in the ARWebReports.pbl.
On the Data Sets page, select the Queries for People/Organization Lists option.
In the Data Sets Filter, enter the following information and then click Apply.
For Keyword, enter "charges".
For Modules with Access, select "Accounts Receivable".
For Type, select "InfoMaker".
From the Action drop-down for the query you want to customize, select View details.
In the details pop-up, click Download query syntax.