Reconcile Bank Accounts
Important
Information and features vary according to the roles to which you belong and the permissions associated with those roles. For more information, contact your module manager or your campus support team.
Use the Reconcile Bank Accounts page to reconcile bank statements with your record of checks, e-Payments, and deposits for the selected account. By default, the page displays the Beginning Balance for the previously reconciled month, and this amount should match the beginning balance on the bank statement.
The Deposits and Payments options determine which transactions are visible in the details spreadsheet. You can choose to summarize deposit transactions by batch or by date, and whether to include e-Payments for payment transactions.
After entering cleared dates for all the month's deposit and payment transactions and verifying the Difference is 0, you can save transaction details to reconcile the account and update balances.
Tip
The Difference is calculated with the following equation:
Ending Balance = Beginning Balance + Deposits - Cleared Payments
Permissions Required
To access this page, you must be in a Procurement - Accounts Payable role with the "Can reconcile bank accounts" permission.
Note
You may need to be in additional General Ledger Accounting roles for permission to view batch details. Batch roles are categorized by source code. For more information, see General Ledger Roles and Permissions.
Desktop Location
You can also reconcile bank accounts from the Desktop Reconcile Bank Accounts window.
From the Finance Procurement Hub options, select Reconcile bank accounts. The Reconcile Bank Accounts page opens.
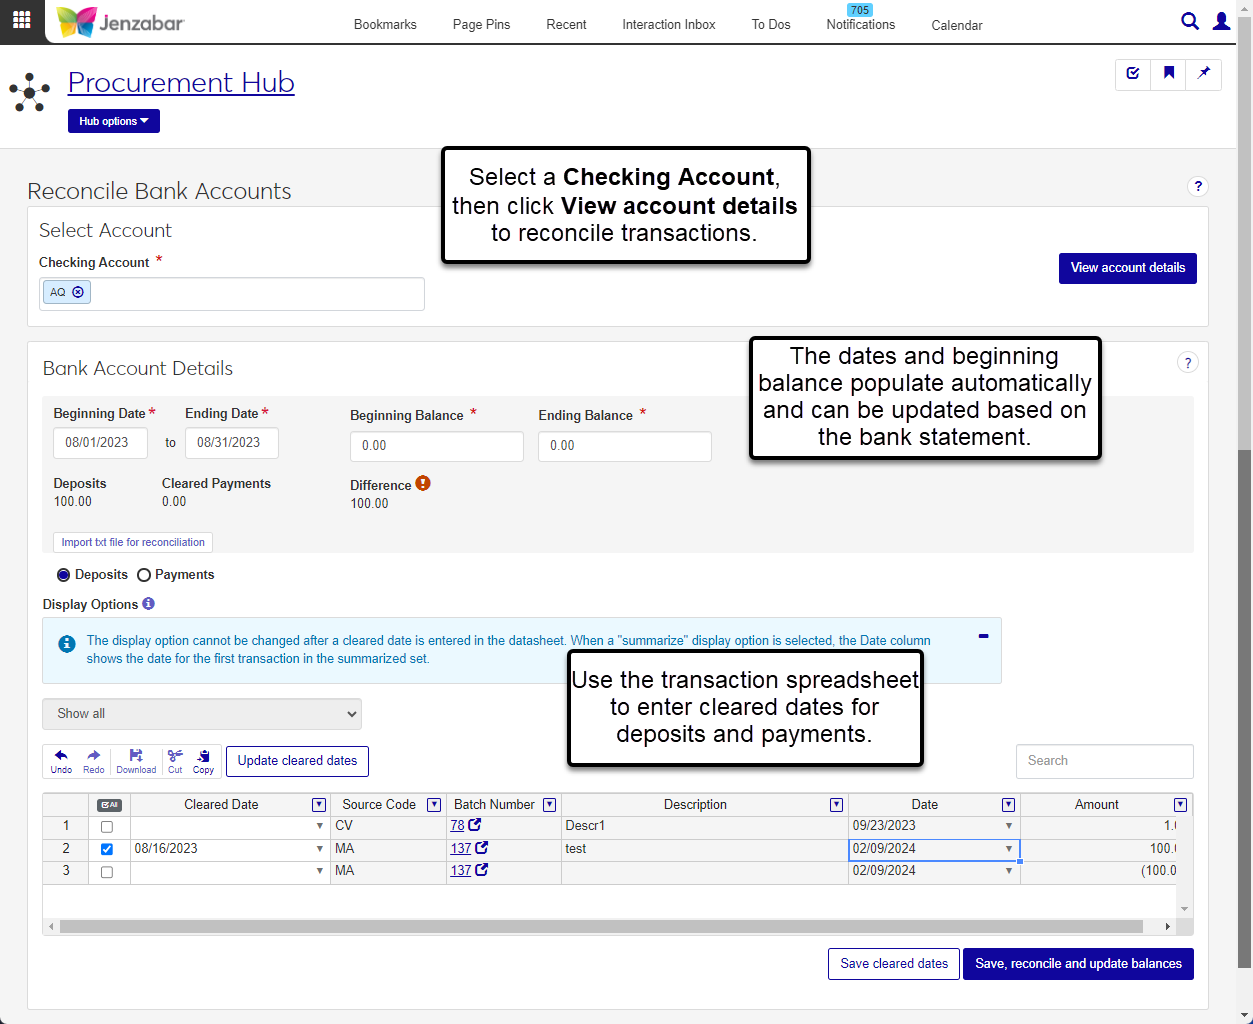
Click in the Checking Account field and select an option from the drop-down.
Click View account details. The Bank Account Details section displays.
The Beginning Date and Ending Date are prepopulated for the next month that needs to be reconciled, but both dates can be updated if needed. Required.
The Beginning Balance is prepopulated with the ending balance from the previous month's reconciliation. Required. This amount should match the beginning balance on your bank statement.
In the Ending Balance field, enter the ending balance from your bank statement. Required.
The read-only Deposits, Cleared Payments, and Difference amounts are updated as changes are made to the transaction spreadsheet.
To update deposit transaction cleared dates:
Select the Deposits option below the balance details.
In the Display Options drop-down, select one of the following:
Show all (default). Displays all the transactions within the date range.
Summarize by batch. Displays one row per source code and batch number combination. When this option is selected, the Description column is hidden. For example, if there are 5 transactions for JL 100, only one row for JL 100 is displayed when 'Summarize by batch' is selected.
Summarize by date. Displays one row per source code and transaction date combination using the date of the first transaction in the batch. When this option is selected, the Batch Number and Description columns are hidden. For example, if there are 2 batches, one with the JL source code and first transaction dated 6/1/2022, and the other with the CG source code and first transaction dated 6/1/2022, one row is displayed for each source code and date when 'Summarize by date' is selected (one row for JL 6/1/2022 and one row for CG 6/1/2022).
Enter or select a Cleared Date for each row in the spreadsheet. To apply the same cleared date to multiple rows:
Select one or more rows.
Click the Update cleared dates button. The Update Cleared Dates pop-up opens.
Review the selected rows and click the Remove icon
 for rows you don't want to update.
The Cleared Date is prepopulated with the Ending Date, but you can change it if needed.
Click Update. The list updates to display the selected cleared date for those rows, and the Deposits amount in the balance details is updated with the total amount of the cleared rows.
Use the spreadsheet toolbar to undo, redo, cut, and copy changes, and to download transaction details to Excel.
Click Save cleared dates.
To update payment transaction cleared dates:
Select the Payments option below the balance details.
In the Display Options, select one of the following:
Exclude electronic payments (default)
Include electronic payments
Enter or select a Cleared Date for each row in the spreadsheet. To apply the same cleared date to multiple rows:
Select one or more rows.
Click the Update cleared dates button. The Update Cleared Dates pop-up opens.
Review the selected rows and click the Remove icon
for rows you don't want to update.The Cleared Date is prepopulated with the Ending Date, but you can change it if needed.
Click Update. The list updates to display the selected cleared date for those rows, and the Cleared Payments amount in the balance details is updated with the total amount of the cleared rows.
Use the spreadsheet toolbar to undo, redo, cut, and copy changes, and to download transaction details to Excel.
Click Save cleared dates.
Review cleared dates for deposit and payment transactions, and ensure the Difference in the balance details is 0.
Click Save, reconcile and update balances. All rows with a cleared date are removed from the spreadsheet, and the transaction details are updated with reconciliation information. The page refreshes and updates the Beginning Date, Ending Date, Beginning Balance, and Ending balance to the next month to be reconciled.
You can upload .txt files from your bank to automatically update the cleared dates for payment transactions. At this time, only payment transactions with cleared dates can be updated from a text file.
On the Reconcile Accounts page, select the Checking Account associated with the bank statement file and click View account details.
Review Beginning Date, Ending Date, Beginning Balance information and update as needed to match the bank statement.
Enter the Ending Balance from the bank statement.
Select the Payments option below the balance details.
Click the Import txt file for reconciliation button, select the bank file in the browser pop-up, and click Open. The Cleared Dates column updates for the payments in the file.
Click Save cleared dates.
Rows with cleared dates outside the date range won't be reconciled. The system doesn't prevent you from entering cleared dates outside the reconciliation range, so be sure to review the warnings and verify the date range noted on your bank statement.
At this time, J1 Web only allows .txt files to be imported. When the file is imported, only payment transactions with cleared dates are updated.