Business Office/Finance
Note
Enhancements for the Desktop Business Office and the J1 Web Finance product are included below. See the other finance module pages for specific updates in each area.
2024.3
2024.2
2024.1
The Campus Portal purchasing and budget functionality is now available in J1 Web Finance! Schools can opt to migrate functionality in the Campus Portal Requisitions and Orders, Requisition Approval, and Budget features to the J1 Web Finance product.
 Watch this quick video for an overview of the new features in J1 Web Finance!
Enabling the Campus Portal functionality in J1 Web requires a large number of users to be added to roles and granted permissions. Jenzabar advises clients to follow the steps below to prepare for implementing J1 Web Finance and migrating users from the Campus Portal to J1 Web.
Danger
Enabling J1 Web Finance features for your campus users cannot be undone; once the features are active, users can no longer perform those tasks in the Campus Portal. Be sure that you've set up your system properly and adequately prepared your users before completing the migration.
Verify license information. You must have the J1 Web Financials license to migrate J1 Web features from the Campus Portal. Work with Jenzabar Support to ensure you have the appropriate license.
Plan your migration. Identify the J1 Web product areas you want to prioritize as you transition users from the Campus Portal to J1 Web. This will position you to seamlessly adopt additional functionality when it is ready.
Note
Open items, state reporting, and foreign currency features are not yet available with J1 Web and cannot be run in parallel with the Desktop application due to data issues. Clients using those features should not upgrade to J1 Web Finance until the features are available. Open Items, State Reporting, and Foreign Currency features are scheduled for a future release.
Familiarize users with J1 Web standard features and navigation. If your school isn't already using J1 Web, gain familiarity with the system's standard features including navigation, search, blocks, bookmarks and pins, and user preferences. The MyJenzabar Common Module Resource Center provides access to guides, YouTube videos, and eLearning courses about these features.
Familiarize users with Jenzabar Communications. J1 Web uses the Communication Management hub to send and view emails, comments, and notifications (collectively called "interactions"). The MyJenzabar Communications Module Resource Center provides access to guides, YouTube videos, and eLearning courses about these features.
Learn about permissions in J1 Web.
Review Common J1 Web roles that impact users' ability to use standard features, especially if you are just starting with J1 Web. See the User Management online help for information.
Review Finance permissions available in J1 Web and consider how your Finance department wants to set up a new permission structure. Desktop and Campus Portal Finance permissions are not migrated into J1 Web. J1 Web uses unique roles and permissions, and this new model provides additional flexibility as well as an opportunity to re-imagine and improve existing permission structures. See the J1 Web Finance Permissions and Setup Admin Guide on MyJenzabar for more information.
Note
Remember that working in J1 Web and Desktop at the same time will require managing dual permissions. The Desktop groups and permissions for campus users are not honored in J1 Web.
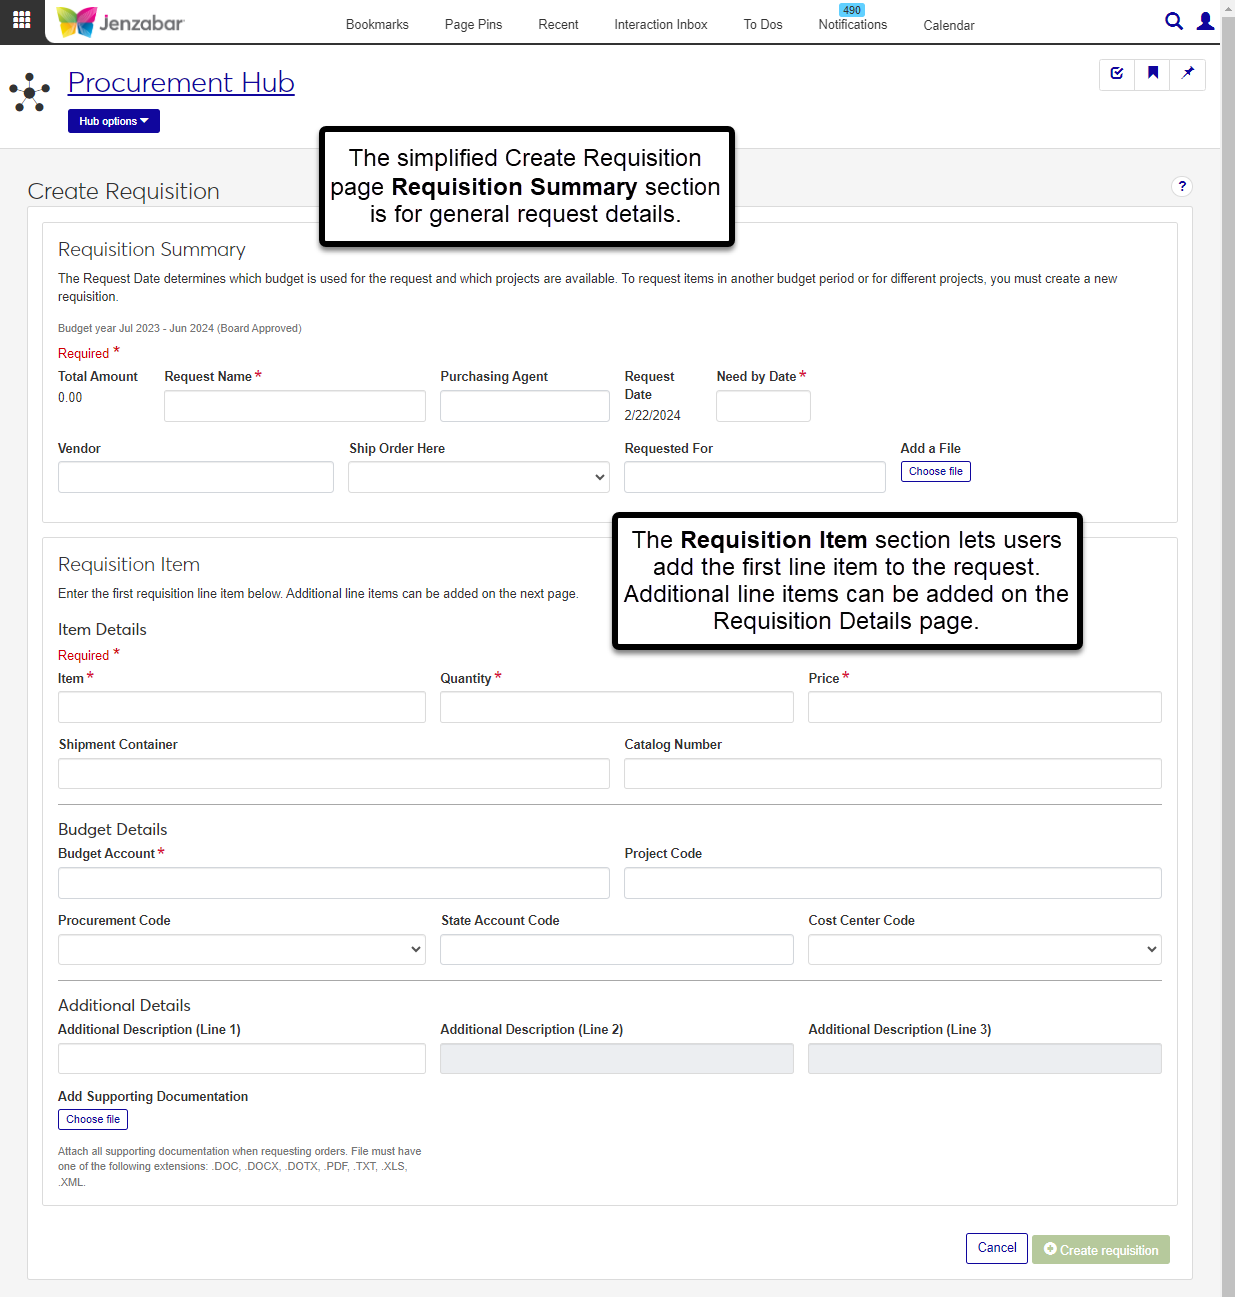
Users that are migrated from the Campus Portal to J1 Web will see a simplified version of the J1 Web pages that are available for admin users. For example, the Create Requisition page for a campus user looks different from the Create Requisition page for an admin user. Access to the appropriate version of each page is managed via roles and permissions.
For more information about setting up roles and permissions for campus users, see J1 Web Finance Roles and Permissions for Campus Portal Migration.
Procurement - Purchasing Role
The Procurement - Purchasing role grants permission to access the Orders and Requests and Review Requisitions pages. The following permissions are available in the new Orders and Requests section.
Can create and submit basic requisitions
Can update purchase order line item receiving status
Budget Management Worksheet & Adjustment Access Role
The Budget Management Worksheet & Adjustment Access role grants permissions to work with worksheets and transfers on the Budget Activity page. The following permissions are available in the new Budget Activity section.
|
|
The Associations tab lets you specify which worksheets campus users can work with. The permissions that have been granted in the role are only applicable to the associations that are enabled for the role.
The new Budget Administration and Procurement Administration hubs let you manage the settings to migrate Campus Portal functionality to J1 Web. Both hubs include a Settings page where you can enable J1 Web functionality.
For more information, see:
Danger
Enabling J1 Web Finance features for your campus users cannot be undone; once the features are active, users can no longer perform those tasks in the Campus Portal. Be sure that you've set up your system properly and adequately prepared your users before completing the migration.
The J1 Web Orders and Requests page in the Procurement hub replaces the Campus Portal Requisitions and Orders feature. From this page, users can view, create, and submit their requests for approval.
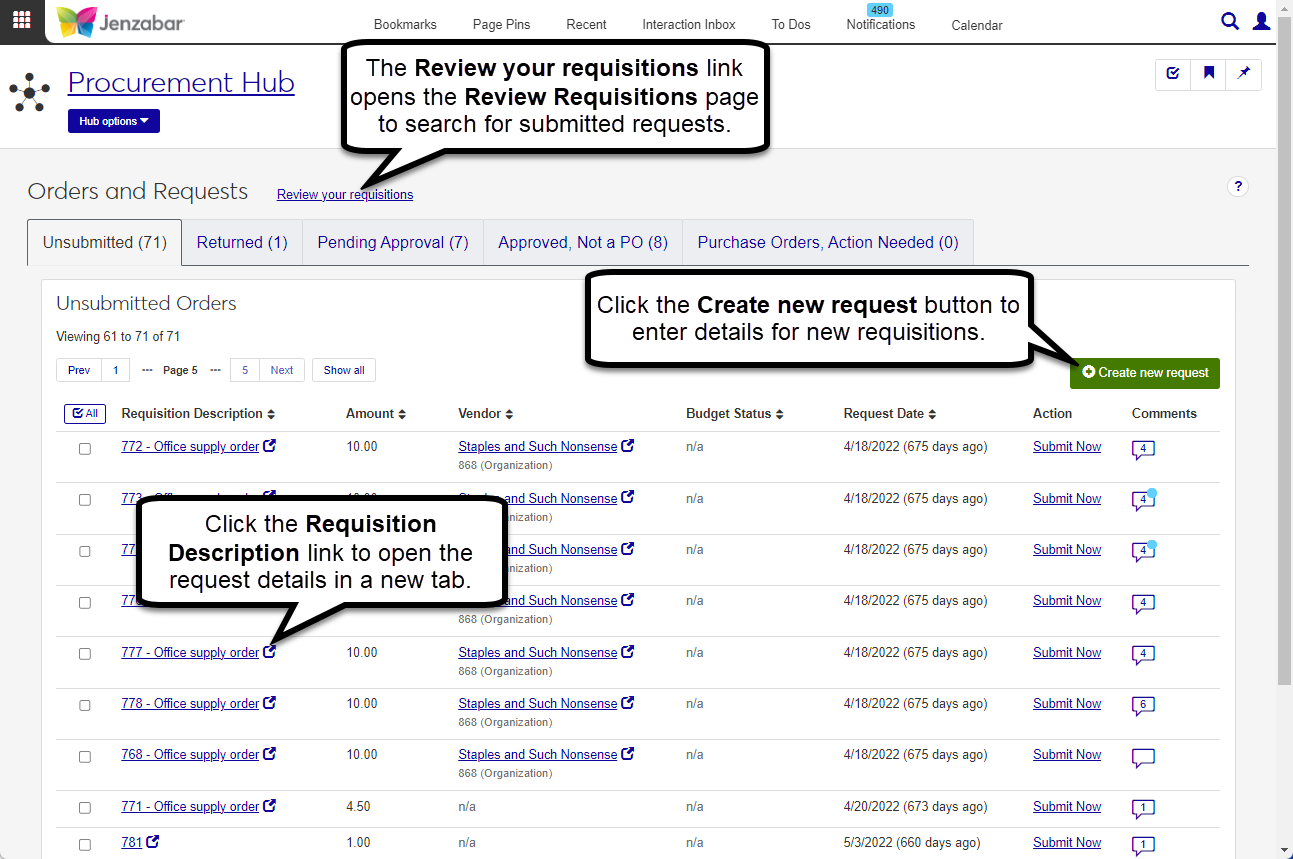
Each tab on the page lets you view requests in different statuses, and the Create new request button opens a simplified version of the Create Requisition page. Users can enter the first line item from the Create Requisition page and any additional line items are added from the Requisition Details page.
The simplified Requisition Details page has summary and line item list sections. Additional line items can be added with the Create new line item button. Use the Req options button to approve/deny/return the requisition or generate the requisition file.

For more information, see Orders and Requests.
The Review Requisitions page in the Procurement hub replaces the Campus Portal Requisition Approval feature. From this page, you can search for requisitions based on specific criteria and access the simplified Requisition Details page to review and approve requests. You can also see details about the approval track associated with the request and access simplified Purchase Orders created from a request.
Note
Users can only approve, deny, or return requisitions when they are listed as the next approver for the approval track associated with the requisition and have approve/deny/return permission.
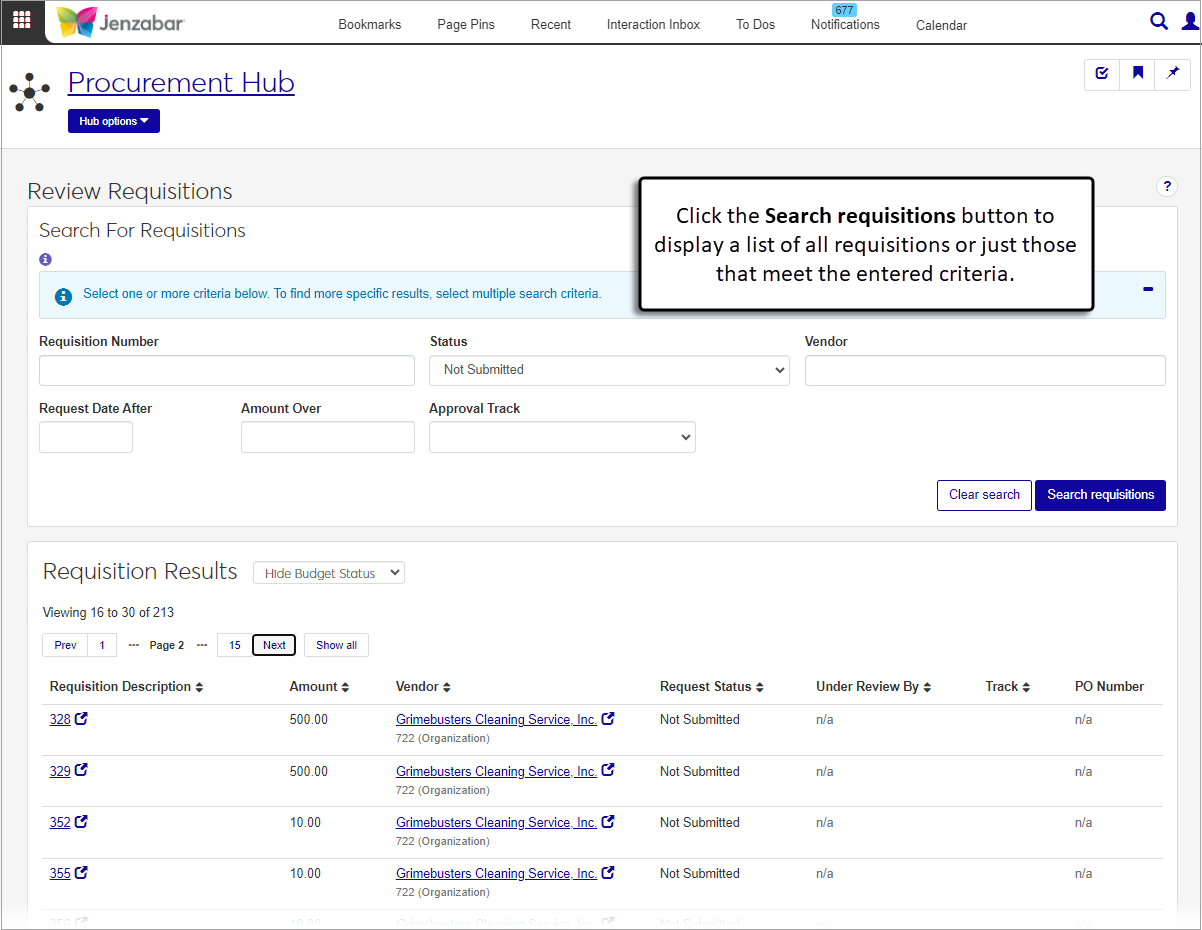
For more information, see Review Requisitions.
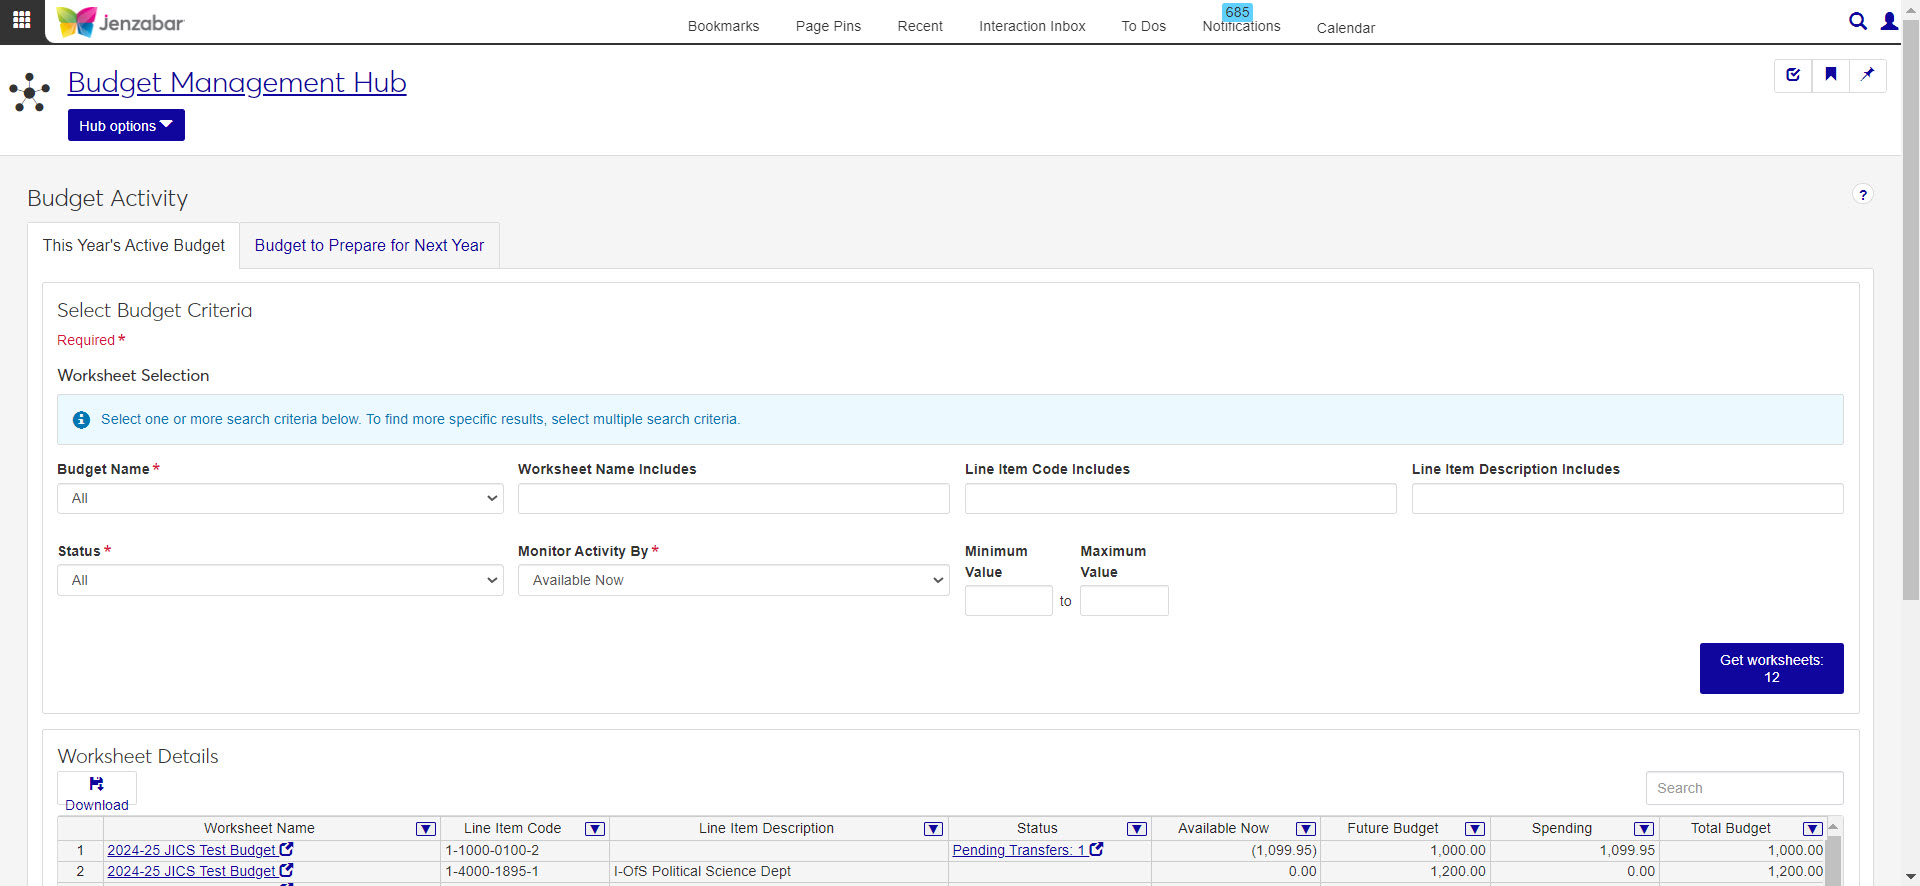
The Budget Activity page in the Budget Management hub replaces the Campus Portal Budget feature. From this page, campus users can search and view their current budget worksheet activity, submit transfer requests, and prepare for next year's budget.
For more information, see Budget Activity.
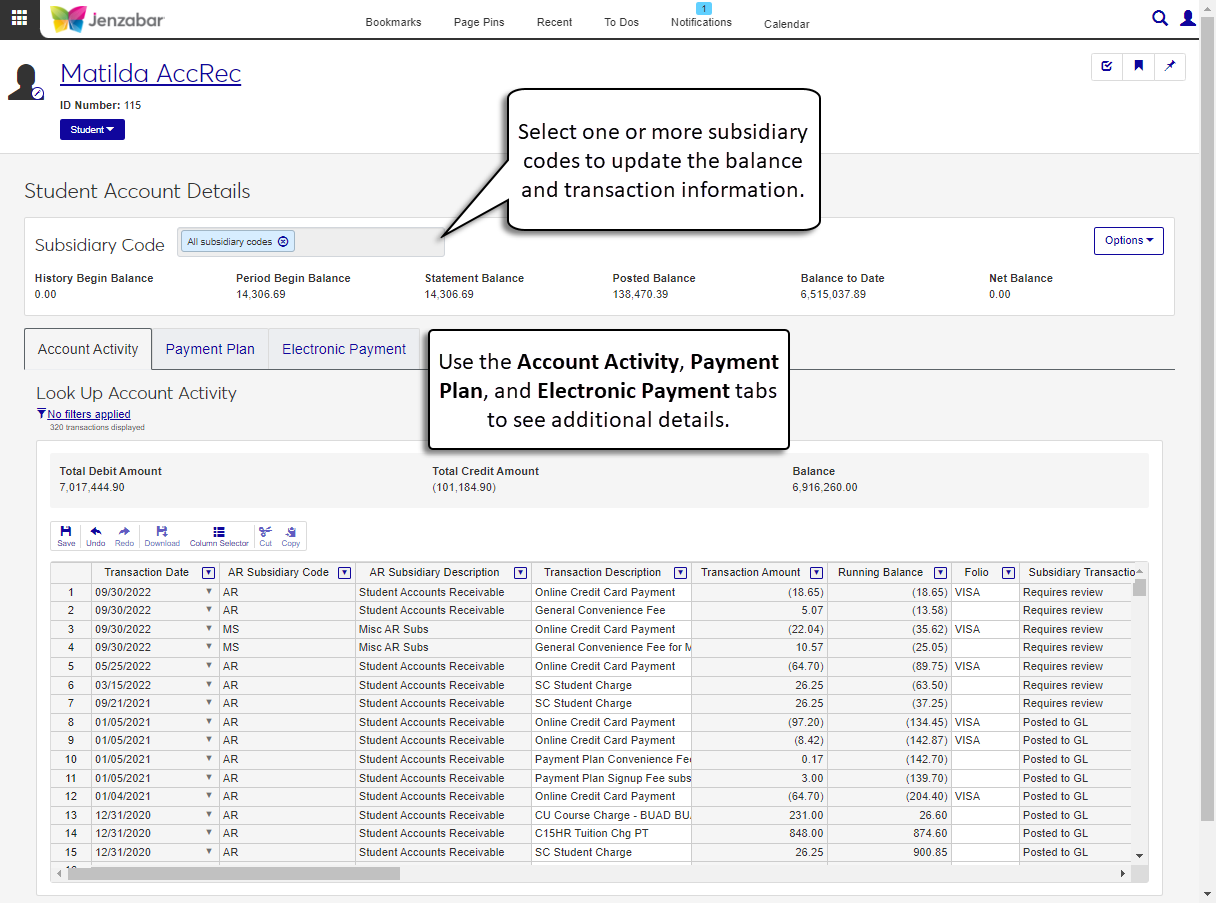
Additional functionality is now available on the Student Account Details page, Payment Plan tab.
A new Balance Locked checkbox in the plan summary lets you lock a plan balance so the account won't be recalculated when the recalculation process is run prior to the plan freeze date.
You can now recalculate a plan balance or make a plan payment from the Options drop-down.
In the plan payment activity, you can now reverse, attach, and detach payment rows.
For more information, see Student Account Details: Payment Plan tab.
Automatic emails are now generated for system events related to purchase orders (POs) and requisitions. When system event interactions are turned on for PO and requisition events (e.g., requisition submitted or PO changed), users associated with the system event interaction will receive an email. J1 Web provides default email templates, and you can customize messages in the Communication Management hub.
For more information, see Customizing System-Generated Emails for Procurement.
Note
The notifications set up in the Desktop Purchasing Module Setup window are not honored in J1 Web.
The Remove Access feature was added to the Create GL Account wizard. When a user selects at least one account from Step 3: Apply Security to New GL Accounts, the Remove Access button will be enabled. When clicked, a pop-up window will appear with Component Security and Alternate Security and the user will be able to remove any security they have previously granted to the selected accounts.
Warning
When removing Component Security, be aware that this change will affect other accounts in the system that are using the same role. Be sure to check the active users and accounts that will be affected by the change before you click the Yes, remove access button.
You can now view the adjustment history for an active worksheet. When viewing a Worksheet detail page, if there are existing adjustments to the worksheet you will be able to select the View adjustment history link under Worksheet Options. From the View Adjustment History pop-up page, you will be able to see the worksheet details and any pending or approved transfers for that worksheet.
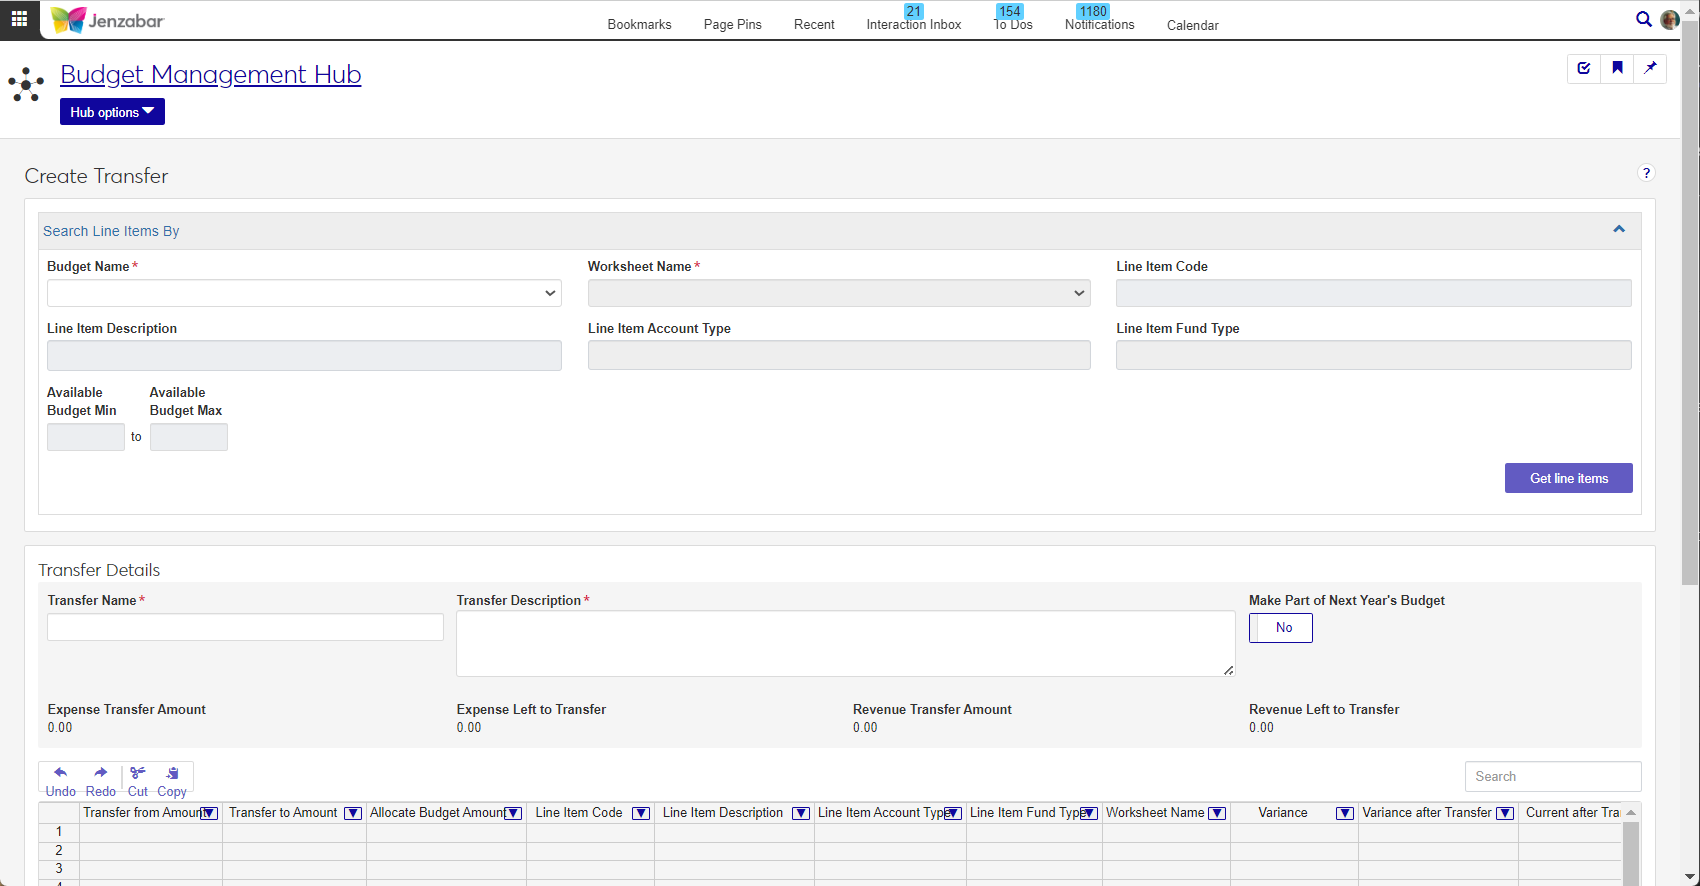
The new Create Transfer page allows users to freely switch between the Transfer From and Transfer To tabs to add or edit columns for a transfer.
A new All Access option is available on the Associations tab for GL Account Roles. This will act as a "wild card" option when dealing with the component security.
Jenzabar One Web Finance is Here!
The integrated Finance product is now generally available in Jenzabar One (J1) Web!
Note
Licensing for J1 Web Finance is applied during the Desktop upgrade process. Contact Jenzabar Support for more information.
Warning
J1 Web does not currently support the Open Items configuration. If your school is configured for Open Items in the Desktop A/R Configuration window, continue working in J1 Desktop as you will not be able to use J1 Web Finance at this time.
Before You Get Started with Jenzabar One (J1) Web Finance
Jenzabar advises clients to follow the steps below to prepare for implementation.
Familiarize users with J1 Web standard features and navigation. If your school isn't already using J1 Web, gain familiarity with the system's standard features including navigation, search, blocks, bookmarks and pins, and user preferences. The MyJenzabar Common Module Resource Center provides access to guides, YouTube videos, and eLearning courses about these features.
Learn about permissions in J1 Web.
Review Common J1 Web roles that impact users' ability to use standard features, especially if you are just starting with J1 Web. See the User Management online help for information.
Review Finance permissions available in J1 Web and consider how your Finance department wants to set up a new permission structure. Desktop Finance permissions are not migrated into J1 Web. J1 Web uses unique roles and permissions, and this new model provides additional flexibility as well as an opportunity to reimagine and improve existing permission structures. See the J1 Web Finance Permissions and Setup Admin Guide on MyJenzabar for more information.
Note
Remember, working in J1 Web and Desktop at the same time will require managing dual permissions.
Plan your migration. Identify the J1 Web product areas you want to start using as you strategically shift from Desktop. This will position you to seamlessly adopt additional functionality when it is ready. A couple things to note:
Open items, state reporting, and foreign currency features are not yet available with J1 Web and cannot be run in parallel with the Desktop application due to data issues. Clients using those features should not upgrade to J1 Web Finance until the features are available. Open Items and State Reporting features are targeted for a future release.
Because the J1 Web Finance permissions do not integrate with the Campus Portal, the Campus Portal Budget feature is being migrated into J1 Web. Budget module users who use the Campus Portal Budget feature should wait to implement the J1 Web Finance product until the 2023.3 release when the Campus User Budget Activity feature is available.

Tip
Remember these tips!
The Desktop is here to back you up! It uses the same database and can be run in parallel with J1 Web.
Learning resources are available on MyJenzabar.net and learn.jenzabar.com. You have time to learn at your own pace.
This is the first version of J1 Web Finance. Additional features and functionality will be available in subsequent releases.
The new Finance Product includes 5 module hubs. Most functionality available in the Desktop application can now be completed in J1 Web, and tasks accomplished in either application are synced with the other.
Use the Asset Management hub to inventory, create, and track capital assets.
The Budget Management hub lets you can create, review, and manage annual budgets, worksheets, and adjustments.
The General Ledger Accounting hub lets you create and control access to GL accounts, enter and post batches, and manage projects.
The General Ledger Administration hub lets you manage General Ledger settings and configurations.
The Procurement hub provides access to manage Accounts Payable tasks associated with vendors, invoices, and payments, along with Purchasing tasks for requisitions, purchase orders, and receiving goods.
Use the Receivables Management hub to to manage student accounts, process charges/refunds, statements/bills, deposits, and receipts.
Note
Configurations, settings, and definitions for accounts payable, accounts receivable, and purchasing are still managed in Desktop and will be available in a future J1 Web release.
Throughout the Finance product, you'll see common layouts and patterns.
List pages provide a comprehensive list of items in the system (e.g., invoices, batches, purchase orders, etc.). Different pages allow different actions, but each list page includes a filter to refine the list and lets you click links to access more details.
Tip
In J1 Web, you can search for items in the posted (C) status on list pages.

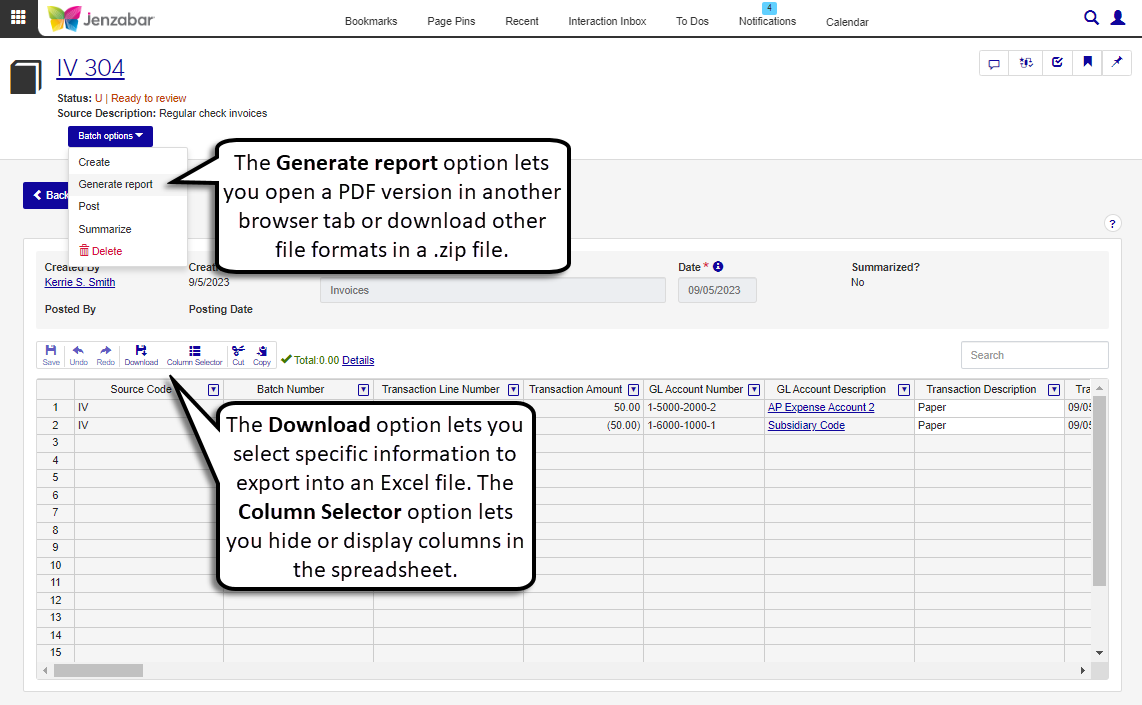
Create pages can be accessed from the Hub navigation, or from the list pages. After the create process is complete, you're navigated to either the list page or the details page. Create pages typically have a top header section with basic information (e.g., name, date, etc.) and a spreadsheet section where you can add detailed information for a row (e.g., GL account, transaction or line item description, etc.).
Detail pages typically include general information (e.g., name and contact info) as well as transactions or line items. Pages with spreadsheets let you enter or update transactions/line items when the page is in an editable status.
Tip
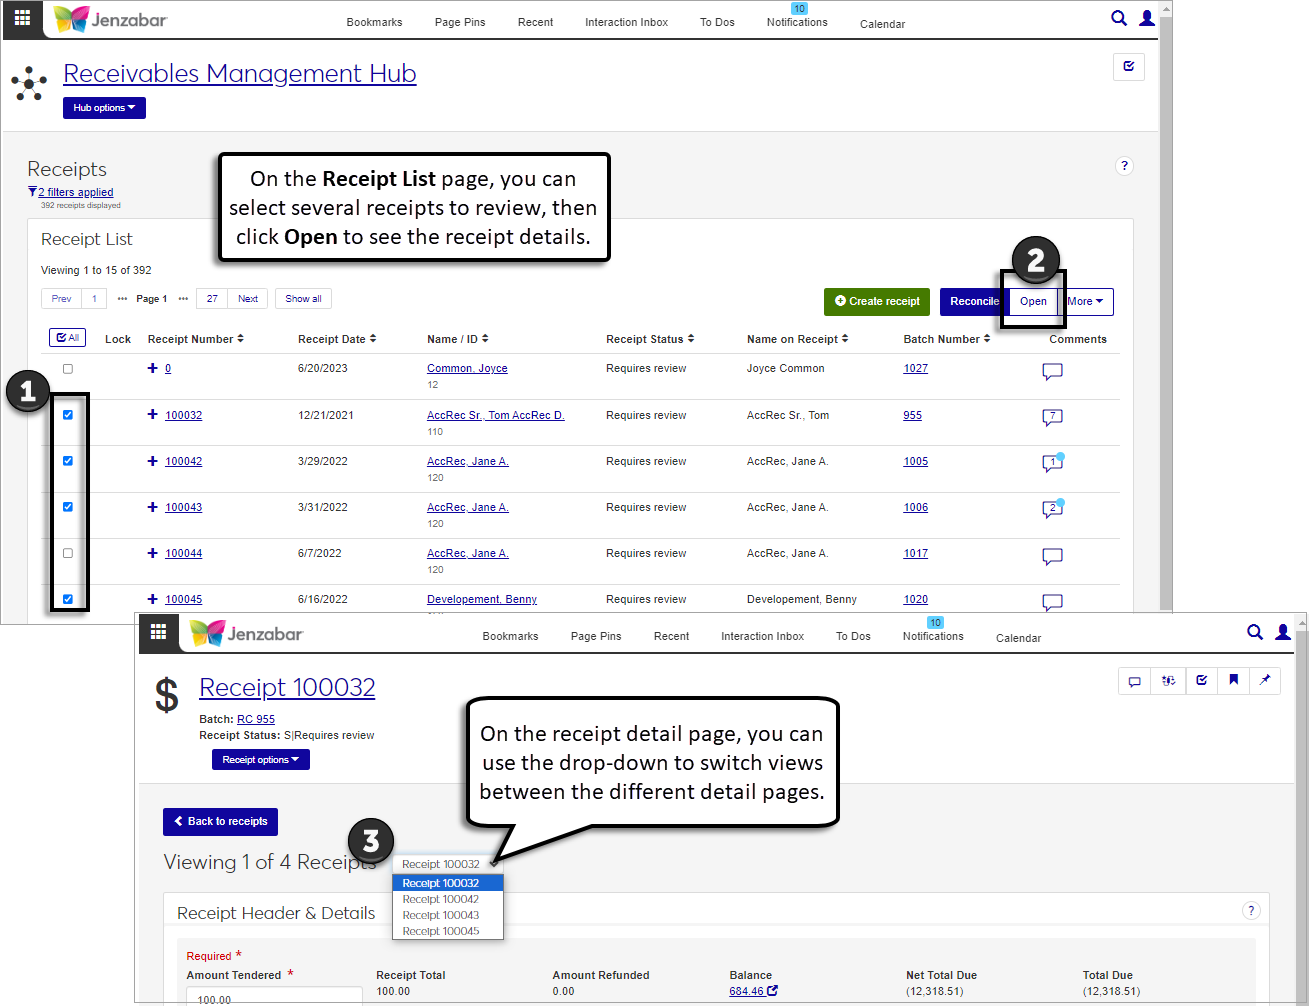
You can select multiple pages to open from the list page, and use the drop-down at the top of the page to switch between different detail pages.
Most pages include options to download to Excel and to generate a report in a variety of file formats. Certain pages also include a Column Selector option, which lets you show or hide columns in the spreadsheet for easy viewing.
Access to finance pages and information is managed via J1 Web's roles and permissions. The default roles for each module hub can be customized to grant the appropriate access to different areas of functionality.
Warning
Desktop permissions for finance users are not automatically transferred to J1 Web. To work in J1 Web Finance, users must be assigned to J1 Web roles with the appropriate permissions to access information and complete their tasks.
The Associations tab on certain finance roles lets you specify which pieces of information users in a particular role can access. The permissions that have been granted in the role are only applicable to the associations that are enabled for the role.
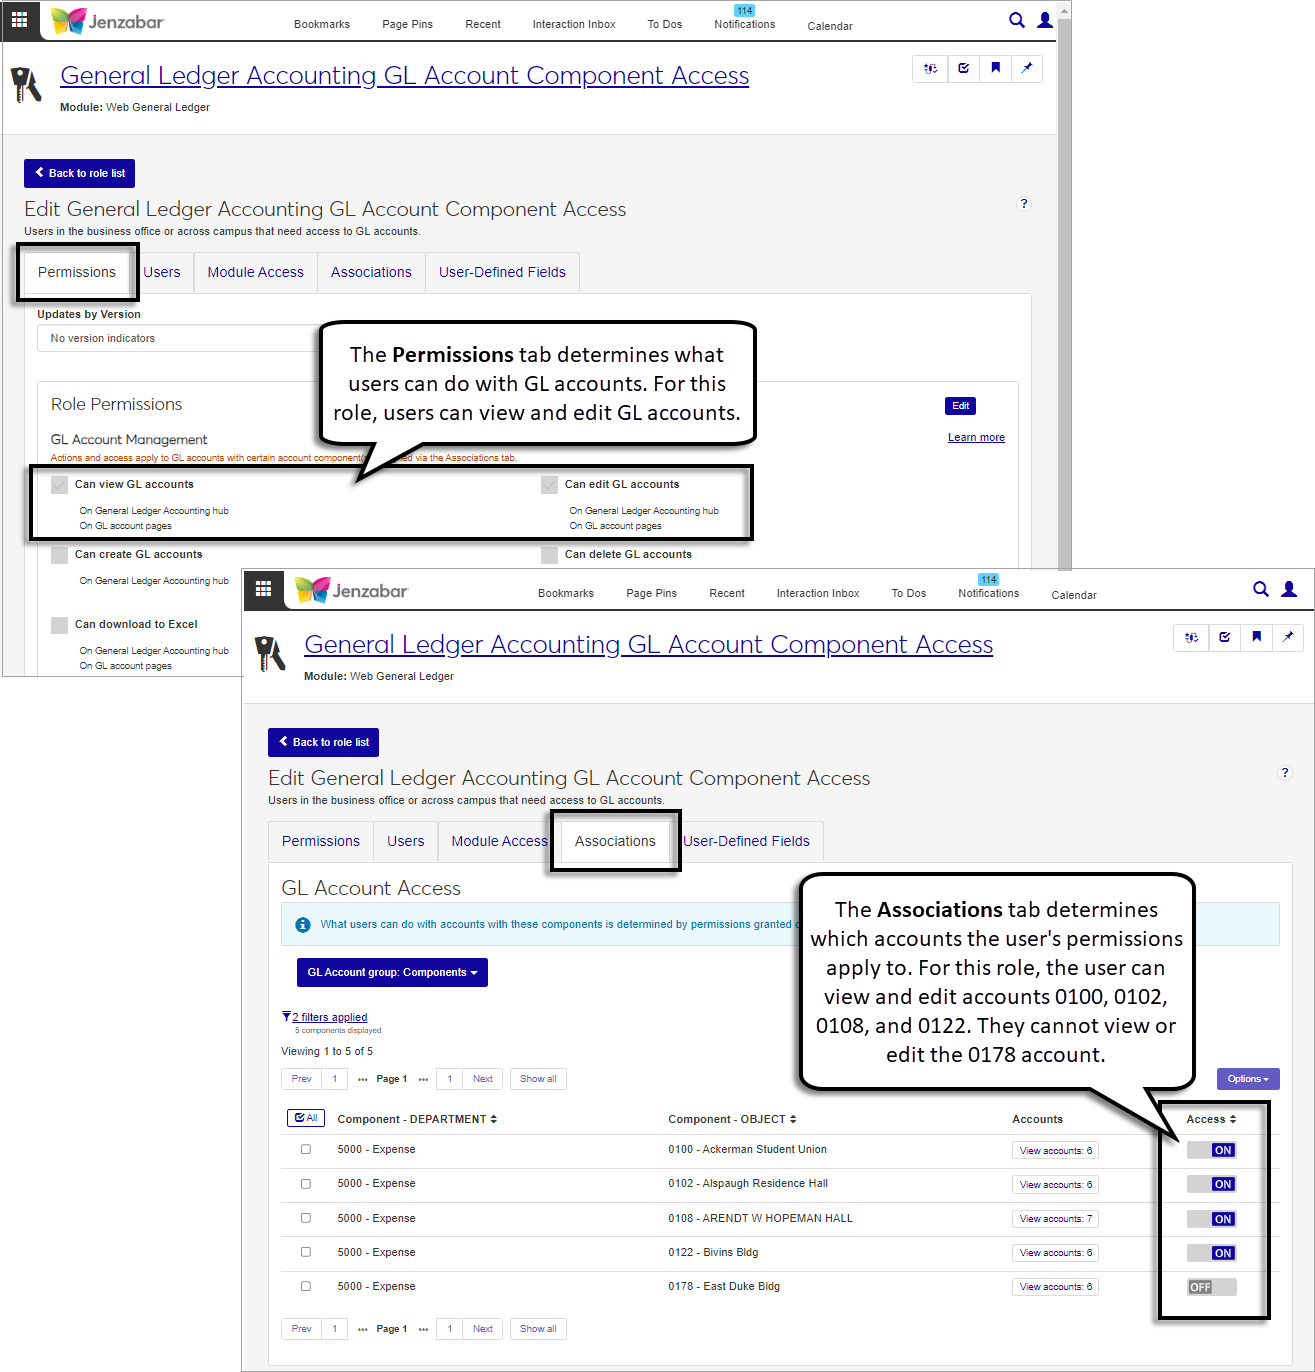
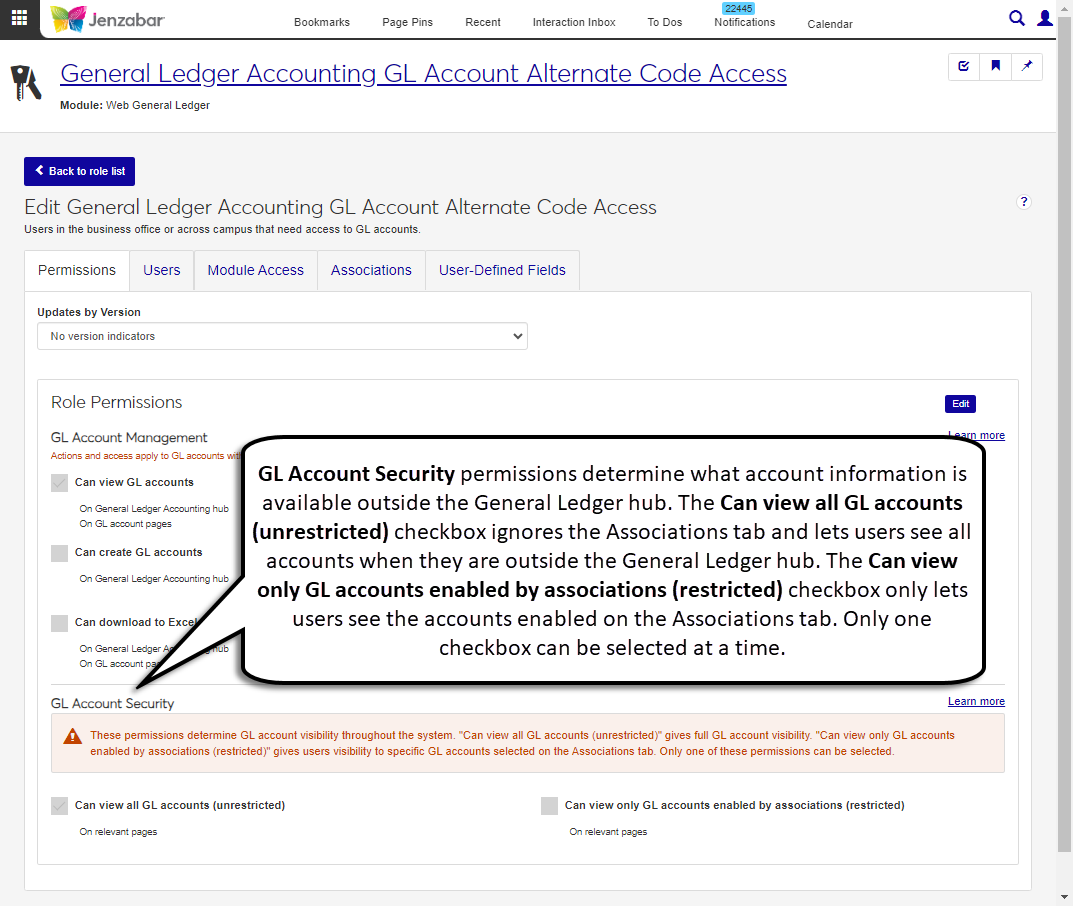
Permission to view GL accounts outside the General Ledger hub is managed in the GL Account Security section of the Permissions tab. The checkbox selection determines whether users in the role can see all GL accounts anywhere in the system (unrestricted), or if they are only able to view the GL accounts that are enabled on the Associations tab (restricted).
To learn more about access granted through finance roles and permissions, see the J1 Web Finance Permissions Overview and Setup Guide on MyJenzabar.net.
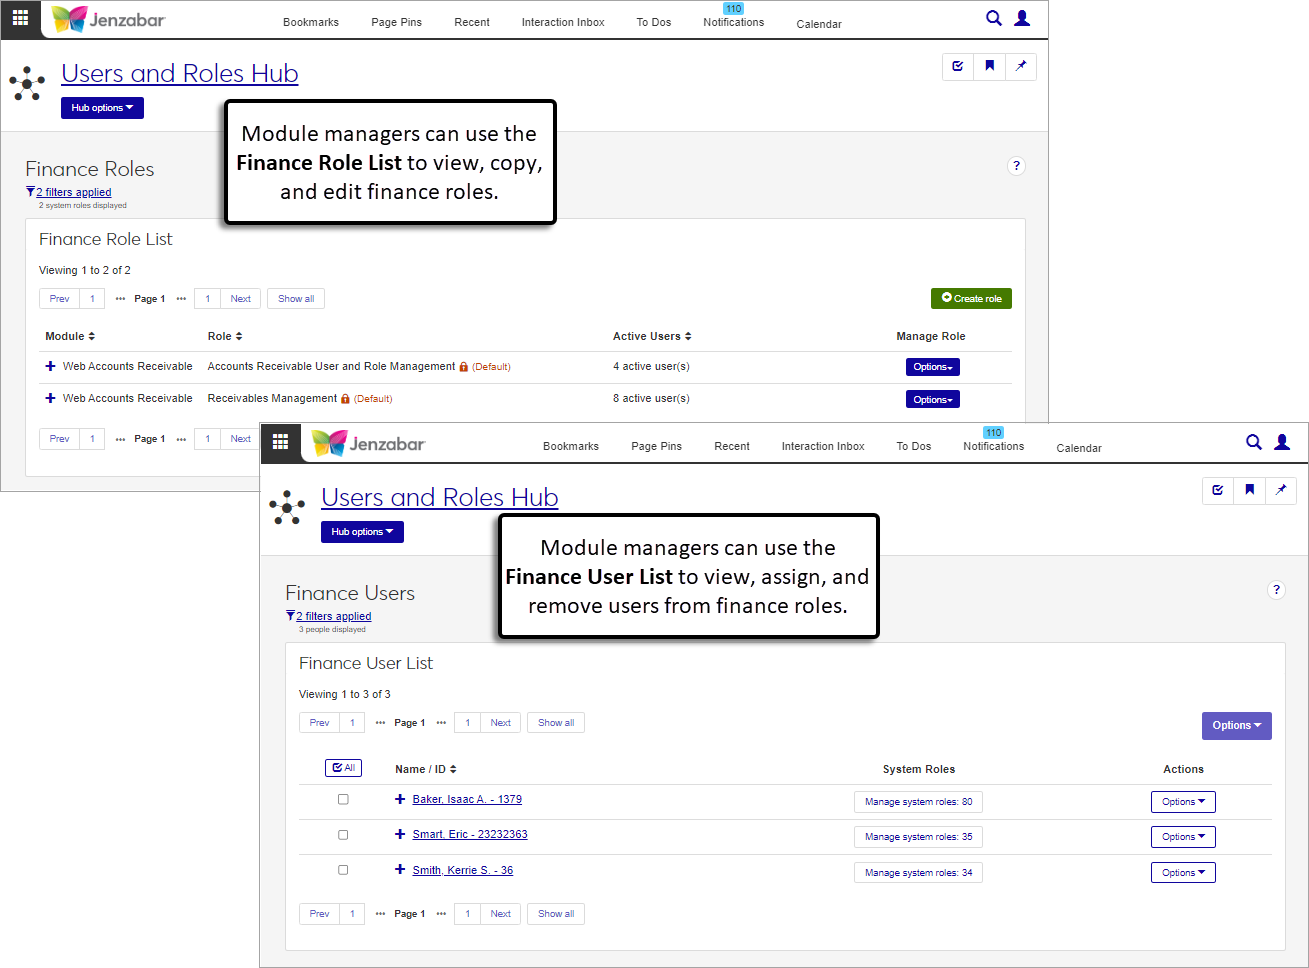
Each module hub has a "User and Role Management" role that lets finance module managers maintain roles and permissions for their users. For example, the Accounts Receivable User and Role Management role allows AR module managers to create and copy Receivables Management roles and assign users to them.
The Finance Role List manages default and copied roles, as well as the permissions associated with the roles. The Finance User List displays all the users assigned to at least one finance role.
Three default roles provide permissions to work with fixed assets.
The Asset Management Fixed Asset Access role grants permissions to view, create, and manage fixed assets.
The Asset Management Reporting role grants permissions to generate fixed asset reports.
The Fixed Asset User and Role Management role is for module managers who maintain user access in the Asset Management hub.
Four default roles provide permission to work with and access budgets, worksheets, and adjustments.
The Budget Management Budget Access role grants access to view and work with your school's budgets. Users in this role can create initial/proposed budget amounts and worksheets, monitor and maintain budgets, and determine which roles have access to budget details. Additionally, users in this role can create, copy, and manage budget profiles.
The Budget Management Worksheet & Adjustment Access role lets users submit requests, approve budget requests, and approve and submit budget transfers and modifications.
The Budget Management Reporting role lets users generate the Budget to Actual reports for profiles and worksheets.
The Budget User and Role Management role is for module managers who maintain user access in the Budget Management hub.
There are several default roles for the General Ledger Accounting hub.
These roles determine access to GL accounts and project codes throughout the system.
The General Ledger Accounting GL Account Component Access role lets users access accounts based on the components defined on the Desktop General Configuration window. Most finances users need to be in a copy of this role or the Alternate Code Access role to view the GL account list and associate transactions and line items with GL accounts.
The General Ledger Accounting GL Account Alternate Code Access role lets users access accounts based on pre-defined codes associated with the account. Most finances users need to be in a copy of this role or the Component Access role to view the GL account list and transactions and line items associated with GL accounts.
Note
In Desktop, alternate code access was used primarily with the GL budgeting feature to manage who is assigned to view budget and actuals for GL accounts. In Jenzabar One Web, alternate code access simply provides another way for your school to determine who can access a GL account.
The Project Access role lets you create project codes that can be tied to various finance transactions in budgets, requisitions, POs, and other finance entities. You can implement project security to restrict who has access to certain information based on the project code associated with it.
Note
Project codes created in J1 Web are available in Desktop, but user access does not get mapped from one platform to the other. In other words, users who are granted access to the project code in J1 Web must be added to the appropriate security group in Desktop to access the project code in Desktop (and vice versa).
These roles determine what users can do with groups of transactions. Each batch is associated with a source code, and roles can be associated with one or more source codes.
Note
Batch access roles that only include one source code do not have an Associations tab.
Role Name | Associated Source Codes |
|---|---|
General Ledger Accounting Accounts Payable Batches | IM - Immediate check invoices IV - Regular check invoices MN - Manual check invoices RF - Refunds from vendors VD - Void check invoices |
General Ledger Accounting Adjustment Batches | JL - Journal entries MA - Monthly adjustments |
General Ledger Accounting Charge Batches | CG - Student charges (automatically created) FC - Finance charges IT - Interest earned TP - Tuition paid in advance |
General Ledger Accounting Conversion Batches | CV - Conversion necessary |
General Ledger Accounting Customized Batches | Any custom source codes your school creates (e.g., source codes for transactions brought into the system from an outside source such as Transact, Herring Bank, or other third parties). |
General Ledger Accounting Development Batches | GF - Development gifts |
General Ledger Accounting Disbursement Batches | DB - Disbursements |
General Ledger Accounting Financial Aid Batches | FA - Financial Aid LD - In-House Disbursement LO - Financial Aid Loan |
General Ledger Accounting Fixed Asset Batches | FX - Fixed assets |
General Ledger Accounting GST Credits Batches | TX - GST tax credits |
General Ledger Accounting Miscellaneous Batches | MS - Miscellaneous transactions |
General Ledger Accounting Payroll Batches | FR - Fringe benefits - Payroll LB - Labor distribution - Payroll |
General Ledger Accounting Preliminary Batches | @C - Preliminary student charges @F - Preliminary financial aid |
General Ledger Accounting Receipt Batches | RC - A/R Receipts |
These roles grant users permissions to work with GL settings, transactions, monthly adjustments, reports, and users.
The General Ledger Administration role grants permission to manage the General Ledger Accounting Settings page, which mirrors the Desktop General Configuration window, G/L tab.
The General Ledger Accounting GL Transaction Access role grants access to view, edit, and download transactions. Additionally, it grants permission to view GL account balances.
The General Ledger Accounting Monthly Adjustment Access role grants permissions to view, edit, create, delete, download, and process monthly adjustments.
Note
Monthly adjustments are treated like batches in Jenzabar One Web, and users with permission to view and process monthly adjustments also need to be in a General Ledger Accounting Adjustment Batches role to see MA batch transaction details.
The General Ledger Accounting Reporting role lets users generate GL reports, including:
Fund Balance Audit
Month Close
Month Close Selection
Trial Balance
Year Close Exceptions
Year to Date History
The General Ledger User and Role Management role is for module managers who maintain user access in the General Ledger Accounting hub.
The Procurement hub includes accounts payable (AP) and purchasing (PO) functionality, and there are four default roles that grant access to those functions.
The Procurement - Accounts Payable role grants permissions to work with vendors, invoices, and payments.
The Procurement - Purchasing role grants permissions to work with requisitions, purchase orders, and received goods.
The Accounts Payable User and Role Management role is for module managers who maintain user access to the AP functions in the Procurement hub.
The Purchasing User and Role Management role is for module managers who maintain user access to the purchasing functions in the Procurement hub.
Two default roles manage functionality and user management in the Receivables Management hub.
The Receivables Management role grants permissions to work with student accounts, receipts, miscellaneous charges, statements, deposits, and reports.
Note
Most of the functionality to manage student accounts is in the Receivables Management hub. Certain account details are managed from the Student Information Details page, and access to student information details is granted from the Registrars role (or copies of it).
The Accounts Receivable User and Role Management role is for module managers who maintain user access in the Receivables Management hub.
Each finance module hub contains a section for reports. Report pages let you select the criteria for the report and generate it in various file formats.
J1 Web report pages do not provide a direct link to InfoMaker to create customized versions of the report. Customized versions of the report must be made in the InfoMaker application and saved to the appropriate report PBL. For additional information about working with reports in J1 Web, see Working with Reports in J1 Web.
If you've customized reports in Desktop, you can save those versions to the appropriate J1 Web location to make them available for selection from the Report Layout field. The File Format field lets you select one or more ways to generate and download the report.
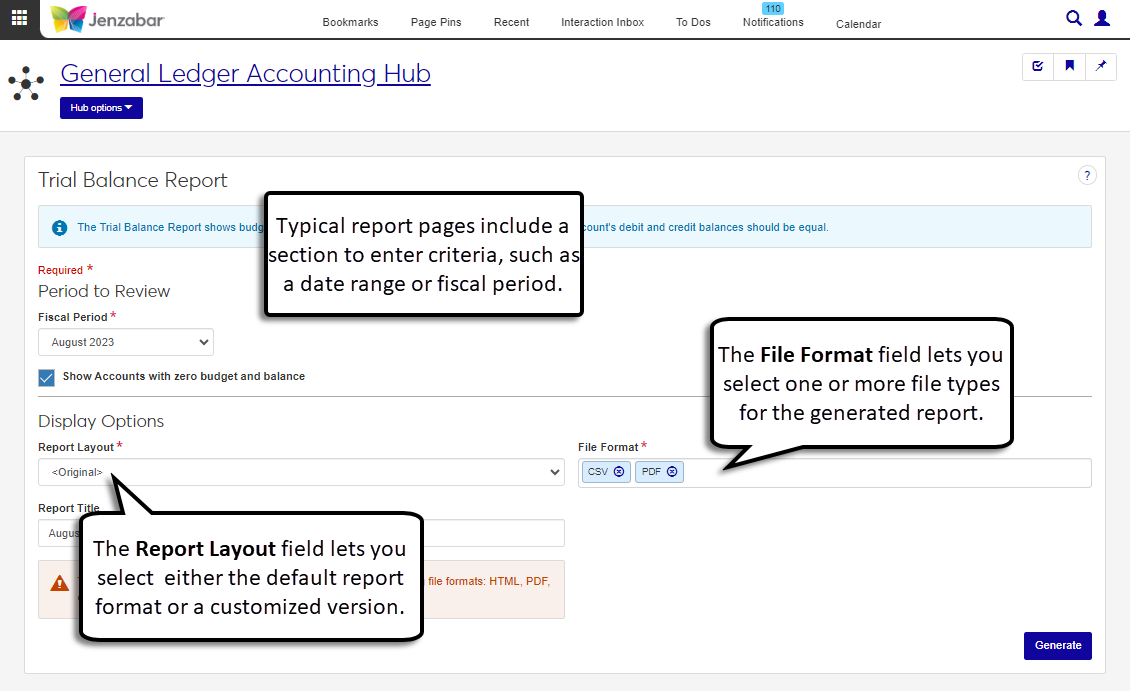
Note
Many of the reports work the same was as they did in Desktop. Some report queries and formats were changed to work in J1 Web, and any customizations of those reports made in Desktop are not available in J1 Web. Those reports must be recustomized from the new J1 Web version.
To see which reports need recustomization in J1 Web, see: ???.
Finance functionality available in the Campus Portal Staff feature is moving to the J1 Web Finance product!
Warning
The Campus Portal features that are being moved to J1 Web will honor the J1 Web roles and permissions. When these features are enabled in J1 Web, they can no longer be accessed from your Campus Portal.
Finance features in the Campus Portal currently receive and send information to the Desktop. Because tasks accomplished in J1 Web are also recorded in Desktop, you can still use the Campus Portal features when J1 Web Finance is enabled and the Campus Portal features have not been enabled in J1 Web.
Enabling the Campus Portal functionality in J1 Web requires a large number of users to be added to roles and granted permissions. Jenzabar recommends waiting until all the Campus Portal features are available in J1 Web before setting up users in J1 Web roles and migrating feature functionality.
The 2023.2 release introduces the GL Account Activity page, which mirrors Campus Portal's GL Account Lookup feature. This new page is available from the General Ledger Accounting hub, and lets users view and download transaction details for the GL accounts they have access to.
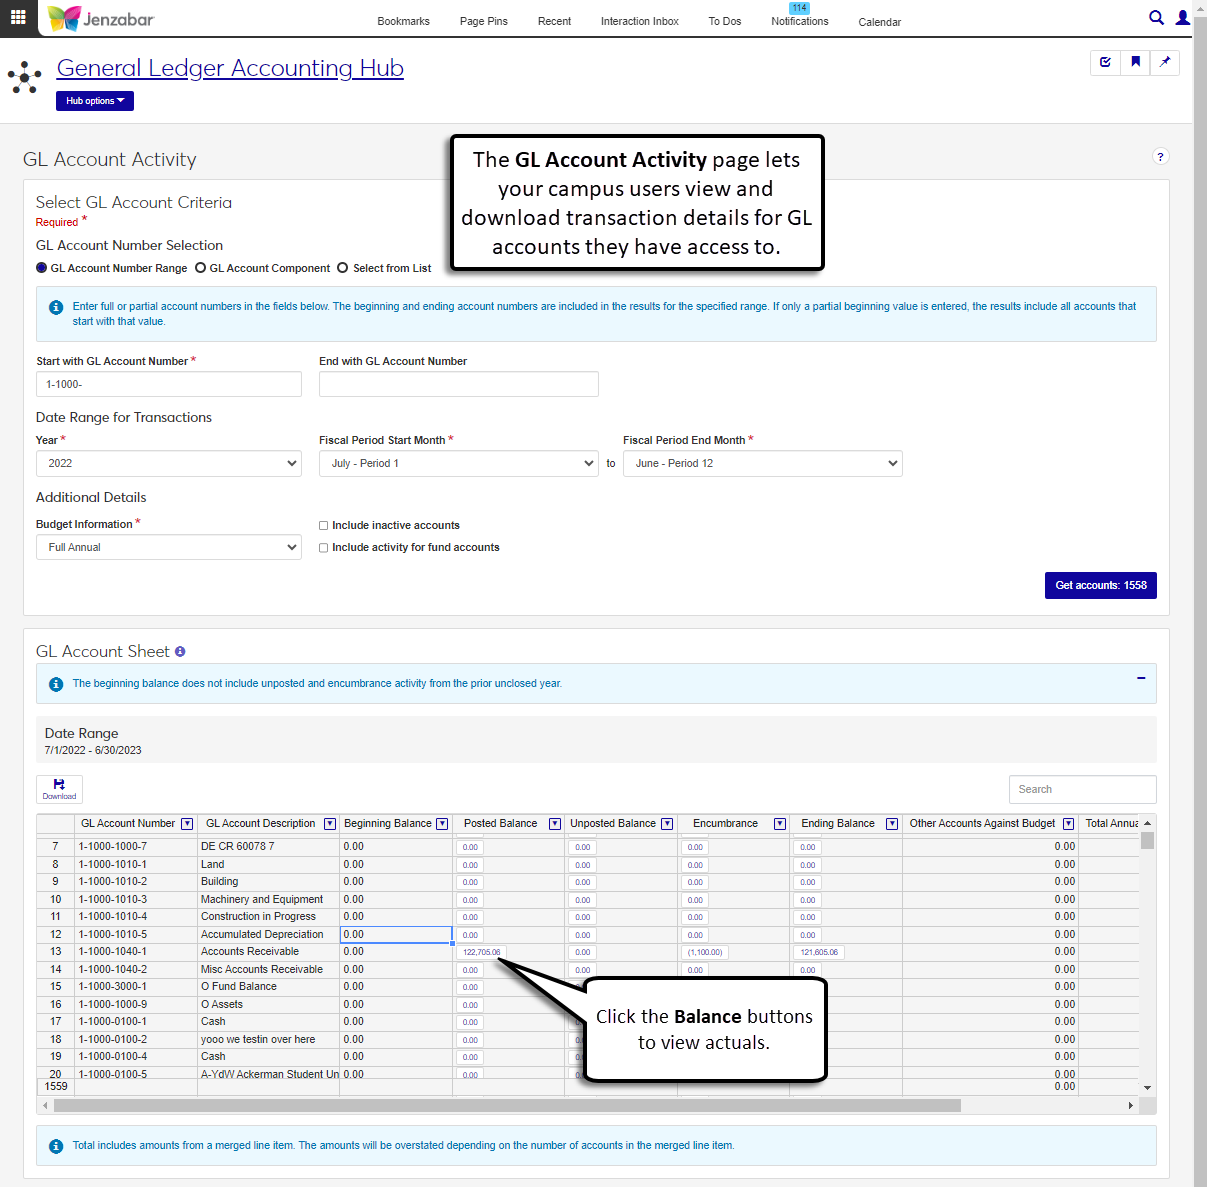
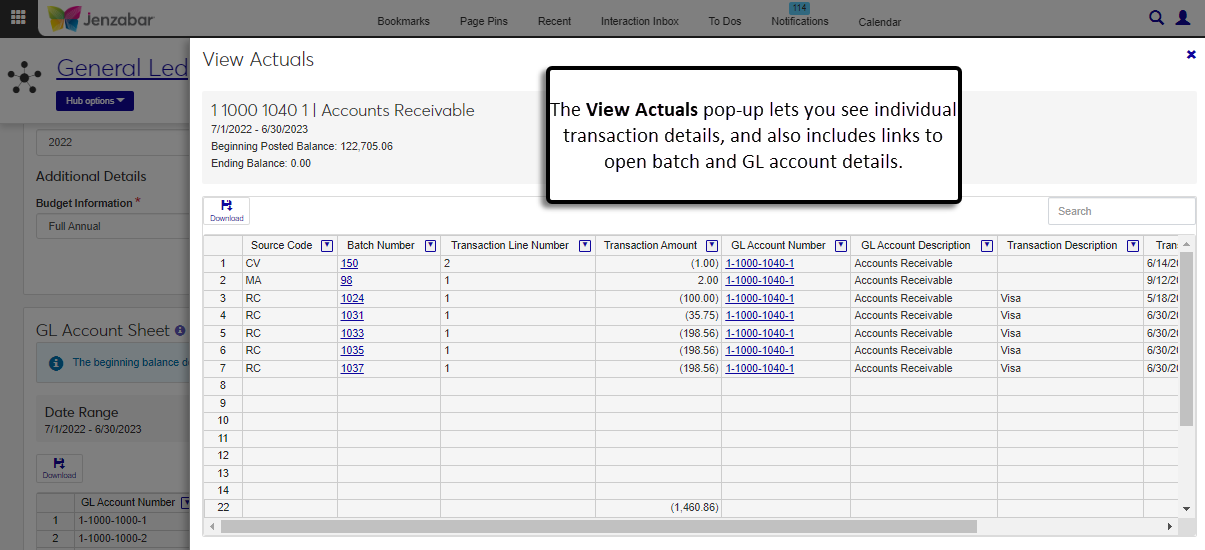
From the GL Account activity spreadsheet, users can access the View Actuals pop-up to see line by line transaction details associated with the GL account.
Access to the GL Account Activity page is granted in the GL Account Activity section of the two GL account access roles:
General Ledger Accounting GL Account Alternate Code Access
General Ledger Accounting GL Account Component Access
Tip
To see examples of how to set up users to work on the GL Account Activity page, see the J1 Web Finance Permissions Overview and Setup Guide.
The Budget Activity page in J1 Web provides the functionality currently available in the Campus Portal Budget feature. Access to this page is managed via the Budget Management Worksheet & Adjustment Access role. This feature will be available in J1 Web's Budget Management hub in a future release coming soon!
The Orders and Requests and Review Requisitions pages in J1 Web provide the functionality currently available in the Campus Portal Requisitions and Orders and Requisition Approval features. Access to these pages is managed via the Procurement - Purchasing role, and they will be available in J1 Web's Procurement hub in a future release coming soon!
The Asset Management hub allows you to inventory and track your capital assets as well as maintain and process depreciation of your capital assets. Access to the this hub is granted via the Asset Management roles and permissions.
Note
In J1 Web, asset security is managed via security roles and permissions.
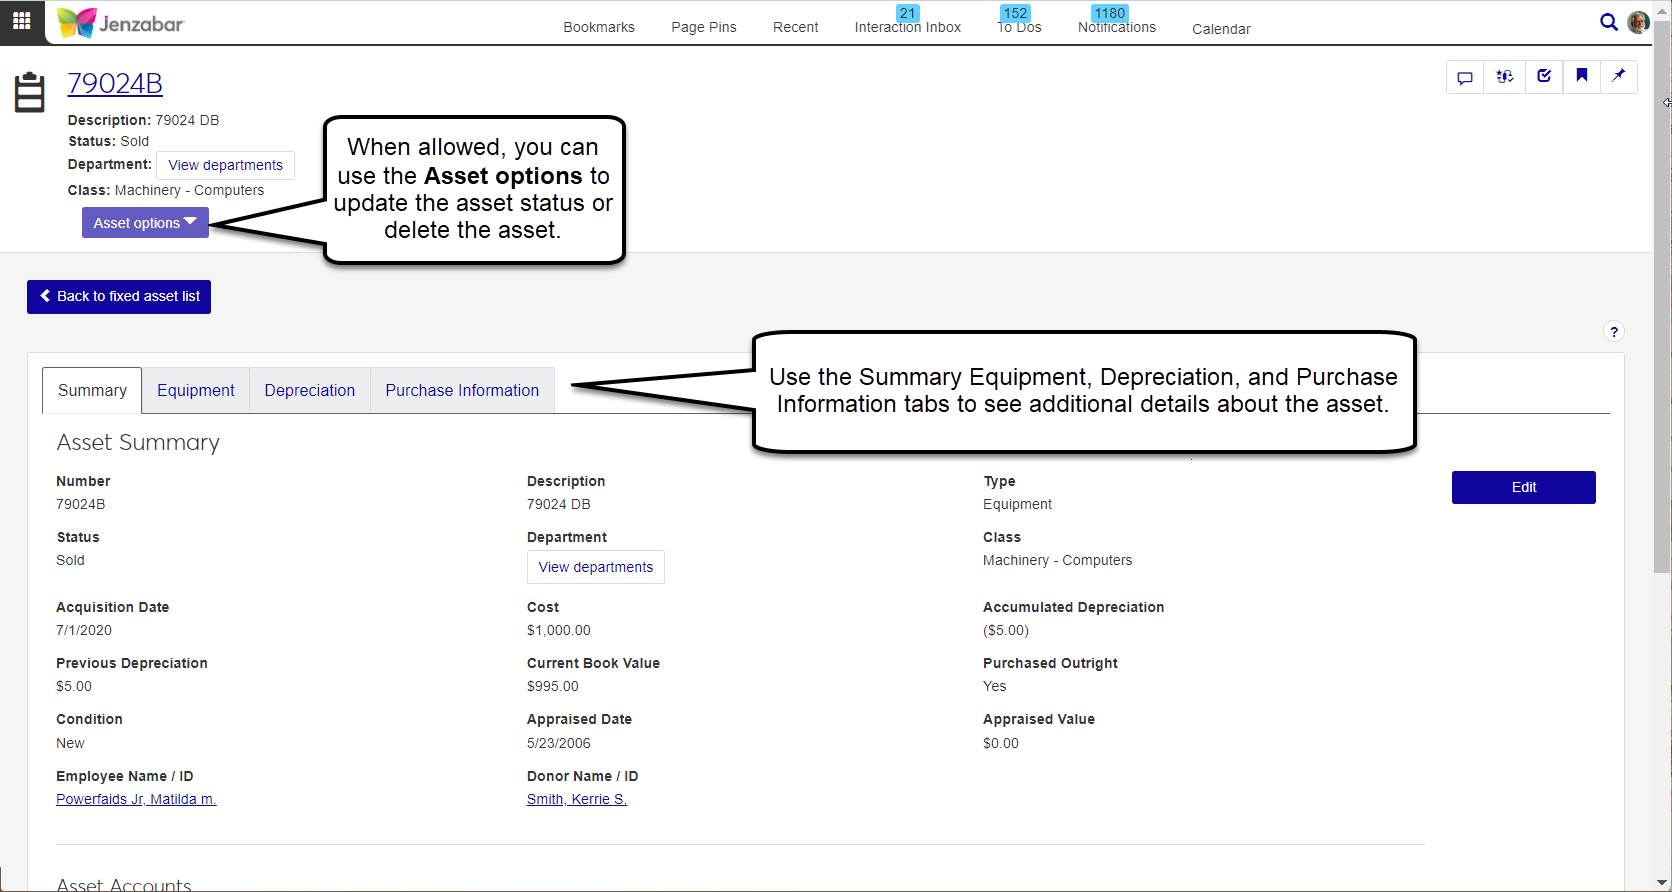
The Fixed Assets page allows you to inventory and track your capital assets as well as maintain and process depreciation of your capital assets.
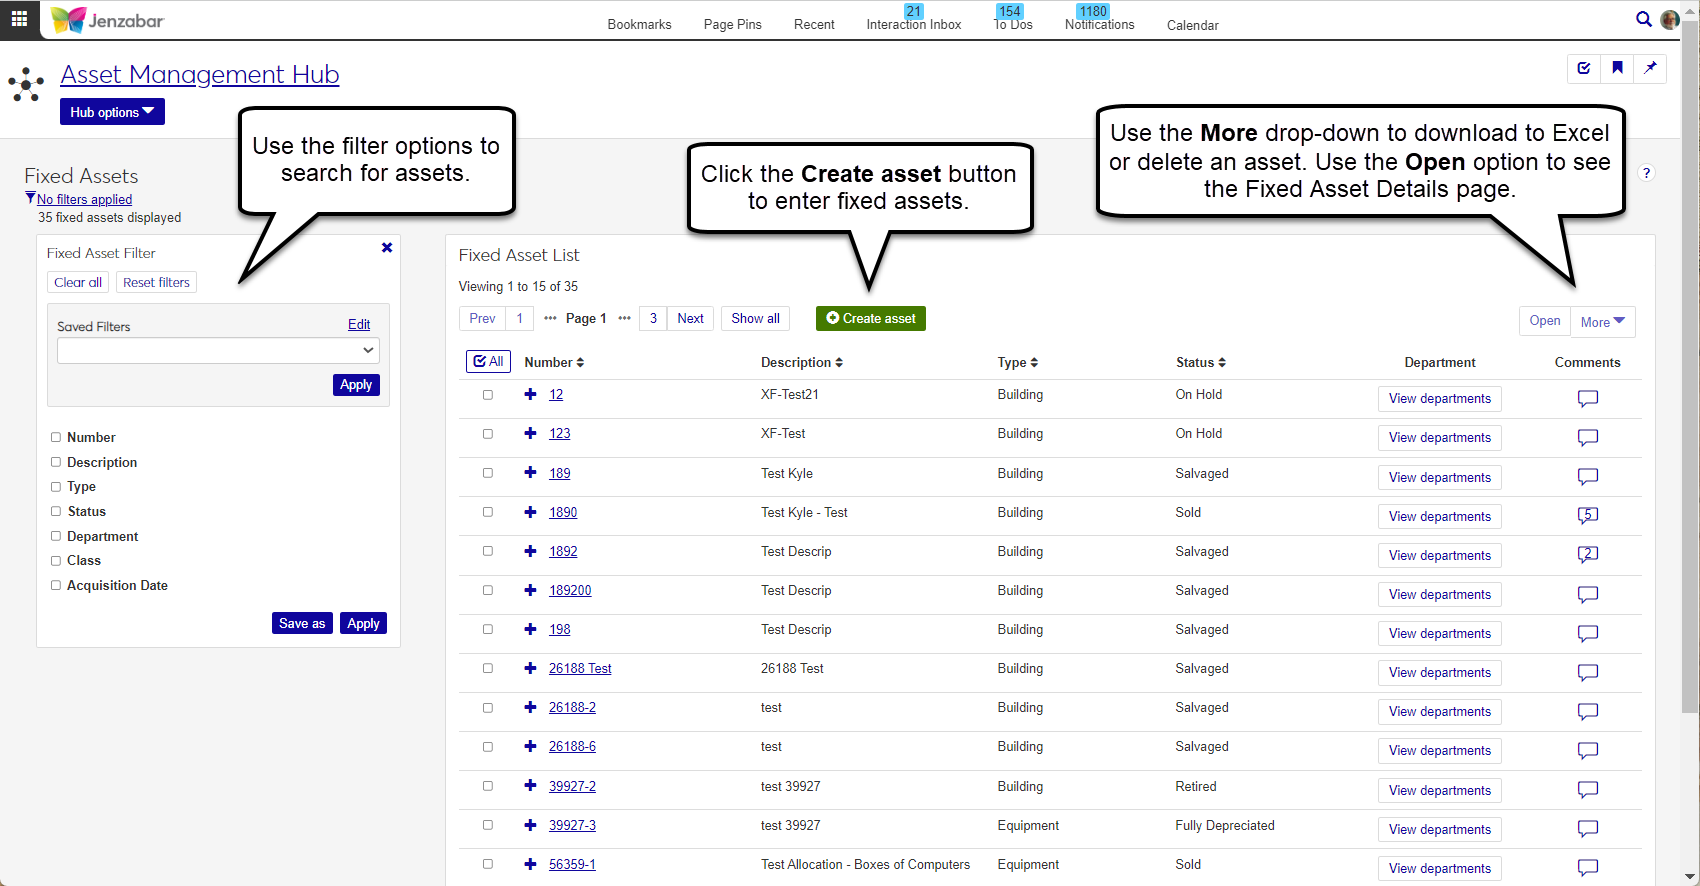
The Fixed Asset Details page lets you see all the asset details. At a glance, you can see the main details on the Summary tab. You can also jump to the Equipment, Depreciation, and Purchase Information tabs to view or edit the asset information.
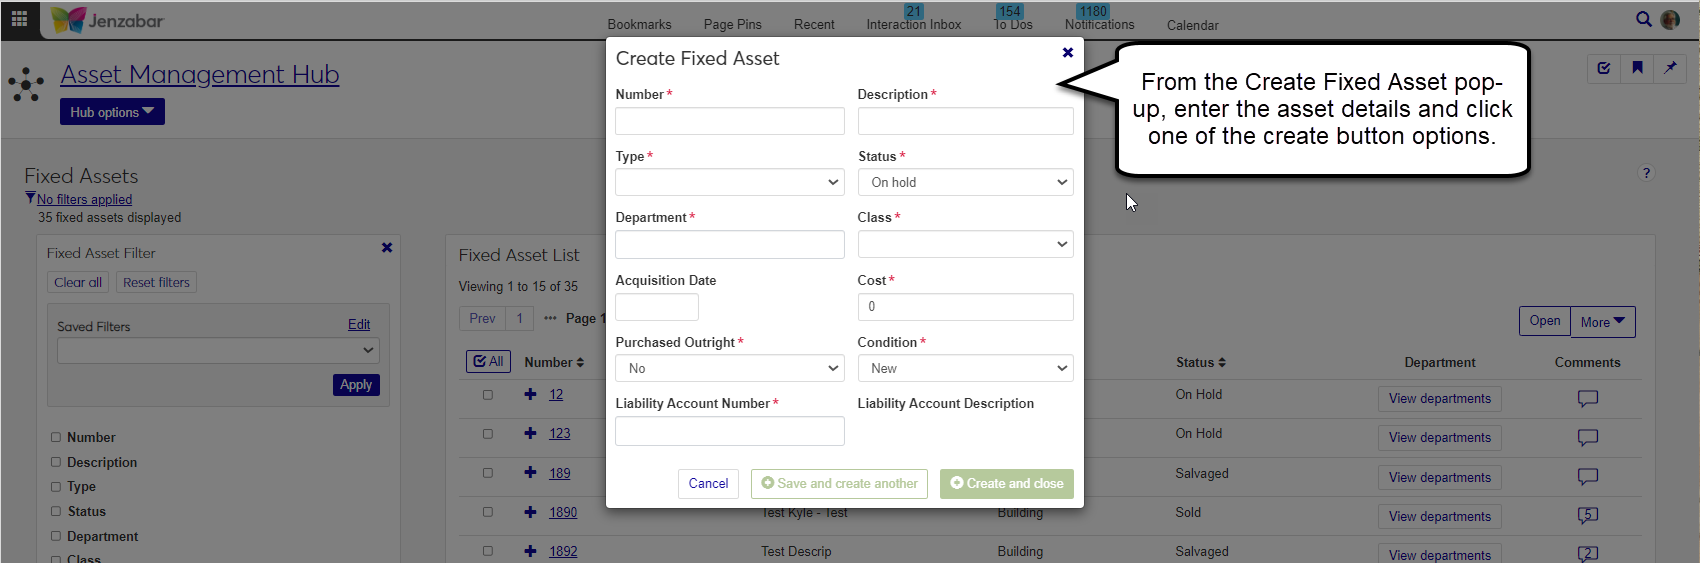
You can open the Create Asset page from the Fixed Assets List to add assets to the system.
Generate various reports from the Reports section of the Asset Management hub navigation. The following reports can be generated:
Accumulated Depreciation Summary
Construction in Progress (CIP) Summary
Depreciation Expense Summary
Disposition of Assets
Fixed Asset Analysis* (Previously named Fixed Asset Information report in Desktop)
Fixed Asset Summary
* These reports must be recustomized and saved to the J1 Web PBL; customizations made in Desktop will not work for these reports. For more information about customizing reports for J1 Web, see Working with Reports in J1 Web.
Budget Management Hub
The Budget Management hub lets you create, review, distribute, update, and approve budgets within a secure and integrated environment. Access to this hub is granted via the Budget Management roles and permissions.
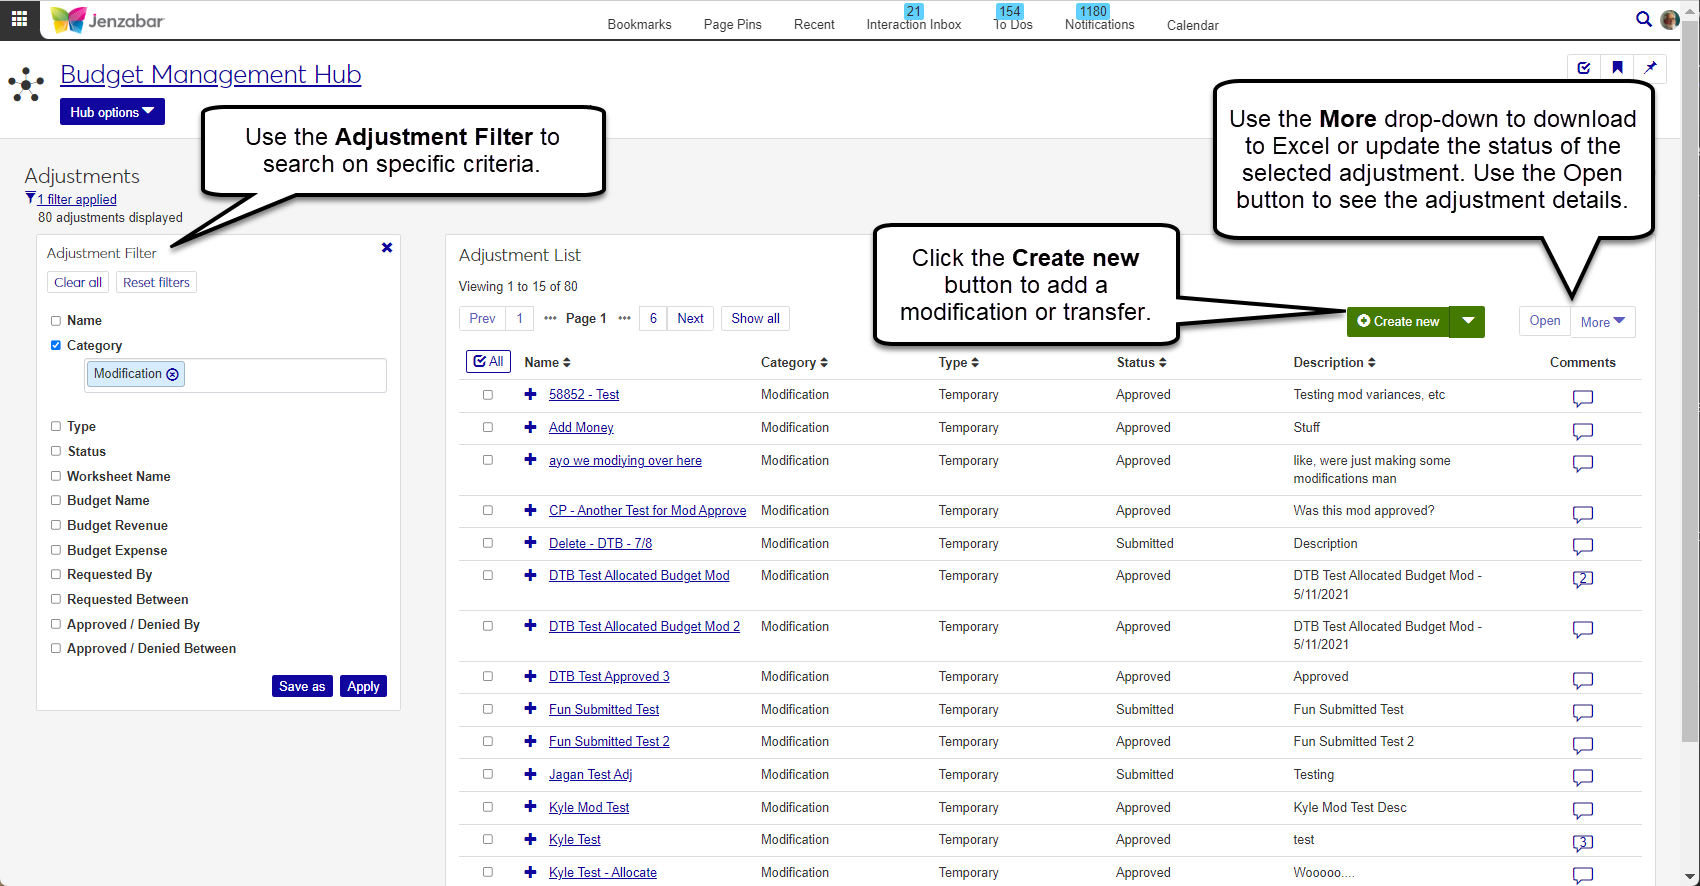
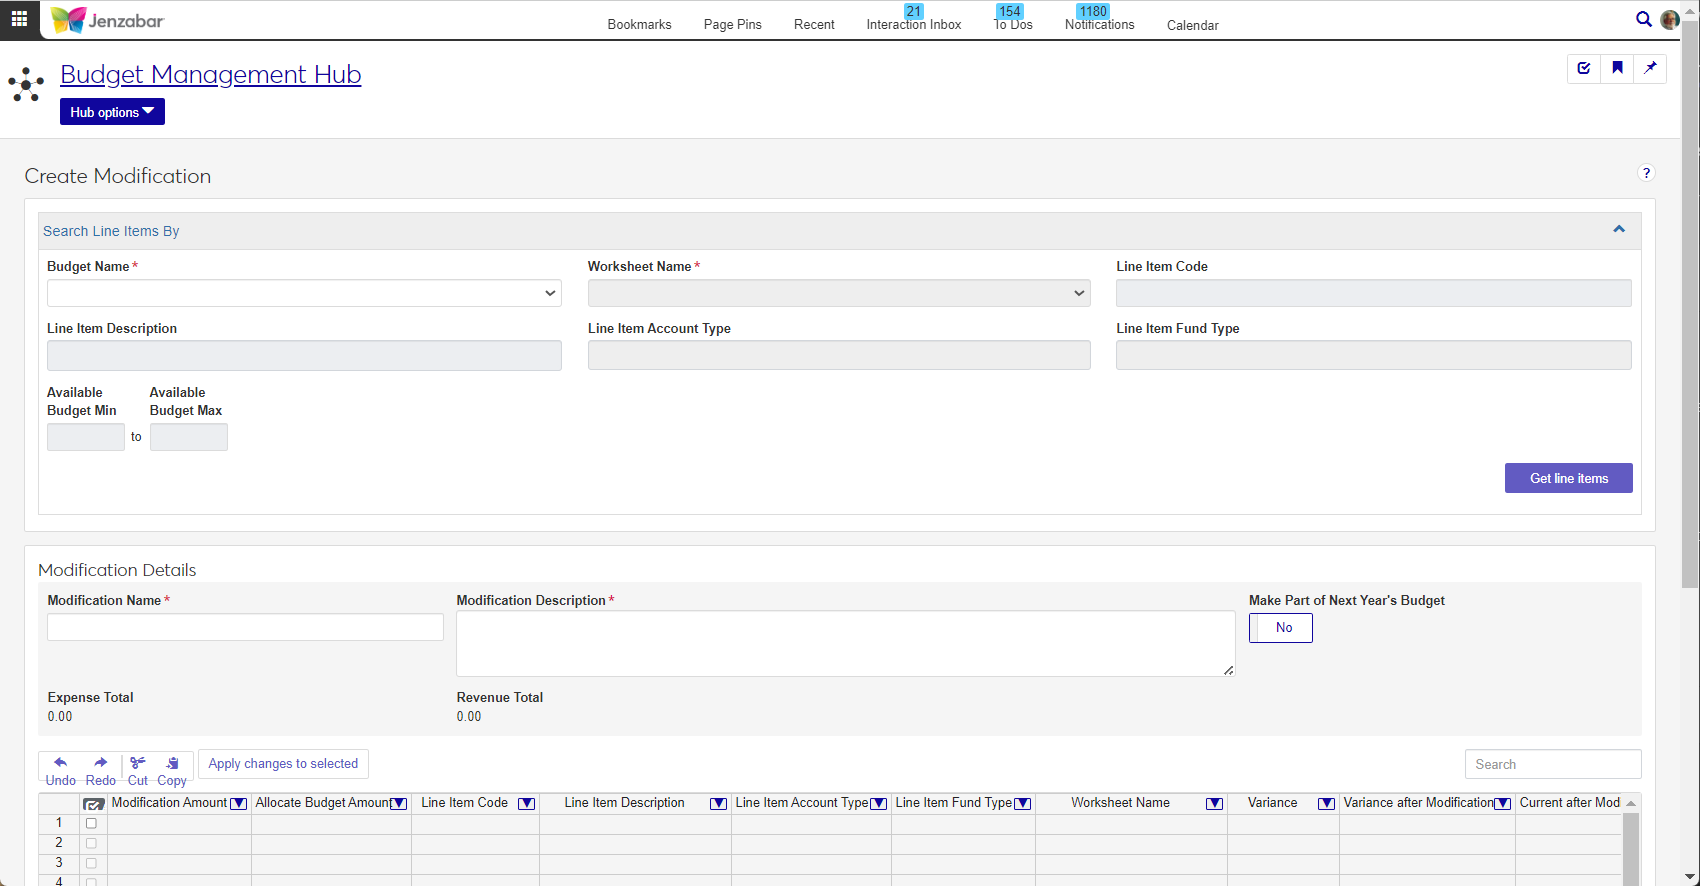
The Adjustments page lists the modifications and transfers in the system. Depending on your role and permissions, you can access adjustment pages, create new modifications or transfers, submit adjustments for approval, and approve or deny submitted adjustments.
The Adjustment Details page shows the transactions related to a specific modification or transfer.
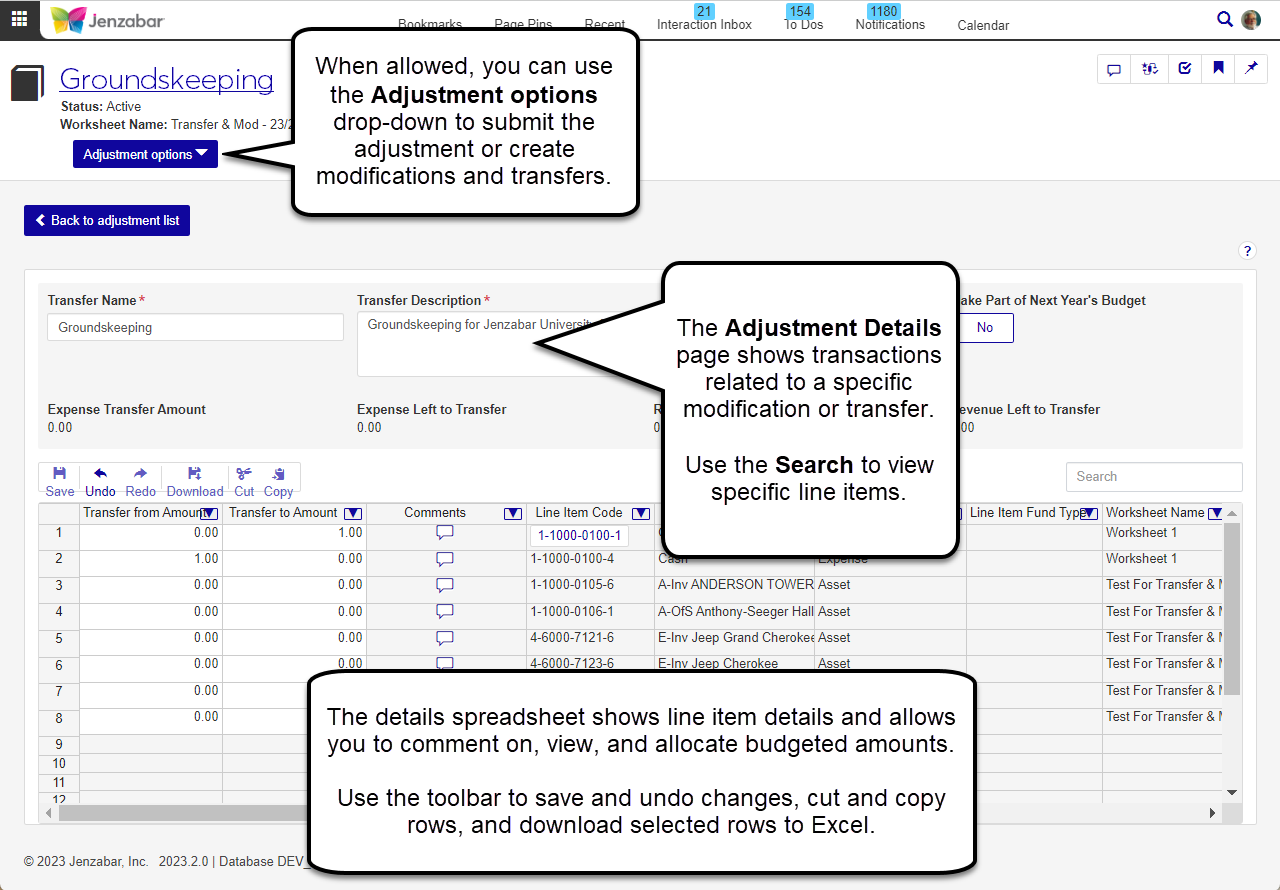
You can create a new Modification or Transfer from the Adjustment List or the Budget Management hub options. In the Search Line Items By section, you can enter line item and budget parameters to view specific line items.
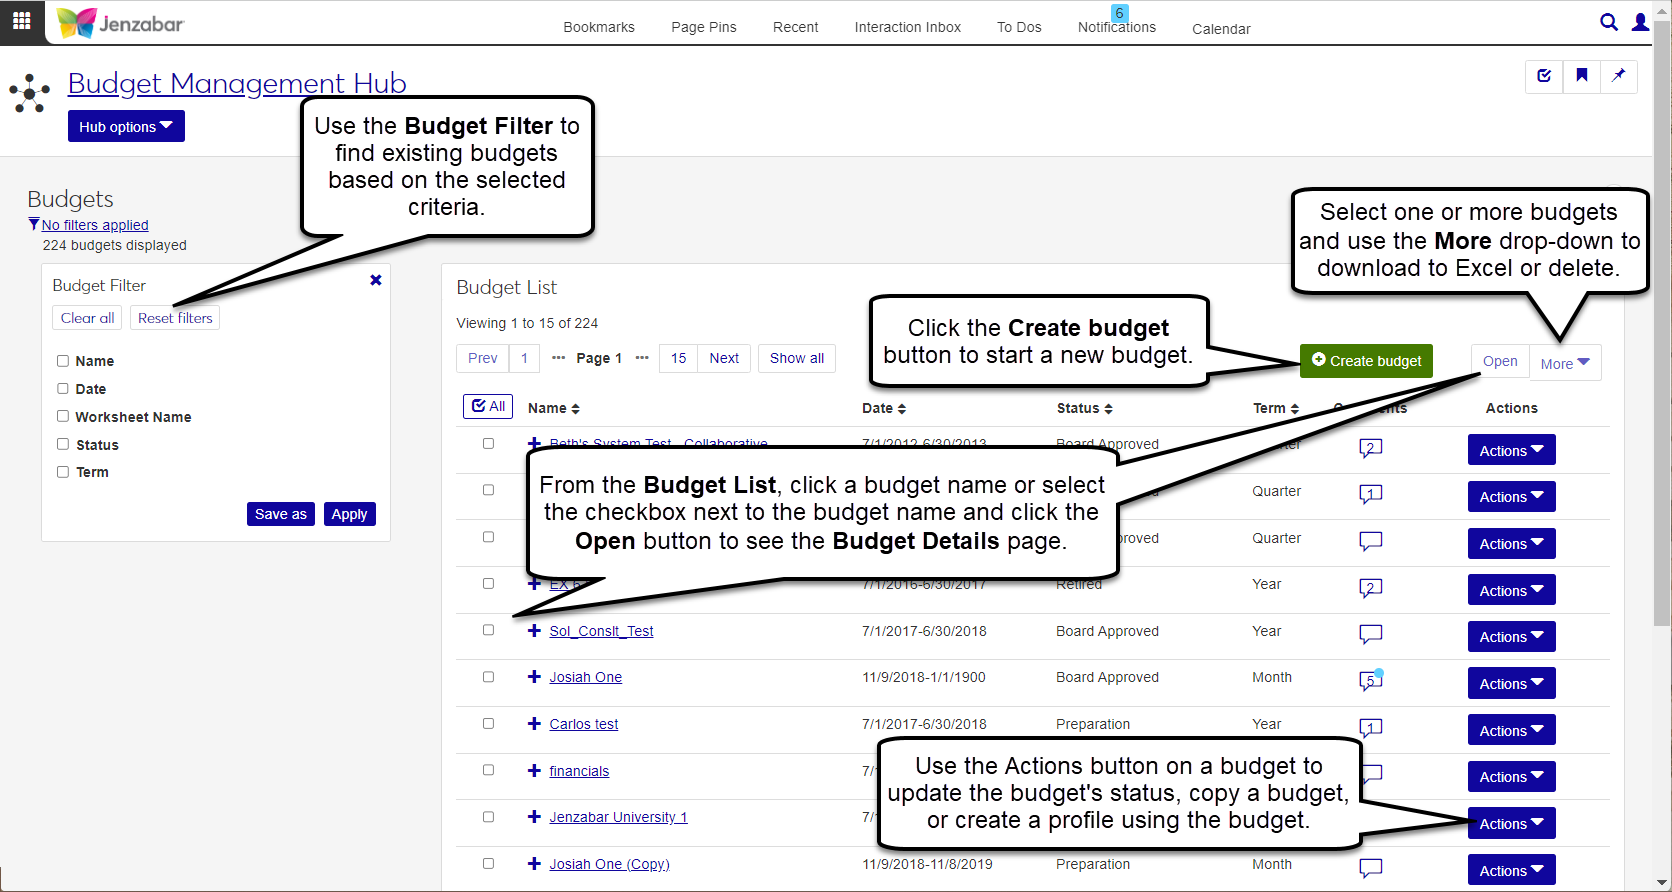
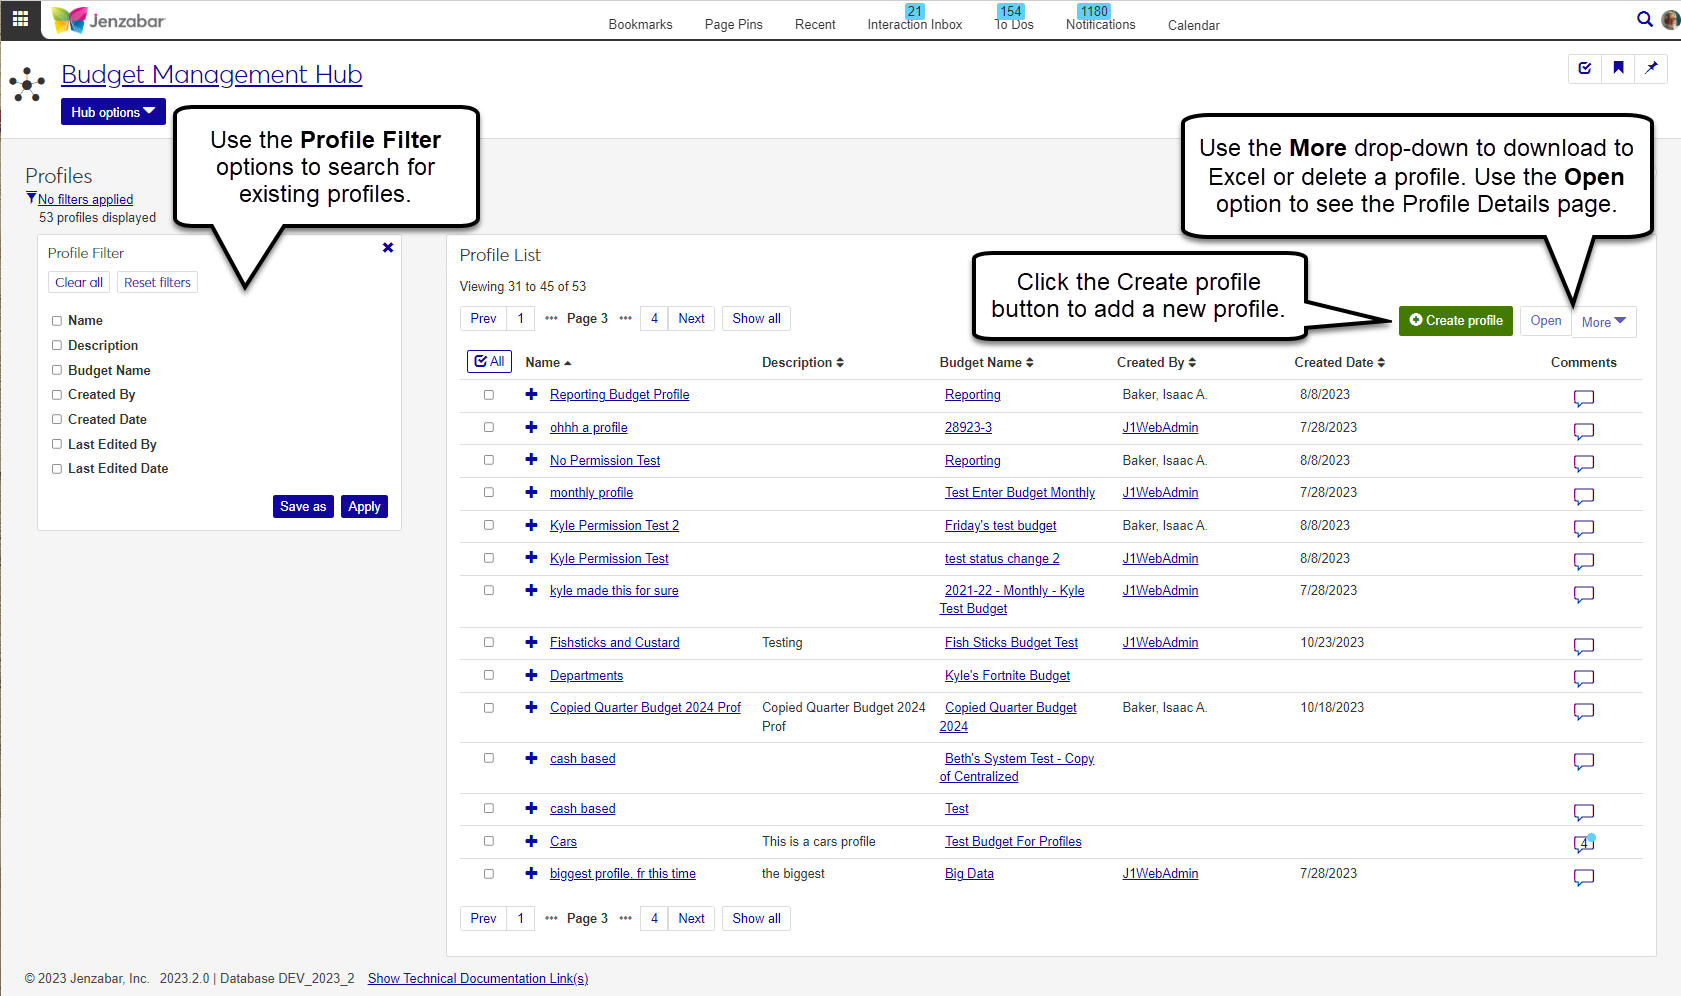
The Budgets page provides a list of the budgets at your school. You can search for and create budgets, view and add comments to individual budgets, and access budget details from this page. When a budget is selected from the list, the More button is enabled with copy, change budget status, and delete.
Important
J1 Web does not assign budget officers. Users must be added to roles and granted access via the associations tab to work with budgets.
The permissions associated with the assigned role determine what the user can do. To learn more about access granted through finance roles and permissions, see the Finance Permissions Guide.
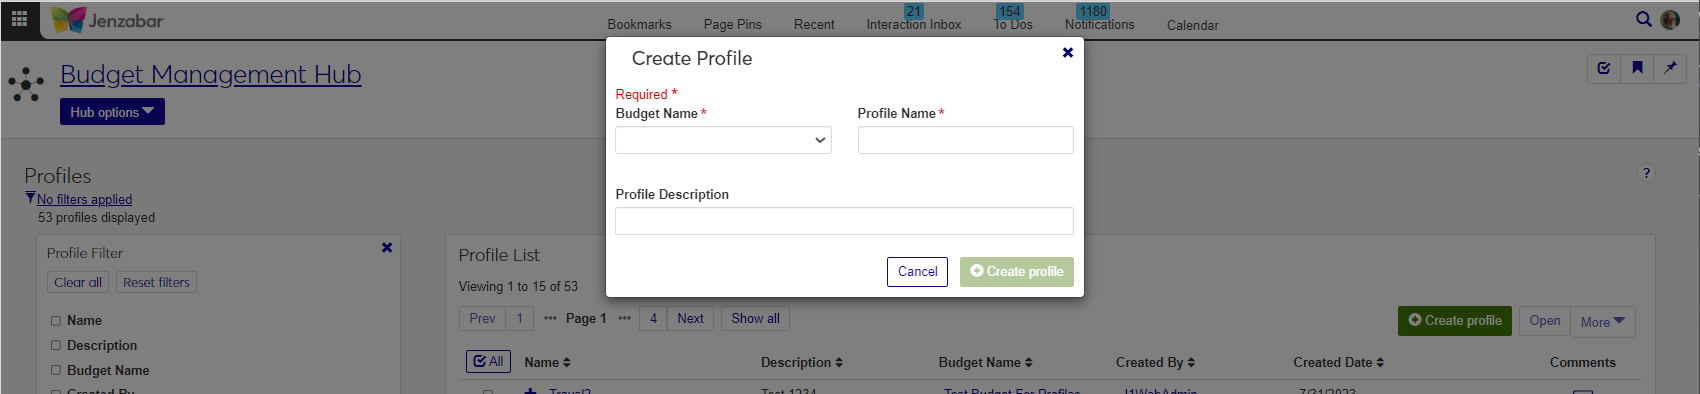
You can create a budget from the Budget List or the Budget Management hub options. From the Create Budget page, you can determine the budget details and assign budget security access.
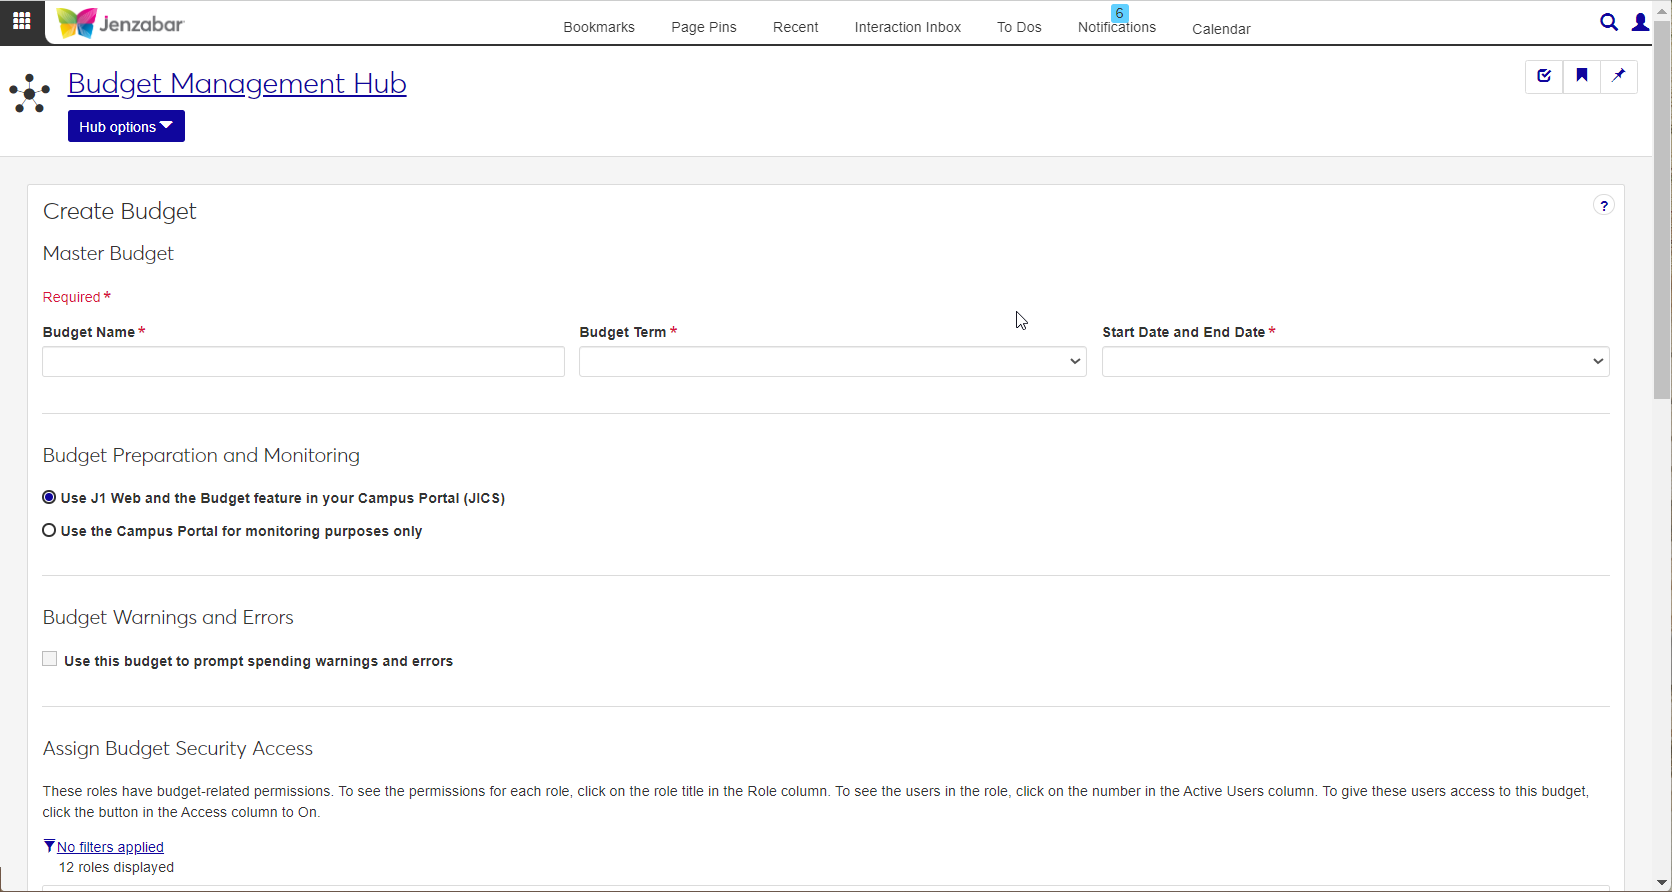
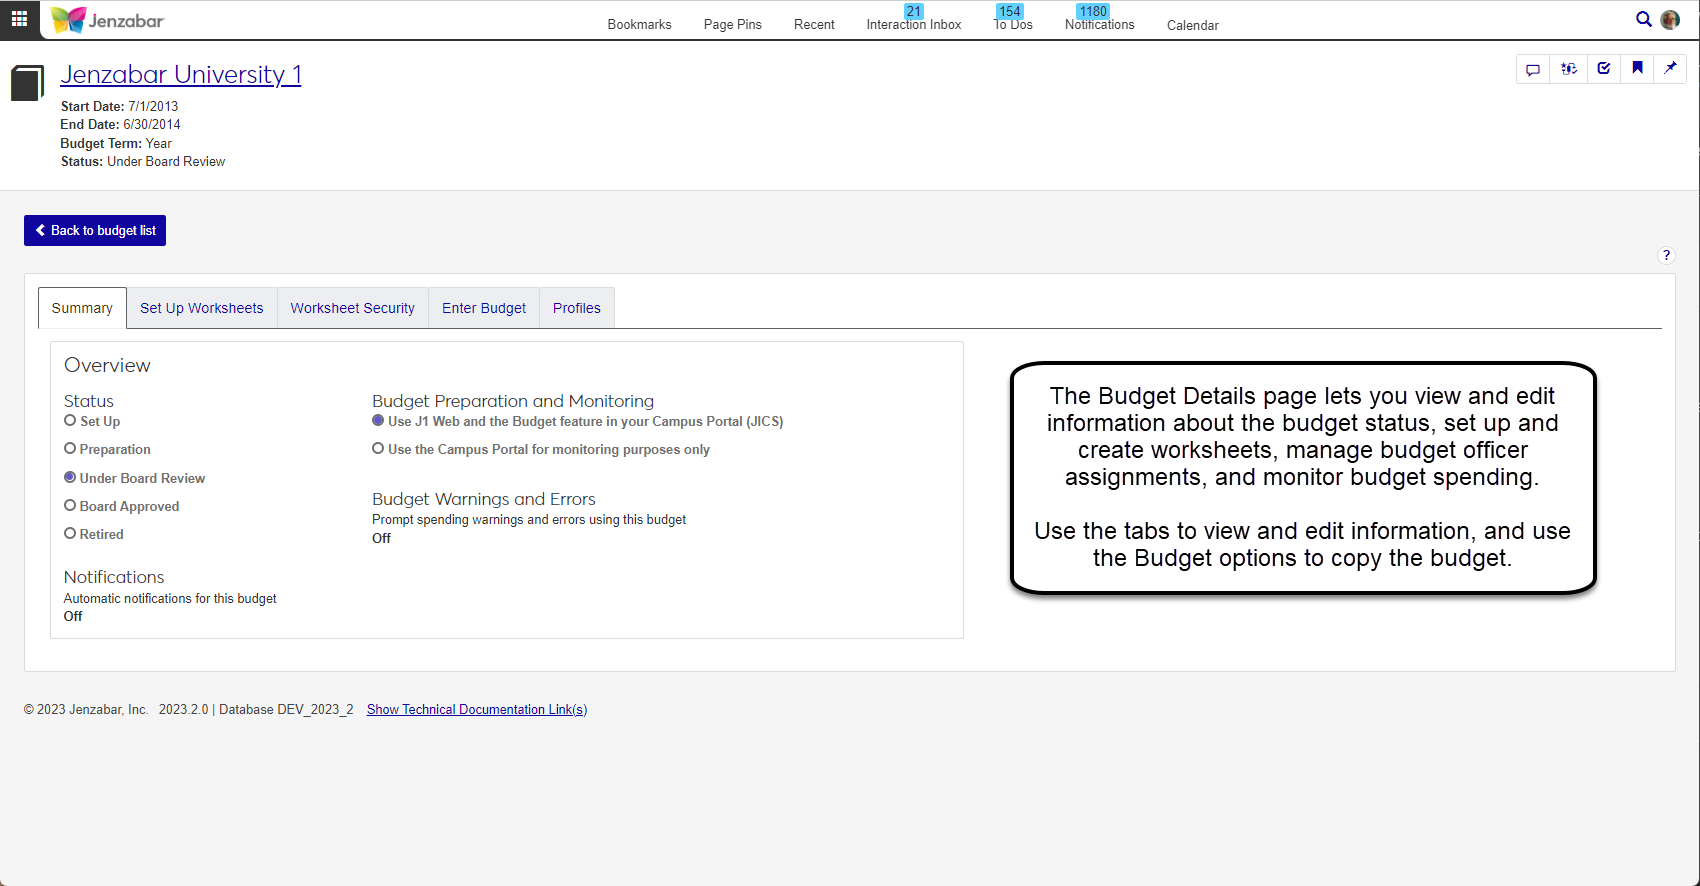
The Budget Details page lets you view and edit information about the budget status, set up and create worksheets, manage budget officer assignments, and monitor budget spending. Use the tabs to view and edit information, and use the Budget options to copy the budget.
Budget profiles allow you to group line items to create different views of the budget. A budget may have one or more budget profiles providing multiple views of budget information.

The Worksheets page shows all the worksheets available for you to work with. Select one or more worksheets to enable the Options button, and use the filter to expand or limit the worksheets in the list.
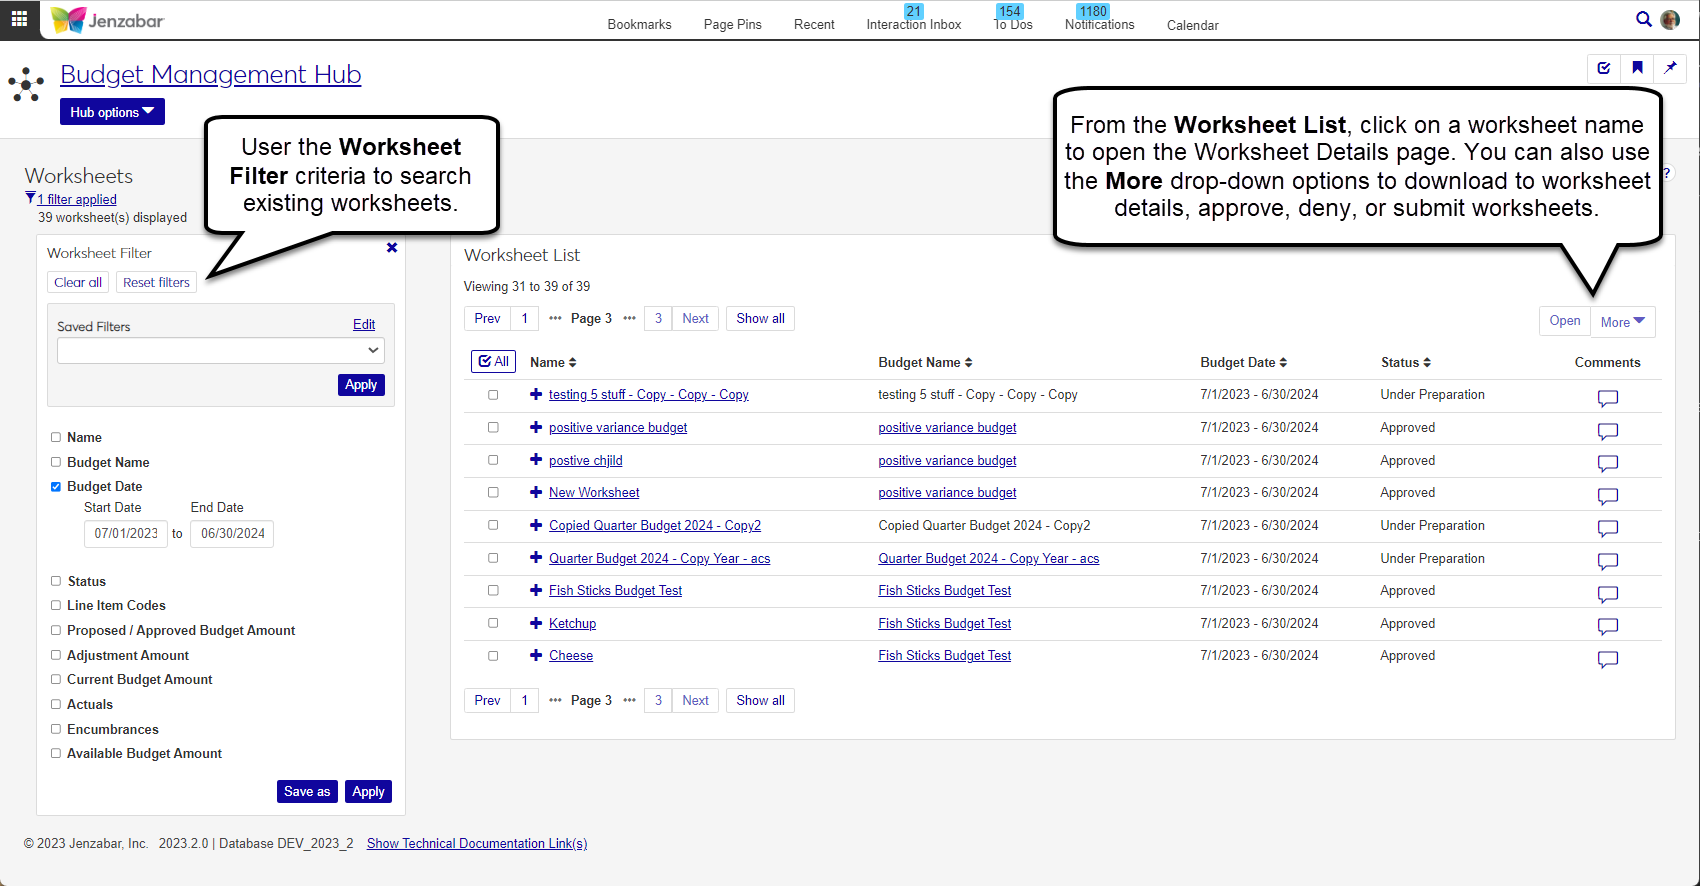
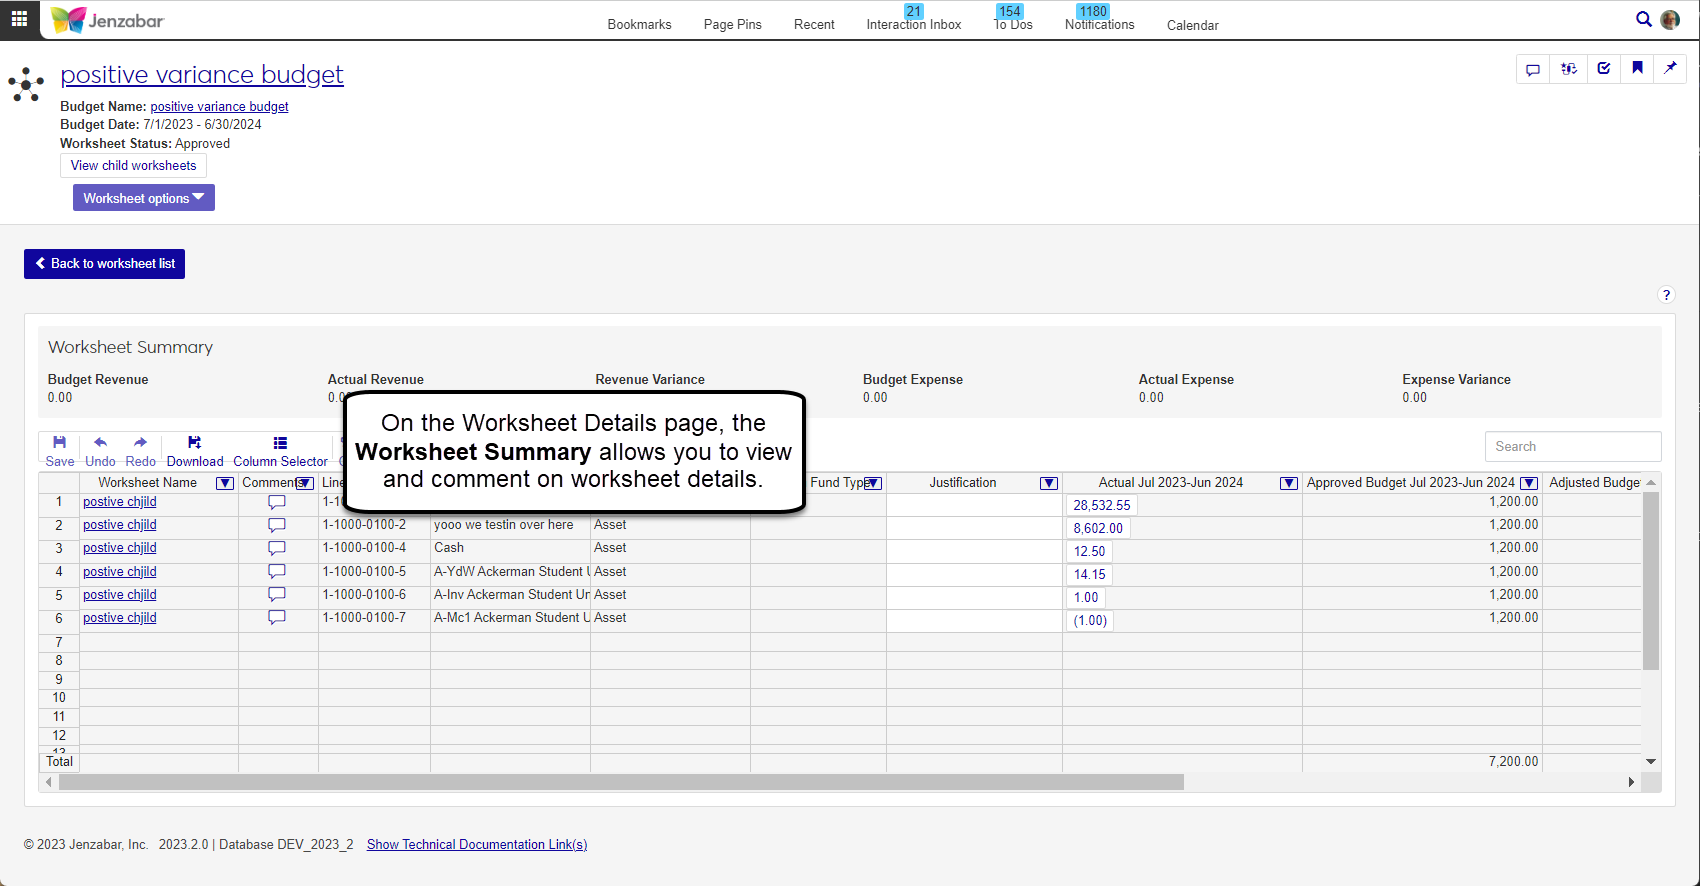
The Worksheet Details page allows you to see the line items and account information included in the selected worksheet. From this page, you can also add comments and additional details.
Generate various reports from the Reports section of the Budget Management hub navigation. The following reports can be generated:
Budget to Actual Profile Report*
Budget to Actual Worksheet Report*
* These reports must be recustomized and saved to the J1 Web PBL; customizations made in Desktop will not work for these reports. For more information about customizing reports for J1 Web, see Working with Reports in J1 Web.
The General Ledger Accounting hub lets you manage GL accounts and security, batches, account balances, projects, and generate reports. The General Ledger Administration hub lets administrators manage the settings and configurations for the General Ledger module.
Access to General Ledger hubs is granted via the General Ledger Accounting and General Ledger Administration roles and permissions.
Note
Certain reporting and definition windows are not yet available in J1 Web and are planned for a future release. The following Desktop windows don't yet have an accompanying page in J1 Web.
Texas TRS Payroll Funding Category Definition
State Account Code Definition
Oklahoma TRS Payroll Funding Category Definition
Import Payroll Transactions
Recalculate Financial Balances
Define Journal Source Codes
Turn On/Off Posting to Closed Months
Due To/From Definition
Create Account Components
Setup A/P & A/R Subsidiary Definitions
Grant Budget Override Privileges
Define Currency Conversion Rates
G/L Year Close
Define Report Cells Manually
Define Auto Report Cell Account Ranges
Create Report Cells Automatically
Deprecation Expense Transfer
The following windows will not be brought into J1 Web.
Define Alternate Account Security Groups
Setup Account Security
Financial Reporting
Manage Reporting Line Items
Budget to Actual Variance Report
Create and Run Report Cell Reports
The General Ledger Settings page provides the same functionality as Desktop's General Configuration window, G/L tab. From this page, you can view and update the General Ledger Configuration, Account Number Structure and Component Configuration, Project Dropdown Filtering, and Budget Checking. The Campus Portal Migration section is new and only available in J1 Web. This setting disables the Campus Portal GL Account Lookup feature and positions your school to migrate Campus Portal users to working in J1 Web.
Warning
There are additional Campus Portal features being moved to J1 Web in future releases. For implementation purposes, Jenzabar recommends not migrating GL Lookup functionality to J1 Web until after the other Campus Portal features are also available in J1 Web. For more details on the other Campus Portal features moving to J1 Web, see J1 Web Enhancements.

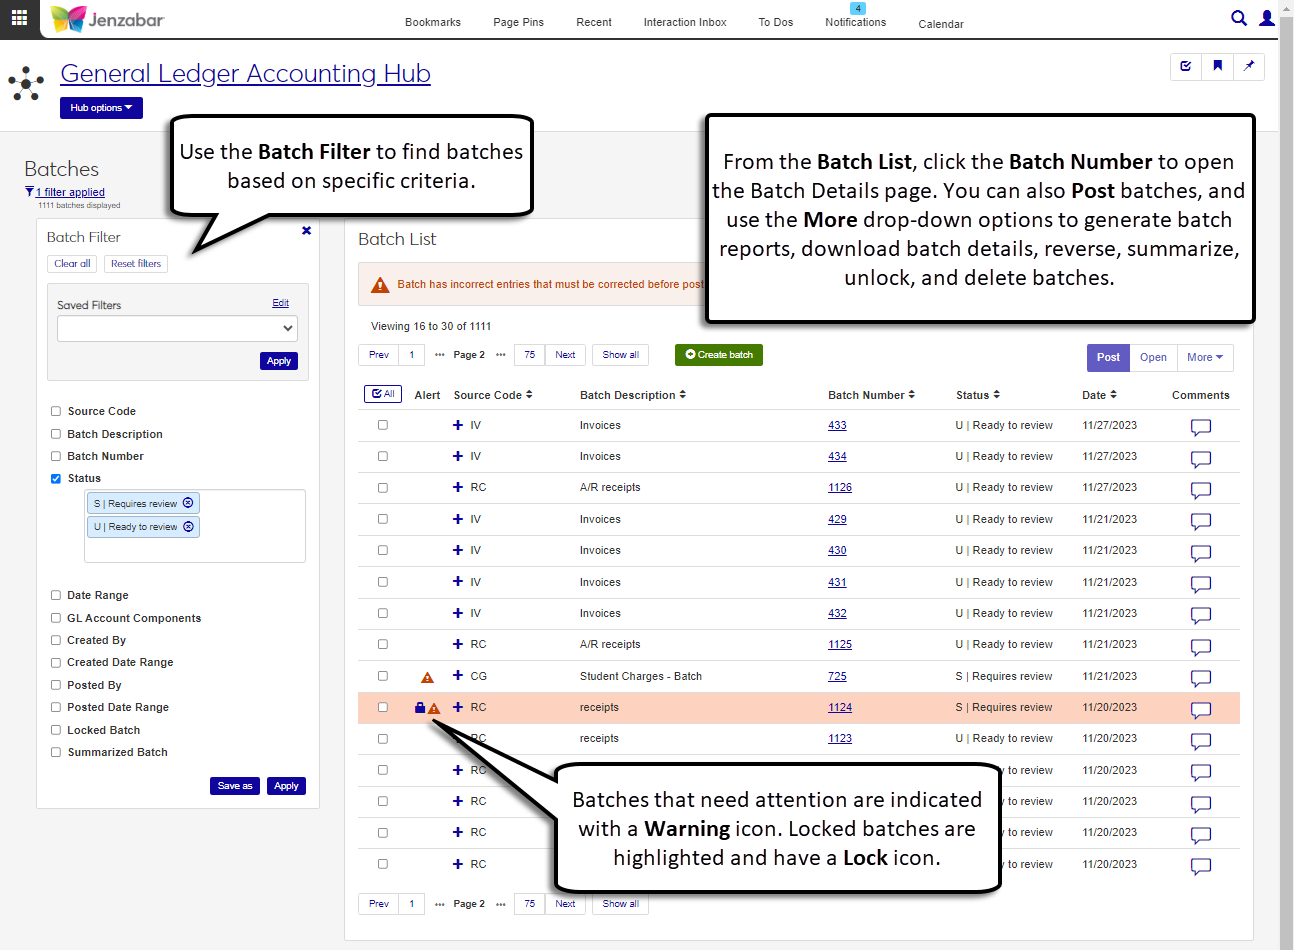
The Batch List page lets you view and create batches for most source codes. From this page, you can use the Batch Filter to find batches that meet specific criteria, such as status (posted (C) batches can be searched from this page), batch number, and posted date. Additionally, you can post, download, reverse, summarize, unlock, and delete batches, and generate batch reports.
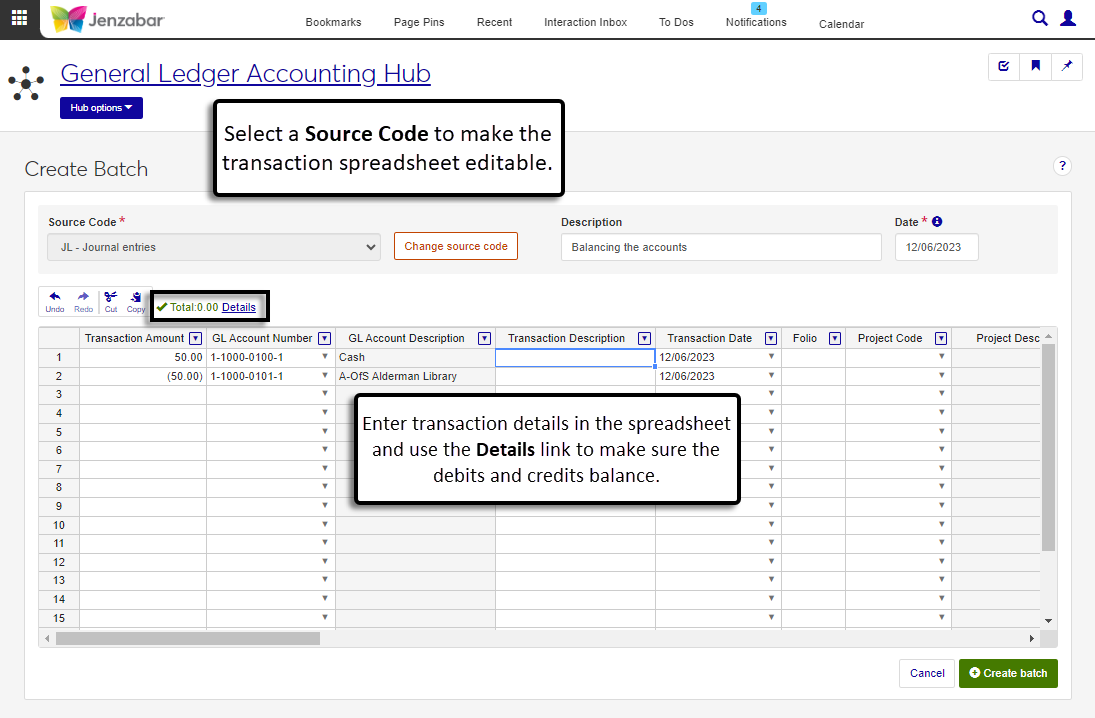
The Create Batch page can be accessed from the Batch List or the General Ledger Accounting hub options. When a Source Code is selected, the transaction details spreadsheet is editable. The Details link above the spreadsheet provides a summary of debits and credits entered.
Note
Some source codes can't be selected from the Source Code drop-down because those batches are created in other system processes (e.g., IV, RC, and MS).
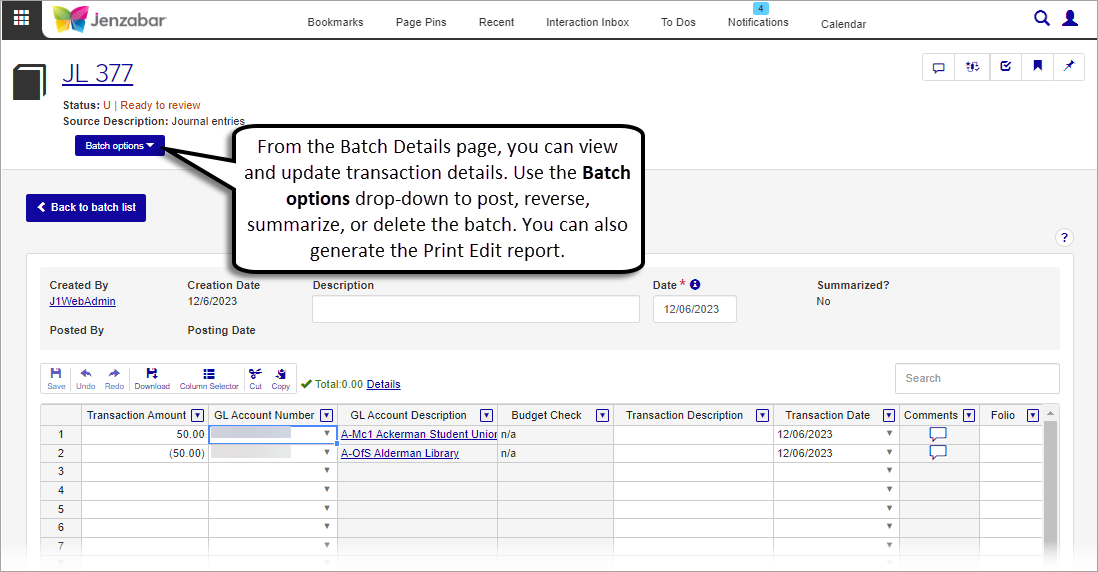
The Batch Details page lets you review and update batch details. Use the Batch options button to post, summarize, reverse, or delete the batch. You can also generate the Print Edit report and create new batches from the Batch options.
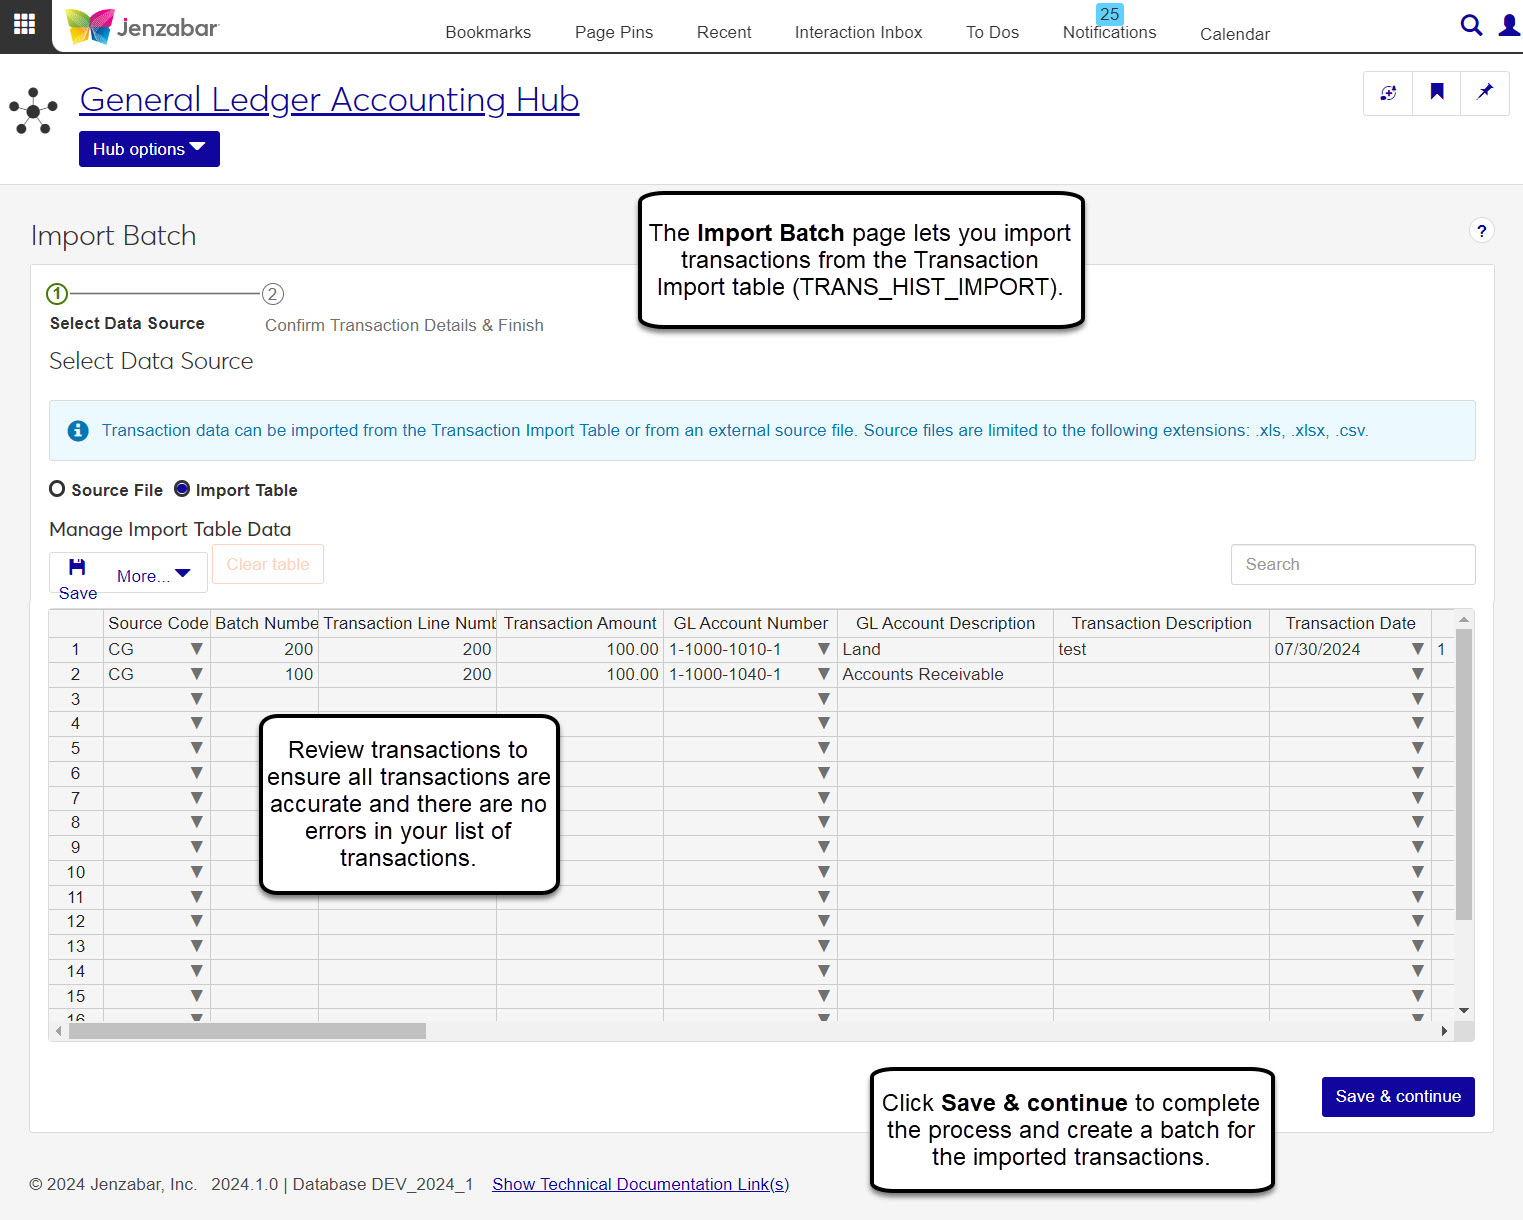
You can also import batches from the Transaction Import table (TRANS_HIST_IMPORT) from the Import Batch page. Follow the steps on the page to select and import transactions from the table.
Note
Importing batches from a source file is functionality planned for a future release.
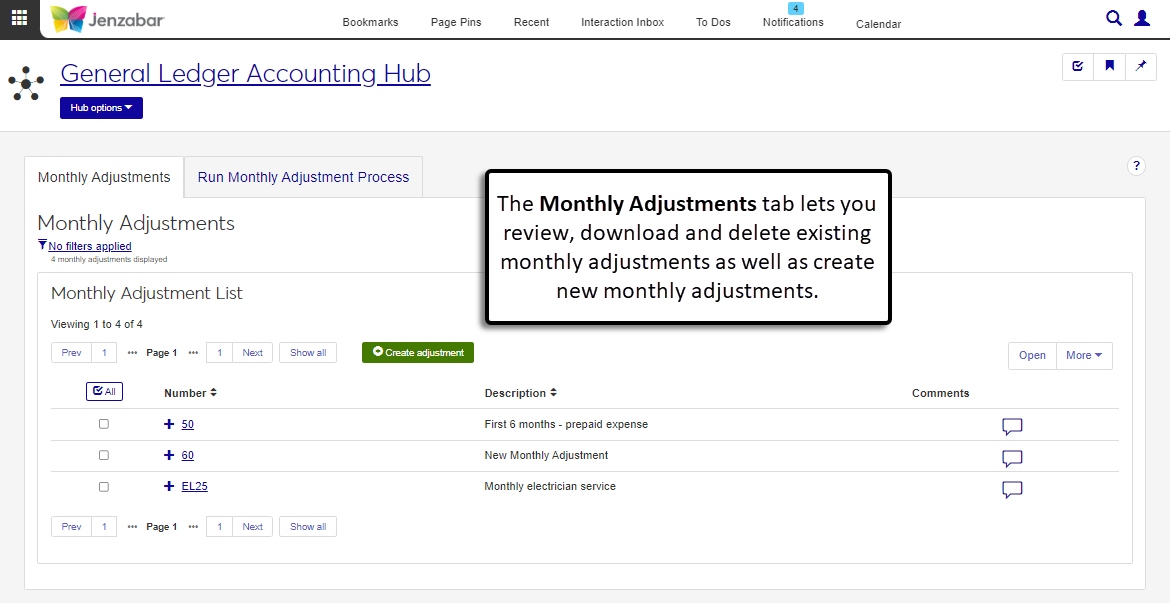
The Monthly Adjustment process is treated as a batch process in J1 Web. From the Monthly Adjustments tab, you can create, update, or delete adjustment transactions on the Monthly Adjustment List. Click the Create adjustment button to open the Create Adjustment page.
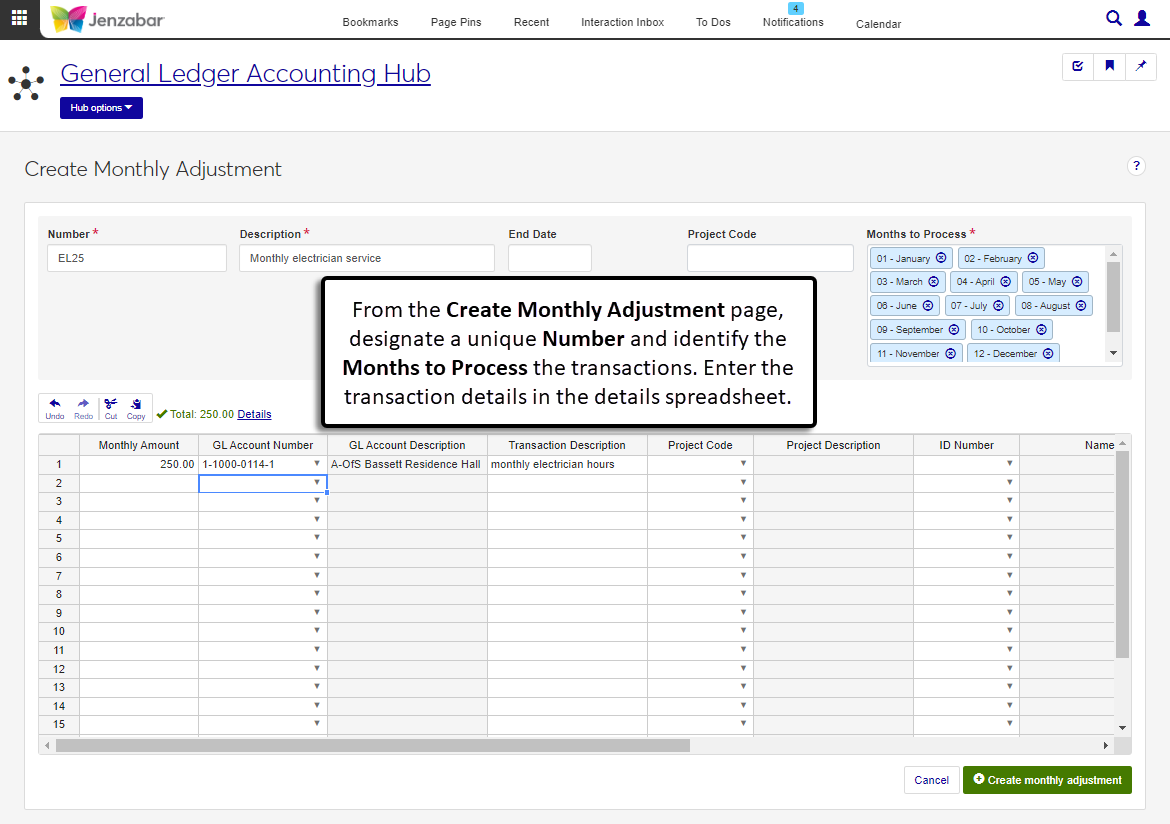
The Create Adjustment page lets you designate an adjustment number and the months the adjustment transactions should be processed.
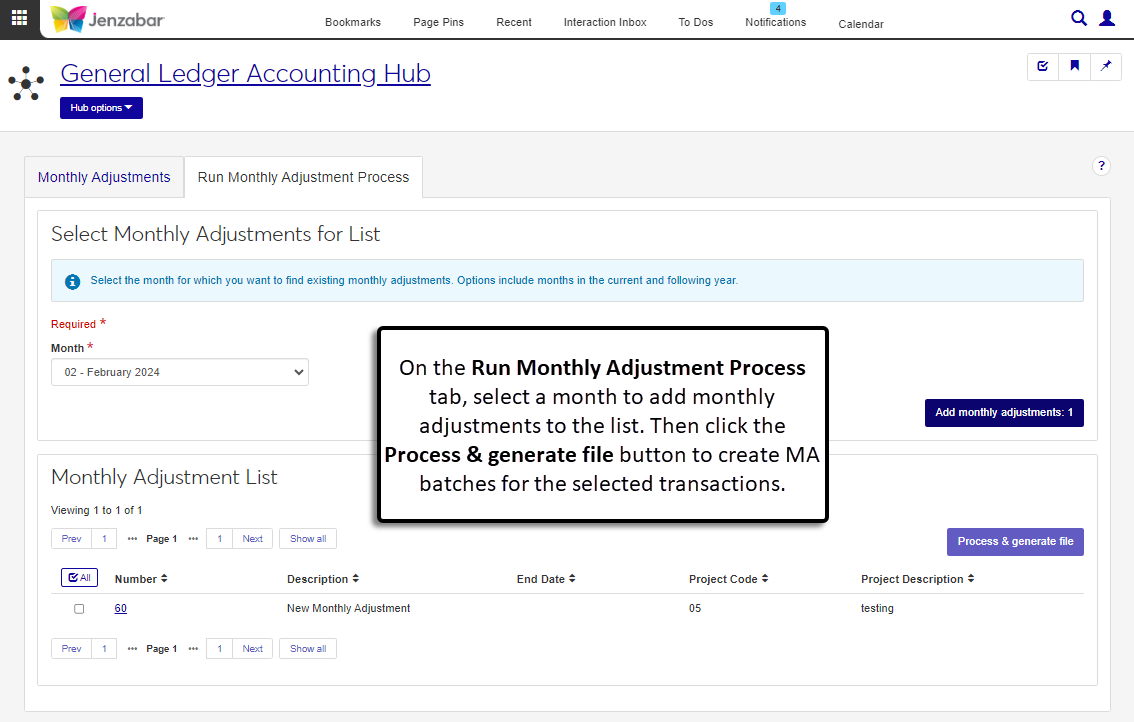
Use the Run Monthly Adjustment Process tab to select a month and adjustments to process. When the Process & generate file button is clicked, MA batches are created for each monthly adjustment number selected for the process.
The GL Accounts list page lets you view the accounts in your system. From this page, you can use the GL Account Filter to narrow down the list of accounts, open the account details page, as well as download, edit, recalculate, and delete accounts.
Note
GL account access is managed by the General Ledger Accounting roles, permissions, and associations. This page will show only the accounts the user has access to.
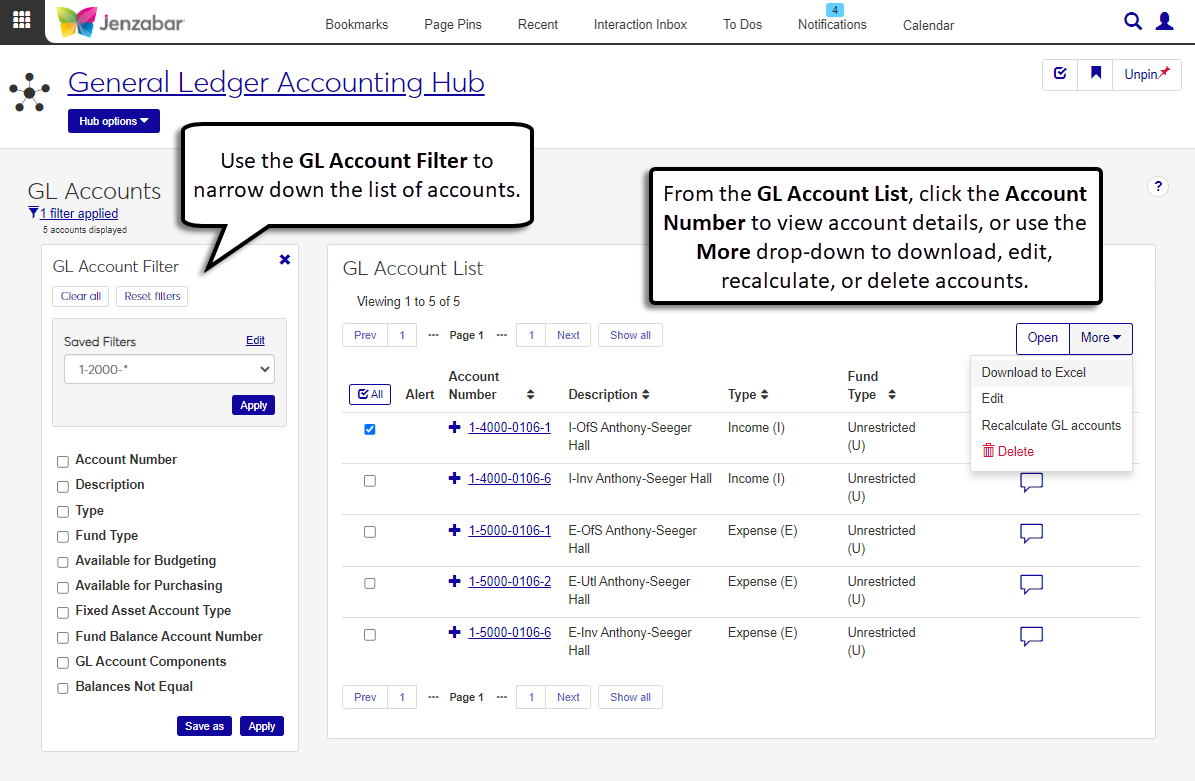
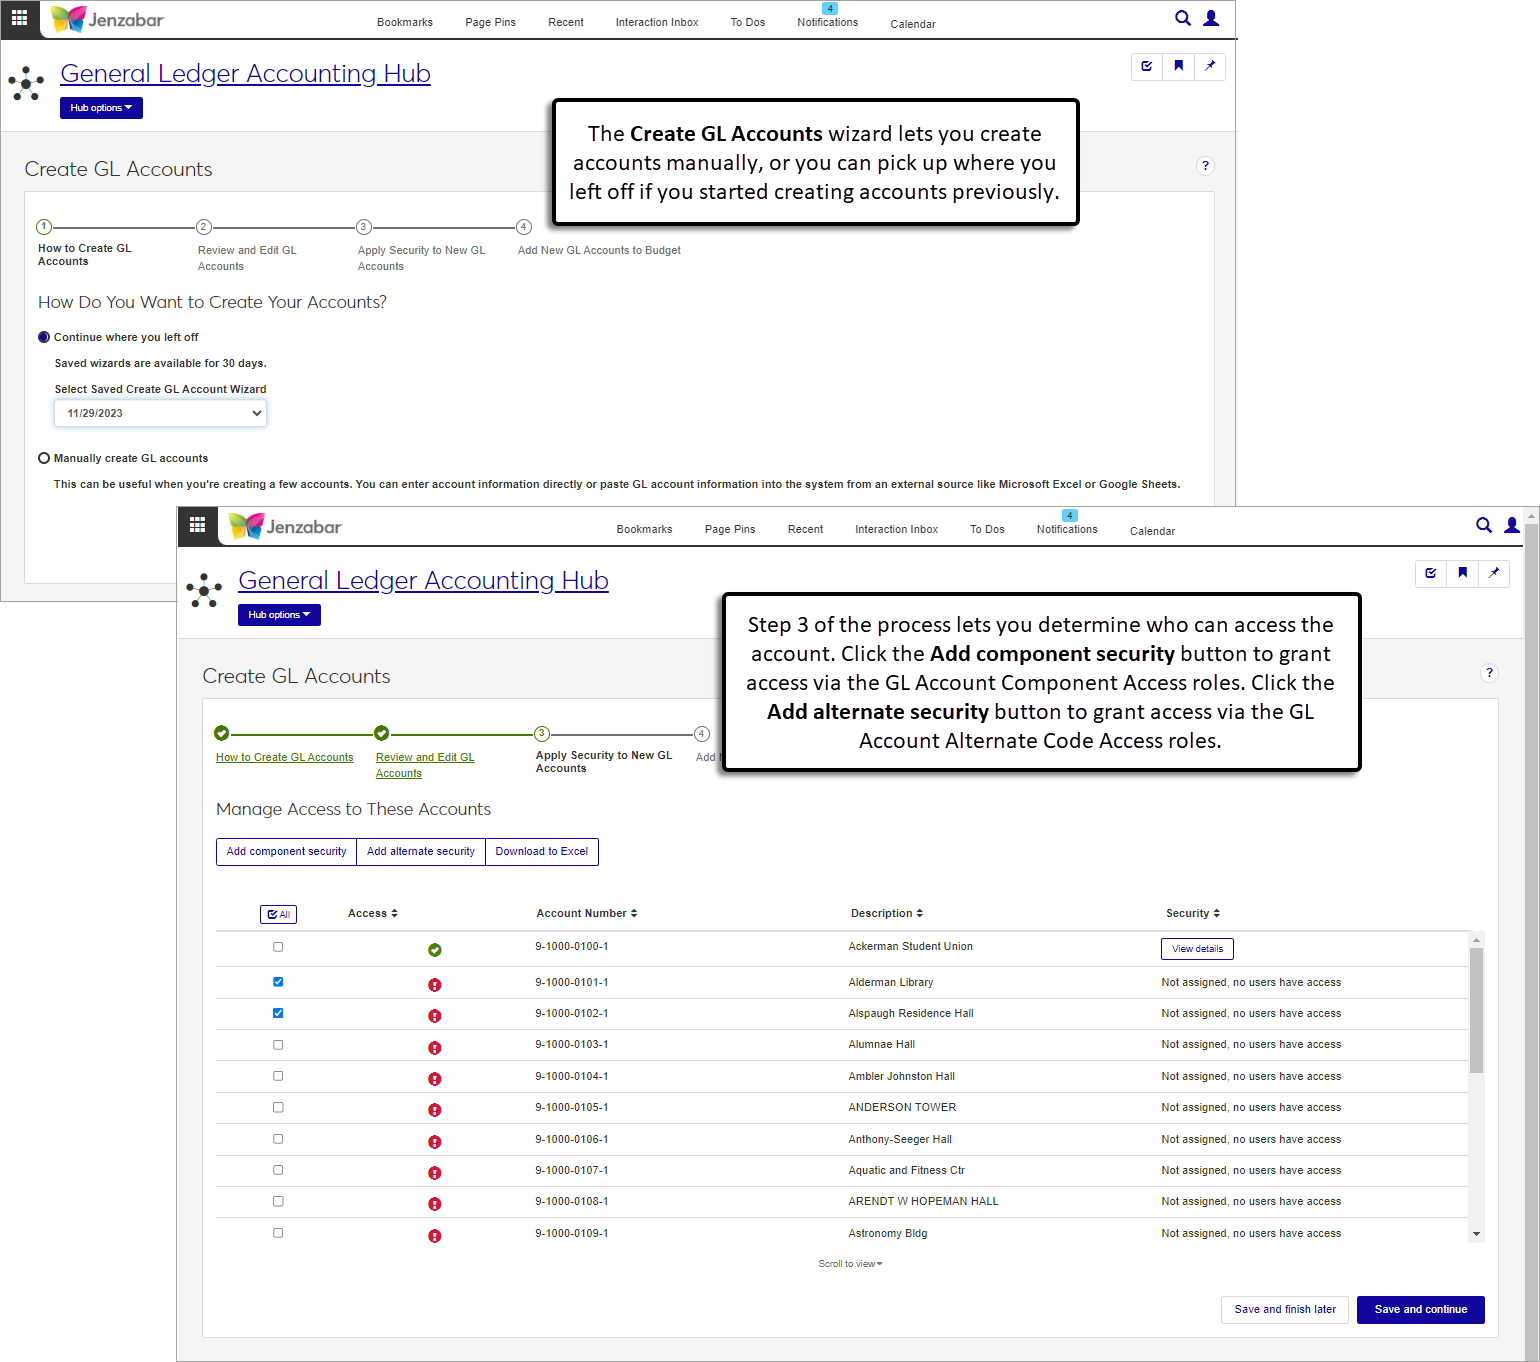
The Create GL Accounts wizard guides you through the process to set up new accounts. During the process, you can set up account security by designating which roles can access the account.
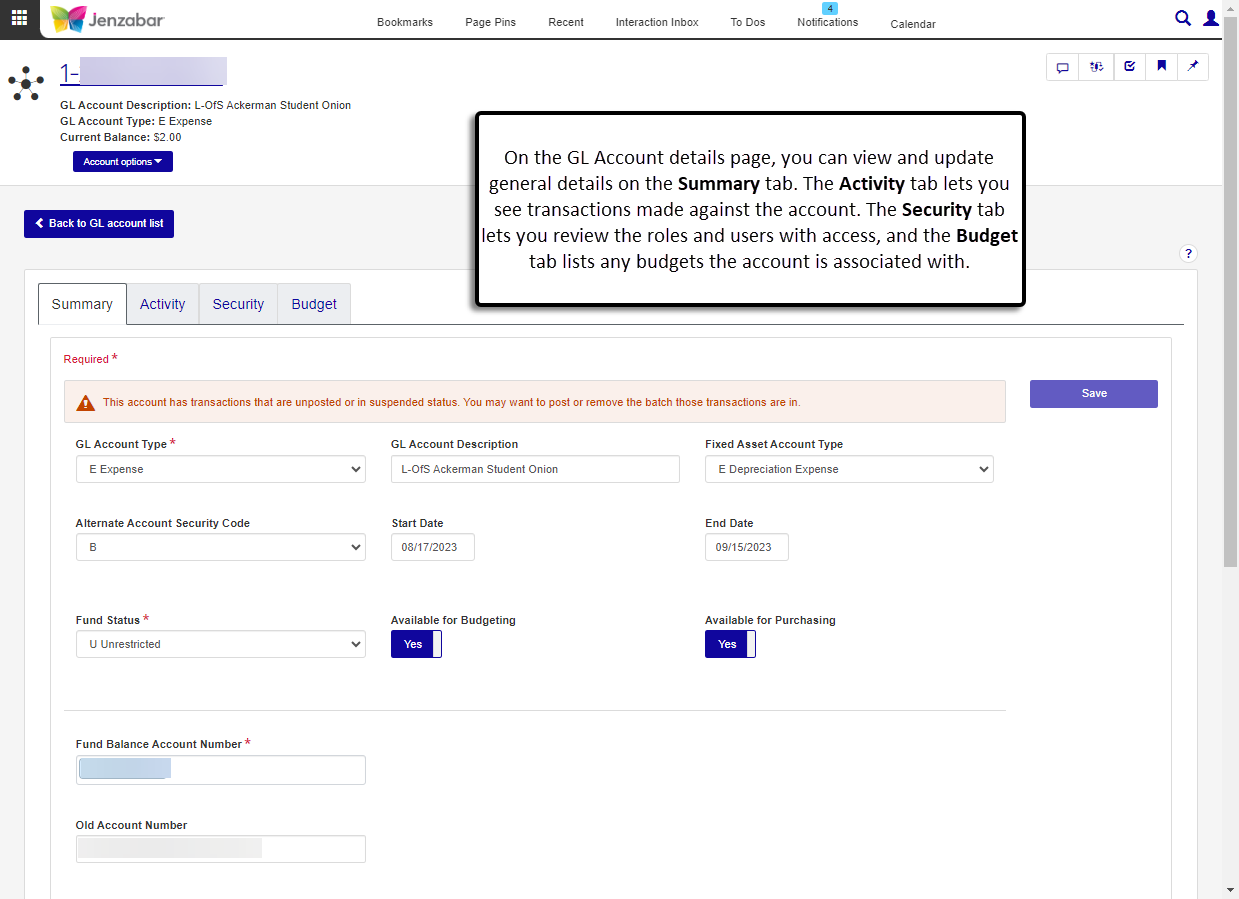
After accounts are created, the GL Account Details page lets you view and update general information on the Summary tab. You can also view account activity (Activity tab), the roles and users with access to the account (Security tab), and any budgets associated with the account (Budget tab).
The GL Account Activity page lets you review balance information for a range of accounts. Use the balance buttons in the GL Account Sheet to view account actuals.
Note
This page provides the same functionality as the Campus Portal GL Account Lookup feature. When you migrate users from the Campus Portal to J1 Web, this is the page they'll use to search for and find account activity.
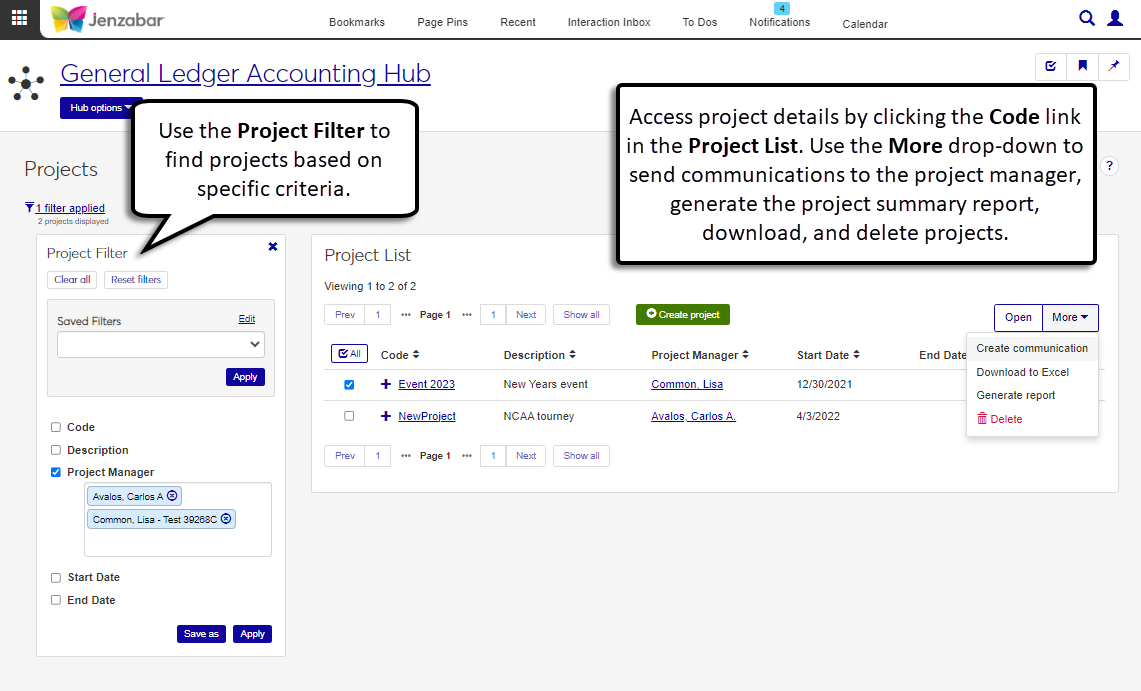
The Project List page lets you view your school's projects. Use the Project Filter to find specific project based on selected criteria. From the Project List, you can open the project detail pages, and use the More drop-down to send communications to the project manager, generate Project Summary reports, download, and delete projects.
Note
Project code access is managed by the General Ledger Accounting Project Access role, permissions, and associations. This page will show only the projects the user has access to.
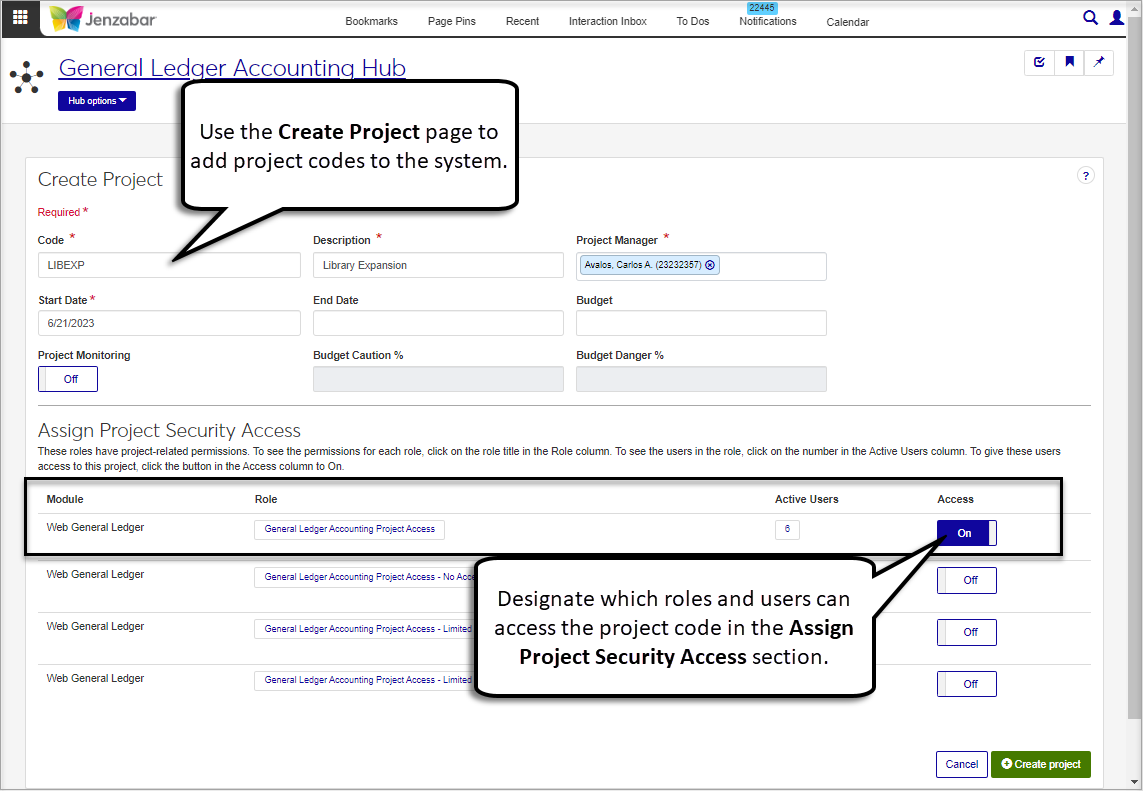
The Create Project page lets you add project codes to the system and designate which roles and users can access the code. These codes can be added to transactions and line items throughout the Finance hubs.
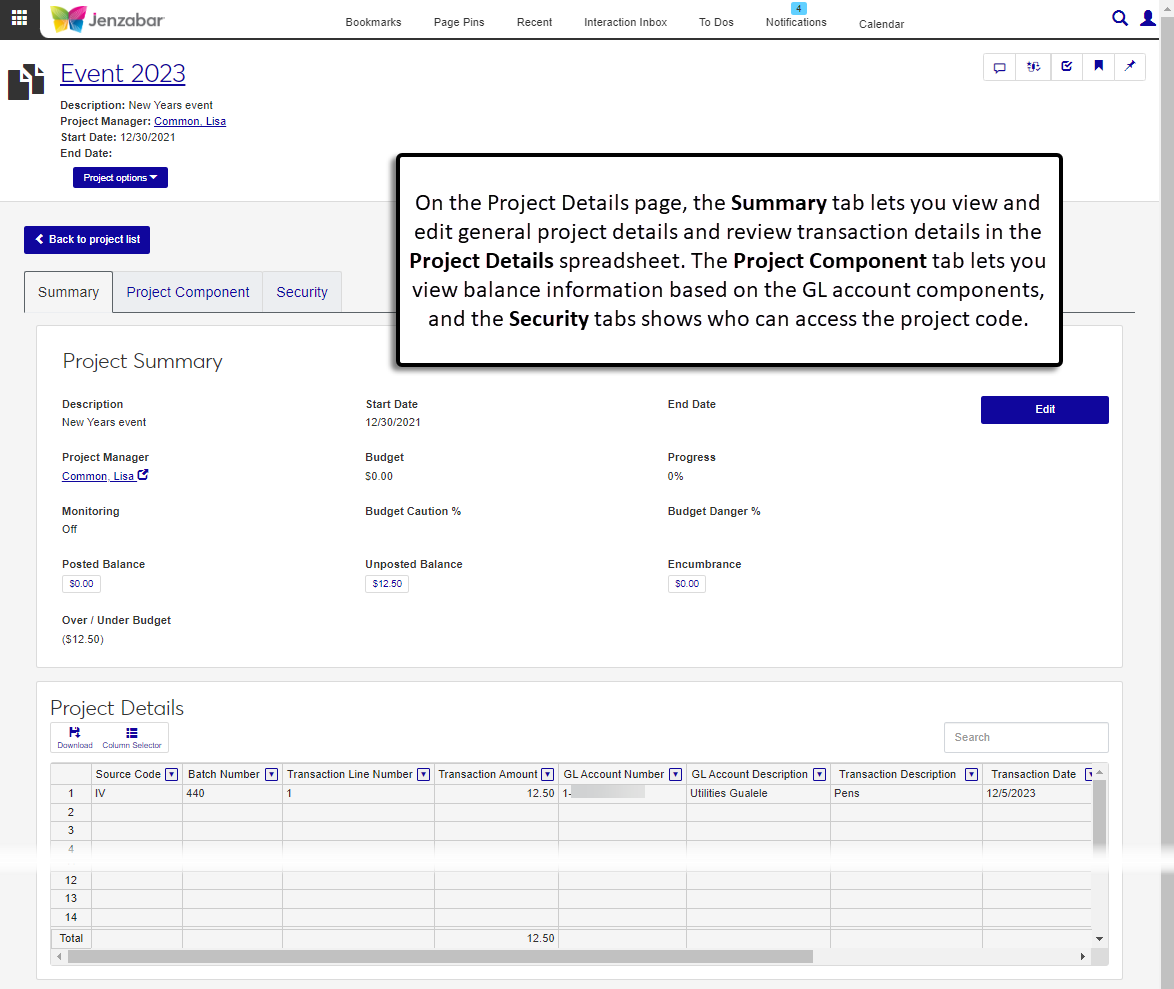
The Project Details page lets you view and update general project information as well as review project activity from the Summary tab. The Project Component tab lets you view balance information for GL account components associated with the project, and the Security tab displays the roles and users with access to the project. Use the Project options button to create new projects, generate the Project Summary report, or delete the project.
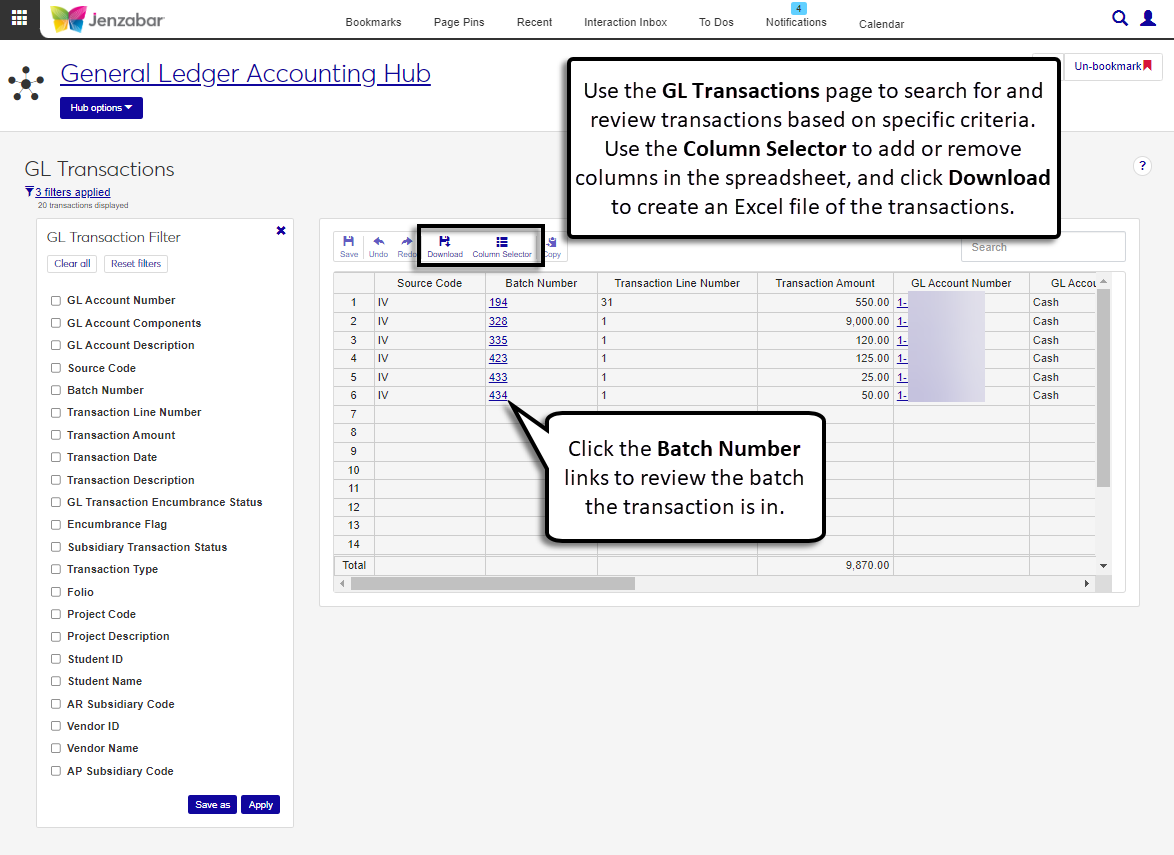
The GL Transactions page lets you review individual transaction activity. You can use the GL Transaction Filter to find specific transactions, then click the Batch Number links to view details about the batch the transactions were in. The Column Selector button on the toolbar lets you add or remove columns, and the Download button lets you save the transaction information in an Excel file.
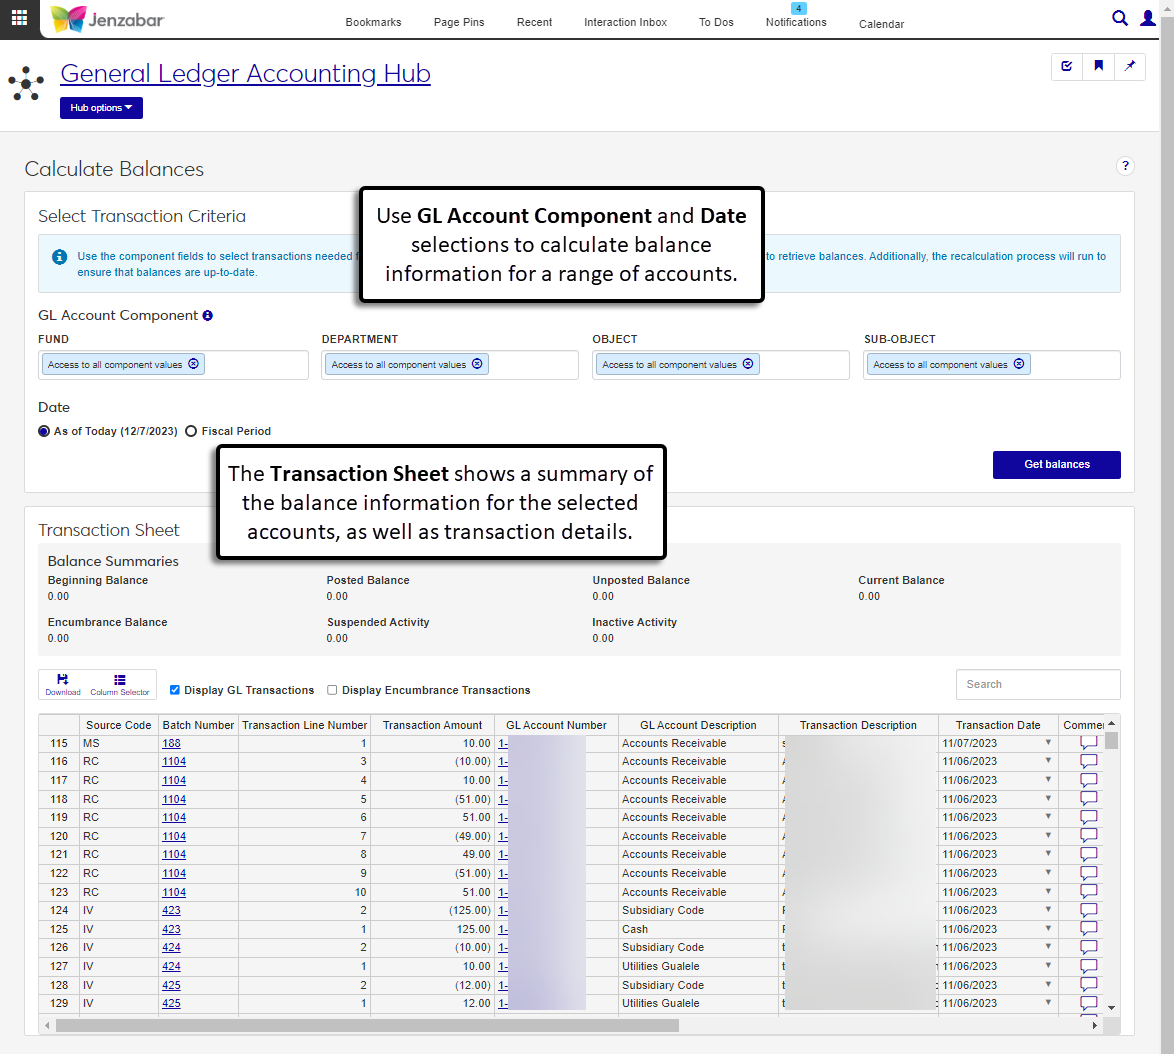
Use the Calculate Balances page to get balance summaries for a range of accounts, either through today's date or for a specific fiscal period.
Generate various reports from the Reports section of the General Ledger Accounting hub navigation. The following reports can be generated:
Fund Balance Audit
Month Close
Month Close Selection*
Trial Balance*
Year Close Exceptions
Year to Date History
* These reports must be recustomized and saved to the J1 Web PBL; customizations made in Desktop will not work for these reports. For more information about customizing reports for J1 Web, see Working with Reports in J1 Web.
Warning
J1 Web does not currently support the Open Items configuration. If your school is configured for Open Items in the Desktop A/R Configuration window, continue working in J1 Desktop as you will not be able to use J1 Web Finance at this time.
The Procurement hub includes functionality for accounts payable (AP) and purchasing (PO). Access to this hub is granted via the Procurement - Accounts Payable and Procurement - Purchasing roles.
The accounts payable features let you work with and manage vendors, invoices and payments.
Note
Most of the administrative and configuration windows in Desktop are planned to move to J1 Web in a future release. The following windows are still managed in Desktop and don't have an accompanying page in J1 Web yet.
Setup A/P & A/R Subsidiary Definitions
Subsidiary Group Control
A/P Configuration
Aging Report Configuration
Payment Prefix - Setup Bank Accounts
Select/Create Regular Payments
Tax Refund
Electronic Payment Configuration
Government Forms Filing Wizard
The Vendor List page lets you search for vendors based on various criteria. From here, you can also create new vendors, navigate to vendor detail pages, manage subsidiaries associated with vendors, and update 1099 form defaults.
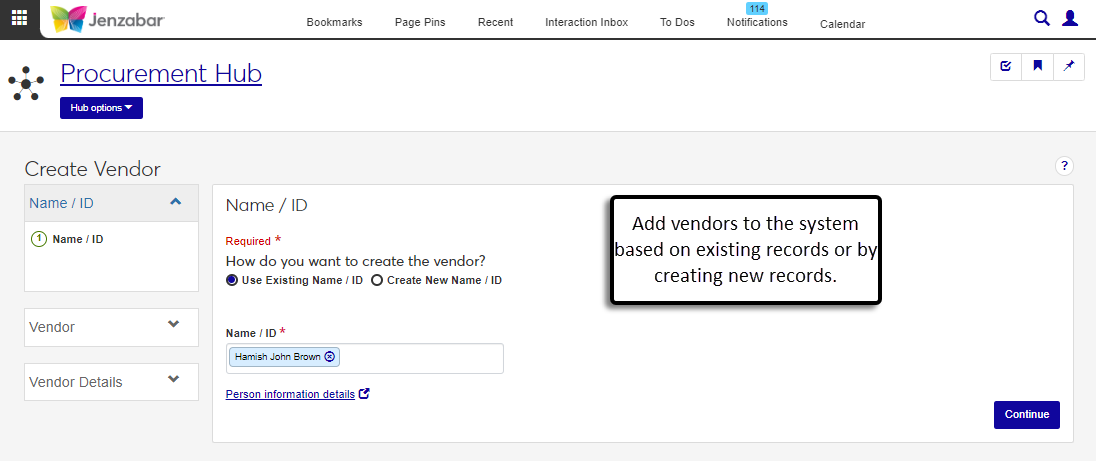
You can create new vendors with the Create Vendor page, which can be accessed from the Vendor List or via the Procurement hub navigation. New vendors can be based on existing ID numbers in the system, or ID numbers can be assigned when the vendor is created.
After vendors are created, you can view vendor information in varying levels of detail from the following pages.
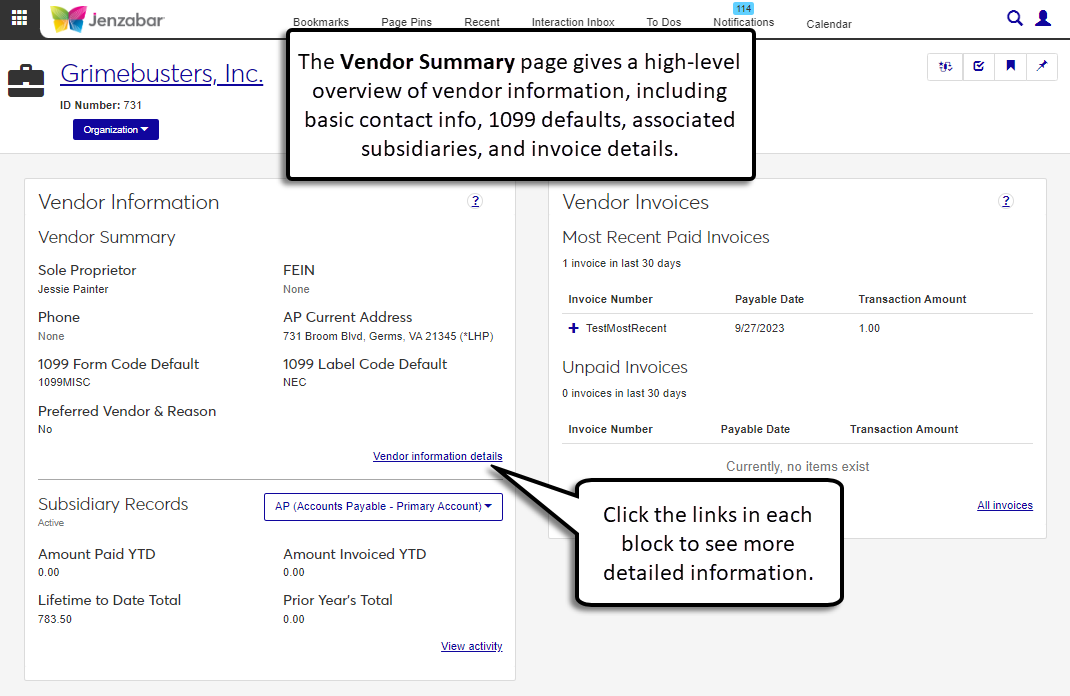
The Vendor Summary page provides a high-level overview of vendor information. From here, you can click the links to access the Vendor Information Details page and see vendor invoices.
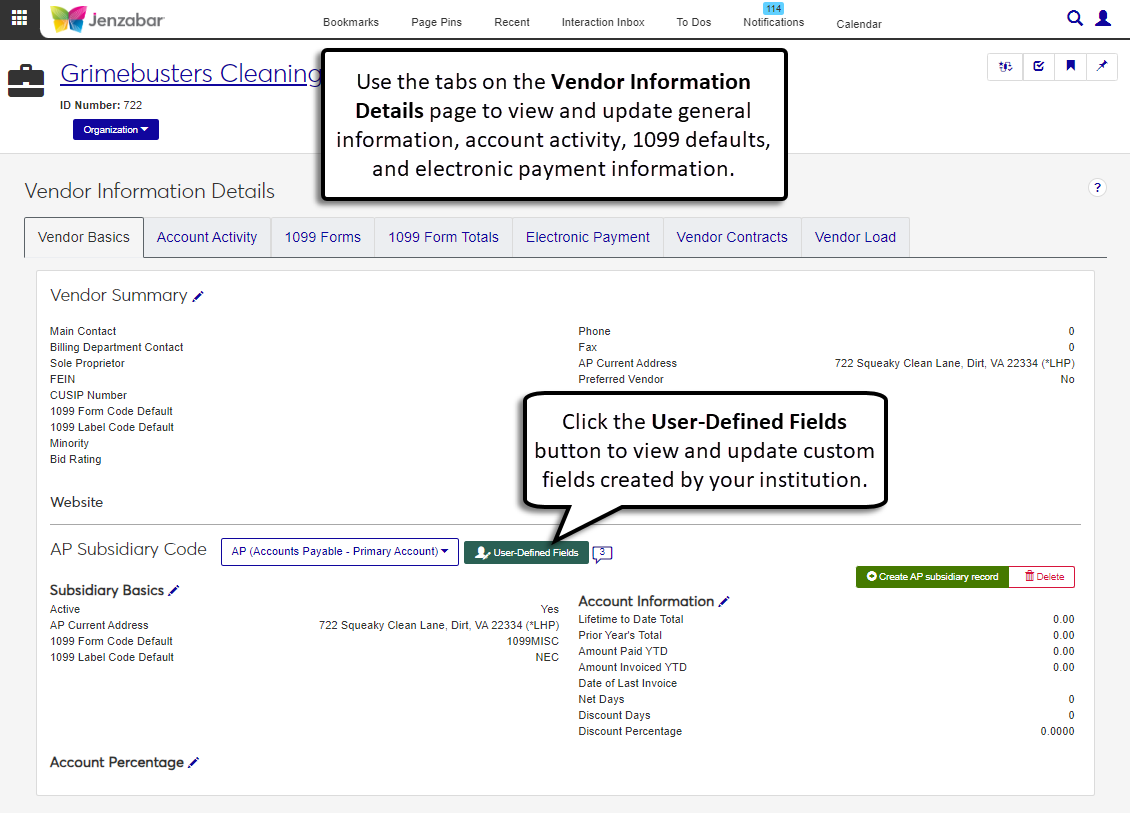
The Vendor Information Details page lets you update general information, account activity, 1099 defaults, and electronic payment information. You can also make view and make updates to vendor user-defined fields (UDEFs).
The Organization Information Details page mirrors Desktop's Name Entity window and lets you view a vendor's organization and contact information.

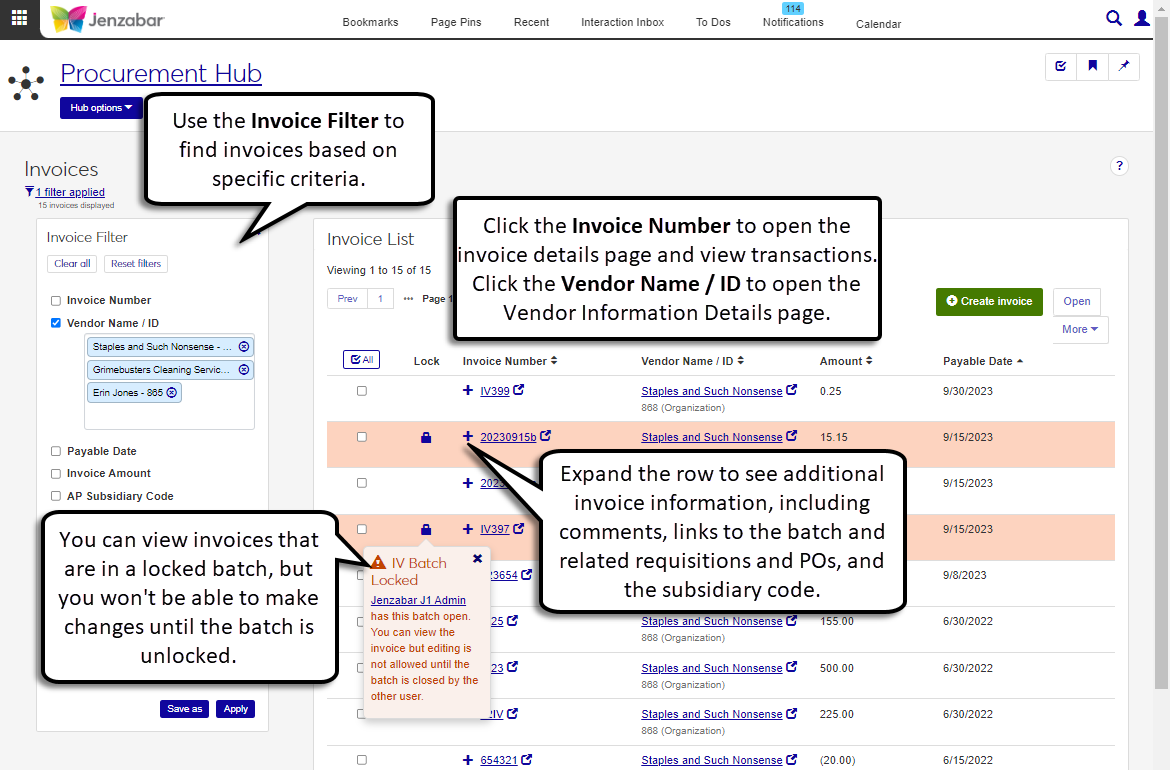
You can search for invoices based on specified criteria on the Invoices page. Use the links to open invoice details or view vendor details, and click the Expand icon to view additional details, like comments, links to invoice batch details, and related POs and requisitions. You can view locked invoices, but you cannot make changes to locked invoices.
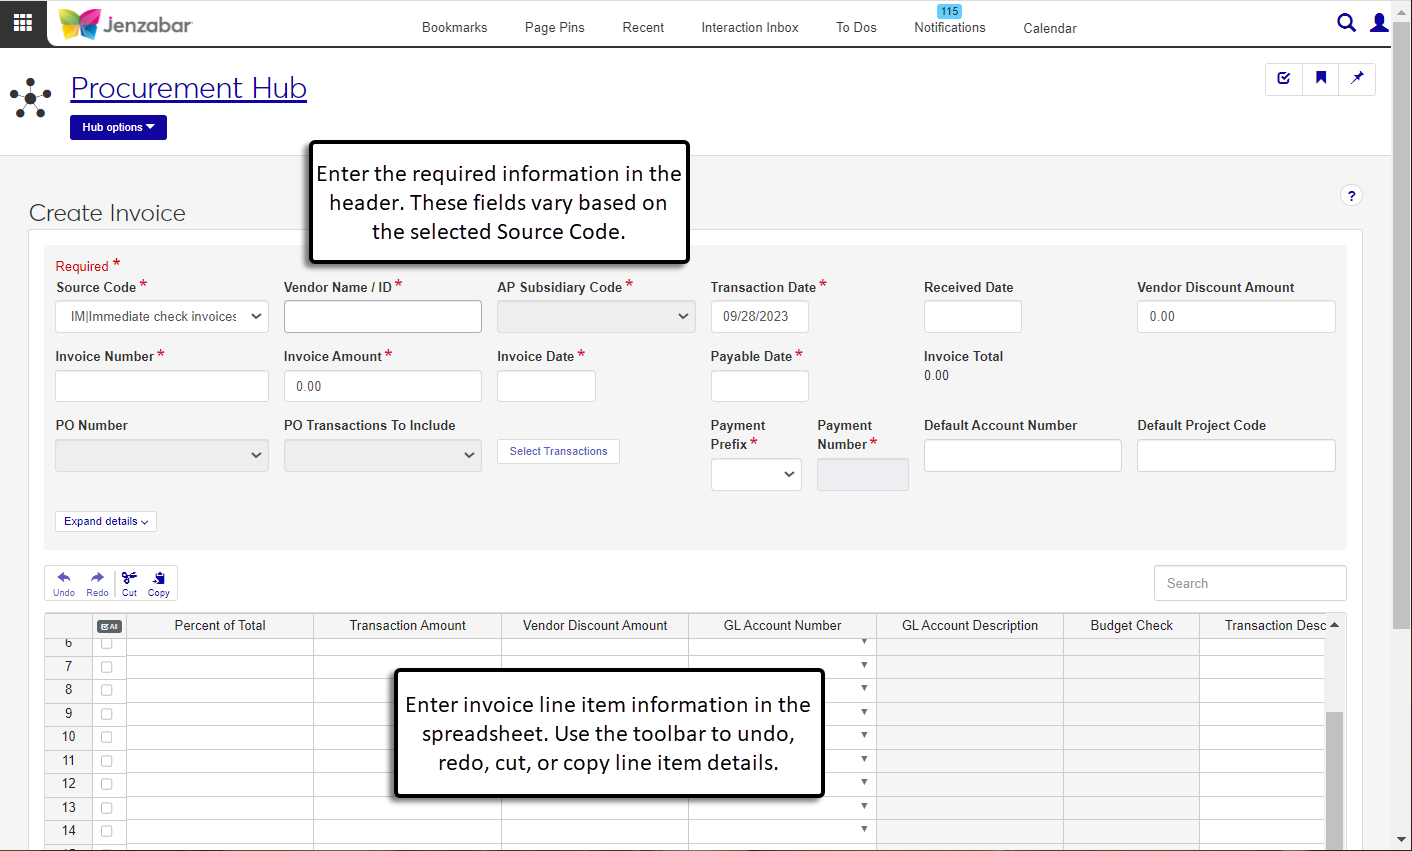
The Create Invoice page lets you select the appropriate Source Code, and then the available fields are updated to reflect the requirements for the selected source code.
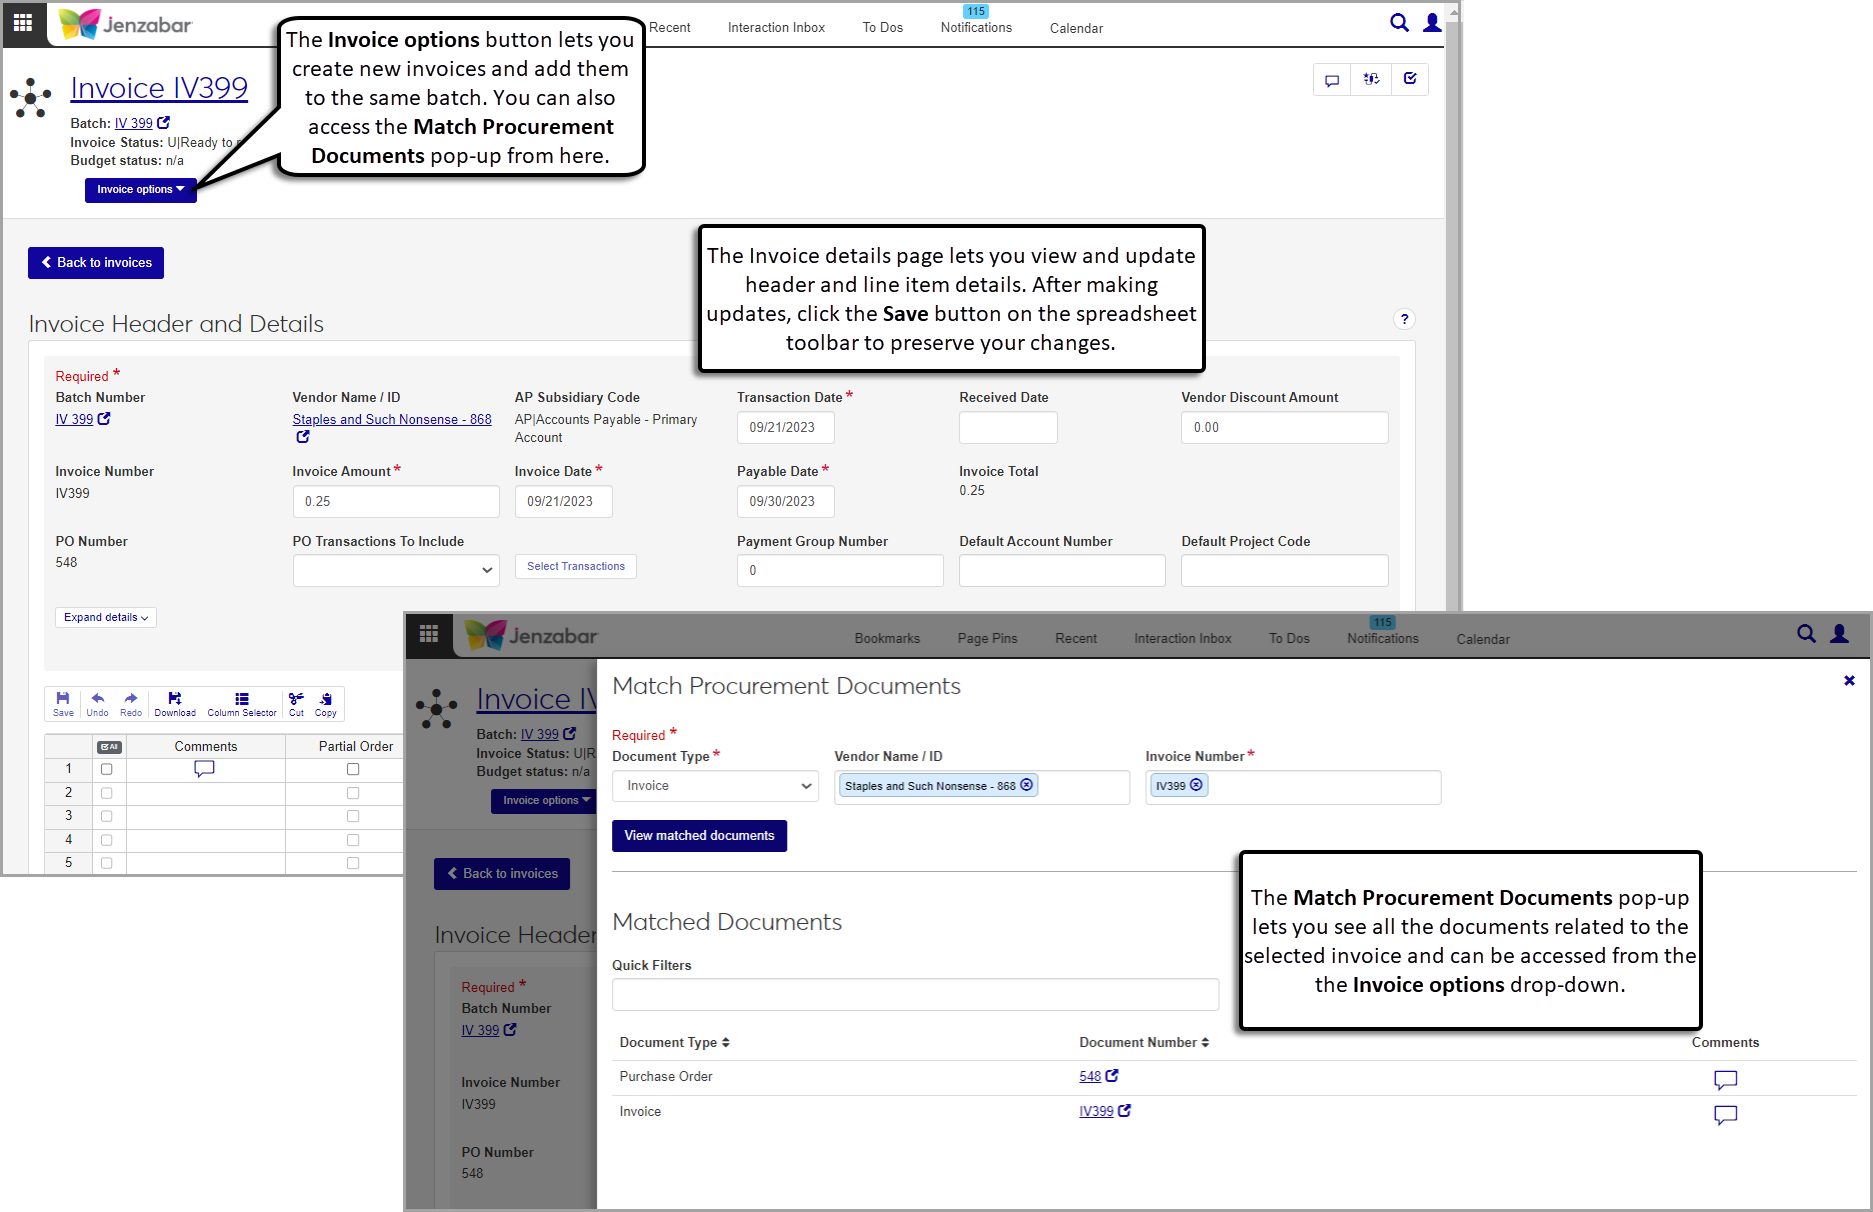
After the invoice is created, you can view and update the details from the invoice details page. Use the Match procurement documents option to find all the documents related to the invoice, such as requisitions, POs, and payments.
The Payments list page lets you view the list of system payments. From this page, you can access payment details, create new payments, make adjustments to existing payments, and void payments.

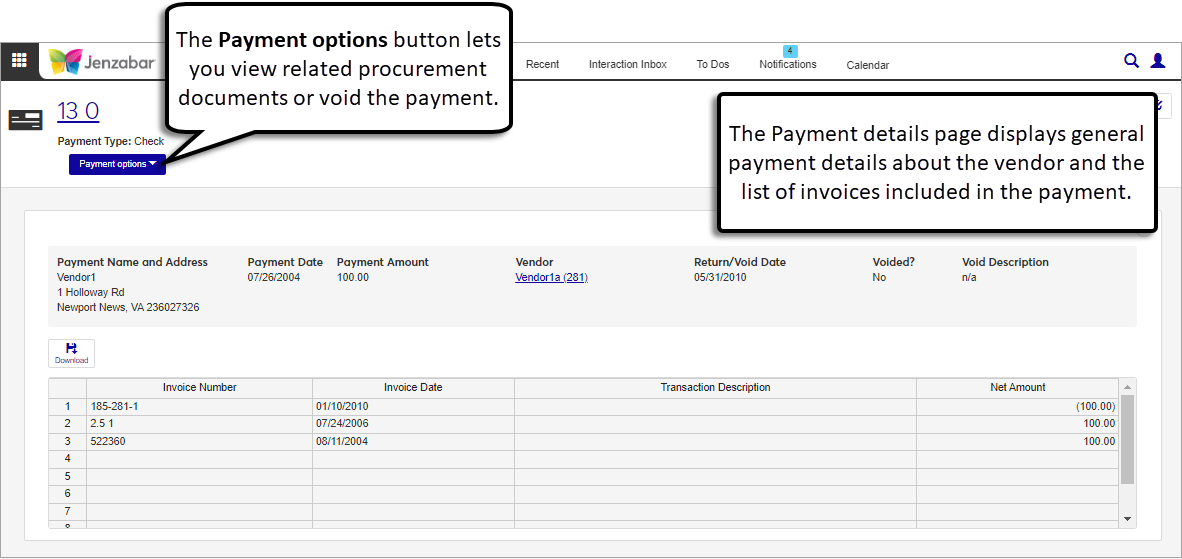
Click the Payment Number links to open the payment detail pages, where you can see the invoices paid, view related procurement documents, or void the payment.
When the Void option is selected on the list page, a pop-up appears and lets you review the selected payments, add details, and void the payment.

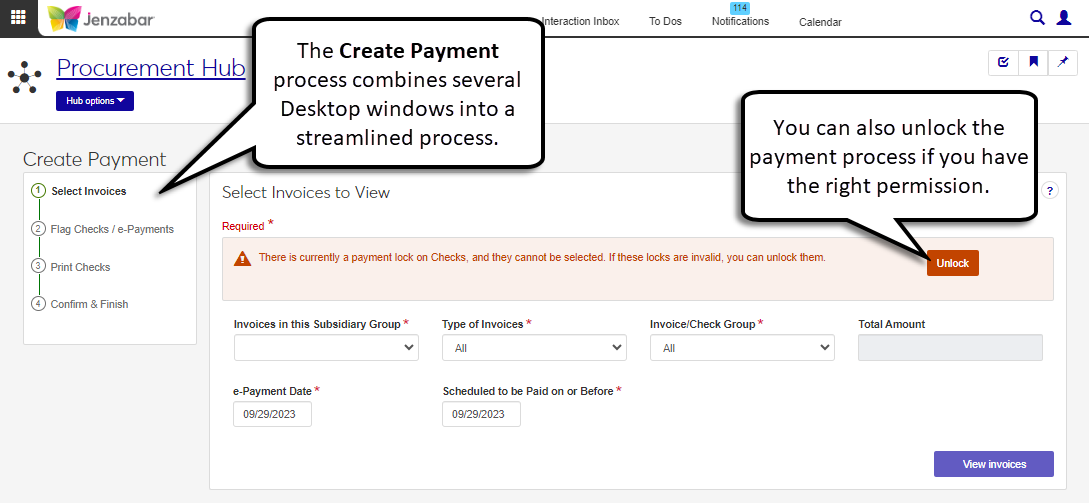
Creating payments in J1 Web is a streamlined process that combines several Desktop windows into a series of sequential pages.
Warning
Although the information is saved in both Desktop and J1 Web, the payment process must be run to completion in either J1 Web or in Desktop. In other words, once you start the process in J1 Web, you cannot continue the process in Desktop (and vice versa).
The following reports and files are generated during the Create Payment process.
Checks to be Issued*
Electronic Payments to be Issued*
Check*/Electronic Payment Register
Check/Electronic Payment reports
Electronic Payment transfer file
Note
Reports marked with an asterisk (*) need to be customized for J1 Web (i.e., reports that were customized in Desktop are not available in J1 Web). For additional information about customizing reports in J1 Web, see Working with Reports in J1 Web.
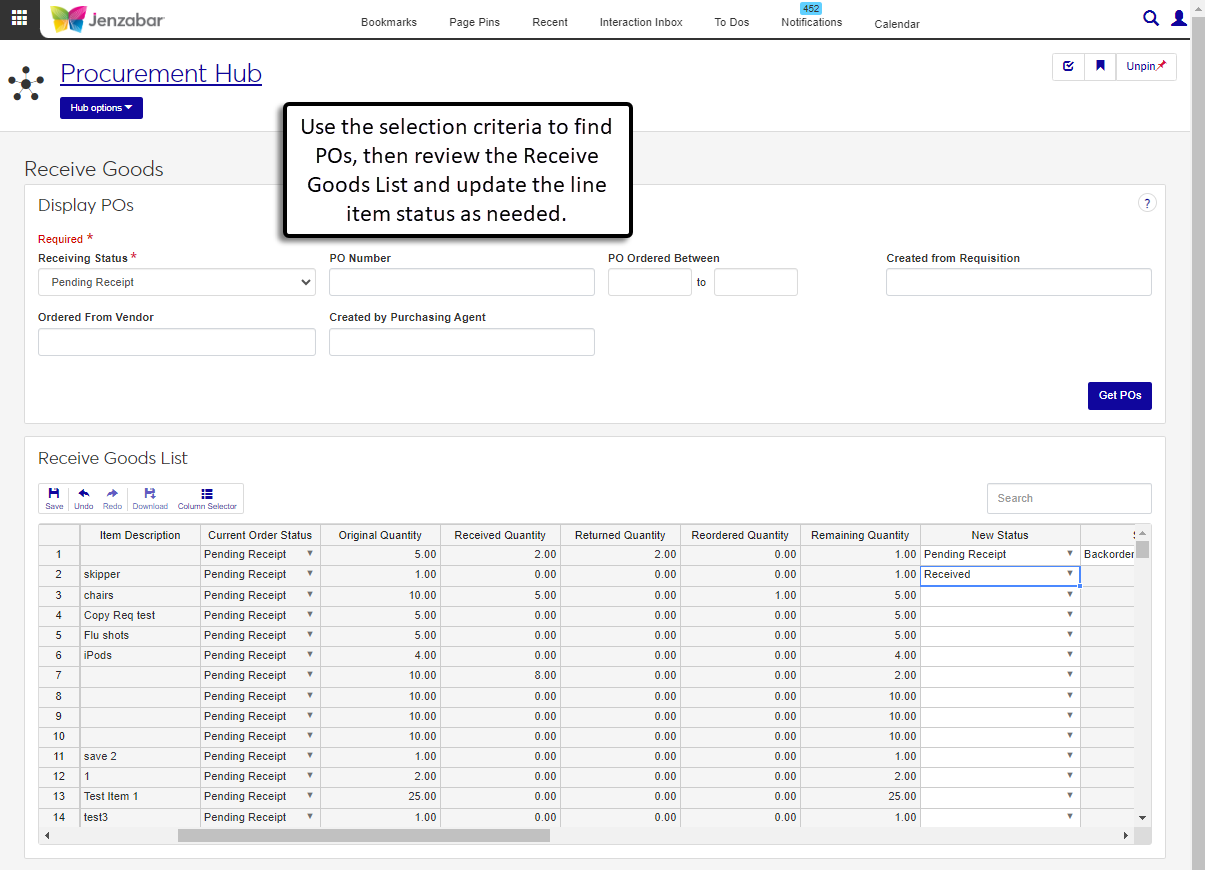
The Purchasing features in the Procurement hub let you work with requisitions, purchase orders, and received goods.
Note
The Purchasing Module Setup window is still managed in Desktop and doesn't have an accompanying page in J1 Web.
The notification settings defined in the Purchasing Module Setup window are not honored in J1 Web. Notifications in J1 Web are managed via the Communications module, and will be available in a future release coming soon. In the 2023.2 release, users won't receive notifications for events related to requisitions and purchase orders (e.g., when a requisition is approved or returned).
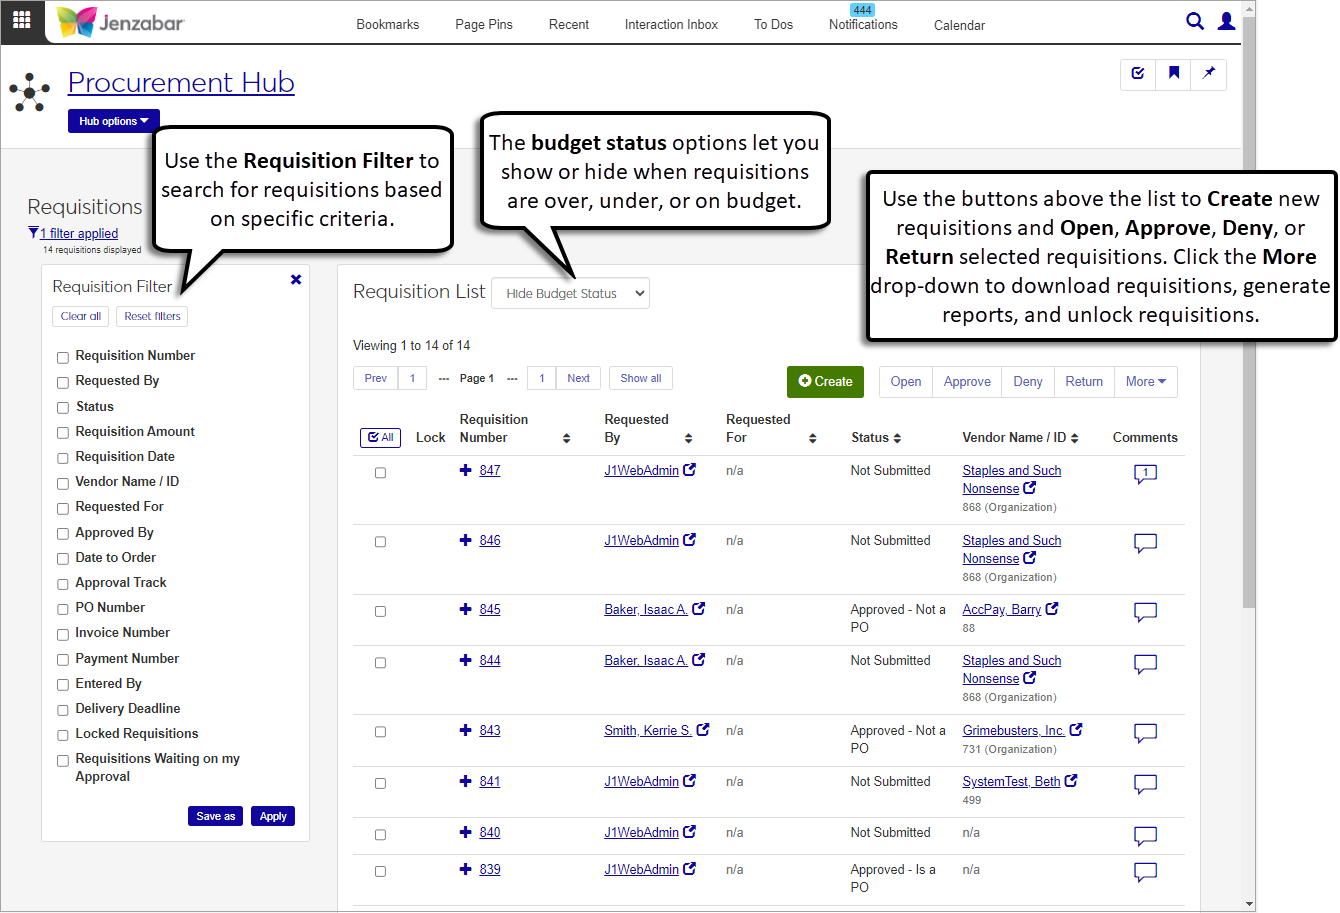
The Requisitions List page lets you search for, create, approve or deny, and generate requisition reports. From this page, you can access the requisition details page to view or update the requisition header and line item details. The Budget Status drop-down lets you display or hide budget status information for the requisition list.
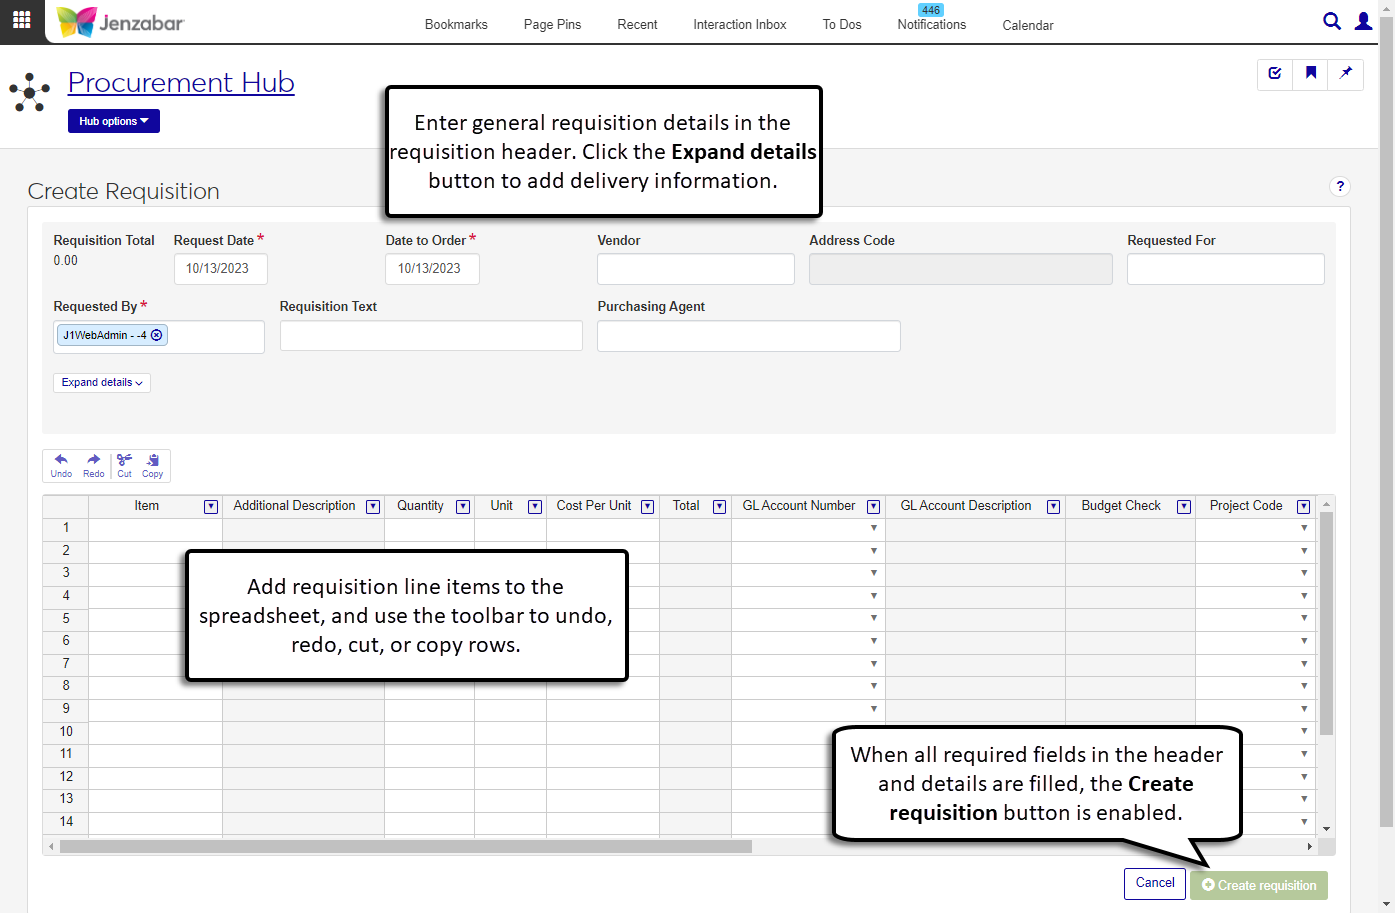
The Create Requisition page can be accessed from the Requisition List page or from the Procurement hub navigation.
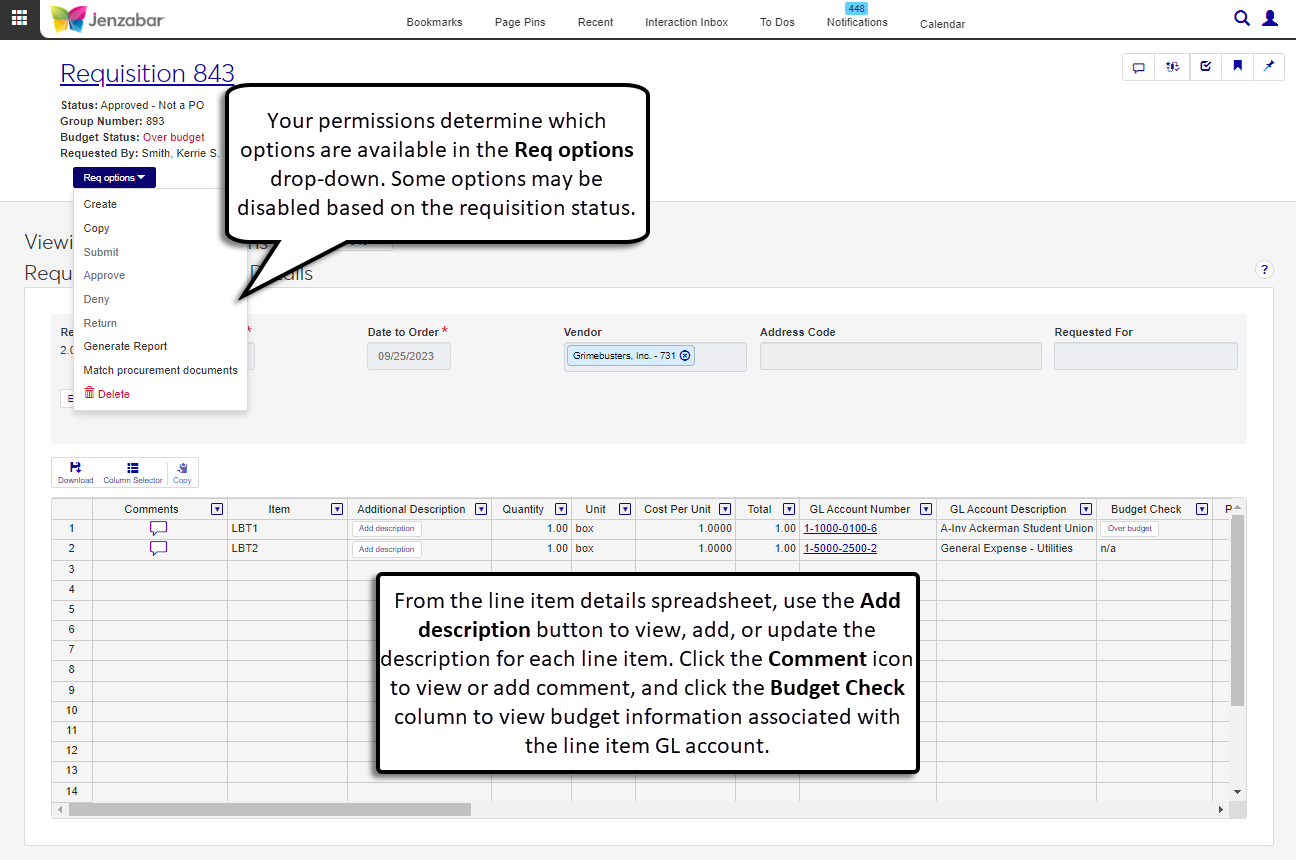
After the requisition is created, you can view or update details on the Requisition Header and Details page. Depending on your permissions and the requisition status, you also have options to submit, copy, approve, deny, return, or match procurement documents from this page.
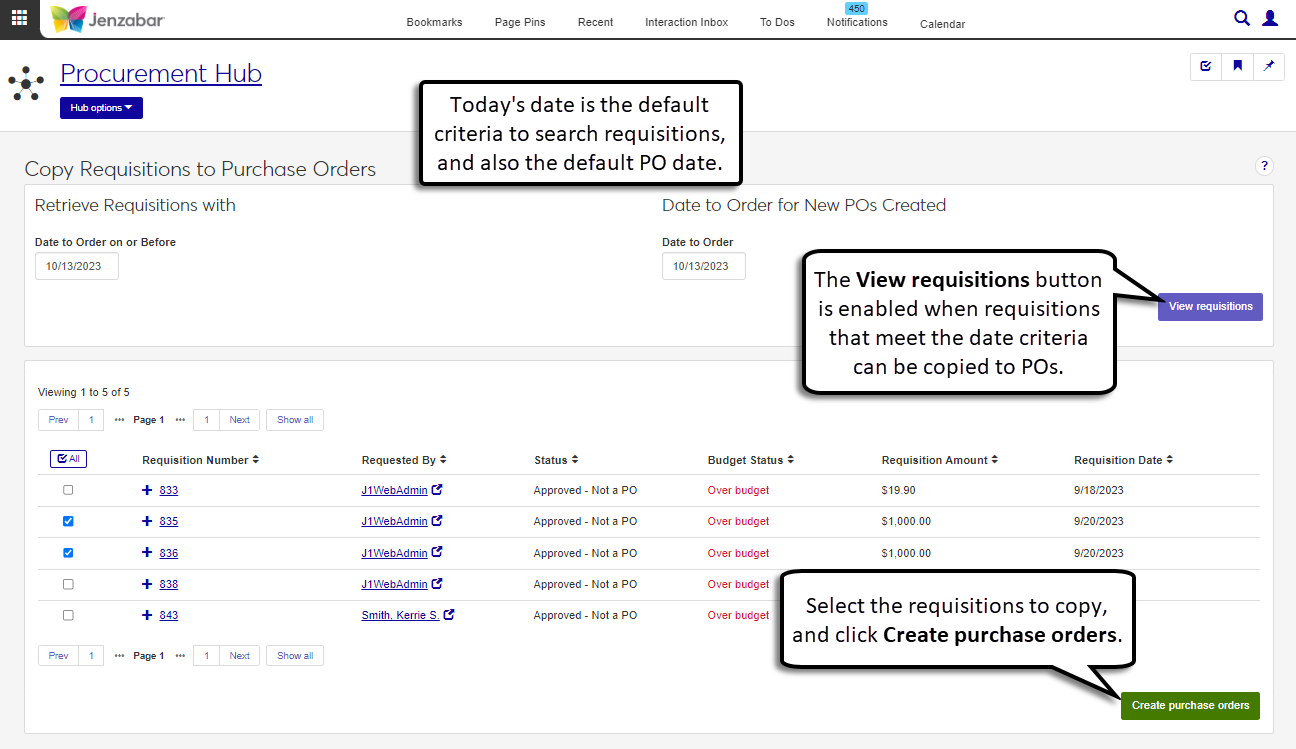
The Copy Requisitions to Purchase Orders page, accessed from the Procurement hub navigation, lets you select requisitions within a date range to create purchase orders.
Note
This page is only available if your institution is not configured to automatically create a purchase order upon final approval.
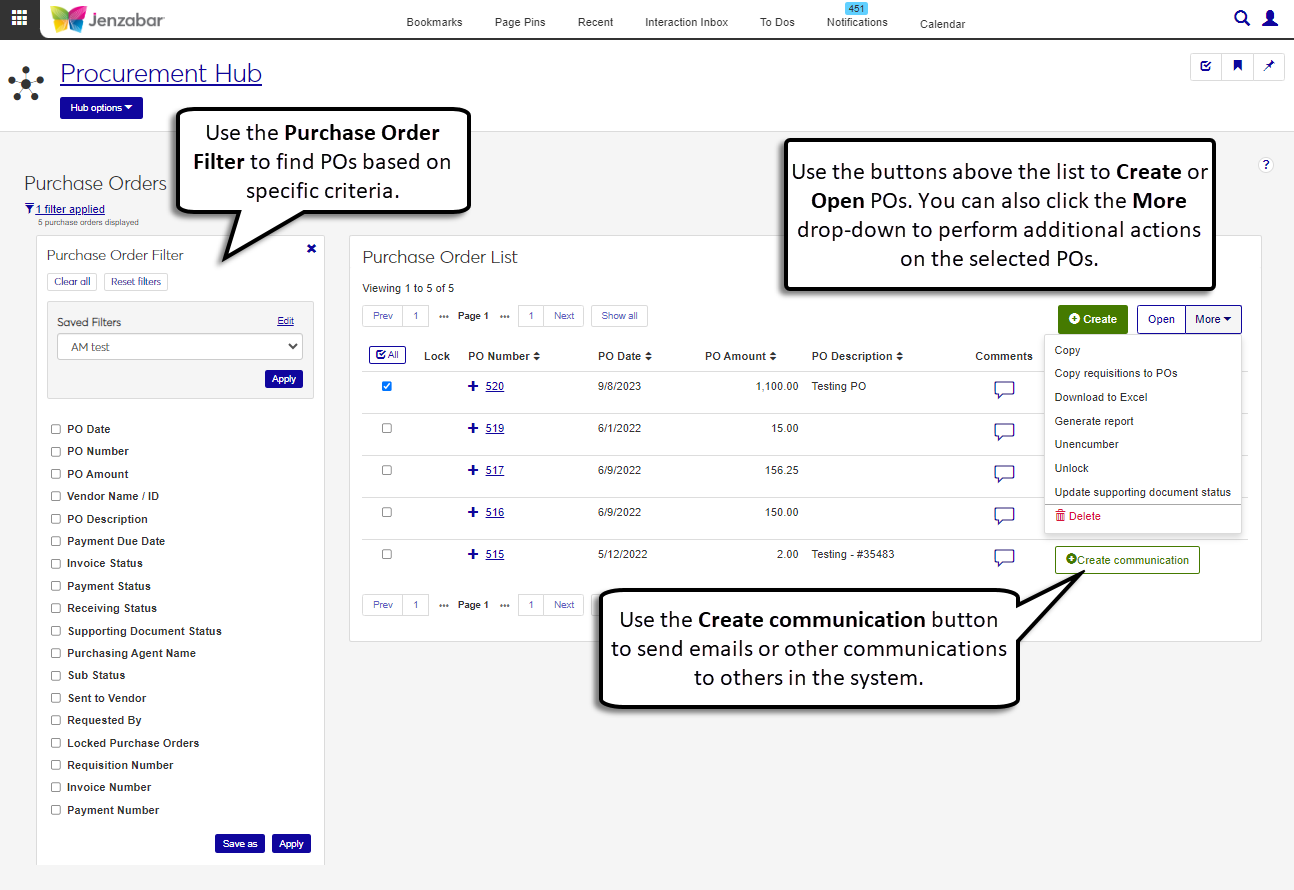
The Purchase Order List lets you view and access details for POs in your system. From this page, you can create, copy, and download POs. Additionally, you can unencumber POs and update supporting documentation. Use the Create communication button to send messages to vendors.
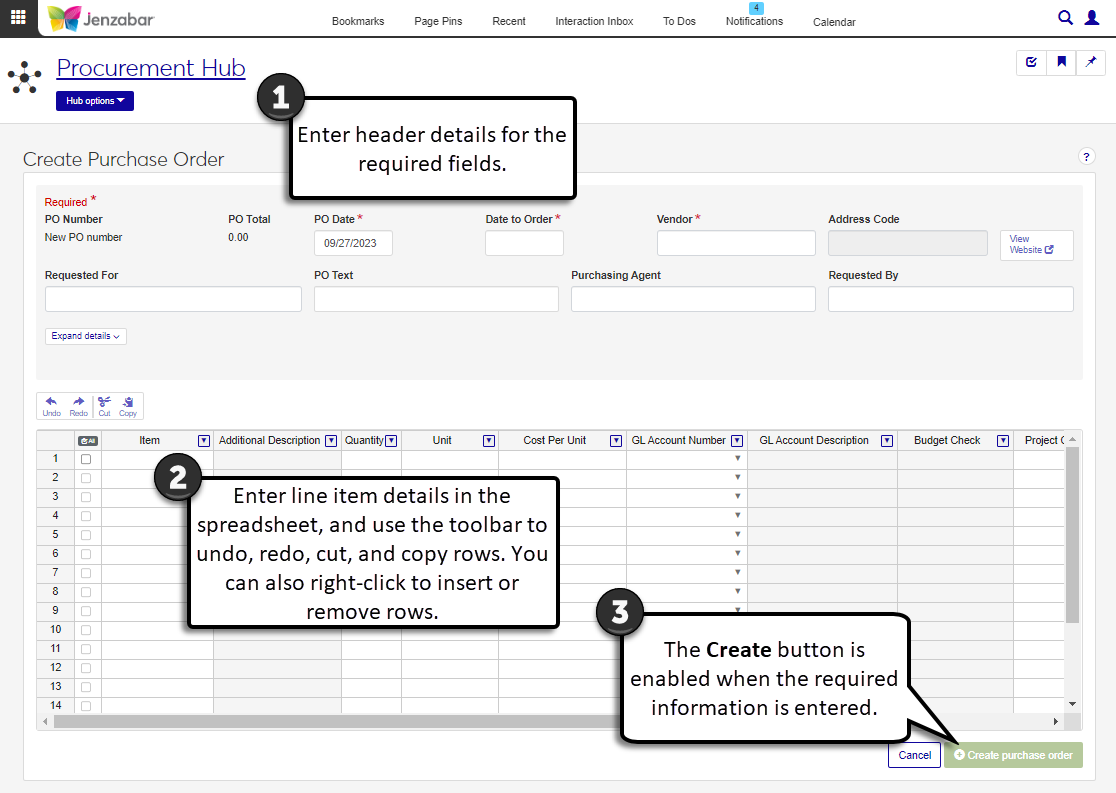
You can create POs in several ways: from the Create Purchase Order page, by copying a requisition to a PO, or by copying an existing PO.
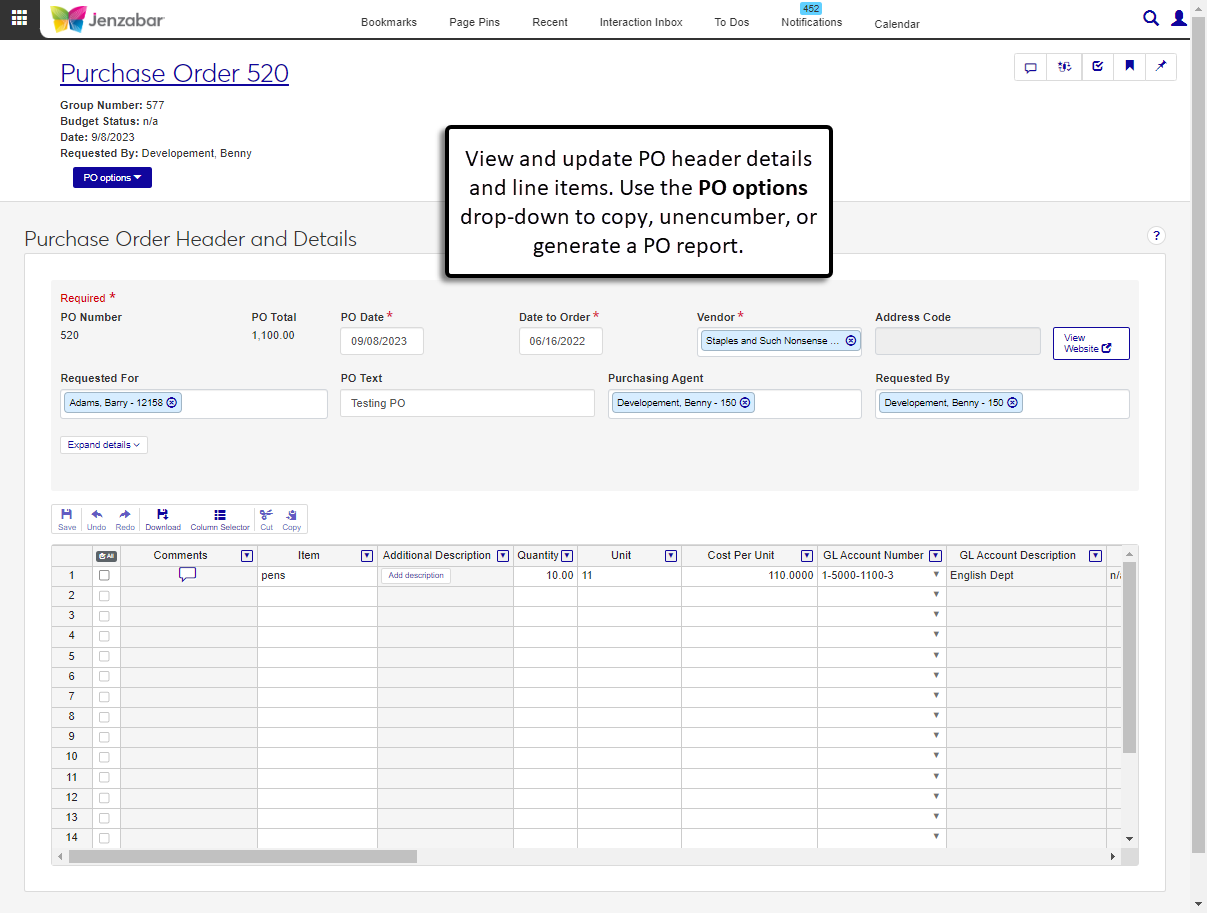
The Purchase Order Details page lets you view and update PO information. Additionally, you can copy the PO, unencumber the PO, generate the PO report, and view related procurement documents.
Generate various reports for procurement processes and documents from the Reports section of the Procurement hub navigation. The following reports can be generated from the Reports section.
AP Aging*
AP Register*
Credit Memo
MSDS
Open Purchase Orders Not Invoiced*
Open Purchase Orders Not Received
Purchase Orders by Date Printed
Purchase Orders by Vendor
Unpaid Invoices by Bank Account
Unpaid Invoices by Vendor
Vendor Payment History
* These reports must be recustomized and saved to the J1 Web PBL; customizations made in Desktop will not work for these reports. For more information about customizing reports for J1 Web, see Working with Reports in J1 Web.
Warning
J1 Web does not currently support the Open Items configuration. If your school is configured for Open Items in the Desktop A/R Configuration window, continue working in J1 Desktop as you will not be able to use J1 Web Finance at this time.
The Receivables Management hub manages accounts receivable information, including student account information, receipts, and charges. Access to this hub is granted via the Receivables Management role and permissions.
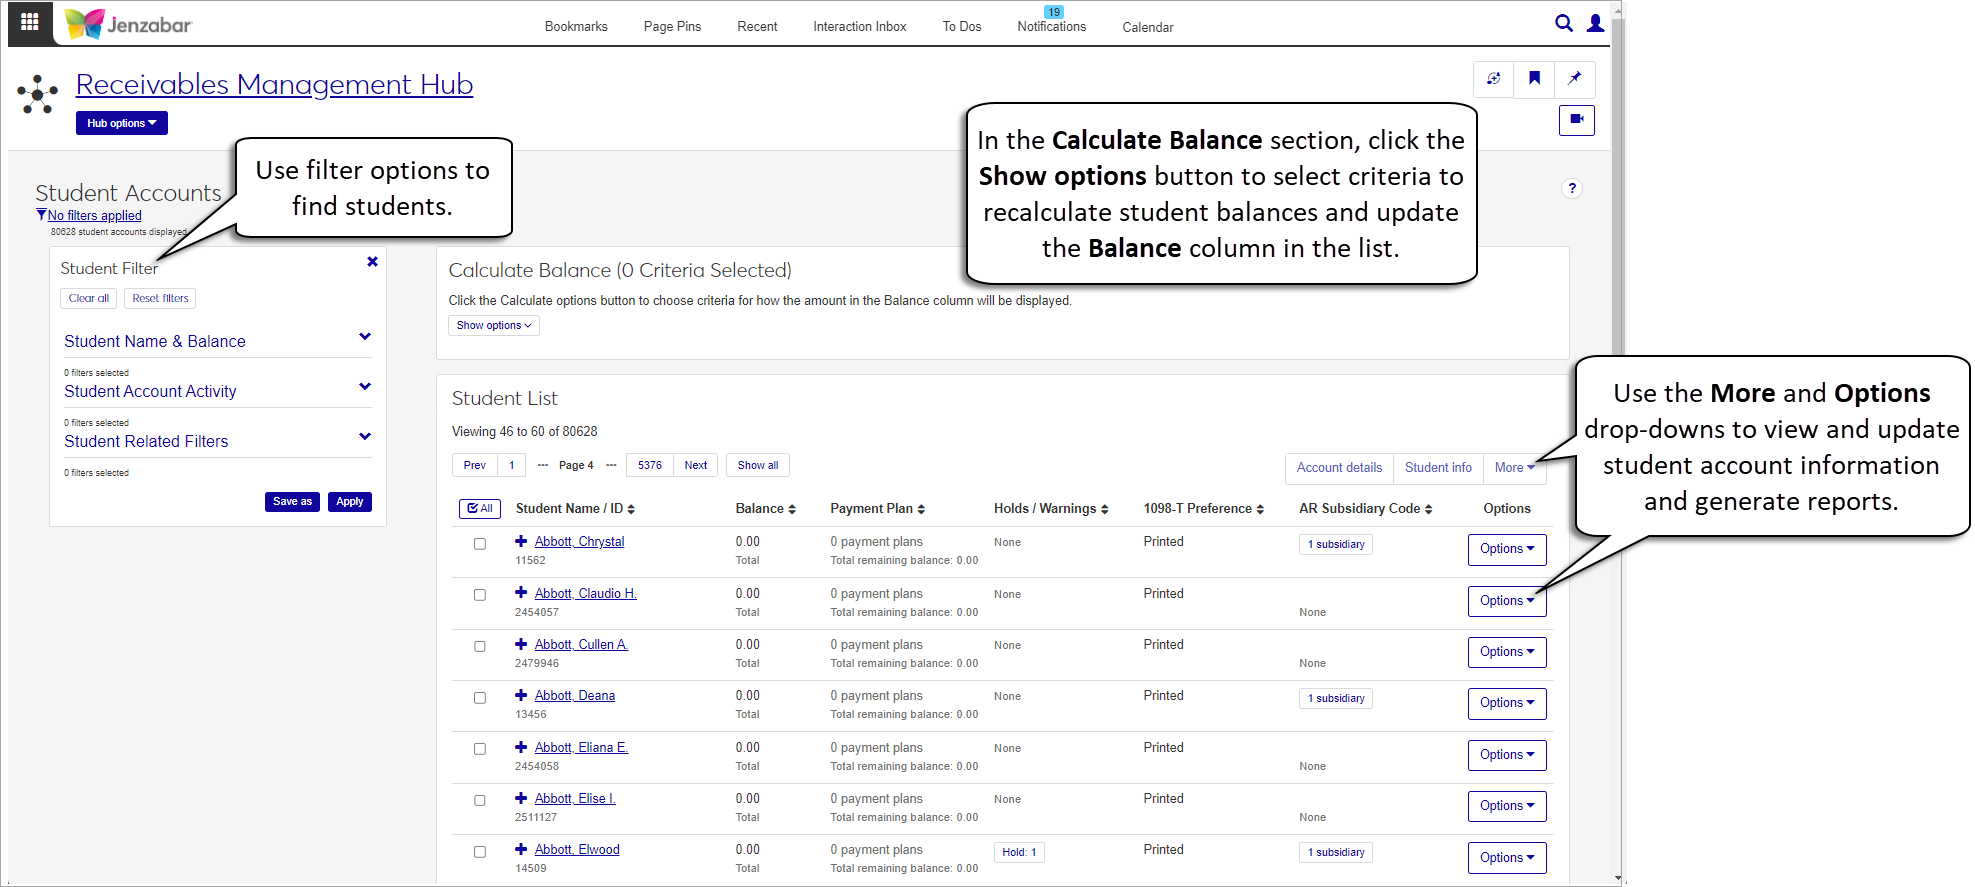
Most information related to student accounts can be accessed from the Student Accounts page, which lets you view and search for student account details based on various criteria. From this page, you can:
Filter the list of students based on financial or student information.
Calculate and display account balances based on criteria like 1098-T year/term, billing period, subsidiary code, and subsidiary group code.
Add discounts, exemptions/waivers, and holds.
Generate the A/R Inquiry report.
Access additional account and student information pages for one or multiple students.
Note
The Receivables Management hub grants access to the Student Account Details page; permissions to access the Student Information Details and Person Information Details pages is granted via the Common and Registration hub roles.
The Student Account Details page lets you view and update account activity, payment plan details, and electronic payment information for one or more students. You can view information for all subsidiary codes associated with the student, or for a single or subset of the associated subsidiary codes. Additionally, you can associate another subsidiary record with a student from this page.
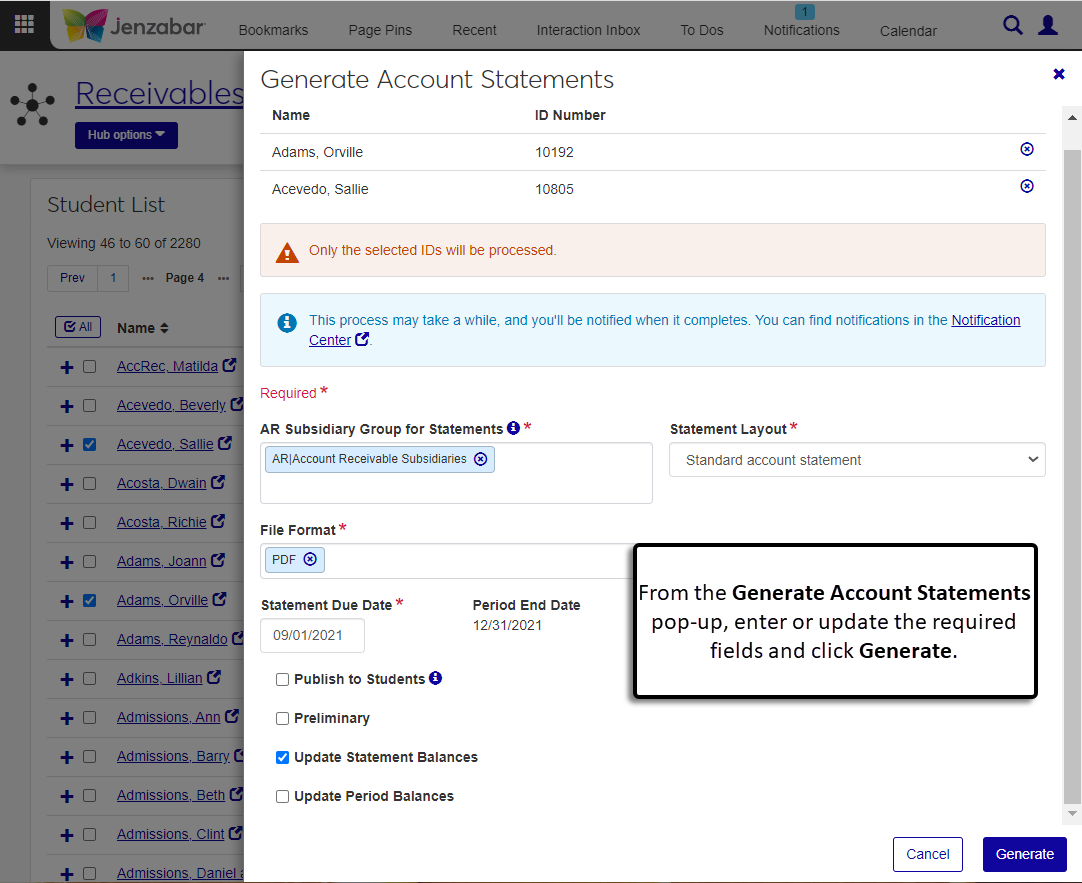
The Account Statements page lets you generate statements, publish them to the Campus Portal, and update account balances. You can add student to the list based on data sets (i.e., queries) or you can add students individually. Then select the students you want to generate statements for, click the Generate account statements button, and enter the required information to start the process.
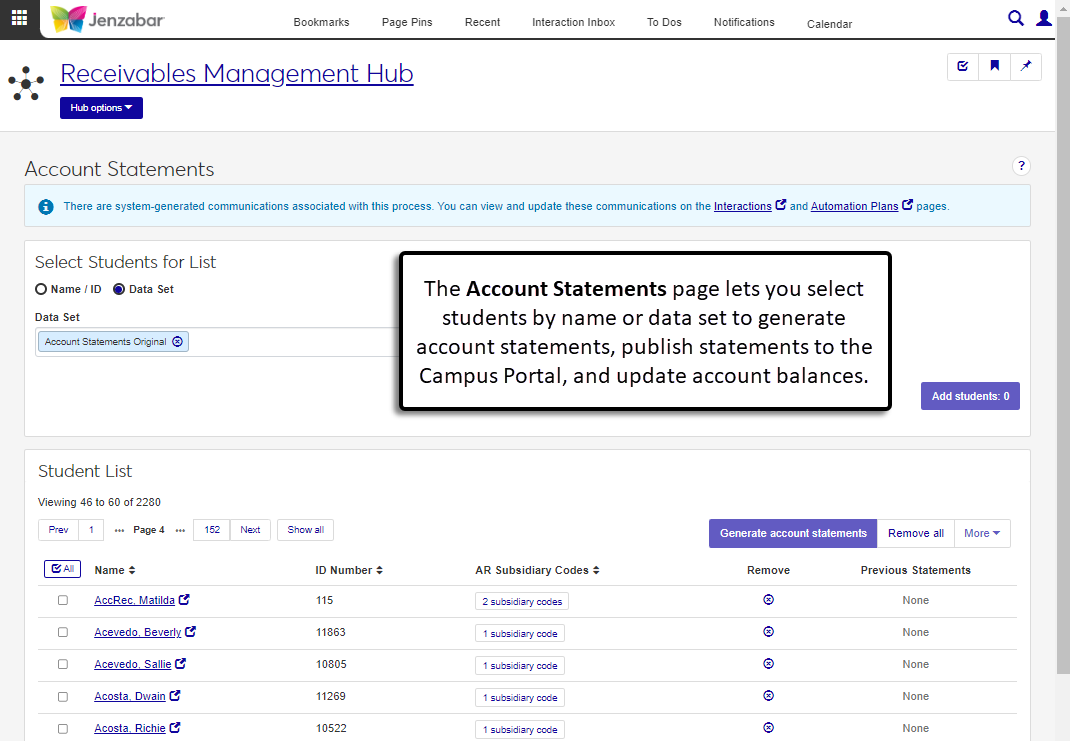
Note
Jenzabar provides four default account statement layouts:
Standard account statement
Account statement with schedule
Account statement - year/term
Account statement - billing period
The "Account statement with schedule" statement layout is specific to J1 Web, and any versions of this layout that were customized in Desktop are not available in J1 Web. To customize this layout for J1 Web, follow the steps in Working with Reports in J1 Web.
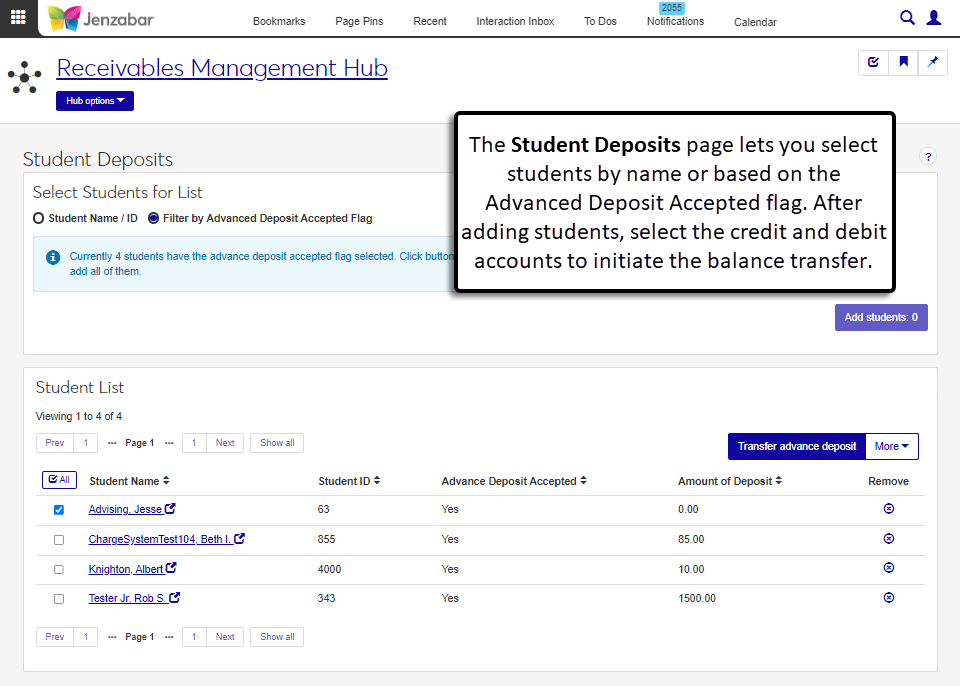
The Student Deposits page lets you transfer advance deposits to the appropriate subsidiary associated with the student. You can select students by name or based on the Advance Deposit Accepted flag. The process is initiated after the credit and debit account information is entered.
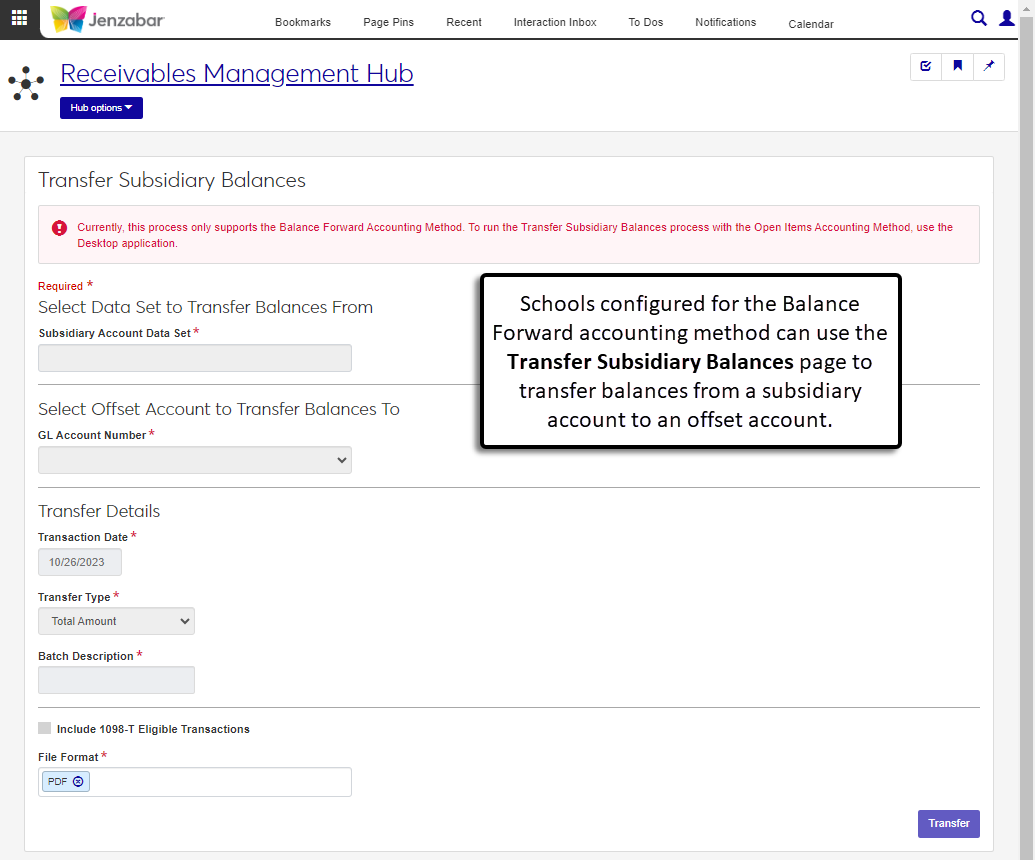
Use the Transfer Subsidiary Balances page to transfer balances from one subsidiary to another.
Warning
At this time, J1 Web supports this process only for schools configured for the Balance Forward accounting method. Schools configured for the Open Items accounting method must run the Transfer Subsidiary Balance process in Desktop.
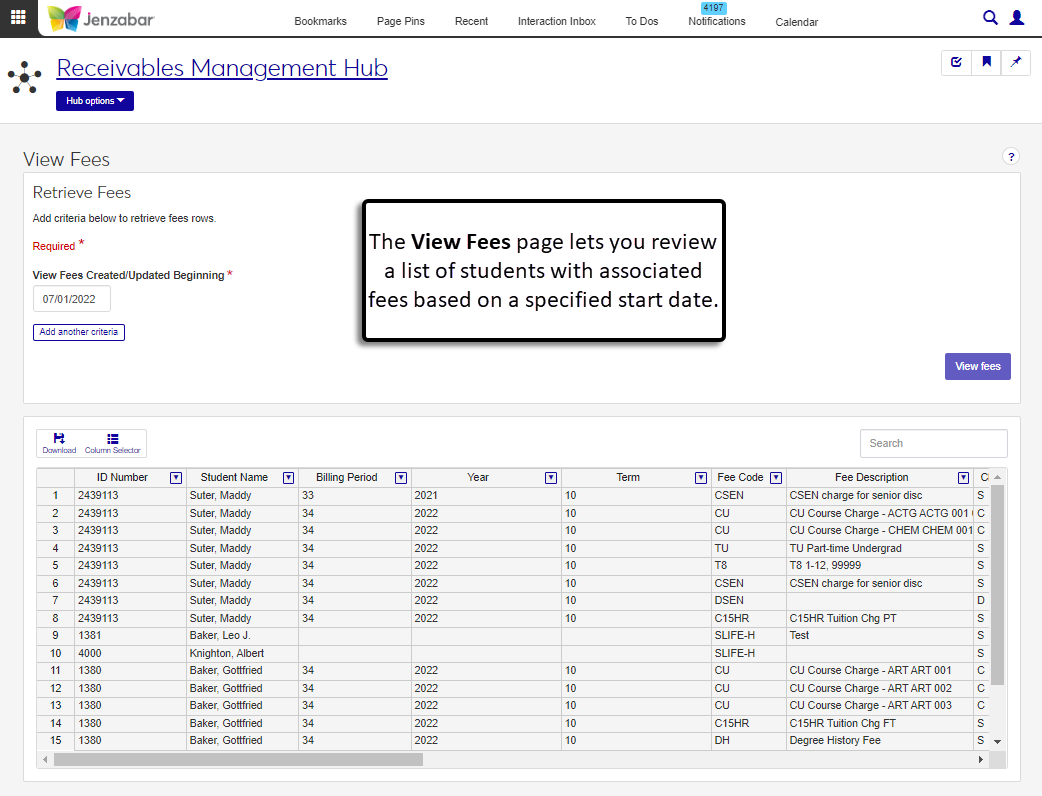
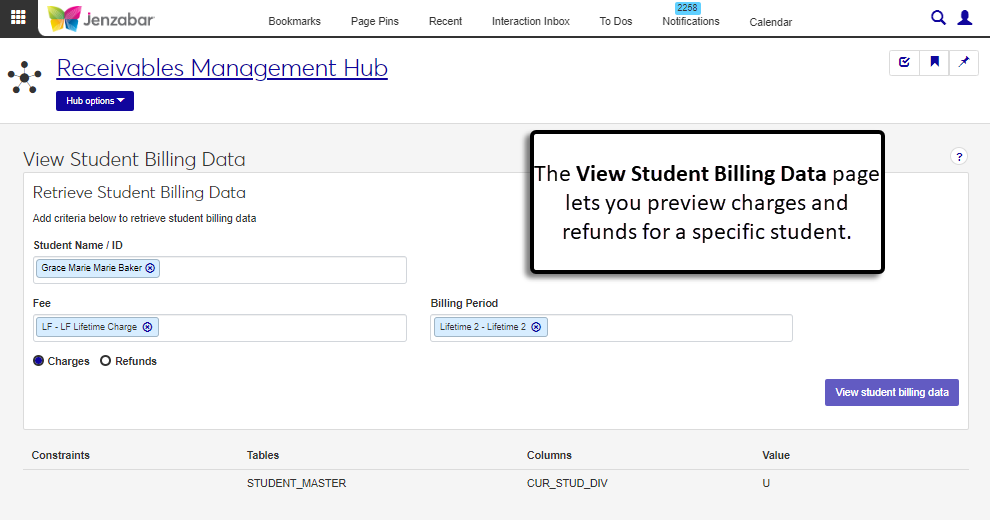
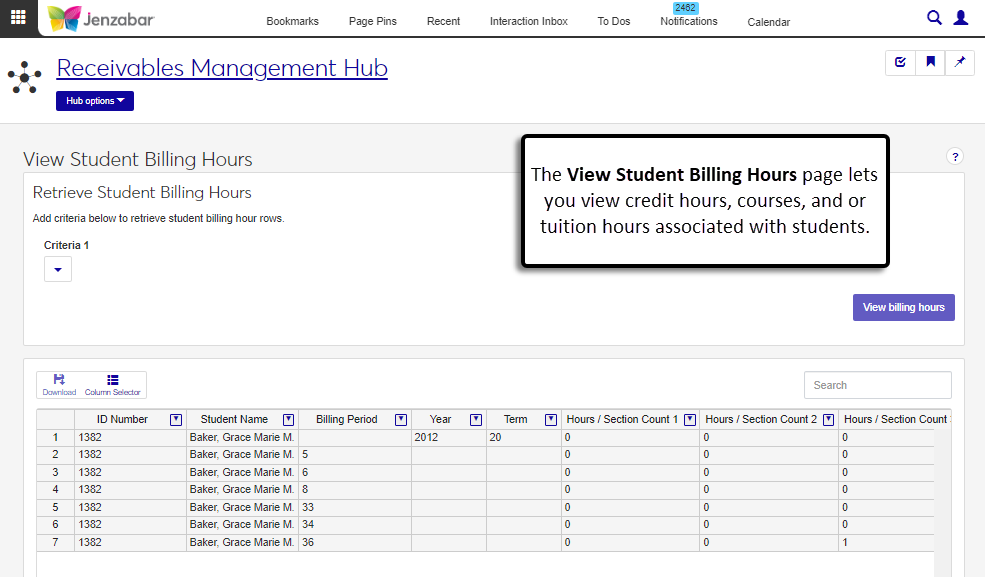
The View Fees, View Student Billing Data, and Student Billing Hours pages let you view student charge related information to help troubleshoot billing issues. You can enter criteria on each page to generate specific results.
The Miscellaneous Charges page displays a list of miscellaneous (MS) charge batches. You can filter the list based on various criteria, including batch status and number. From this page, you can access the MS charge details, MS batch details, create new MS charges, and unlock MS batches.
Note
The MS Batch List page lets you access both the MS charge details page and the MS batch details pages with the right permissions. Access to the MS batch pages is granted from the General Ledger Accounting hub.
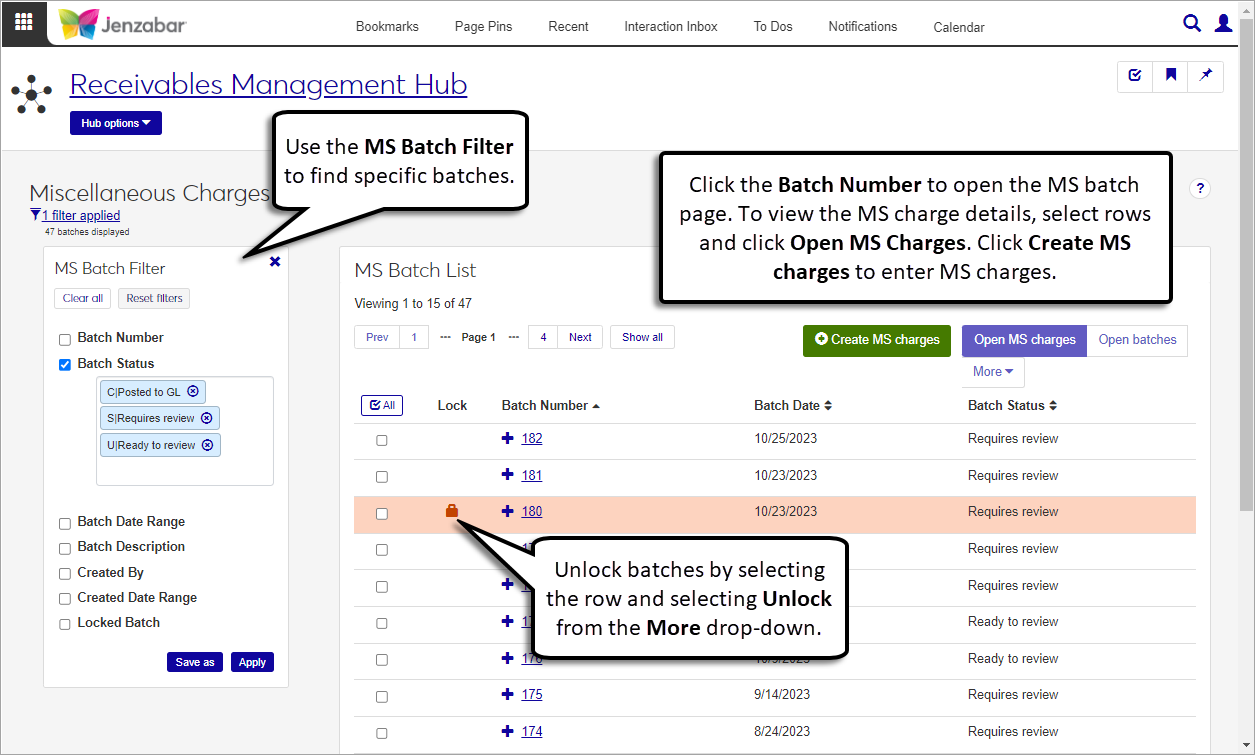
The Create Miscellaneous Charges page lets you add MS charges to the system and create MS batches.
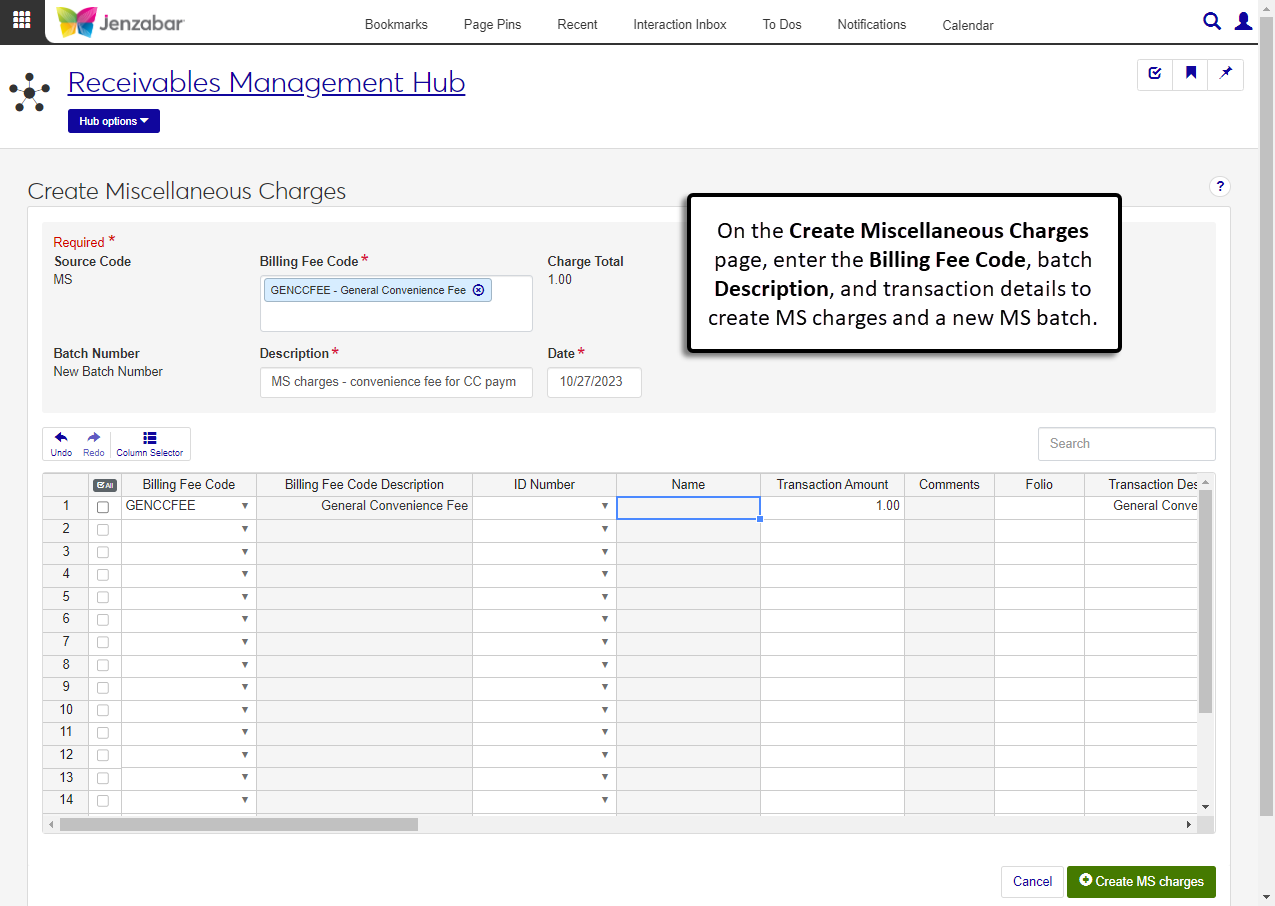
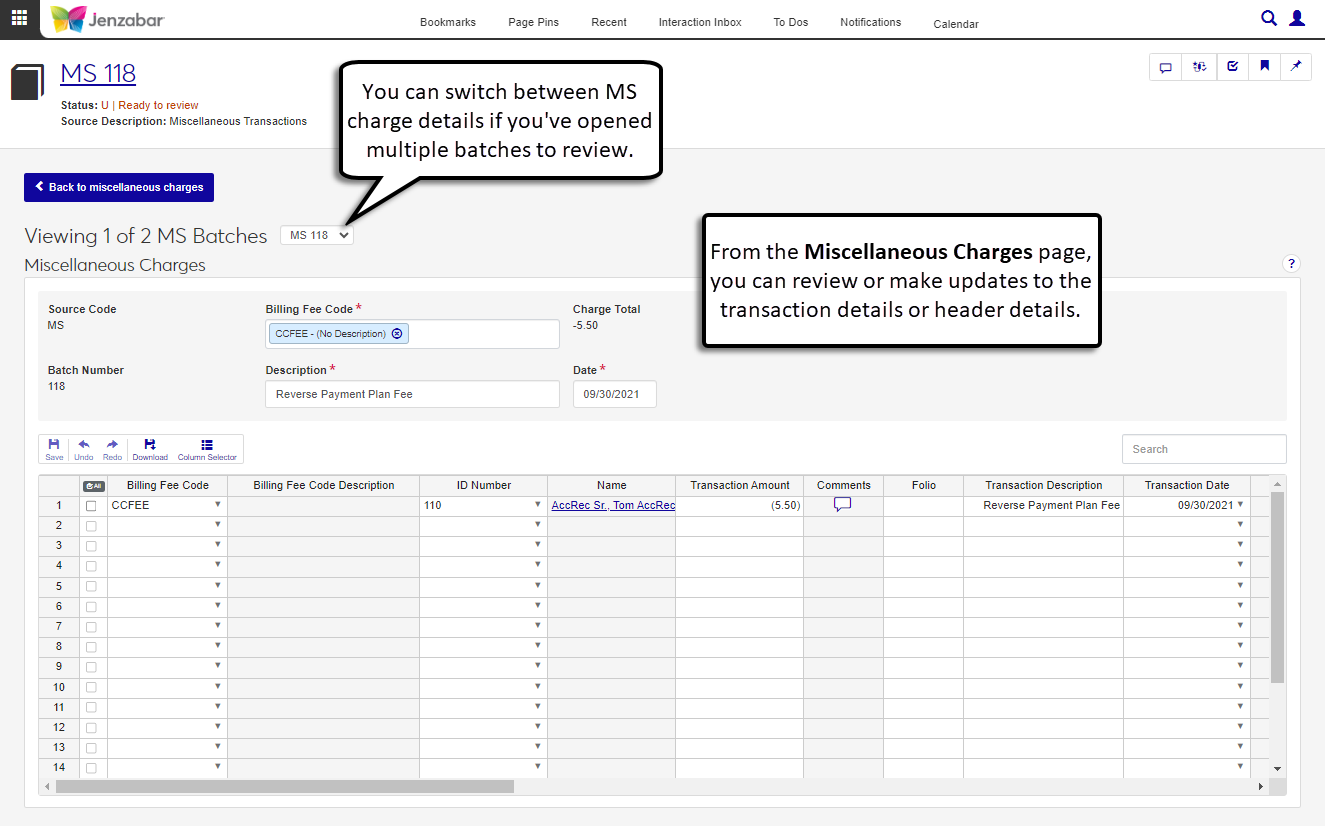
After you've created MS charges, you can review them from the Miscellaneous Charges page, which is accessed from the MS Batch List page by selecting one or more rows and clicking Open MS charges.
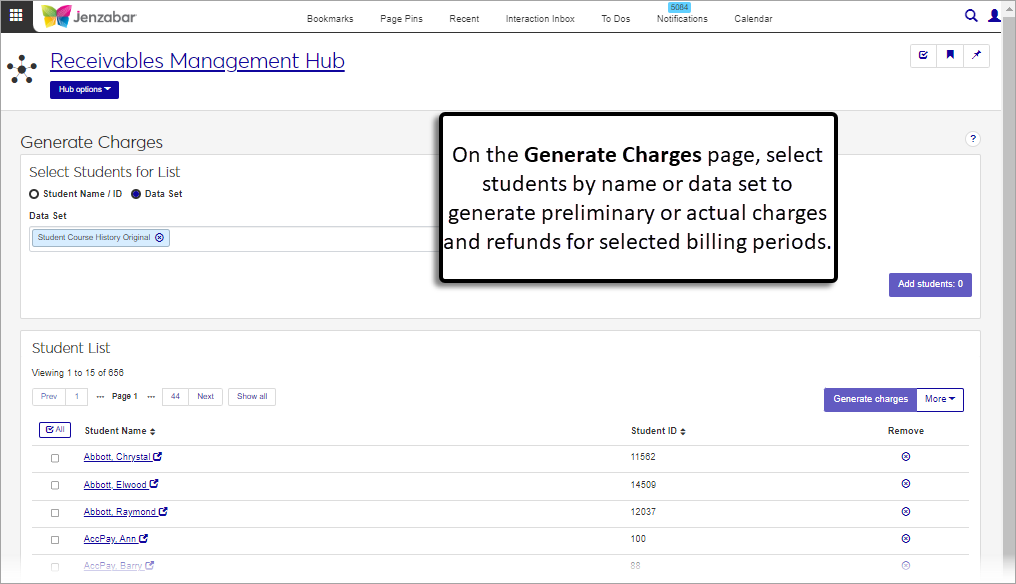
The Generate Charges page lets you generate preliminary or actual charges and refunds for selected billing periods. You can add students to the list individually or use a data set to retrieve multiple students based on predefined criteria.
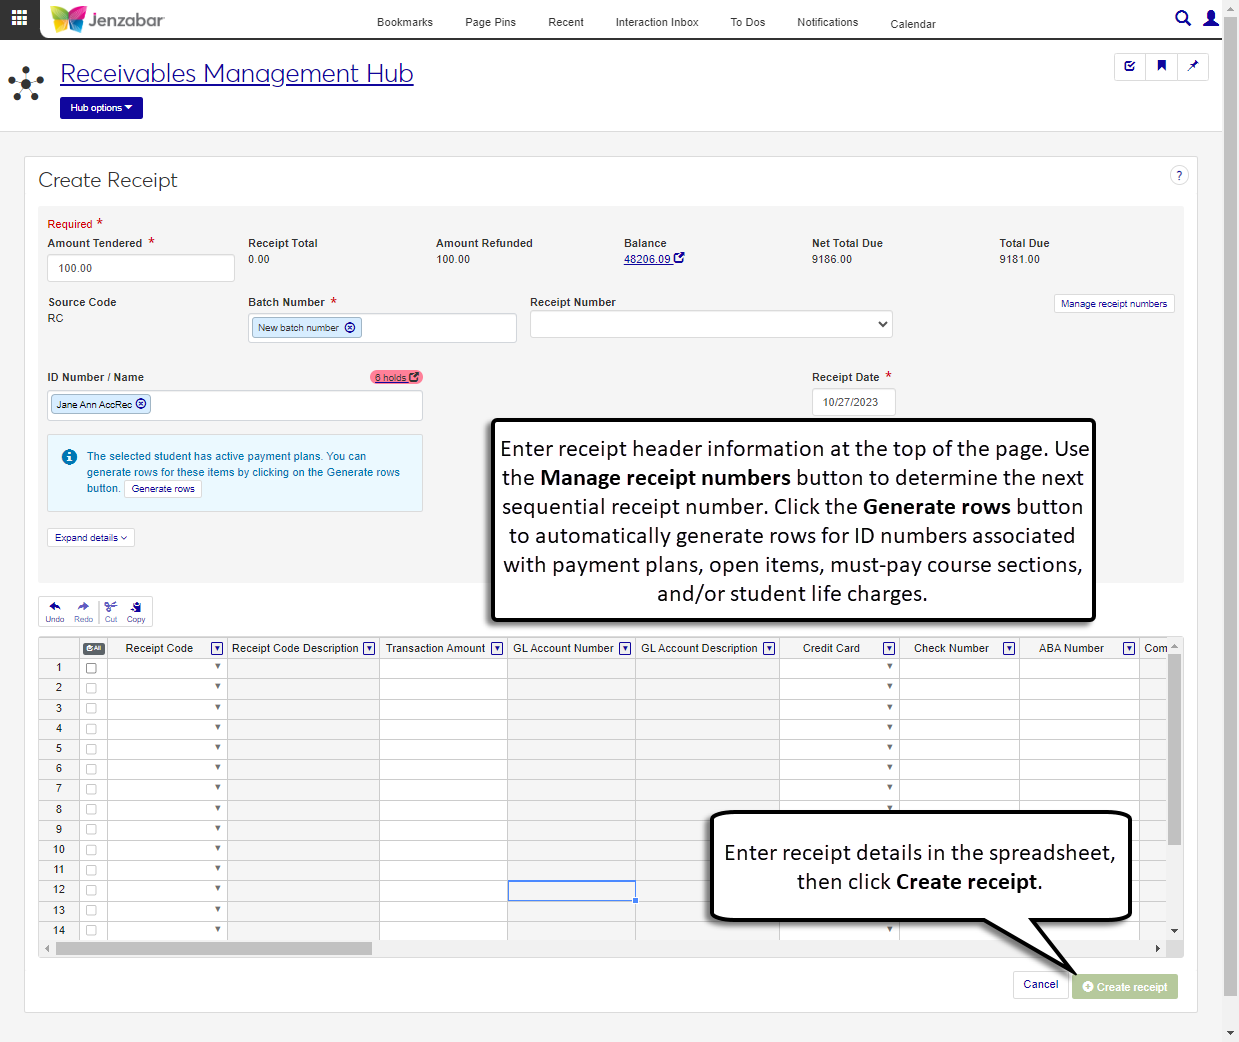
The Receipts page lists the receipts in your system and the batches they are included in. From this page, you can access receipt details, create new receipts, and generate receipt PDFs and the Payments Received report. You can also view and add comments to receipts from this page.

You can open the Create Receipt page from the Receipt List or by clicking Create receipt from the Receivables Management Hub options drop-down. The Create Receipt page lets you enter transactions manually and also provides options to generate receipt detail rows for students associated with payment plans, must-pay course sections, and/or student life charges. Use the Manage receipt numbers button to create receipt groups and determine which number is assigned to the new receipt.
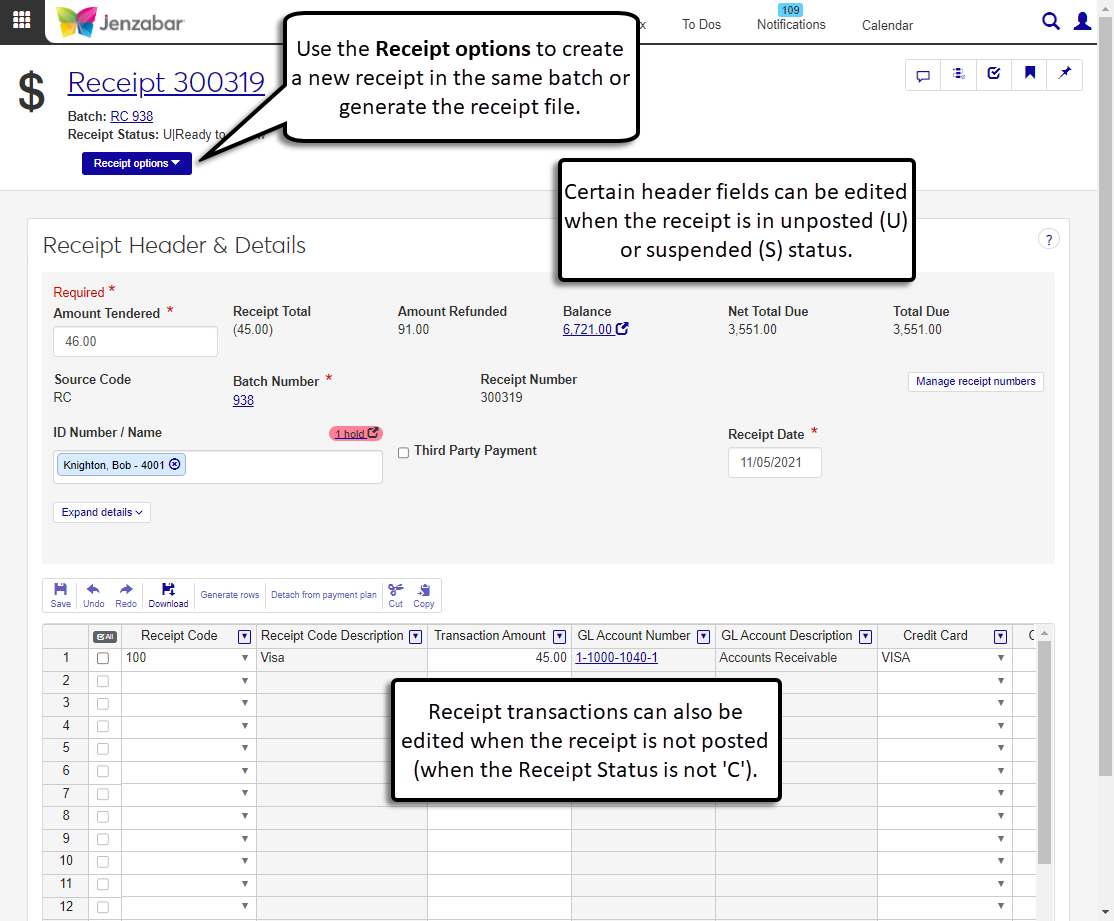
The Receipt Details page lets you review and update header and transaction details for payments. From this page, you can view and update receipt header and transaction details, as well as delete, create, and generate receipt files.
Note
The J1 Web receipt report is specific to J1 Web and therefore customizations made in Desktop are not available for selection. To customize the receipt report for J1 Web, see Working with Reports in J1 Web.
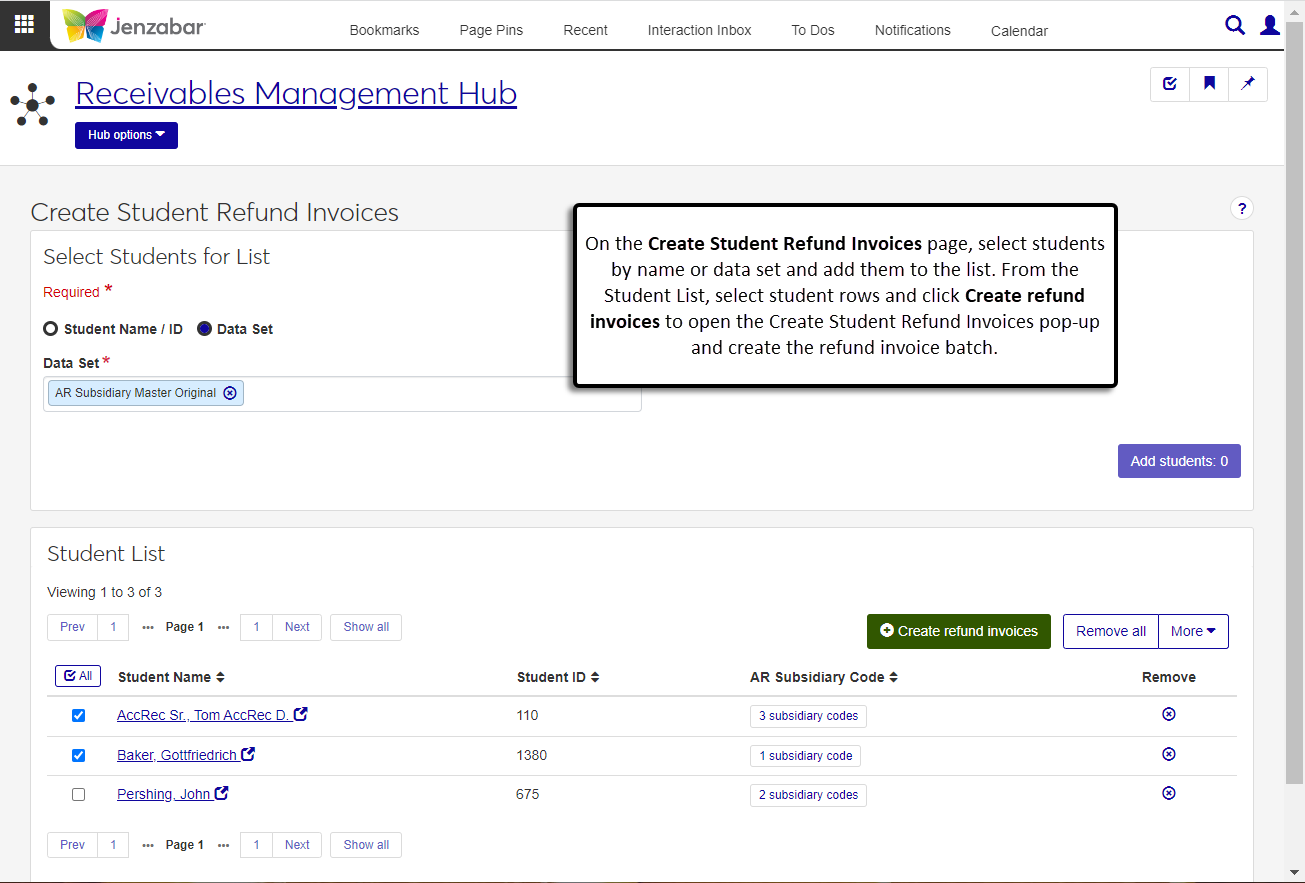
The Create Student Refund Invoices page lets you select students by name or by data set and generate refund invoices for them. After the process runs, you'll receive a notification that an invoice (IV) batch has been created.
Note
Access to the IV batch page is granted from the General Ledger Accounting hub.
Many reports in the Receivables Management hub are generated during a process or from a specific page (e.g., receipt reports and A/R Inquiry reports). At this time, the Reports section of the Receivables Management hub lets you generate the AR Exceptions report. Additional reports are planned for future releases!
For more details about J1 Web Finance, including transition guides and training videos, visit the Finance Resource page on MyJenzabar.net and learn.jenzabar.com.
Jenzabar One Web Finance Is Available for Early Adopters!
Limited finance functionality is available for licensed early adopters. The new integrated Finance Hub contains functionality for the business office, including general ledger, budget, fixed assets, student accounts, purchasing, and accounts payable. Look for the generally available release at the end of the year!
2022.2
2022.1
2021.3
2021.2
2021.1
2020.3
2020.2
2020.1
2019.5
Updates to the 1098-T Process
Several updates to the 1098-T process and related windows have been made for this release to provide schools with more control over amounts included in the 1098-T reports.
New 1098-T Eligible flag on the Setup A/P & A/R Subsidiary Definitions window that allows you to choose which subsidiaries are included in the 1098-T process. Any transactions that are flagged as 1098-T eligible will be required to have a year and term entered on them during transaction entry.
New Capping Options on the Generating 1098-T window allow you to determine how Box 1 will be calculated. There are three options, No Cap (used for 2018), Year, and Year/Term.
Box 4 (Adjustments to Prior Year) calculations will now be based on payments (amount paid) instead of charges (amount billed) for the 2019 tax year. The process will select all refunds, invoices, and transactions (IV, IM, MN, VD) dated in 2019 with the Eligible 1098-T value of P and a Year/Term from a prior year.
1098-T Audit Reports have been rewritten for simplicity and better performance. Totals for boxes 1 and 5 will no longer appear on the audit reports due to the variation of results and the new capping feature that may alter the actual results of the 1098-T process.
Updates to the query for the list of students in the Select Students grid should now match all students who will receive a 1098-T form.
The Name Master will now provide a warning message instead of an error message, allowing you to select SSN Verified even if no SSN exists. The warning message will let you know there is missing content in a verified field but still allow you to continue the process or cancel to make corrections.
Export to Excel is now available for the list of students in the Select Students grid of the Review and Generate 1098-T options.
Import from Excel and Export to Excel are now available on the Maintain Student Year Reporting Data window
New Eligible 1098_T Code on the Header tab of the Benefits Control window will allow you to flag appropriate benefits as 1098-T eligible. When a benefit has an Eligible 1098-T code, the Update Payroll process will require a 1098-T year/term.
When the Update Payroll process is run, the system will check the selected batch to see if any included IDs have a benefit code associated with a 1098-T flag. If a 1098-T flag is found, a 1098-T year and term is required.
Tip
Which windows and flags will determine the transactions included in a student’s 1098-Ts?
Receipt Code Control window: 1098-T Eligible checkbox
Define Journal Source Codes window: Payment Source Code checkbox
Year Term Subterm window: Ensure all year/term and year/term/subterm combinations have valid Start and End Dates
Charges/Refunds Definition window: 1098-T Eligibility flag
Miscellaneous Charge Codes Entry: 1098-T Eligibility flag
Benefits Control window: Eligible 1098-T flag
Create Student Refund Invoices window: 1098-T Eligible payments checkbox
Setup A/P & A/R Subsidiary Definitions window: 1098-T Eligible checkbox
Fund Master window: Apply to 1098-T Eligible Charges checkbox &1098-T Eligibility flag
Note
Year/Term required on the following windows for 1098-T eligible transactions:
Receipt Entry
Transaction Entry
Financial Aid Transaction Entry
Miscellaneous Charges-A/R Charge Entry
Invoice Entry
2019.3.1
Changes to J1 Desktop Windows for 1098-T Updates
Note
The updates for the 1098-T form processing affects several Jenzabar products, including Accounts Payable, Accounts Receivable, Financial Aid Manager, and General Ledger.
To account for the changes in IRS filing requirements for Box 1, several windows have been updated in J1 Desktop.
New Apply to 1098-T Eligible Charges checkbox on the Fund Master window to note which scholarships and grants that can be applied to eligible charges. This flag is referenced during the calculation of Box 1.
New Payment Source Code? checkbox on the Define Journal Source Codes window to handle custom source codes for payments (including payments from outside sources).
New 1098-T Eligible checkbox on the Create Student Refund Invoices window gives the ability to specify a payment 1098-T eligible code for refund checks to a student for a credit balance/over payment so they are included in the calculation for the amount going into Box 1.
The Void Vendor Payments process now selects the 1098-T Eligible checkbox appropriately based on the original Invoice (IV) transaction(s) for the check being voided.
Removed the 1098-T Priority field from the Charges/Refunds Definition, Charges, and Miscellaneous Charges windows since calculations are no longer based on eligible charges.
Removed the Validate Payments option from the Audit Reports section of the Generate 1098-T window.
Moved many warnings and errors on the 1098-T Audit Reports. Warning reports include any errors that have to do with Box values validation. The Included Transactions Audit reports now show any name and address errors. The Excluded Transactions Audit reports now show any 1098-T flag and year/term errors.
Require a year and term on the Receipt Entry window if the receipt is assigned a student ID number.
Require a year and term on the Miscellaneous Charge Entry window if the 1098-T Eligible value is selected for the charge.
Require a year and term on the Transaction Entry window if the 1098-T Eligible value is selected or if the transaction has a payment type source code and a student ID.
Require a year and term on the Financial Aid Transaction Entry window if the 1098-T Eligible value is selected for the transaction row.
Require a year and term on the Invoice Entry window if the 1098-T Eligible value is selected and a student ID.