Import Communication Contacts
Important
Information and features vary according to the roles to which you belong and the permissions associated with those roles. For more information, contact your module manager or your campus support team.
Warning
With 2024.1 the contact import process is a part of Data Management. Communication contacts are now imported through the Import Processing Queue page in the Data Management hub. This process still supports uploading multiple individuals and organizations at once from a .csv, .xls, or .xlsx file, with the option to preview contacts before importing.
There is a new step in the contact import process. Users must now associate a data mapping template with the communication contact file being uploaded. This template defines how imported contact data is mapped to specific tables and columns within Jenzabar One. Jenzabar provides a predefined Communications Contact Import data mapping template that schools can use during the import process, or schools can create and select a custom template of their own.
Permissions to the contact import process have moved from the Communication Management Base role to the Data Management role. Users that have or require permission to import communication contacts must now be assigned to the Data Management role with that permission enabled.
The Import Communication Contacts page lets you add multiple individuals and organizations at a time from a .csv, .xls, or .xlsx file. You can preview the contacts in the file and select which ones you want to add to the system as external persons/organizations. Once added, these contacts can receive communications from your school. This can be helpful when reaching out to prospective students, potential donors, etc.
Note
If needed, external persons can be added as internal users and assigned an ID number from the Person Information Details page.
When you import new contacts, the system checks for duplicates and lets you compare information. You can choose to create a new record or update the contact information for an existing record. If your file has new or updated information, you can upload it again and evaluate which updates need to be made in the system.
Tip
If you are importing a group of contacts your school communicates with regularly, you can create a data set based on the file. That data set can then be used repeatedly as a communication recipient list.
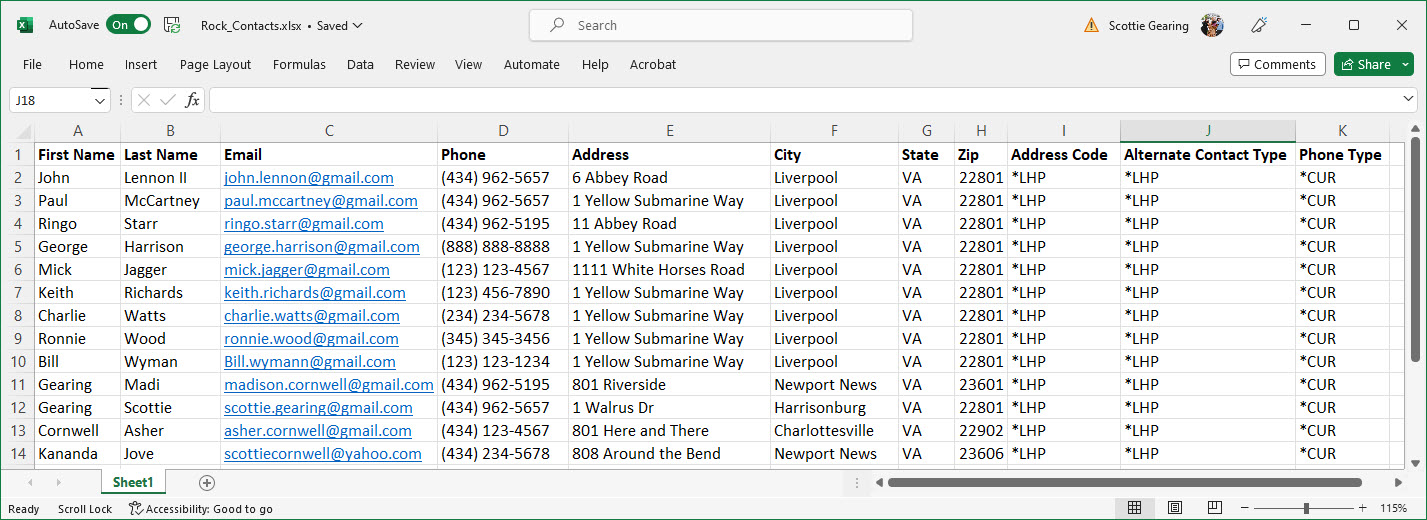
You can upload contacts from .xls, .xlsx, and .csv files. Your file must include the following columns:
First Name
Last Name
Email Address
Phone Number
Phone Type
Address
Address Code
City
State
Zip
Alternate Contact Type
Note
Not all of this information must be filled in to complete the import process, but the columns must exist in the file.
To access this page and work with the different features, you must belong to a Communication Management Base role with the Can import communication contacts permission enabled.
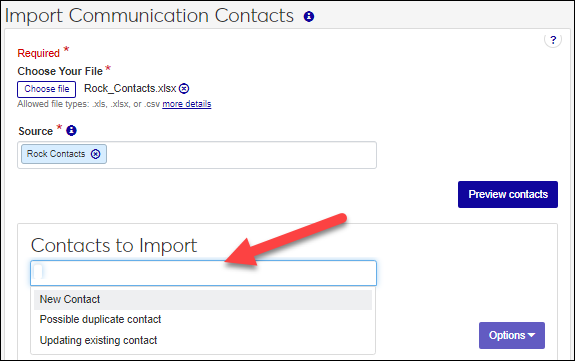
You can filter contact lists by new ones to be added, ones that may duplicate existing individuals/ organizations in the system, and ones with updated contact information. If you are importing a large number of contacts, this can help filter the list down.
To filter, select an option from the search field under Contacts to Import.
Caution
Only one file can be imported and processed at a time. If more than one user has permission to import contacts, you may need to coordinate with them to ensure they complete the import process before you begin.
Note
File upload steps may vary slightly according to your operating system and version.
Access the Import Communication Contacts page.
Click the Choose file button.
Browse your computer or network to find the appropriate .csv, .xls, or .xlsx file and select it.
Note
The file must include columns for first and last name, phone number and type, address, city, state, zip and address code, alternate contact type, and email address. Not all of that information must be filled in to complete the import process, but the columns must exist in the file.
Click the Open button.
From Source: select . . . . Import Source. This source is associated with every person that gets created in the system so you know how they came to be added. For example, if you import an SAT list from the College Board, you can associate "SAT List" with those individuals.
To create a new import source, enter the name of the import source and click Add at the bottom. When you add a source to the system, it can also be used to create a communication recipient data set.
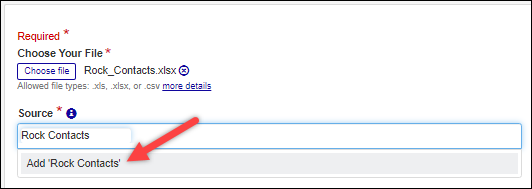
To add the contacts to an existing import source, select it from the Source options. Selecting an existing source lets you re-upload a file that may have new or updated contacts. Once you preview, you can just upload those new or updated contacts.
Click Preview contacts button. Contacts in the file are listed.
Tip
The Status column displays a warning if contact information duplicates or includes conflicting information for existing information in the system. You can chose to resolve these issues, remove them from the import list, or import them as new external records.
Review the contact list carefully and determine who you want to import.
Click the Remove icon to exclude a contact from the import.
Evaluate and resolve possible duplicate records. See the Resolve Possible Duplicates section for more information.
Select the checkboxes of the contacts you want to add to the system.
Tip
Click the All button to select all the names at the same time.
Click the Import Contacts button. Contacts are added and available as communication recipients.
When you import new contacts, the system checks for duplicates and lets you choose whether to create a new record or update the existing contact information.
Note
Duplicate contacts must be deleted manually.
Access the Import Communication Contacts page.
From the Contacts to Import list, find the potential duplicate contact you want to resolve.
Note
Select Possible duplicate contact from the search field under Contacts to Import to only show contacts that are potential duplicates.
Click the + icon to see additional information.
To update existing system information for the contact:
Click the Review and update existing contact button. The Review and update existing contact window appears.
The information included in the file is shown at the top of the window. Contacts in the system that match the contact in the file are listed below.
Click the Select & update button for the system contact you want to update with the information from the file. The Update Existing Contact window appears.
Compare the existing system information with the information in the import file.
If you want to keep existing information, select the option in the Existing Information column. If you want to update the information, select the option in the New Imported Information column.
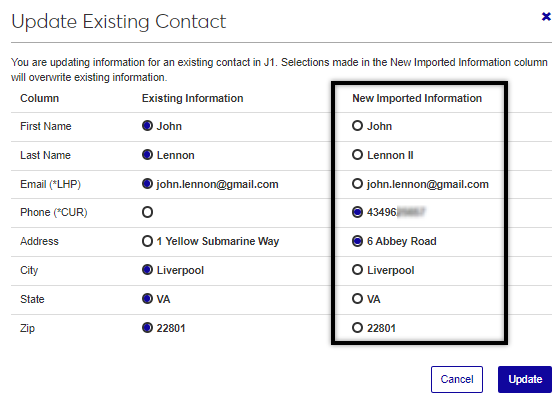
Click the Update button. Information in the system for the contact is updated.
To create a new record, click the Create a new external person button. The contact's status is updated to Create new allowing the contact to be imported into the system as a unique record.
To exclude the contact, click the Remove icon
 next to their information.
File upload error messages appear if you are attempting to upload a file in the wrong format or that's missing required information.
Confirm you are uploading a .xls, .xlsx, or .csv file.
Confirm your file includes first and last name, phone number and type, address, city, state, zip and address code, alternate contact type, and email address information.
No, there is no limit to the number of contacts that can be imported from one file.
No, the import process only imports first and last name, phone number and type, address, city, state, zip and address code, alternate contact type, and email address information.
If an imported file includes a group of contacts you want to use repeatedly as a communication recipient list, you can add the file as source and create a data set based on it.
After you choose the file you want to upload, enter the name of the import source and click Add at the bottom.
Access the Data Sets page.
From the Queries for drop-down, select Recipients.
Click the Create data set button.
Enter a name for the data set.
From the Classification drop-down, select Communication Recipients.
From the Select Modules Allowed Access to Data Set, select the modules you want to be able to access the data set. Anyone in a role with access to a selected module can see and use the data set when working in J1 Web.
From the Type drop-down, select Source.
From the Select One or More Sources, select your contacts import file.
Click the Create data set button.
Address codes identify different types of addresses. For example, *LHP identifies a legal home permanent address and *CUR identifies a current address. These may be the same for some individuals and organizations, but others may have multiple different addresses. Address codes let you distinguish between them.
If you're not sure which address code should be used, you can leave this field blank.
Alternate contact types identify the kind of contact information being associated with an individual/organization in J1 Desktop. For example, different email addresses and social media accounts. Individuals may have multiple email addresses and the codes let you distinguish between them.
If you're not sure which alternate contact type should be used, you can leave this field blank.