Manage Check-In Groups
Important
Information and features vary according to the roles to which you belong and the permissions associated with those roles. For more information, contact your module manager or your campus support team.
Check-in groups help you manage how, when, and where your residents check in to student housing. You will need at least one check-in group in order to use the check-in feature, but multiple groups will make it easier to manage groups checking in on different days, or with different check-in agreements. You create the check-in groups as you set up your check-in process. Once process is broadcast, you are no longer able to edit, add, or remove students.
How To
Before you can create a check-in group, you will need to create the session this group will be a part of, and import residence spaces. Check-in groups cannot be created after the Check-in Process has been published.
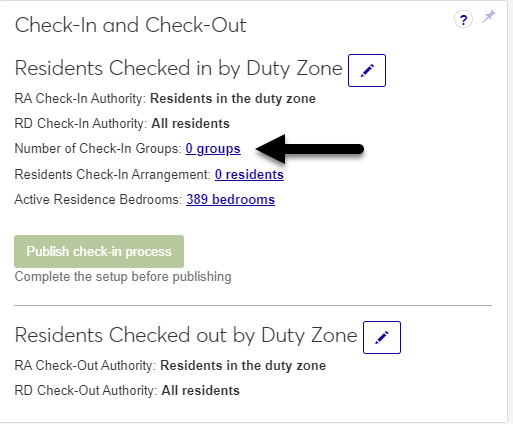
On the Session summary page, in the Check-in and Check-out block, on the Number of Check-In Groups row, click the [#] groups link. The Manage Check-In Groups page opens.
Click the Create check-in group button. The Create Check-In Group pop-up window opens.
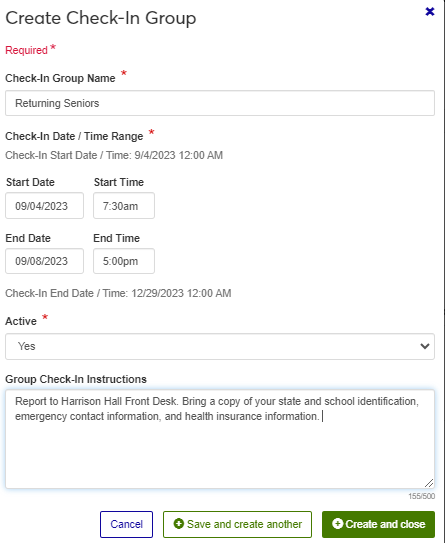
In the Check-In Group Name field, enter a descriptive name for the check-in group—for example, Returning Residents, Freshmen, or Football Team.
In the Start Date and Start Time fields, enter the date and time that this group can begin checking in.
In the End Date and End Time fields, enter the last date and time that this group can check in.
If you want the check-in group to be available to assign to students, leave the Active field set to Yes. If not, select No.
Enter the instructions that will be send to the students in this check-in group when it is published. This might include the building or room to report to, documents to bring, contact information, etc. This is not the check-in agreement that they will sign when they check in.
Click Create and close, or if you want to create another group, select Save and create another. The window closes and the new check-in group is added to the list.