Student Page Resident Housing Block
Important
Information and features vary according to the roles to which you belong and the permissions associated with those roles. For more information, contact your module manager or your campus support team.
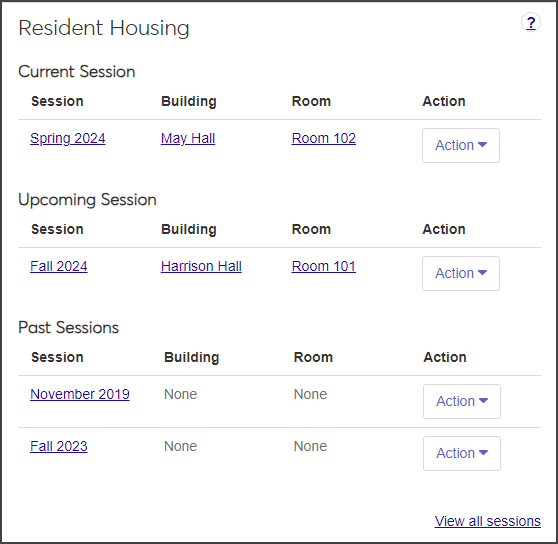
The Resident Housing Block on the student's summary page provides a brief summary of the student's housing for the current session as well as upcoming and past sessions, if any exist. For each session listed, the block displays the session, building, and room, each of which links to the summary page for the entity. For the current session, you can use the Action drop-down to check a student in or out of the residence and generate or update a room item condition report.
To view the Resident Housing block, users need the "Can view housing assignments results" permission found in the Residence Life Administrator or Student Life Module Manager role or roles copied from them.
The Resident Housing block displays the session, building, and room for the following:
Current Session: If the student belongs to an applicant group in the current session, the block displays current housing information.
Upcoming Session: If the student belongs to an applicant group for any upcoming sessions, the block displays housing information for the nearest one.
Past Sessions: The block displays housing information for up to three past sessions in which the student belonged to an applicant group.
View all sessions: Click to open the Sessions page.
Click on the session, building, or room link to open its summary page.
Use the options in the Actions drop-down to check the resident in or out and generate or update an unsigned room condition report. The Actions options are not available if the session's end date has passed.
You can check in a resident from the Resident Housing block by selecting Check in resident from the Actions drop-down for the current session. This option is only available if the session is active, the student has been assigned a room, and the check-in process has been broadcast.
On the Resident Housing block, select Check in resident from the Actions drop-down for the current session. The Resident Check-In wizard opens to step one, Check-In Basics.
The Resident Check-In wizard walks you through all the steps required to check students in to their residences and record room conditions.
Enter the resident's phone number and any relevant Notes and click Save & continue. The Emergency Contact Information step opens.
If the resident already has emergency contact information entered, it appears here. You can create a new emergency contact or edit an existing one from this page. See Create Emergency Contact During Check-In.
Note
This step is only included if Enable Emergency Contact Information at Check-In is selected in the Resident Check-In section of the Resident Life Settings page.
When you have finished entering or editing emergency contact information, click Save and continue. The Student Keys step opens, if your school has included it.
Note
The Student Keys step is included only if Enable Student Keys at Check-In is selected in the Resident Check-In section of the Residence Life Settings page.
If the resident has already been issued keys, that information will be displayed on this page.
Note
If you are not assigning a key at this point, click Save & continue to move to the next step.
To assign a key as part of check-in, click the Assign a key button at the bottom of the page. The Assign Key pop-up opens.
Begin typing the Key Number and select the appropriate key from the list that appears.
Choose the appropriate status (e.g., Issued or Assigned) from the Key Status drop-down.
The Building and Room fields are pre-populated with the room this resident is being checked in to and cannot be changed. The Status Date is automatically set to the current date.
Add any relevant comments.
If you need to assign the student another key, select Save and assign another key and repeat steps 3b–3d. When you are finished assigning keys to the resident, select Assign key and close.
Click Save & continue. The Room Condition Report step opens.
The Room Condition Report page shows all items associated with the room and their condition at check-in. This page allows you to review the items and their condition with the resident during a walk-through inspection prior to signing the check-in agreement.
For each room item, click the Update button to open the Update Item Check-In Condition window.
From the Check-In Condition drop-down, select the item's condition as it is now. Add any notes about the item, then click Update.
If you want to include any supporting documentation, such as a photo of the item, click the Choose file button under Add Supporting Documentation and upload the file.
When you have finished recording item conditions, click Save & continue. The Sign Report step opens.
Enter the resident's full name and student ID in the fields.
The Date field autofills with the current date. If you need to change it, click in the field and use the pop-up calendar to select a new date.
Select the checkbox at the bottom of the page to indicate that you agree on the recorded room condition.
Click Save & finish to save the check-in and room condition information.
If you would like to generate a PDF of the room condition report, click the Review PDF button.
If you need to edit any of the information at a later time, click one of the steps linked on the left side of the Resident Check-In window to open that step and make the needed changes. You cannot edit the Sign Report page.
You can check out a resident from the Resident Housing block by selecting Check out resident from the Actions drop-down for the current session. This option is available only if the session is active and the resident has been checked in.
On the Resident Housing block, select Check out resident from the Actions drop-down for the current session. The Resident Check-Out wizard opens to step one, Check-out Basics.
The Resident Check-Out page walks you through all the steps required to check students out of their residences and record room conditions at the time of checkout.
Enter the resident's Mobile Phone number if it did not autofill.
Enter optional comments in the Notes field.
Click Save & continue to continue to the Student Keys step.
Note
The Student Keys step is included only if Enable Student Keys at Check-Out is selected in the Resident Check-Out section of the Residence Life Settings page.
To retrieve keys individually:
Click the pencil icon for the relevant row. The Edit Key pop-up opens.
Select a new status from the Key Status drop-down.
Add optional comments.
Click Update to return to the check-out wizard page.
To update multiple keys at once (for example, if the student was issued more than one set of keys):
Select the checkbox next to the keys you need to update.
Select Edit keys from the Options drop-down. The Edit Keys pop-up opens.
Under Select a Detail to Update, select Key Status or Comment from the drop-down.
If you are updating key status, select a new status from the drop-down.
If you are updating a comment, enter your comment in the text box.
Click Save & continue to move to the next step, Room Condition Report. This page lists all items associated with the room and their condition when the resident checked in. You should review the items and their condition with the resident during a walk-through inspection prior to signing the check-out agreement.
Note
There is a room condition report for each bedroom in the space.
To change the condition of a room item, click the Update button for the item. The Update Item Check-Out Condition pop-up opens.
Select an option from the Check-Out Condition drop-down.
To add the name of the resident responsible for the item, click in the Responsible Resident field and select the correct name when it appears. This field is optional.
Add optional Check-Out Notes as needed.
To add supporting documentation, such as a photo of the item, click Choose file under Add Supporting Documentation and upload the file.
When you are done, click Update. The condition of the item is updated in the list. If you selected Damaged, Dirty, or Needs to be replaced, the value in the Check-Out Condition column is in red text and flagged with a warning icon.
After you update the room items, click Save & continue to continue to the Sign Report step.
Enter the Resident Full Name and Student ID in the fields. This information is required.
The Date field autofills with the current date. If you need to change it, click in the field and use the pop-up calendar to select a new date.
Select the checkbox at the bottom of the page to indicate that you agree to the recorded room condition.
Click Save & finish to complete the process.
To generate a PDF of the Check-Out Report, click the Review PDF button.
The Generate unsigned report option in the Actions drop-down is only available if the session is active, the student has been assigned a room, and a check-in has not been completed for the room or suite.
If an unsigned report has not been created yet, the option is Generate unsigned report. After the report has been created, the option is renamed Update unsigned report.
On the Resident Housing block on the student's summary page, select Generate unsigned report from the Action drop-down. The Generate Unsigned Room Condition Report wizard opens to the first step, Report Basics. The session and report type autofill.
Enter optional Report Notes, then click Save & continue to move on to step 2, the Room Condition Report. The report lists all the items in the room.
To mark multiple items as being in Good condition, select the checkbox next to each item you want to update and then select Mark as good condition from the Options drop-down.
To assign items a condition other than Good and to add notes and supporting documentation, you must update the items individually:
Click Update next to an item. The Update Item Condition pop-up opens.
From the Condition drop-down, select the current condition of the item and add notes as needed.
To add supporting documentation, such as a photo, click Choose file under Add Supporting Documentation and upload the document or image.
Click Update.