Student Health Profile
Important
Information and features vary according to the roles to which you belong and the permissions associated with those roles. For more information, contact your module manager or your campus support team.
The Student Health Profile provides pertinent information about students to users who have permission to view this information. This may include important health information such as required immunizations, existing health conditions and allergies, and medications. Emergency contact information is also available on several pages in J1 Web.
Some student health information is displayed in the Student Health Summary block on the student's summary page. This block displays any health groups the student is in, all met or missing health codes, and links to the full Student Health Profile page. There is also a link to view and manage insurance information for the student. The Student Health Profile block requires the same permissions as the Student Health Profile page.
In order to view the Student Health Profile, you must belong to a role with "Can manage health group roster" permissions turned on. Jenzabar provides this permission with the Student Health Administrator default role, but your school may have created a customized version of this role. You must be in a Person Management role with "Can view emergency contacts" permission to access the Emergency / Missing Persons Contacts information. To add, update, or delete contact information, you must also have "Can manage emergency contacts" permission.
To add, edit, or delete student health insurance information, you must have the "Can manage health group roster" permission enabled for the Student Health Administrator or Student Life Module Manager role.
Student Health Profiles can also be managed in Desktop on the Student Health Profile window. Changes made in J1 Web are available in Desktop, and vice versa.
Student Emergency Contacts
Student Insurance Information
Health Codes
You can access emergency contact information in a couple of ways:
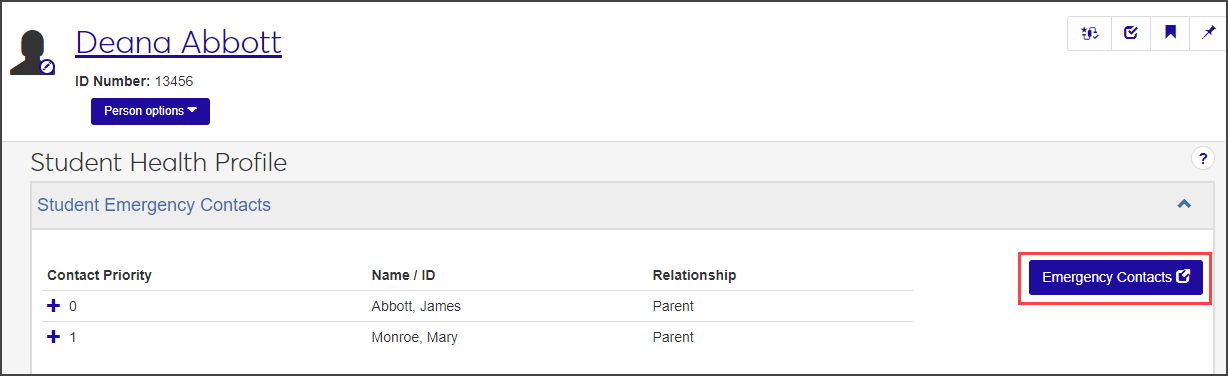
On the Student Health Profile page, click the Student Emergency Contacts section at the top of the page to expand it.
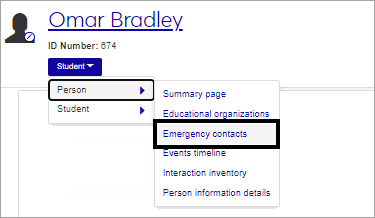
On the Student summary page, select Person > Emergency Contacts from the Person options drop-down menu.
Important
You must be in a Person Management role with "Can view emergency contacts" permission to access the Emergency / Missing Persons Contacts information. To add, update, or delete contact information, you must also have "Can manage emergency contacts" permission.
Tip
Each student has their own Student Health Profile page. To find this page, do one of the following:
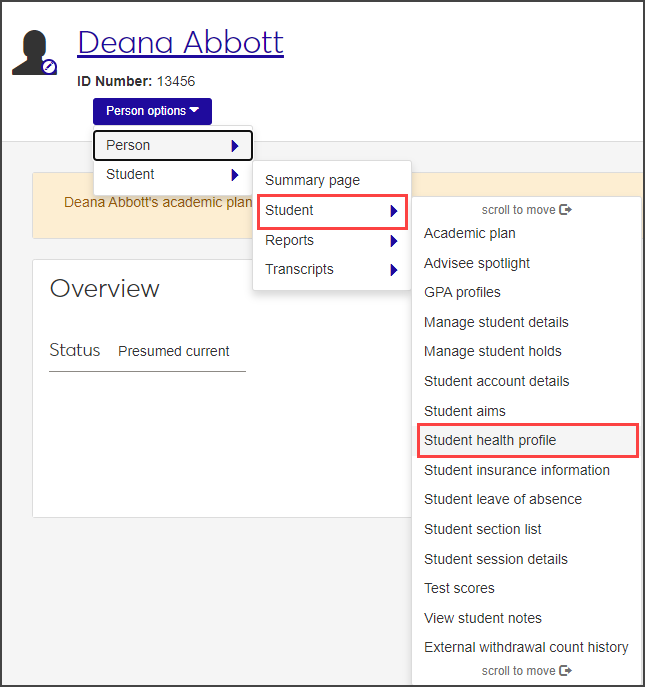
Use the J1 Web search feature in the upper right corner of any J1 Web page. Use the Person search and enter a name, then select the name from the results list. This takes you to the Person summary page. From the Person options drop-down menu, select Student > Student > Health Profile page.
Throughout the J1 Web system, if the student's name is a link, clicking the link takes you to the student's summary page. From there, click the Person options drop-down menu and select Student > Student > Student health profile.
On the Student Health Profile page, the health codes assigned to the student are displayed in a list at the bottom of the page. With proper permissions, you can update the health code status for the student.
Important
In order to view the Student Health Profile, you must belong to a role with "Can manage health group roster" permissions turned on. Jenzabar provides this permission with the Student Health Administrator default role, but your school may have created a customized version of this role.
Important
In order to view or manage student health information, you must belong to a role with the "Can manage health group roster" permissions turned on. Jenzabar provides this permission with the Student Health Administrator default role, but your school may have created a customized version of this role.
The fastest way to manage most health information tasks is from the Student Health Profile page. From this page, you can manage the student's emergency contact and health insurance information, and view and manage required health codes.
Some tasks, however, must be performed on the Student Health Administration hub, such as creating new health codes and adding students to a health group.
To access a student's Health Profile page, click the student's name anywhere it appears as a link in J1 Web. From the student's summary page, click the Person options drop-down menu and select Student > Student > Student Health Profile.
On the Student Health Profile page, click the Student Emergency Contacts row to expand it.
Important
You must be in a Person Management role with "Can view emergency contacts" permission to access the Emergency / Missing Persons Contacts page. To add, update, or delete contact information, you must also have "Can manage emergency contacts" permission.
To manage emergency contact information, click the Emergency Contacts button. The Emergency / Missing Persons Contacts page opens.
Add or edit contact information as needed.
Manage a student's existing health codes in the Health Codes section of the Student Health Profile page. You can mark existing health codes as met or not met, indicate relevant dates, and enter comments. You cannot add new health codes or assign students to new health groups on this page.
Tip
If you need to add the student to an additional health group, you can do that on the Health Group Roster page for the group you want to add the student to. To add a completely new Health Code, use the Manage Health Codes page in the Student Health Administration hub.
If a student is in more than one health group, use the drop-down menu next to the section title to view codes for each health group separately, or view them all.
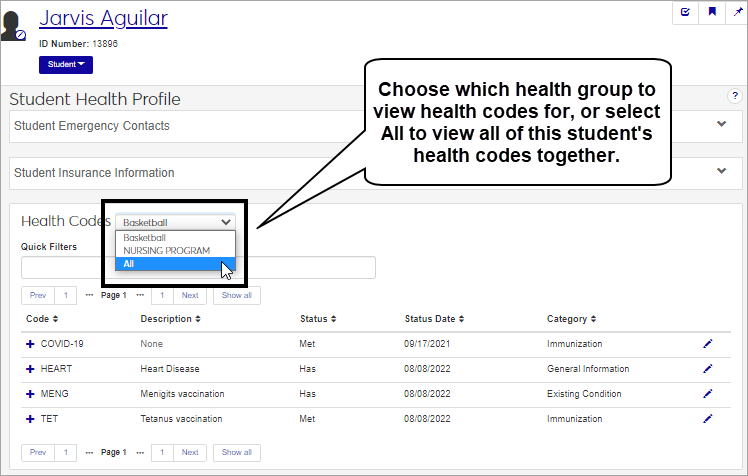
Click the plus sign next to a row to expand it and see more details for that health code.
To update the status of a health code, click the pencil icon at the end of the row. The Manage Required Student Health Codes pop-up window opens. The top section displays Immunization and Medical Exam Health Codes; the bottom section displays Informational Health Codes.
Mark Immunization and Medical Exam Health Codes as met by selecting the checkbox next to the appropriate code.
Mark Informational Health Codes as met or unmet by selecting Has or Doesn't have from the relevant drop-down menu.
To see more detailed information about the code or to enter a comment or edit dates, click Show details.
Click Update when you are done editing.
On the Person summary page, click the Person options menu button and select Person > Emergency Contacts.
Tip
Reach the Person summary page by clicking on a person's name anywhere that it is displayed as a link in J1 Web.
Important
You must be in a Person Management role with "Can view emergency contacts" permission to access the Emergency / Missing Persons Contacts page. To add, update, or delete contact information, you must also have "Can manage emergency contacts" permission.
It's possible that you don't have the correct permissions applied to your user role. In order to view the Student Health Profile, you must belong to a role with "Can manage health group roster" permissions turned on. Jenzabar provides this permission with the Student Health Administrator default role, but your school may have created a customized version of this role. Talk to your campus support team for more information.
To view student health information, you must belong to a role with "Can manage health group roster" permissions turned on. Jenzabar provides this permission with the Student Health Administrator default role, but your school may have created a customized version of this role. You must be in a Person Management role with "Can view emergency contacts" permission to access the Emergency / Missing Persons Contacts information. To add, update, or delete contact information, you must also have "Can manage emergency contacts" permission. Talk to your campus support team for more information.
Navigate to the student's summary page. You can reach this page by clicking the student's name anywhere it appears as a link in the J1 Web system.
From the Person options drop-down, select Student > Student > Student insurance information. The Student Insurance Information page opens, displaying the student's existing insurance information.
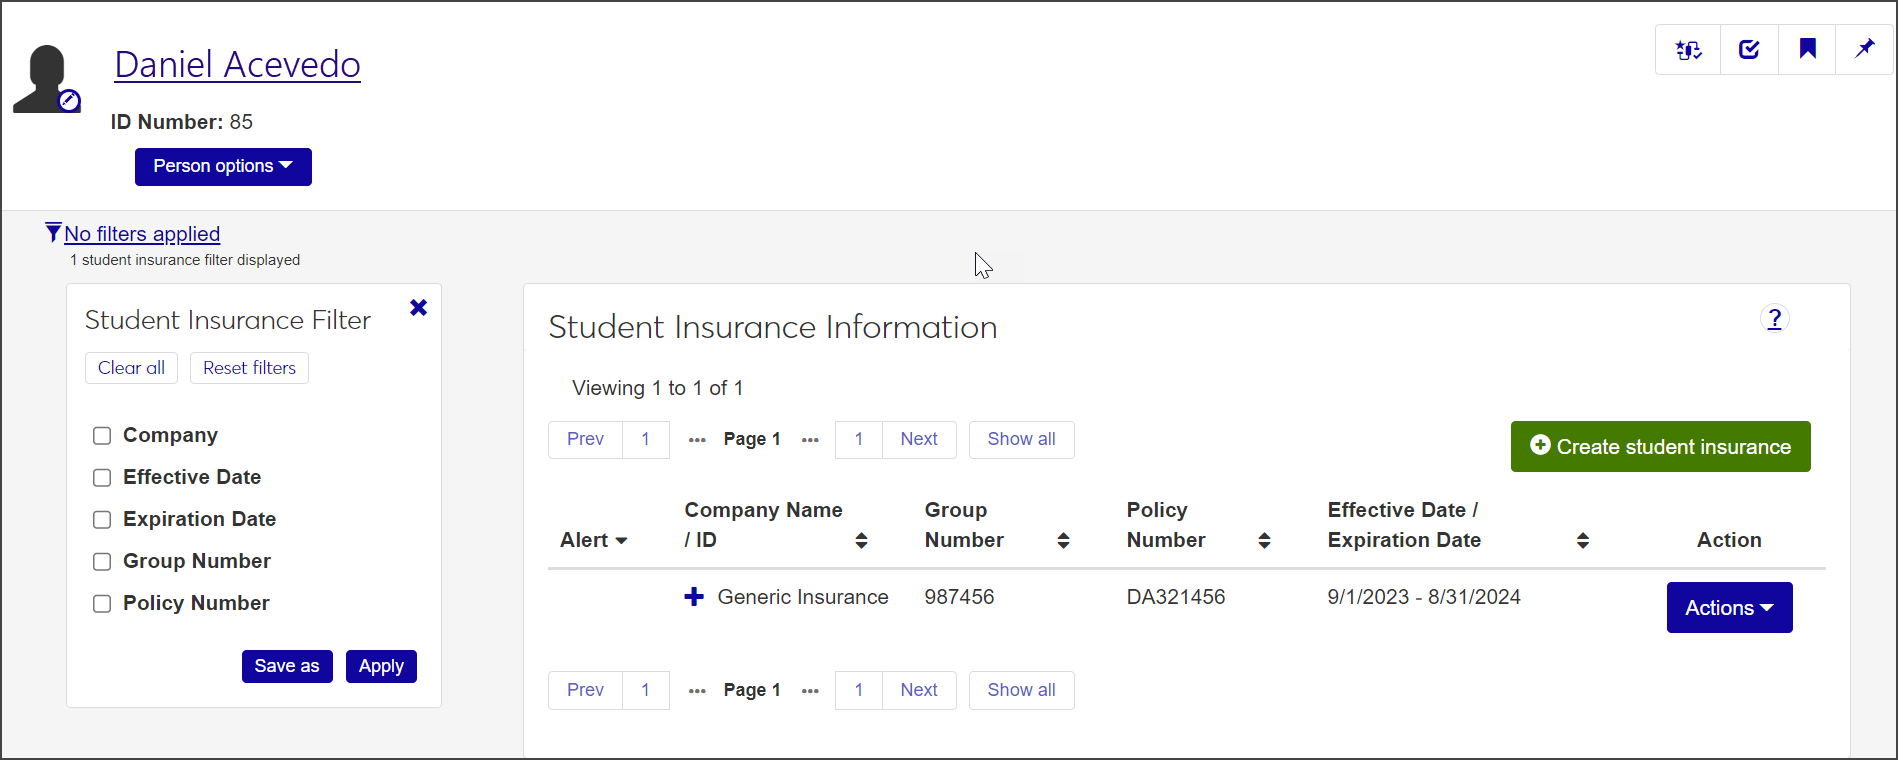
Click the Create student insurance button. The Create Student Insurance pop-up opens.
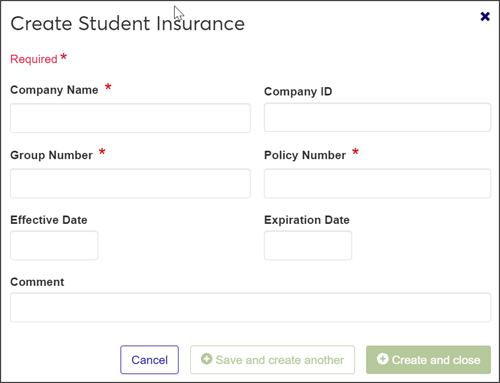
Enter the insurance Company Name, Group Number, and Policy Number. All are required fields.
Note
Although the Company ID is not required, you can use it to search for existing organizations in the database. Begin typing the ID in the field to generate a list of possible company names. When you select an organization, the Company Name field fills in automatically.
Enter the Effective Date and Expiration Date of the policy, if applicable. These fields are optional.
Enter an optional Comment about the insurance plan or coverage.
When you're done, click Save and create another or Create and close. The new insurance information is now listed on the Student Insurance Information page.
On the Student Health Profile page, click the Student Emergency Contacts row to expand it.
Important
You must be in a Person Management role with "Can view emergency contacts" permission to access the Emergency / Missing Persons Contacts page. To add, update, or delete contact information, you must also have "Can manage emergency contacts" permission.
Manage a student's existing health codes in the Health Codes section of the Student Health Profile page. On this page, you can mark existing health codes as met or not met, as well as relevant dates and comments. You cannot add new health codes or assign students to new health groups on this page.
Tip
If you need to add the student to an additional health group, you can do that on the Health Group Roster page for the group you want to add the student to. To add a completely new Health Code, use the Manage Health Codes page in the Student Health Administration hub.