Case Summary: Violations and Sanctions Tab
Important
Information and features vary according to the roles to which you belong and the permissions associated with those roles. For more information, contact your module manager or your campus support team.
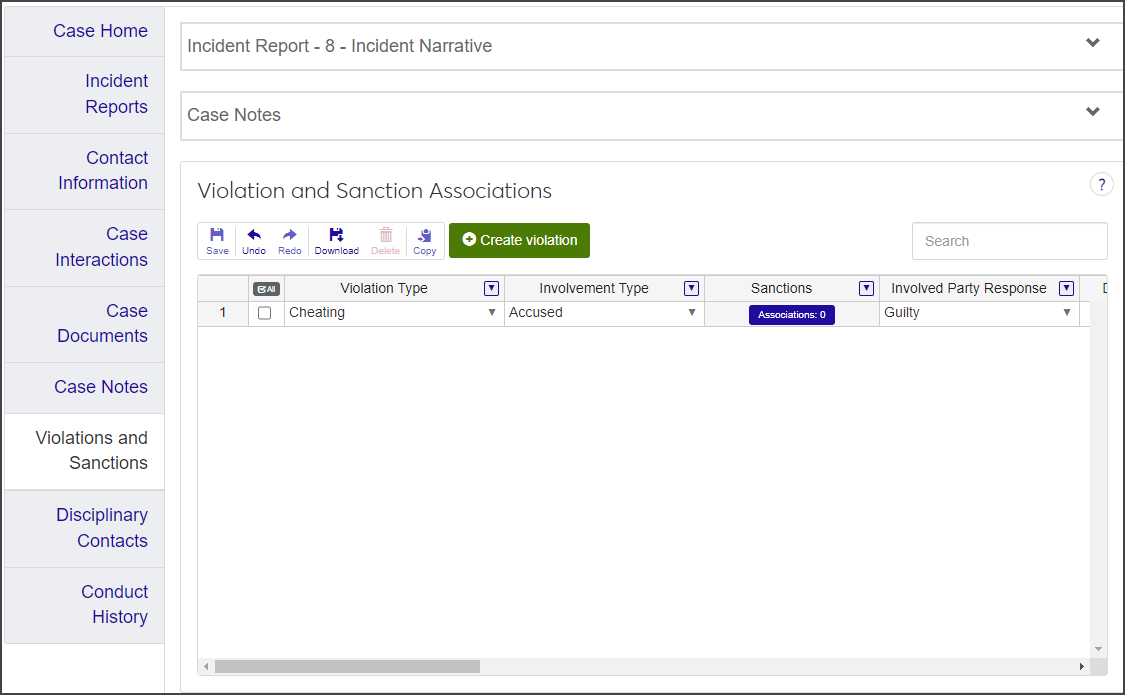
The Violations and Sanctions tab displays the incident narrative for each incident associated with the case; case notes; and a Violations and Sanctions Associations spreadsheet that lists all the violations associated with the case.
From the spreadsheet, you can manage all aspects of violations and sanctions for the case, including:
creating, editing, and copying violations
associating sanctions to a violation
downloading the list of violations to an Excel spreadsheet
To manage violations and sanctions, you must be in one of the following roles (or a role copied from one of them) with the specified permissions:
Student Conduct - Assistant Director Access by Department role with the "Can apply sanctions to assigned cases" permission
Student Conduct - Director Access by Department role with the "Can apply sanctions to all cases" permission
Use the buttons on the spreadsheet's toolbar to save changes, undo and redo actions, download selected rows to an Excel file, delete selected rows, and copy rows.

The Delete button is disabled until at least one row is selected. It is also disabled if all rows are selected because a case must have at least one violation associated with it; you cannot delete all of them.
The Save, Undo, and Redo buttons are enabled after you make a change to one of the rows.
The Copy button is enabled when at least one row is selected.
The Violations and Sanctions tab consists of three sections:
Incident Narrative: The most recent narrative for each incident report associated with the case.
Case Notes: All the case notes associated with the case so far.
Violations and Sanctions Associations spreadsheet: A detailed spreadsheet that lists all violations and sanctions associated with the case.
To view the incident narratives and case notes, expand each section by clicking the down arrow on the section title.
Use the horizontal scroll bar at the bottom of the page to see all the columns in the Violations and Sanction Associations spreadsheet.
To widen a spreadsheet column, hold your cursor over the vertical edge of the column heading until it changes to a solid bar, then click and drag the column to the width you want.
The spreadsheet includes the following columns:
Column | Description |
|---|---|
Violation Type | Drop-down menu. The options in the drop-down include all active Violation Type definitions. |
Involvement Type | Drop-down menu. The options in the drop-down include all active Involvement Type definitions. |
Sanctions | Button. This column is only visible if the user has the "Can apply sanctions to assigned cases" or "Can apply sanctions to all cases" permission. The number next to the button label reflects the number of sanctions currently associated with the violation. Click the button to add or remove sanctions. |
Involved Party Response | Drop-down menu. This column is not required and can be left blank. |
Decision | Drop-down menu. Decision options are defined by your school. |
Comment | Optional text field. The comment can contain a maximum of 100 characters. |
Violation Category | View only. The Violation Category autofills with the category associated with the selected Violation Type. If no category is associated with the violation type, this column is empty. |
NoteThe columns containing Campus Crime Report (CCR) data are only enabled if the Violation Category is one of the default violation category definitions and Report on CCR is set to Yes. Non-default violation categories are not reported on the CCR. | |
CCR - Report Section | Drop-down menu. If this column is enabled, it is required.
|
CCR - Occurred in Student Housing | Checkbox. The checkbox is selected if the violation occurred in student housing. |
CCR - Report Section Category | Drop-down menu. Select the appropriate Report Section Category from the list. If the CCR - Occurred in Student Housing checkbox is selected, the column autofills with On-campus Student Housing Facilities. This column is required. |
Informational Alert | This column is empty unless one of the following situations is true, in which case the column contains an information icon:
Click the information icon to view additional information about the incident. |
CCR - Hate Crime Bias | Drop-down menu. This column is only enabled if the CCR - Report Section Category is Hate. Select the type of hate crime bias from the list. |
CCR - Qualify the Forcible Sex Offense | Drop-down menu. This column is only enabled if the Violation Category is Sex offenses - Forcible. If enabled, select an option from the drop-down. |
CCR - Qualify the Non-Forcible Sex Offense | Drop-down menu. This column is only enabled if the Violation Category is Sex offenses - Non-forcible. If enabled, select an option from the drop-down. |
Unfounded Crime | Checkbox. Selected if a reported crime is investigated by law enforcement authorities and found to be false or baseless. |
Include in Non-Academic Profile Report | Checkbox. Selected if the violation should be included in the student's academic profile report. |
User-Defined Fields | User-defined fields allow you to capture information that isn't recorded by other areas of the system. Only visible if the user has permissions to manage user-defined fields. |
Note
You can only create a violation if you have "Can edit assigned cases" or "Can edit all cases" permissions. Otherwise, the Create violation button is not available.
Click the Create violation button. A new row is added to the top of the spreadsheet.
Select a Violation Type from the drop-down. This column is required.
Note
When you select a Violation Type, the Violation Category column autofills with the category associated with that violation type. If no category is associated with the violation type, the Violation Category column remains empty.
Select the Involvement Type from the drop-down. This column is required.
Skip the Sanctions column for now. Sanctions are associated with the violation after the violation is saved. The column is empty until you save the new violation; after that, the Associations button becomes available.
Select the Involved Party Response from the drop-down, if applicable. This column is optional.
Select the Decision from the drop-down, if applicable. This column is optional.
Enter a brief, optional Comment. The column can contain a maximum of 100 characters.
The columns related to the Campus Crime Report (CCR) only apply if the violation category is flagged as Report on CCR. If this is the case, complete the columns as follows:
Select an option from the CCR - Report Section drop-down as follows:
If the violation category is Drug abuse violations, Liquor law violations, or Weapons: carrying, possessing, etc., select Arrests or Disciplinary Action.
If the violation category is Destruction / damage / vandalism of property, Intimidation, Larceny, or Simple assault, select Hate Crimes.
If the violation category is Dating violence, Domestic violence, or Stalking, select Violence Against Women.
For all other violation categories except Negligent manslaughter, select Criminal offense. For Negligent manslaughter, select Hate Crimes.
Select the checkbox under CCR - Occurred in Student Housing if the incident occurred in student housing. This column is only enabled if you selected a value in the CCR - Report Section field. It is not required.
Select a category (for example, On campus or Public property) from the CCR - Report Section Category drop-down. This column is required.
Note
If you selected the CCR - Occurred in Student Housing checkbox, this column defaults to On-campus Student Housing Facilities and cannot be edited.
If the next column displays an information icon, click the icon to see an informational alert about the violation. An information icon is displayed in the following situations:
If the CCR - Report Section is Hate Crime and the violation category is AGA (Aggravated assault); ARS (Arson); BUR (Burglary); FSO (Sex offenses - Forcible); MNM (Murder/Non-negligent manslaughter); MNN (Negligent manslaughter); MVT (Motor vehicle theft); NSO (Sex offenses - Non-forcible); or ROB (Robbery).
If the CCR - Occurred in Student Housing checkbox is selected.
The CCR - Hate Crime Bias column is only enabled if the report section category is Hate. If it is enabled, select an option from the drop-down.
The CCR - Qualify the Forcible Sex offense column is only enabled if the violation category is FSO (Sex offense - Forcible). If it is enabled, select an option from the drop-down. This column is not required.
The CCR - Qualify the Non-Forcible Sex Offense column is only enabled if the violation category is NSO (Sex offenses - Non-forcible). If it is enabled, select an option from the drop-down. This column is required when it is enabled.
The Unfounded Crime checkbox is selected if the reported crime was investigated by law enforcement authorities and found to be false or baseless.
Select the Include in Non-Academic Profile Report checkbox if the violation should be included in the student's non-academic profile report.
If you have permissions to manage user-defined fields, click the User-Defined Fields button to open the User-Defined Fields window and edit them as needed.
Click the Save button on the toolbar to save the new violation.
In the Violations and Sanctions tab, click the Associations button in the Sanctions column. The Associations window for that violation type opens.
The window displays a list of the sanctions currently associated with the violation, showing the Code, Description, and Default Fine for each one.
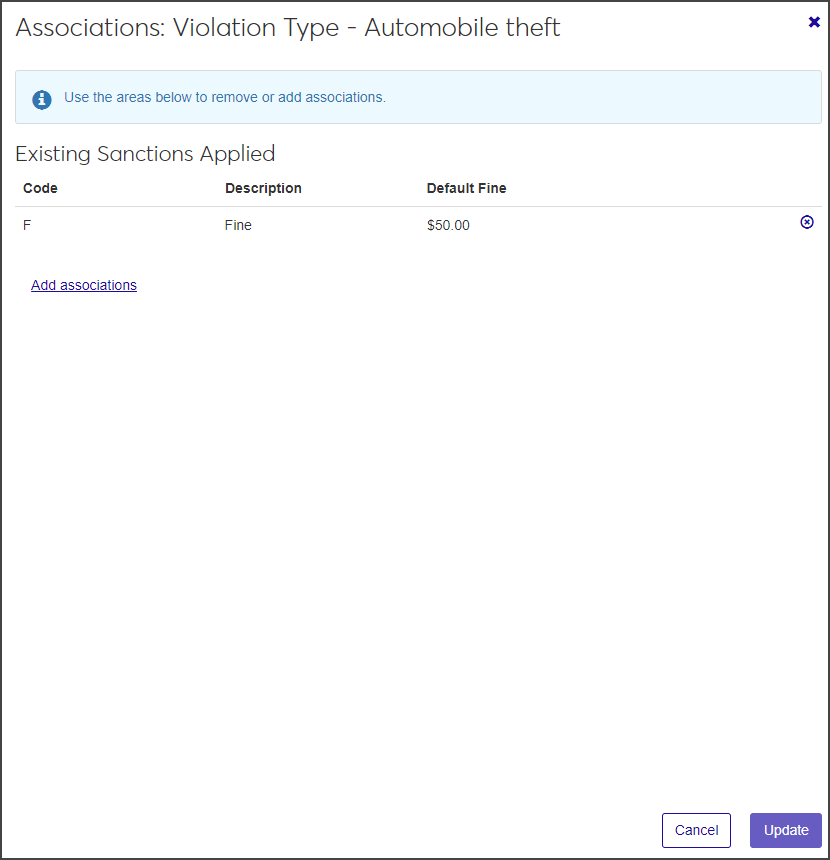
To remove an existing sanction, click the Remove icon for the row you want to delete.
To add a sanction, click the Add associations link, then click in the Sanctions field and select a sanction from the list.
You can add multiple sanctions to the violation.
When you are done, click Update to return to the Violations and Sanctions tab.
In the Violations and Sanctions Associations spreadsheet, edit the columns in the row of the violation you need to update by selecting a new option from a drop-down or selecting or deselecting a checkbox. To edit the Comment, click in the column and enter a new comment or update the existing one.
When you are done, click the Save button on the toolbar.
If you need to create a new violation that is similar to an existing one, you can copy one or more existing violations and then edit them as needed.
In the Violations and Sanctions Associations spreadsheet, select the checkbox next to each violation you want to copy.
Click the Copy button on the toolbar. For each row you selected, a duplicate row is added to the top of the spreadsheet.
Make changes to the new rows as necessary.
To associate new sanctions to the violation:
Click the Associations button in the Sanctions row. The Associations window opens.
To remove an existing sanction, click the Remove icon for the sanction you want to delete.
Click the Add associations link.
Click in the Sanctions field and select a sanction from the list.
Repeat steps c and d to associate additional sanctions.
Click Update to save the changes and return to the Violation and Sanction Associations spreadsheet.
When you are done editing, click Save on the toolbar to save the changes.
Select the checkbox next to the violations you want to delete. You must select at least one.
Note
The Delete button is disabled until you select at least one violation. It is also disabled if you select all violations because there must be at least one violation associated to the case.
Click the Delete button on the toolbar. The Delete Violations? pop-up opens.
The Delete Definitions? pop-up lists the selected definitions in two categories:
Ready to Delete: Definitions that can be deleted.
Unable to Delete: Definitions that can't be deleted, either because they're in use or are protected by the system.
If you decide not to delete one or more of the definitions listed under Ready to Delete, click the Remove icon to remove them from the list.
When you're sure you want to delete all the rows listed under Ready to Delete, click Yes, delete.