Grade Entry in J1 Web
Important
Information and features vary according to the roles to which you belong and the permissions associated with those roles. For more information, contact your module manager or your campus support team.
Use this page to enter or edit grades. Navigate to it either of these ways:
From the Course Center or My Course Center or blocks, or from the Course List or My Course List pages, click Select action and select Manage grades.
From a course summary page, click Section options and select Manage grades.
Note
Your school uses either J1 Web or the Campus Portal for faculty entering grades. It can't use both.
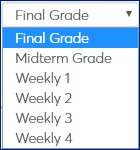
Use the view drop-down list to select a grading period.
Tip
Parent and child courses may have different grading periods assigned. You can enter or edit grades only when a grading period for the particular course section is open.
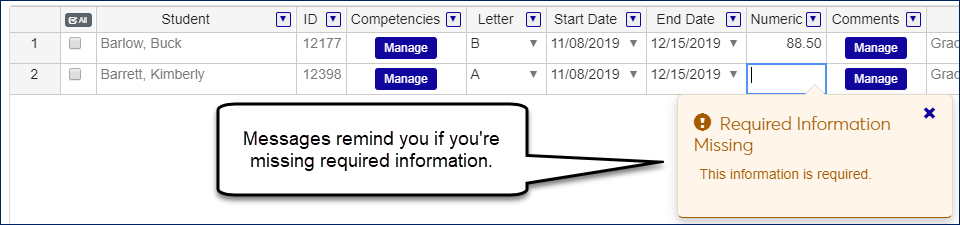
Enter or edit grades as you would in a spreadsheet. Once you begin entering information for a student, messages remind you if you're missing required information. The Save button is available when you have all required information in all the rows you've worked in.
Columns might or might not appear depending on several settings. Some of the settings are on the Grading Period Definition window. If columns are marked as Required on the Grading Period Definitions page, then you must complete all required fields on a row you've edited in Grade Entry before saving.
Column | Description |
|---|---|
Letter | The grade from the grade table. Editable. |
Comments | Predefined phrases to select NoteInactive comments can't be entered, but if they were already entered before being switched to inactive, they are still visible. |
Remark | A field for free-form text |
Numeric | Up to 3 digits before the decimal and 2 digits after (Edit mask = 0.00) |
Narrative | A field for free-form text |
Grading Period Days Absent | Enter the number of absences during this grading period. |
Total Days Absent | Enter the number of absences during the whole course. |
Grading Period Clock Hours | Enter the number of clock hours the student participated in during this grading period. |
Total Clock Hours | Enter the number of clock hours the student participated during the whole course. |
Column | Description |
|---|---|
Student | Not editable |
ID | Not editable |
Education Success Level | The options in this drop-down are defined on the Education Success Level Definitions page. Your school can create and edit definitions. The following options are provided by Jenzabar:
NoteThis column is available only if the section is designated an Education Success section (Manage Section Details page, Reporting tab). |
Dual Enrollment | Available if your school has the Texas State Reporting license and dual-enrollment students. Not editable. If 'Yes', then both Letter and Texas Dual Credit Numeric Grade columns are required. |
Texas Dual Credit Numeric Grade | Available if your school has the Texas state reporting license. If a student is dual enrollment, then this and the Letter column are required. |
Start Date | Available if your school is using Open Enrollment. Date is calculated when the student registers. |
End Date | Available if your school is using Open Enrollment. Date is calculated when the student registers. |
Competencies | Available if your school has the Competency Based Education (CBE) license and CBE is turned on. Appears for sections designated as Competency Based Education. (If the section is set up so that competency grades roll up to the section grade, you enter or edit grades. However, if the section is set up so that grades roll down from the section grade to the competencies, then you can't enter or edit grades for the competencies.) |
Grading Type | Displays if the grading period uses a letter grade. Not editable. For Final and Midterm grading periods, this value comes from Student Course History. For other grading periods, it's based on Grade Scale and Credit Type from the Manage Section Details page, Grading Controls tab. |
Credits | Credit hours. Not editable. |
Last Date of Attendance | Editable only if required. Can be required only for final grading periods. |
Athletics | From the Course Roster. Not editable. |
Degree Period | From the Course Roster. Not editable. |
Midterm Letter | Included only in the Final Grade period. Not editable. |
The Grade Entry page includes links to other pages and pop-ups.
The section title in the page heading links to the section's summary page.
The instructor's name links to their summary page.
The Create new communication link opens the Create New Communication pop-up.
The Edit Student Details link opens the Edit Selected Students pop-up. There you can edit student course history fields for the selected students simultaneously. (The link is available only if the selected students have the same Grading Type.)
Tip
You can use the Edit Selected Students pop-up to apply a single grade (or remark, comment, etc.) to multiple students simultaneously.
You can sort the list of students by any column. Click the column heading to sort by that column, ascending. Click it again to sort descending.
Tip
Sorting by the Grading Type column can be helpful for filling grades down or selecting multiple students whose details you want to edit.
You can filter the list by each column in the same ways you filter spreadsheets.
By value: Select any or all of the values.
By condition: Select a condition, and enter a value.
As a grading period approaches, if your school has turned on grade entry messages, you'll receive a notification reminding you to enter grades. You'll also receive a To Do item with a link to the Grade Entry page for the course. After you've finished entering the grades, be sure to mark your To Do complete. The registrar's office receives a message if the To Do isn't marked complete.
If a section is designated Open Enrollment, it can have only the final grading period. The day you enter a student's grade is set as the End Date in that student's student course history.
Entering and editing grades requires permissions. While your school's permissions may be customized, in general, users in the following roles (or roles copied from them) can enter grades when the 'Can edit grades' permission is enabled.
Faculty role: Enter grades in open grading periods depending on the Web Grading Rights assigned to them in on the Manage Section Details page, Faculty tab.
Web Grading Rights distinguish between entering a grade for the first time and editing an existing grade.
The Department Head Course Access role and the Course Information – Access to All Courses role (and roles copied or created from them) can enter grades in open grading periods if they have the permission labeled "Can edit grades".
Most users can enter or edit grades only when the grading period is open. However, the Registrars role (and roles copied or created from it) can always enter grades (even when the grading period is closed) if they have the permission labeled "Can edit grades".
Open the Grade Entry page one of these ways:
From the Course Center or My Course Center or blocks, or from the Course List or My Course List pages, click Select action, and select Manage grades.
From a course summary page, click Section options and select Manage grades.
Select a grading period from the drop-down list.
Enter grades as needed in any or all of the available columns. Some columns may not be required.
Letter: Select a grade from the drop-down.
Numeric: Type or paste up to 3 digits before the decimal and up to 2 digits after.
Comment:
Click the Manage button to open the Comments pop-up.
Select the appropriate comments, and click Save.
Remark: Type or paste text. You can use ALT + Enter to start a new line.
Narrative: Type or paste text. You can use ALT + Enter to start a new line.
Competencies: This column appears only for CBE sections.
Click the Manage button. The Manage CBE Details for Student Section Record page opens. See "How to Enter Grades for Competencies" for detailed instructions.
Enter information as needed.
Click the Save button. The page closes.
Click the Save button. The page closes.
To withdraw a student from the course and give them a withdrawal grade, you use the Withdraw Student button. You can't merely enter a withdrawal grade in the Letter Grade column. (In fact, withdrawal grades aren't available to select there.)
Select a grading period from the drop-down.
Select the checkbox for a single student.
Click the Withdraw Student button. The Withdrawal Details pop-up opens. An alert tells you how many withdrawals the student already has, and how many your school allows. If the student has reached the limit, a warning tells you.
Note
The withdrawal limit is set on the Registration Limits page in Registration Administration. Also set there is how the limit is enforced. If it's enforced with a stop, you can't withdraw students who've reached the limit. If it's enforced with a warning, you'll see the warning, but the system allows you to withdraw the student.
Note
The Census Date and the Last Withdraw Passing Date are visible for reference.
Fill in the information. All fields are required except the checkboxes.
Add to withdrawal counts (checkbox): Select the checkbox if you want this withdrawal to add to the student's count of withdrawals. This is the usual practice. If you're changing an existing grade, selecting or deselecting this checkbox overrides the previous setting.
Withdrawal Date: Select from the drop-down:
First day of class
Day before first day of class
Friday before first day of class
Date dropped
Last date of attendance
Manual date entry
Withdrawal Reason: Select from the drop-down. Options are defined on the Withdrawal Reason Definitions page.
Tip
If you're withdrawing the student from all courses, select the Total withdrawal from term option. This doesn't automatically withdraw them from all courses; you'll still need to withdraw them from each course.
Drop Date: Select from the drop-down:
First day of class
Day before first day of class
Friday before first day of class
Last date of attendance
Manual date entry
Drop Flag: Select Drop or None from the drop-down.
Last Date of Attendance: Enter a date.
Final Grade: Select from the drop-down. The options are defined on the Grade Table Definitions page. Only grades designated as withdrawal grades are listed.
Update Midterm Grade Columns: If you select this checkbox, select a Midterm Grade from the drop-down. The options are defined on the Grade Table Definitions page. Only grades designated as withdrawal grades are listed.
Click OK. This enters your changes but doesn't yet save them to the student's record. The Withdrawal Details pop-up closes, so you're back on the Grade Entry page.
Click the Save button. The grade (including withdrawal information) is saved to the student's record.
Some familiar shortcuts from spreadsheets are available on the Grade Entry page.
Copy and Paste: CTRL + C and CTRL + V
Fill down: Move the cursor over the bottom-right corner of the cell to copy until the cursor changes to crosshairs. Hold the left mouse button and drag the crosshairs down over all the cells you want to paste into.

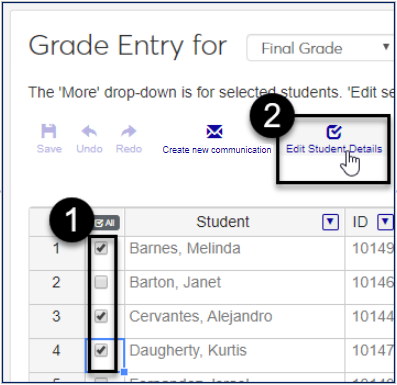
You can also use the Edit Selected Students pop-up to apply a grade to multiple students simultaneously.
On the Grade Entry page, select the students you want to receive the same grade. (They must have the same Grading Type.)
Click the Edit Student Details link. The Edit Selected Students pop-up opens.
If necessary, click the Add another detail link, and choose the grade (Final, Midterm, Remark, Comment, Narrative).
Enter or select the value.
Click the Update button. The grade is applied to all the selected students.
These instructions apply to CBE courses only. For information on roll-up and roll-down grading, see the Competency Based Edcuation Overview topic.
If the section is a roll-up section (that is, grades roll up from the competencies to the section), then you can't enter grades on the Grade Entry page. Instead, you grade the competencies on other pages. The section grade is then automatically calculated from the competency grades.
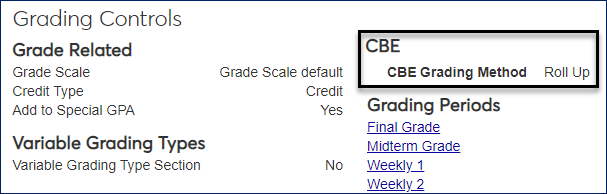
To find out if the section is a roll-up section:
Click the Section icon
 . The section's summary page opens.
In the Section options drop-down, select Manage section details. The Manage Section Details page opens.
Click the Grading Controls tab. The CBE Grading Method field says 'Roll Up' or 'Roll Down'.
Tip
For roll-down sections, you can enter grades for competencies that are not required. (If they're required, they roll down from the section grade.) You can enter Remarks whether the competency is required or not.
To enter grades for individual students,
To Enter Competency Grades for Individual Students
On the Grade Entry page, in the Competencies column, click the Manage button. The Manage CBE Details for Student Section Record opens.
For each required competency, make a selection from the Grade drop-down. (You can select grades for non-required competencies as needed.)
Enter a Remark for any or all competencies as needed.
Click the Save button. The section grade will be calculated and appear on the Grade Entry page. The Met column will be calculated from the Satisfies Advising Requirement field on the Grade Table Definitions page.
To Enter Competency Grades for Multiple Students Simultaneously
Select the students that you want to give the same competency grade to. (For example, select all the students who are getting an A.)
Click the Edit student details link. The Edit Selected Students pop-up opens showing the required competencies that the students have in common.
Click the X on any student you don't want to grade now.
Click the X on any competency you don't want to grade now for the selected students.
Select a Grade.
Enter a Remark as needed.
Click the Update button.
Tip
Some of the students you selected may have other required competencies (not in common with all the students you selected). Use the Manage button in the Competency column (Grade Entry page) to grade those other competencies.
Click the drop-down arrow on a column heading.
To filter by the column's values, select checkboxes for the information you want to see.
To filter by conditions, select a condition, and enter a value.
To add more conditions, select the And or Or radio button, select another condition, and enter another value.
Click the OK button.
Select one or more students.
Click the Create new communication button. The Create New Communication window opens.
Enter your subject and message information, include any needed attachments, and click Send button. If you are sending the email to more than one student, each will receive an individual copy of the email.
No. Your school can use J1 Web or Campus Portal for Grade Entry, but not both.
See the Switching to J1 Web Features: Grade Entry and Course Overrides topic.)
Midterm and Final grading periods are provided by default. Your school can add other periods on the Grading Period Definitions page. There your school determines which columns display, which are editable, and which are required.
Your school can control which grading periods are available for courses in particular years and terms on the Year / Term / Subterm Definitions page, and you can assign grading periods to individual courses on the Manage Section Details page, Grading Controls tab. (See the "Setting Up Grade Entry" topic.)
The parent and child courses may have different grading periods assigned. If the parent course's grading period is active, but the child course's grading period isn't active, you can enter grades for the parent course now but not the child course.
There are separate permissions for those tasks:
Can view and enter grades for ungraded courses
Can view and update grades for graded courses
Ask your module manager about permissions for your role.
Some grades (such as withdrawal grades) may require a Last Date of Attendance, but only for final grading periods. If you can't enter a Last Date of Attendance, then either the grade doesn't require it or it's not the final grading period.
For roll-up sections, you grade the competencies. The section grade is calculated from the competency grades. See "How to Enter Grades for Competencies" above.
Note
Roll-up and roll-down sections apply only to schools using the Competency Based Education features.
The section may be Open Enrollment. Because students take Open Enrollment courses at their own pace, only the final grading period is available.