Individual Transcript Notes
Important
Information and features vary according to the roles to which you belong and the permissions associated with those roles. For more information, contact your module manager or your campus support team.
Use this page to add notes to a particular student's transcript for the selected year/term and division. For example, you might want to note that they received an award or a certificate during that term. You can place notes in the header, detail, or summary of a term.
Note
You assign these individual notes to a single student at a time. For notes you want to show on all students' transcripts, use the Transcript Institutional Notes page.
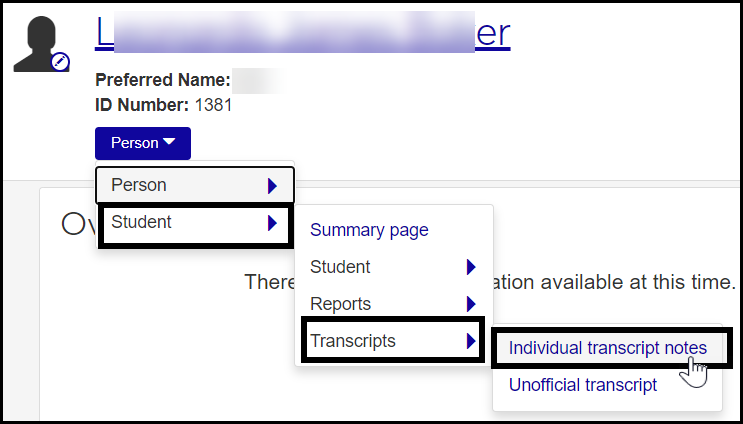
To manage a student's individual transcript notes, first go to the student's summary page. Then use the drop-down navigation to open the student's Individual Transcript Notes page.
Reusable Notes and Free-Form Notes
There are two kinds of notes:
Note Code: reusable notes you maintain on the Maintain Table Values page (transcript_note_cd) and select on the Individual Transcript Notes page
Transcript Note: free-form notes you enter directly on the Individual Transcript Notes page
Caution
Have a value in either Note Code or Transcript Note, but not both. If there's a value in both, they'll overwrite each other on the transcript, and both will be illegible. And if you don't have a value in either, no note will appear on the transcript.
Desktop Location
You can manage these notes in Desktop, too, on the Individual Transcript Notes window. Changes you make in Desktop apply to J1 Web and vice versa.
Database Location
The notes are stored on the Transcript Note table (transcript_note).
Note Code: (transcript_note.transcript_note_cd)
Transcript Note: (transcript_note.transcript_note)
The notes automatically appear on the individual student's transcript in the division and year/term you select. (You don't have to add the notes when you generate a transcript. If the notes are defined here, they appear on the transcript for the year/term and division selected.)
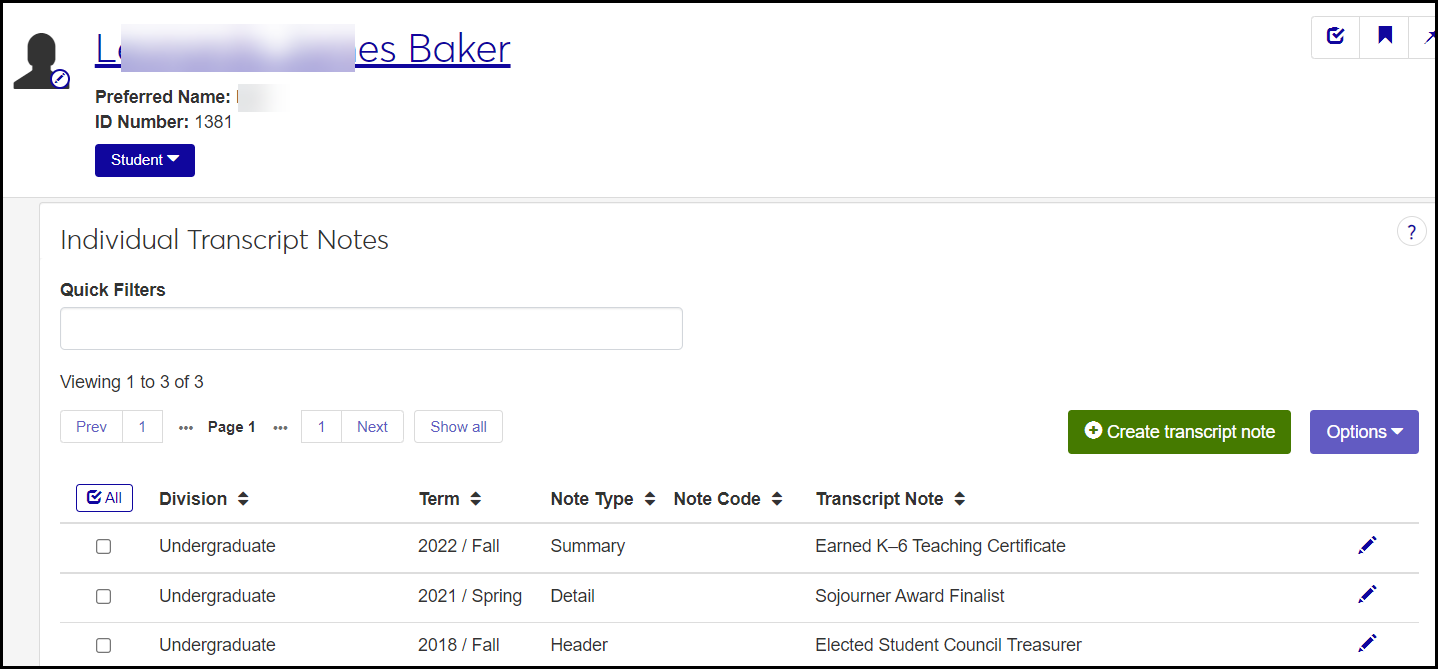
These are the fields on the Individual Transcript Note page:
Division
A student's transcript has a separate portion for each division the student has coursework in (such as Graduate and Undergraduate). The note appears in the portion for the listed division (defined on the Division Definitions page).
Term
Each division in a student's transcript is divided into terms. The listed term is where the note goes on the transcript. (Defined on the Term Definitions page.)
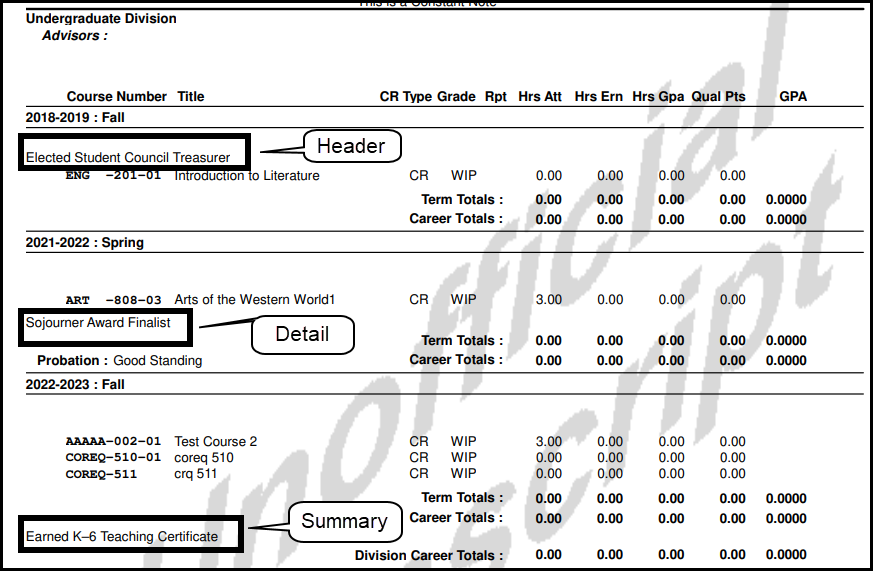
Note Type
This is where the note appears within a term listing on the transcript: in the Header, the Detail, or the Summary.
Note Code
A defined note you can reuse on any student's transcript. (Defined in Desktop on the Individual Transcript Notes window, Maintain Table Values pop-up. Planned for a future release in J1 Web.)
Transcript Note
A free-form text field. Up to 60 characters.
Permission to manage individual transcript notes is available in the Student Management section of these roles:
Registrar
Registration Module Manager
The permission required is "Can manage individual transcript notes".
Use the Search to find a student (by name or ID), and open their summary page.
On the student's summary page, click the Person drop-down > Student > Transcripts > Individual transcript notes. The student's Individual Transcript Notes page opens.
To filter the notes, enter a phrase in the Quick Filters field. To remove a filter, click its Remove icon
 .
.To sort the notes, click the arrows at the head of the column you want to sort on.
Click the Create transcript note button. The Create Individual Transcript Notes pop-up appears.
Select a Division. The note appears in that division's portion of the transcript. Required.
Select a Term. The values available are the year/terms the student has coursework in. The note appears in that year/term's portion of that division's portion of the transcript. Required.
Select a Note Type to determine where in the selected division and term the note should appear: Header, Detail, or Summary. Required.
Do one or the other of the following: Either select a Note Code or enter a free-form Transcript Note. Do not do both. (If you have a value in both, they'll overwrite each other on the transcript, and both will be illegible.)
Select a Note Code from the drop-down. Do this if you want to select from a list of reusable notes instead of writing a free-form note. If you want to edit a reusable note or create a new one:
In Desktop, on the Individual Transcript Notes window, right-click and select Maintenance Screen. The Maintain Table Values window opens with Transcript Note selected.
You can edit the Table Description. This is the note that appears on the transcript.
To add a new reusable note, right-click, and select Add Row.
Enter a code in the Table Value column (up to 3 characters).
Enter a Table Description (up to 60 characters). This is the note that appears in the transcript.
Leave the Alternate Value 1 and Alternate Value 2 columns blank unless your school uses them for a process or report. (Most schools don't have alternative values for Note Code.)
Click the Save button on the main toolbar.
Back in J1 Web, you may need to close and reopen the Create Individual Transcript Notes pop-up to see your changes in the Note Code drop-down.
Enter free-form text (up to 60 characters) in the Transcript Note field.
Caution
Have a value in either Note Code or Transcript Note, but not both. If there's a value in both, they'll overwrite each other on the transcript, and both will be illegible. And if you don't have a value in either, no note will appear on the transcript.
Click Create and close or Save and create another.
Click the Edit icon
 on the row of a definition. The Edit Individual Transcript Note pop-up opens.
You can edit these fields:
Note Type: Determines where in the selected division and term the note should appear: Header, Detail, or Summary. Required.
Note Code: Select a reusable note from the drop-down. The notes are maintained in Desktop from the Individual Transcript Notes window (and planned for a future release of J1 Web). If you have a value in Note Code, make sure Transcript Note is blank.
Transcript Note: Enter up to 60 characters. If you hae a value in Transcript Note, make sure Note Code is blank.
Caution
Have a value in either Note Code or Transcript Note, but not both. If there's a value in both, they'll overwrite each other on the transcript, and both will be illegible. And if you don't have a value in either, no note will appear on the transcript.
Click Update.
Delete Individual Transcript Notes
Select the checkbox for one or more notes.
In the Options drop-down, click Delete.
The Delete Transcript Notes? pop-up opens. It lists selected notes in up to two categories:
Ready to Delete (for notes that can be deleted)
Unable to Delete (for notes that can't be deleted, because they're either in use or protected by the system)
Under Ready to Delete, if there are any definitions that you don't want to delete after all, click their Remove icon
to remove them from the list of items to delete.When you're sure you want to delete all the rows listed under Ready to Delete, click the Yes, delete button.