Manage Sections
Important
Information and features vary according to the roles to which you belong and the permissions associated with those roles. For more information, contact your module manager or your campus support team.
Overview of Managing Course Sections
Use this page to view and edit all aspects of course sections. You will find this page in the Registration Administration hub, in the Hub options drop-down.
Sections appear 15 to a page. Above and below the list, you can navigate to the next page of 15, or show all courses at once.
Use the Create section button to create a new section.
The Options drop-down menu allows you to apply a specific action to all rows that are selected. For the Manage Sections page, options include the following:
Copy sections to a new year and term: Lets you avoid recreating sections each term. The pop-up gives you options to copy subterms, section text, nontraditional course information, and session information, as well as for setting dates for add, drop, withdrawal, and grading.
Download to Excel: Download the current view (Section Demographics or Schedule / Faculty, for example) to a spreadsheet.
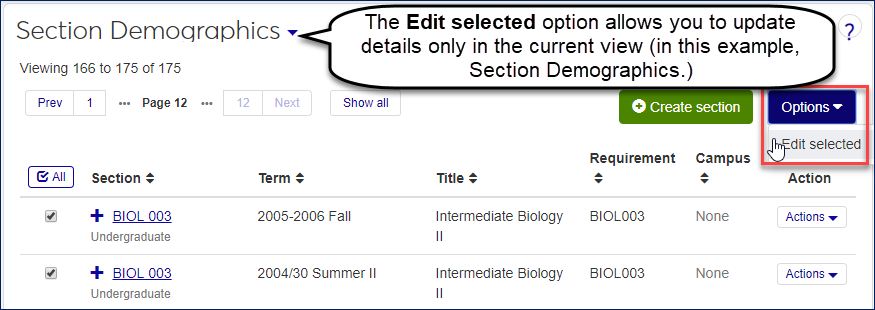
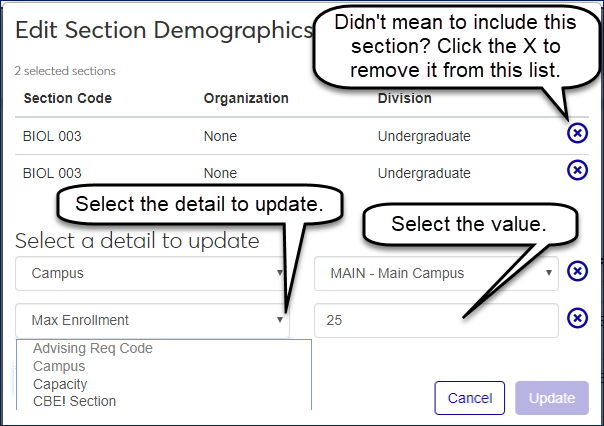
Edit selected: Allows you to choose a detail to update for all selected sections.
Warning
The details that you can edit are limited to the details shown on that view. For example, on the Grading Controls view, you can only update Grade Scale, Credit Type, Variable Grading Type, or Division.
Tip
As long as you're not editing more than 200 rows at a time, the Edit Details pop-up shows the sections that will be affected by this update. You can use the X icon beside each course to remove any section that you don't want to include in this update if you accidentally grabbed the wrong one.
Generate course lists PDF: Creates a course list (section list report) for each of the selected sections. The report opens in a new browser tab. Information includes instructor, status, capacity, credits, prerequisites, grade scale, credit type, and load hours for each selected section.
Generate rosters PDF: Creates a report with the rosters of all the selected sections. The report opens in a new browser tab.
The Actions drop-down performs the selected action on that row only. On the Manage Sections pages, the actions available in the drop-down- will change based on the view that you have chosen from the drop-down menu in the table title. Some of the actions that you may see are:
Copy Section - This lets you copy the section (and other sections you add to the list) to a new year/term. See the description above under Options Drop-Down, and see the instructions below for copying sections to a new term.
Generate roster PDF: Creates a report of the course section's roster. The report opens in a new browser tab.
Manage attributes - Choosing this option displays a pop-up where you can add or remove attributes. Attributes are used only if your institution is licensed for Non-Traditional Registration. Attributes available for you to choose from are defined in J1 Desktop, in the Attribute Definition window. You can also add and remove attributes on the Manage Section Details page for this course, on the Section Demographics tab.
Manage section details - This takes you to the Manage Section Details page, where you can view or edit most details about this section.
Manage section faculty - This opens a pop-up with options to manage faculty. You can assign an instructor, or multiple instructors, designate if the course has a lab component, and set some web controls such as whether it will appear on the portal, and whether the instructor has the ability to view and enter grades. You can also view and edit these details on the Manage Section Details page for this course, on the Faculty tab.
Note
The Grading Rights drop-down includes these options:
No access to view grades
View-only access for grades
Can view and enter grades for ungraded sections
Can view and update grades for graded sections
Can view and edit for both graded and ungraded sections
The same grading rights are available on the Manage Section Details page, Faculty tab.
The Faculty - Access to Courses and Students by Course role also has permissions to view and enter grades. A permission the instructor has in any of these locations gives them access.
Manage section schedules - This opens the Manage Schedule pop-up with options to manage the schedule for this section. Available settings include days, times, and location of classes, as well as web settings for the schedule.
Note
An alert tells you if there's a schedule conflict with another course section for the primary instructor or the space. The alert names the conflicting section. The Save button is labeled Save with conflict, but if you edit the schedule to fix the conflict, the button is labeled Update.
Tip
You can also view and edit these details on the Manage Section Details page for this course, on the Schedule tab.
Delete section - This opens a popup window to confirm that you want to permanently delete this section. If there are students registered for this section, or for cross-listed sections, you will not be able to delete the section.
View section roster - This takes you to the Course Roster page and shows all students registered for this section.
Manage variable grading types - This opens a pop-up window that allows you to selected one or more variable grading types to associate with this section. This action is available on the Grading Controls view of the Manage Sections page only when you have turned on Variable Grading Types for this section.
Manage Sections Table Views
The Manage Sections page shows information related to each section, including term, scheduled times, current enrollment, financials, and more. To see all the information available on this page, use the view drop-down in the table title to switch between views.
Tip
For more information on each of these details, see Manage Section Details. Detailed descriptions of each field are also found in the Online Help for J1 Desktop - Courses window.
The Section Demographics view shows these section details in the table:
Section (code, location, and division
Term
Title
Requirement
Campus
Clicking the + icon beside any section row will show the following information for that section:
Attributes
Capacity: The ideal maximum number of students. When capacity is reached, the section is considered full. New registrations are waitlisted (if waitlisting is turned on). Students can then be allowed into the section by users with the "Can overenroll as Current or move Waitlisted to Current" permission found in the Registration Override and Access Control role and roles copied from it.
Catalog Course Code
Section Reminder
Exclude Section from Checkpoint Reporting
Flexibility Scheduled
Institutional Division
Meeting Type
Max Enrollment: The very top limit of enrollment for the section. It can't be exceeded even with with overrides.
Min Enrollment: If there are fewer registrations than the minimum, the course section may be canceled.
Note
School Code
Short Title
Program Category
Request Number
Work Experience
CBE Section
The Schedule / Faculty view shows these section details in the table:
Section title, location, and division
Term
Schedule (shows how many schedules exist for this section)
Section Date Range
Faculty
Clicking the + icon beside any section row will show the following details for each schedule that exists for that section:
Section Time
Primary Instructor
Campus
Place
Space
Schedule Dates
Comments
Days Override
Meeting Type
Schedule Show on Web
Schedule Sequence Number
The Grading Controls view shows these section details in the table:
Section title, location, and division
Term
Grade Scale
Credit Type
Clicking the + icon beside any section row will show the following details for that section:
Add to Special GPA
Grading Periods
Variable Grading Type
The Enrollment view shows these section details in the table:
Section title, location, and division
Term
Section State
Total Enrolled
Census Date
Clicking the + icon beside any section row will show the following details for that section:
Allow Drop
Allow Waitlisting
Cancellation
Cancellation Date
Cancellation Reason
Course Duration
Enrollment Status
First Begin Date
Group Registration Code
Last End Date
Last Withdrawal Passing Date
Parent / Child Course
Display "Parent" or "Child"
Parent Course Code
Total Current
Total History
Total Preregistered
Total Reserved
Total Waitlisted
The Hours view shows these section details in the table:
Section code, institution, and division
Term
Total Credits
Clicking the plus icon + beside any section row will show the following details for that section:
Lecture Credits
Lab Credits
Lecture / Lab Credits
Clock Hours Variable / Fixed
Clock Hours
Max Clock Hours
Min Clock Hours
Lecture Clock Hours
Lab Clock Hours
Load Contact Hours
Number of Week Course Meets
Day/Evening
Default Allow Open Entry
Default Allow Open / Early Exit
Method to Set Census Date and Last Student Withdrawal Date (for Open Enrollment courses). Each selection displays pertinent columns.
By date
By number of days
Census (days after start date)
Last Student Withdrawal (days after start date)
By percentage
Census (% from start date to end date)
Last Student Withdrawal (% from start date to end date)
When a student registers for the section, we use this method to calculate the individual student's Census Date and Last Student Withdrawal Date. The dates appear in the student course records such as on the section's Manage Student Section Details page.
Begin Date: the day the student registers
End Date
Census Date: calculated according to the method selected above
Last Student Withdrawal Date: calculated according to the method selected above.
Default Registration Cutoff: Days before End of Term
Default Max Days Duration
The Financials view shows these section details in the table:
Section title, location, and division
Term
Exclude from Tuition
Tuition Hours
Tuition Code
Clicking the + icon beside any section row will show the following details for that section:
Billing Override Date
Billing Period
Contract Code
Contract Course
Funding Source
Refund Code
Third Party ID
The Portal Controls view shows these section details in the table:
Section title, location, and division
Term
Section Show on Web
Course Authorization Required
Clicking the + icon beside any section row will show the following details for that section:
CRM Display of Cross-listed Sections
Must Pay
Public Registration
Restrict Registration by Course and Restrict Registration by Web Group
Note
You can use these to limit registration in this course section in two ways:
Restrict Registration by Section: You can select one or more groups. Registration in this section will be limited to those groups.
Restrict Registration by Web Group: You can select one or more groups. Students in the selected groups can register only for this course section (and any other section in which their group is selected in this setting).
See details and instructions below in How To: Restrict a Which Groups Can Register for the Section and Which Sections a Group Can Register For.
Section Text
Web Registration Override Dates
External Registration (if your school has the Campus for Institutions license)
The Reporting view shows these section details in the table:
Section title, location, and division
Term
IPEDS CIP Code
IPEDS CIP Extension
Clicking the + icon beside any section row will show the following details for that section:
IPEDS Type
Distance Education Course
Distance Education Provider
Dual Enrollment
Exclude from Withdrawal
Exclude from Repeat
In District
Instruction Mode
Interinstitutional Course
Org Providing Instructor
Performance Based Ed Success (Developmental Course)
PESC Course Level
Remote Location
Self-Paced
State Cost Center
State Funded
State Location
State Type
Type of Instruction
Use this view to see Competency Based Education information for sections. You can use filters to limit the list to sections designated as CBE sections, or even to sections with particular competencies assigned.
Tip
This view may have a different name. The Display Name for Competency Based Education is "CBE" by default, but your school can change it on the Competency Based Education (CBE) Settings page. The Display Name shows in window names, drop-downs, and buttons. In documentation, we call it "CBE".
Each CBE element assigned to the section is listed with the term. If a competency is the child of a unit, the competency is indented under the unit.
To edit the details, click the Manage CBE details button. The Manage CBE Details grid pops up, and you can edit some of the details. For more editing options, including adding and removing competencies, select Manage section details in the Actions drop-down.
Use this view to see the textbooks associated with each course section.
Important
The Textbook view is available if you have the "Can view textbooks" permission available in the Faculty - Access to Courses and Students by Course role and the Registrars role or roles copied from them.
The following fields are included:
Section: Course code including department, course, and section
Term: Year/term
Title: Short title of course section
Requirement: Advising Requirement (ARC) that the course satisfies
Textbook: Indicates how many textbooks are associated with the course section
Textbooks: Lists the textbooks' title, authors, and type
Associations: If you have permission to manage textbooks, click the Manage textbooks button. The Manage Section Details page opens to the Textbooks tab. You can view more details on the associated textbooks, and you can remove or add textbooks to the course section.
Section Filter
The list shows all sections you have permission to view. The filter status indicates the number of sections displayed. You can refine the list with a variety of filters and combinations.
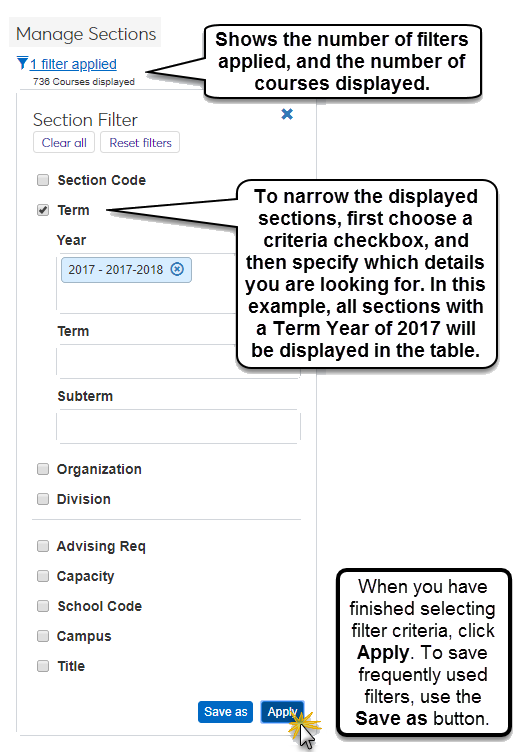
Tip
In the Term drop-down list, you can type a year to jump to that year in the list. For example, you could type '2018' or just '18'.
Tip
The filter has different items for each of the views, so select the view you want before using the filter.
When you select your filter choices, you can apply them for the moment or save them to use anytime on this page and anywhere you can search for sections.
On the CBE view, on a section's row, click the Manage CBE details button.
On the pop-up, select or enter information as needed. If the information doesn't change, the field isn't editable.
Click the Save button.
Tip
You can also edit CBE details on the Manage Section Details window's CBE view. There, you can also add and remove CBE elements.
There are several ways to edit section details.
Most details for a section can be edited on the Manage Sections page using the blue options button. This can be used to edit the same details about multiple courses at one time.
The Options drop-down menu allows you to apply a specific action to all rows that are selected. For the Manage Sections page, the option available is Edit selected. Choosing this option with one or more rows selected allows you to choose a detail to update for all selected sections.
Caution
The details that may be edited using the Options | Edit selected are limited to the details shown on that view. For example, on the Grading Controls view, you will only have the option to update Grade Scale, Credit Type, Variable Grading Type, or Division.
Tip
As long as you are not editing more than 200 rows at a time, the Edit Details pop-up shows the sections that will be affected by this update. You can use the X icon beside each course to remove any section that you don't want to include in this update if you accidentally grabbed the wrong one.
On the Manage Sections page, use the Actions drop-down for the course you want to edit.
The Actions drop-down performs the selected action on that row only. On the Manage Sections pages, the actions available in the drop-down- will change based on the view that you have chosen from the drop-down menu in the table title. Some of the actions that you may see are:
On the Manage Section Details page, click the Edit details button. You can reach the Manage Section Details page from the Section summary page.
In the Schedule / Faculty view, click the Actions drop-down on a section's row, and select Manage section schedules. The Manage Schedule pop-up opens. An alert tells you if there's a conflict for the instructor or the space with a link to the conflicting section.
To fix the conflict, edit the Primary Instructor, Space, or meeting dates and times as needed. To help with space conflicts, select the checkbox for Restrict to available spaces. This removes spaces from the drop-down list if they're unavailable for the dates and times selected.
If you fixed the conflict, click the Update button. The pop-up closes, and your changes are saved.
If you made changes but haven't fixed the conflict, you can click the Save with conflict button. Your changes are saved, and the pop-up closes.
If you haven't made changes, click the Cancel button. The pop-up closes.
Tip
You can also look for room conflicts on the Room Schedule Report page. The report notes sections with schedule conflicts.
Copy Sections to a New Year/Term
Important
The following permissions are available in the Registrars and Registration Module Manager roles or roles copied from them:
Can copy section
Can rename section
Select one or more sections.
Click the Options drop-down, and select Copy sections to new year / term. The Copy Sections to New Year / Term pop-up opens.
Tip
As an alternative, for a single section, you can click the Actions drop-down, and select Copy section. The Copy Sections to New Year / Term pop-up opens with a table to let you add other sections to copy, if you wish.
To enter the Target Year / Term, begin typing a year, and select the year/term from the list.
If the course sections should go in a subterm, select the Copy subterms checkbox. Then select a radio button:
Stamp existing subterms on sections: The subterms are assigned to subterms parallel to the ones they're copied from.
Stamp target subterm on every section copied: Each section is assigned to the Target Subterm selected below.
Stamp target subterm only on sections that already have a subterm: Sections that are in a subterm are assigned to the Target Subterm selected below. Sections that aren't in a subterm in the source term are not assigned to a subterm in the target term.
To copy the sections' descriptive text, select the Copy text checkbox. Then select a radio button:
Use the Section Text from the copied section: Pastes selected section's Section Text to its corresponding section in the target term.
Use the Catalog Text from the catalog record: Copies the Catalog Text from the corresponding catalog course to the section in the target term.
To copy the sections' billing periods, select the Copy billing period checkbox. (If you don't select this checkbox, the sections won't have a billing period in the target year/term.) Then select a radio button:
Use the new year / term for the target billing period: The sections have the dates of the target year/term for their billing period. If a subterm is copied with the year/term, the subterm is used. If there isn't a valid row for the subterm, then the year/term is used.
Use the billing period for the copied sections selected here: The sections in the target year/term have the same billing period as the selected sections.
To copy the sections' Competency Based Education information, click the Copy information for CBE checkbox.
Important
This is available only if your school has the Competency Based Education license.
To copy the sections' textbook information, click the Copy section textbooks checkbox.
To copy the sections' date calculations, select the desired checkboxes and radio buttons:
Calculate Target Dates Based on Dates on the Copied Section:
For Campus Portal add / drop dates: The dates period students can add and drop using the Campus portal
For grade entry begin and end dates for each grading period: Grade entry dates for instructors
For grade blackout begin and end dates for each grading period: Grade blackout periods for instructors
Section Begin, End, Census, and Last Student Withdrawal Dates:
Use the new year / term or subterm dates for the target dates: The pasted sections use the target year/term or subterm dates.
Use the dates from the section being copied to calculate target dates: The pasted sections use the calculations from the selected sections.
Copy schedule records: The sections' meeting dates and times are copied to the target term. If unselected, the new sections have blank schedule records.
To copy the sections' nontraditional course information, select the desired checkboxes:
Important
This is available only if your school has the Nontraditional license.
Course budget
Course activities
Course services
Course resources
Course marketing items
Section charges
Session information: If unselected, no session information is copied. If you select the checkbox, select a radio button:
Use the session from the copied section: The new sections have the session information from the selected sections.
Use the target session selected here: Select a session from the Target Session drop-down.
In any view, select the checkbox for one or more course sections.
Click the Options drop-down, and select Generate course lists PDF. The report opens in a new browser tab.
Use your browser's controls to save or print the report.
In any view, on a course section's row, click the Actions drop-down.
Select View section roster. The section's Course Roster page opens in a new browser tab.
To generate the roster PDF for a single course section:
In any view, on a course section's row, click the Actions drop-down.
Select Generate roster PDF. The report PDF opens in a new browser tab.
Use your browser's controls to save or print the report.
To generate a PDF of the rosters for multiple course sections:
In any view, select the checkbox for one or more course sections.
Click the Options drop-down, and select Generate rosters PDF. The report opens in a new browser tab.
Use your browser's controls to save or print the report.
On the Textbooks view, click the Expand icon
 to see all the fields.
Important
You need the "Can view textbooks" permission to access the Textbooks view.
To view more details, or to add or remove textbooks for the course section, click the Manage textbooks button. The Manage Section Details page opens to the Textbooks tab.
Important
You need the "Can manage textbooks" permission to add and remove textbooks.
Click the Expand icon
to see all the fields.To remove a textbook, click the Remove icon
 .
.To add a textbook:
Click the Add textbook button. The Textbooks pop-up opens.
Click the Show textbook search button.
You can use the Textbook Filter to narrow the list.
On the row of the textbook you want to add, click the Select button.
Click the Update button. The textbook is added to the section.
From the Registration Administration hub, click the Hub options drop-down.
Select Admin options and then Manage sections. The Manage Sections page opens to the Section Demographics view.
Use the Section Filter to find the section you want.
On the section's row, click the Actions drop-down, and select Manage section details. The course section's Manage Section Details page opens to the Section Demographics tab.
On the Portal Controls tab, click the Edit details button.
Under Restrict Registration, select one or more groups in either or both of the drop-downs, or leave either or both blank. You can use these to limit registration in this course section in two ways:
Restrict Registration by Section: You can select one or more groups. Registration in this section will be limited to those groups.
Only students in the selected groups can register for this course section.
If no groups are selected here, then students in any group can register for this course section.
This setting is useful if you want to restrict some course sections to only particular groups (honor students, for example).
Restrict Registration by Web Group: You can select one or more groups. Students in the selected groups can register only for this course section (and any other section in which their group is selected in this setting).
Students in the selected groups can register only for this course section. They can't register for anything else—no section of any catalog course, unless that section also has their group selected in this setting.
This doesn't prevent others from registering for this course section (but the Restrict Registration by Section setting could).
If no course sections have groups selected here, then there are no groups who are restricted to only particular sections.
This setting is useful if you want certain groups (dual-enrolled students, for example) to be limited to a particular subset of courses.
Click the Done editing button. Your changes are saved.
Turn On Variable Grading Types at the Section Level
Note
Adding a variable grading type to a section, only that section is affected.
First, make sure that you have turned Variable Grading Types on for the catalog course or the section.
On the Manage Sections page, on the Grading Controls table view, select the checkbox on the left side of the section, and then click the Options button.
From the Options drop-down, choose Edit Selected.
In the Edit Section Grading Controls pop-up, choose Variable Grading Type, and Select Yes in the drop-down on the right.
Click Update.
Navigate to the Manage Sections page, on the Grading Controls table view.
On the row for the section you are working with, click the Select action button.
In the drop-down menu, choose Manage variable grading types.
In the Manage Variable Grading Types popup, add or remove variable grading types.
Click Update to save your edits.
Select the checkboxes next to the rows you want to export.
From the Options drop-down, select Download to Excel. The Download to Excel pop-up opens.
Select options for the Excel format and data columns.
Click Download. Your .xlsx or .zip file is saved in the file location that you have set in your browser settings.
No, the system warns you, but it doesn't require you to resolve the conflict.