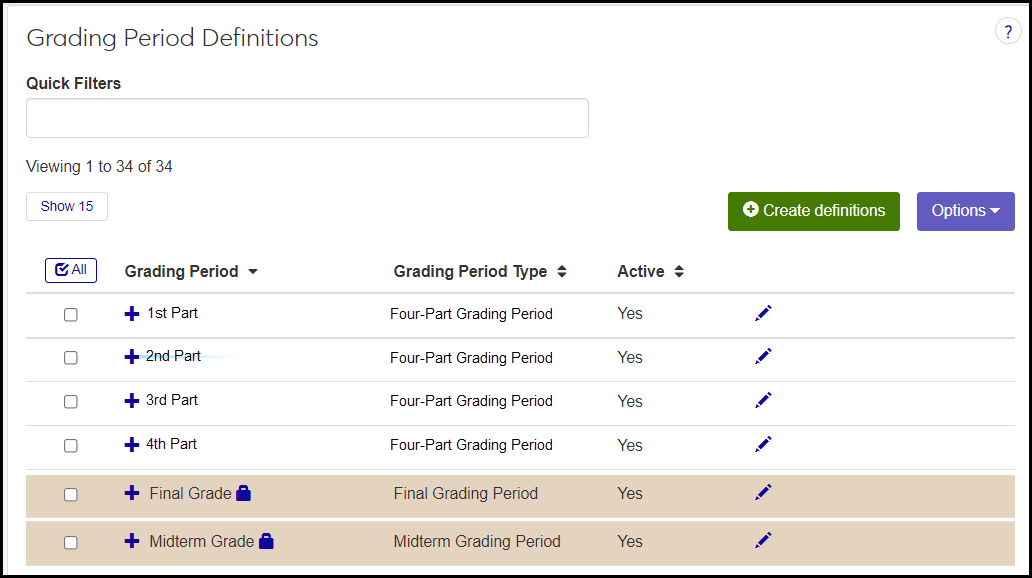
Grading Period Definitions
Important
Information and features vary according to the roles to which you belong and the permissions associated with those roles. For more information, contact your module manager or your campus support team.
Use this window to manage the grading periods available on Grade Entry pages in J1 Web.
Tip
These settings control grade entry J1 Web only, not in Desktop or the Campus Portal. (In Registration Settings in J1 Web, your school can switch from Campus Portal Grade Entry to J1 Web Grade Entry, which has more features.)
Jenzabar provides 2 grading periods by default:
Final Grade
Midterm Grade
You can edit the settings of these grading period definitions, such as whether numeric grades, comments, and clock hours are available on Grade Entry and whether they're required.
Some schools use only the Final Grade, and others also use the Midterm Grade, but if you need more grading periods, such as one for the first two weeks, or one for every four weeks, you can create them.
Grading periods have a grading period type, such as Final, Midterm, or Four-Week.
Why You Might Want Multiple Grading Periods
Grading periods let you customize the types of grades assigned, whether comments, remarks, absences, and clock hours are required, and so on. Thus, you might want to create several grading periods of the Final type. For example, you could create a final grading period that requires absences tracked, one that requires narratives, and another that requires a remark but has narratives available but not required. You can assign these different Final grading periods to different types of courses.
Desktop Location
You can manage grading periods in Desktop, too, on the Grading Period Definition window. Grading periods are not used in Desktop; they're for J1 Web Grade Entry only. Grading periods created or edited in Desktop are available in J1 Web.
Database Location
Grading periods are stored on the Grade Period Definition Table (gradeperioddef.name).
Grading periods are used on the Grade Entry page for each course section in J1 Web. When it's time for instructors to enter grades for a particular grading period, the period is available on Grade Entry.
Catalog courses and course sections have grading periods assigned to them. For example, MATH 101 (and all its sections) might have only the Final Grade grading period assigned, but BIOL 327 might have some sections with both the Midterm Grade and Final Grade assigned, and some sections with Midterm, Final, and a First Two Weeks period assigned.
Grading periods are assigned on the Manage Course Details and Manage Section Details pages.
All fields are required.
Grading Period
Up to 128 characters. This is the name of the grading period as it appears in Manage Course Details, Manage Section Details, Grade Entry, and on transcripts and grade reports.
Grading Period Type
Selected from the grading period types defined on the Grading Period Type Definitions page.
Active
Yes or No. "Yes" means the grading period is available to assign to catalog courses and sections.
Each of these settings asks 2 questions: Should the item display on Grade Entry, and should it be required? For example, if Comments are available but not required, the setting would be like this:
Display on Grade Entry: Yes
Required: No
Caution
If you require a field, the instructor can't enter a grade without also entering a valid value in the required field, too. So make sure you require only fields that instructors have the ability to track. For example, if school policy doesn't require an instructor to take attendance for a large lecture course, make sure the course's grading periods don't require attendance.
Letter (Grade Table Grade)
Your school's grades as defined in the grade table and shown on transcripts and grade reports. (They actually can be letters and/or numbers.) On a course section's Grade Entry page, the instructor selects a Letter grade from a drop-down list of grades available for that section.
If the Grading Period Type is "Midterm" or "Final", then Letter (Grade Table Grade) is automatically set to "Yes" and can't be edited.
Comments
These are prewritten comments, not specific to a particular student, available in a drop-down on Grade Entry. They're defined on the Grade Comment Definitions page.
Remark
Up to 256 characters written by the instructor individually for each student.
Numeric
Numeric grades aren't defined in the Grade Table. That is, they don't already exist in the database, so on Grade Entry, they're not in a drop-down for the instructor to select. Instead, your school can opt to create a policy for numeric grades. The field allows numbers from 0.00 to 999.99, so you could use a 100-point scale or another system you devise. The instructor types a grade into the field on Grade Entry.
Most schools set Display to No.
Note
These are different from the Texas numeric grades used for dual enrollment courses in Texas, and available in J1 for schools with the Texas State Reporting license.
Narrative
Up to 1024 characters written by the instructor individually for each student.
Absences
This displays 2 columns on Grade Entry:
Grading Period Days Absent (for this grading period only)
Total Days Absent (for the whole duration of the course section)
Decimal values are allowed.
Clock Hours
This displays 2 columns on Grade Entry:
Grading Period Clock Hours (for this grading period only)
Total Clock Hours (for the whole course)
Decimal values are rounded to 2 places.
Permission to manage grading period definitions is available in these roles:
Registrar
Registration Module Manager
The permission required is "Can manage grading period definitions".
From the Registration Administration hub, click Hub options.
Click Manage Definitions, and select Grading period definitions. The Grading Period definitions page opens.
To filter the definitions, enter a phrase in the Quick Filters field. To remove a filter, click its Remove icon
 .
.To temporarily sort the definitions, click the heading of the column you want to sort on. Click once for ascending order and again for descending order. The definitions are sorted for this viewing of the page, but the next time you view or refresh the page, it will return to its default sorting.
The Edit Order options let you set the order of definitions in drop-down menus and how they are prioritized when used.
In the Edit Order window, change the order using either the Sort By and Order drop-down menus or the drag and drop option.
Sort By and Order:
From the Sort By drop-down, select the column you want to sort by.
From the Order drop-down menu, select Ascending or Descending.
Drag and drop:
Hold your cursor over the arrow icon
 on the left side of the row until the cursor changes to a hand icon
  .
.Click and hold while you drag the definition to the new location.
Release the mouse button.
Click Update.
After you click Update, your changes are saved in the following ways:
The definitions are listed in the saved order whenever they appear in drop-down menus (where a user selects from the list of definitions).
If the definitions are used in calculations or rules where priority matters, the definitions are now in your saved order of priority.
The definitions page is now sorted according to your changes.
All fields are required to have a value, but if the Display in Grade Entry value for a field is No, then the Required value for that field is automatically set to No, too.
Click the Create definitions button. The Create Grading Period Definitions pop-up appears.
In Grading Period, enter up to 128 characters. This is the name of the grading period everywhere it appears in J1 Web, on student reports, and in transcripts.
In Grading Period Type, select an option from the drop-down. The values are defined on the Grading Period Type Definitions page.
For Active, select Yes if you want this grading period available to assign to courses and sections. You can select No for now and later use the Edit pop-up to change it to Yes.
Select Yes or No for each of the remaining fields.
Each setting has two fields: Display on Grade Entry and Required.
If Display is set to No, then Required is set automatically to No.
If Display is Yes but Required is No, then the instructor has the option to fill in the field on Grade Entry for none, one, some, or all students in the section.
If Required is Yes, then the instructor can't enter a grade without also entering a valid value in the required field. Consider that before making a field required. Will instructors know the required information?
For Grading Period Type, if you select either Final Grading Period or Midterm Grading Period, then the Letter (Grade Table Grade) Display field is automatically set to Yes and is not editable. The Letter (Grade Table Grade) Required field is also set to Yes, but you can change it to No.
Click Create and close or Save and create another.
Click the Edit icon
 on the row of a definition. The Edit Grading Period Definition pop-up opens.
For most grading periods, you can edit every field. Here are the exceptions:
If a setting's Display on Grade Entry field is No, the setting's Required field is automatically No and isn't editable.
For the Jenzabar-provided grading periods Final Grade and Midterm Grade, the Grading Period and Grading Period Type fields are not editable.
If the Grading Period Type is either Final Grading Period or Midterm Grading Period, then the Letter (Grade Table Grade) Display field is automatically set to Yes and is not editable. The Letter (Grade Table Grade) Required field is editable.
Click Update.
Select the checkboxes next to the rows you want to export.
From the Options drop-down, select Download to Excel. The Download to Excel pop-up opens.
Select options for the Excel format and data columns.
Click Download. Your .xlsx or .zip file is saved in the file location that you have set in your browser settings.