My General Settings
Communication preference options let you:
Select a default module access code. When you define an interaction, the code you choose will be the default module access code for it. Other users with permission to that code will be able to see it.
Personalize your outgoing emails with a unique signature tag. You can add images such as logos, department and contact information, social media links, etc. to your personal email signature.
Select a designated email address where you want to receive routinely forwarded To Dos and notifications to keep up-to-date with J1 Web messages, To Dos, and notifications.
Hover over the User Profile and select My general settings to open the My General Settings page.
From the Communication Preferences options, click Edit. Forwarding options become available.
From the Default Code drop-down, select a default module access code. When you define an interaction, the code you choose will be the default module access code for it. Other users with permission to that code will be able to see it.
Click the Save button.
Use this section to create or update a custom email signature that is added to the bottom of your outgoing email interactions. For example, you signature might include your name, title, department, social media links, images (e.g., logo), and contact information.
Note
If you belong to a shared email address and have a custom signature tag, your custom signature tag will be added to emails you send from the shared email address.
Note
Templated emails do not include personalized signature tags, only non-templated emails include it.

Hover over the User Profile and select My general settings to open the My General Settings page.
From the Communication Preferences options, click Edit. Signature Tag options become available.
Click the Enable Signature Tag in Communication Drawer option to On or Off.
Click the Edit button under the Signature Tag options. The Signature Tag field and formatting options become available.
Enter or update your signature details using formatting options to get the appearance you want.
Note
To add an image, click the Add Image icon
 .
.To add a hyperlink, click the Add Link icon
 .
.Under Signature Tag, click the Save button.
Under Communication Preferences, click the Save button.

Hover over the User Profile and select My general settings to open the My General Settings page.
From the Communication Preferences options, click Edit. Forwarding options become available.
From the Forwarding Email Address drop-down, select the email address where you want to have interactions forwarded.
Note
Email addresses are managed on the J1 Web Person Information Details page or in the Desktop (Name Entity window). Contact your campus support team if you do not see an email address or if you want to update what is listed.
If the Forwarding Interaction option is set to Off, click it to enable it.
From the To Do and Notification Forward Email Address drop-down, select the email address where you want to have To Dos and notifications forwarded.
From the To Do and Notification Forwarding Frequency drop-down, select how often you want interactions forwarded outside of J1 Web.
Click Save.
Hover over the User Profile and select My general settings to open the My General Settings page.
From the Communication Preferences options, click Edit. Forwarding options become available.
Click the Forwarding Interaction option to make it Off.
Click Save.
In order to select a specific email address, the email address must be listed in J1 (J1 Web Person Information Details page, Contact Info tab; Desktop Name Entity window) and the email domain must be listed in J1 Web System Administration, To Do & Message Forwarding Domains settings.
To protect privacy information, only notifications regarding messages and To Dos are emailed. Use the link included with the notification to quickly access more information about the To Do or message.
You won't be emailed notifications regarding new, due soon, or important To Dos and messages. These notifications can be helpful reminders, but are not required.
If your school has Communications Plus, responses sent outside of J1 Web are also recorded in J1 Web when interaction forwarding is turned on in System Administration Communications settings. Email conversations can be accessed from the interaction inbox and from the interaction inventory.
If your school has Communications Base, emails are forwarded to your email provider. However, responses sent outside of J1 Web are not synced to the system.
Notifications appear as pop-ups while working in J1 Web. These can be system messages or notification interactions included in an automation plan. Notifications can be viewed in the Notification Center even if you disable the alerts.
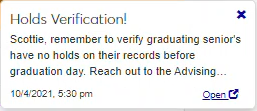
To control notifications, click the Notification option to On or Off.
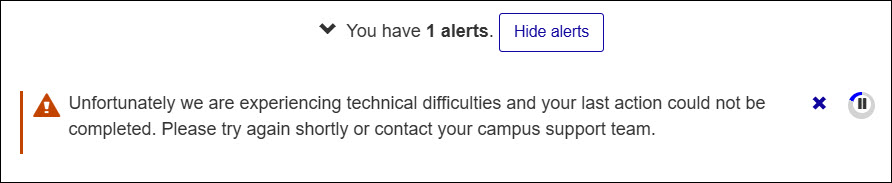
Alerts appear as pop-up messages in the bottom of your J1 Web page to let you know if an action you completed was successful or encountered issues. J1 Web uses three types of alerts:
Success lets you know an action has been completed successfully.
Warning informs you about potential issues or circumstances that require attention but are not critical. They serve as cautionary messages.
Danger indicates serious issues requiring immediate intention. They can signal errors, failures, or critical problems that could lead to significant consequences if not addressed promptly.
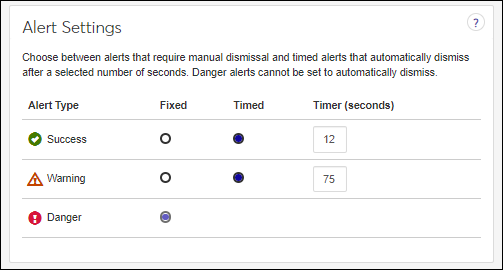
Alert settings let you choose how to handle success and warning alerts:
Fixed option means the pop-up notification remains on the screen until you manually dismisses it. This ensures important messages are not missed.
Timed option lets you determine the duration (in seconds) that the notification remains visible on the screen before it automatically closes. This provides a more streamlined experience for users who prefer notifications to disappear after a brief period.
Note
Danger alerts are always fixed and cannot be customized.
Alerts can be viewed in the Notification Center even if you disable them as pop-ups.
To configure success and warning alerts, select Fixed or Timed. For timed alerts, enter how many seconds you want the alert to show on the screen.
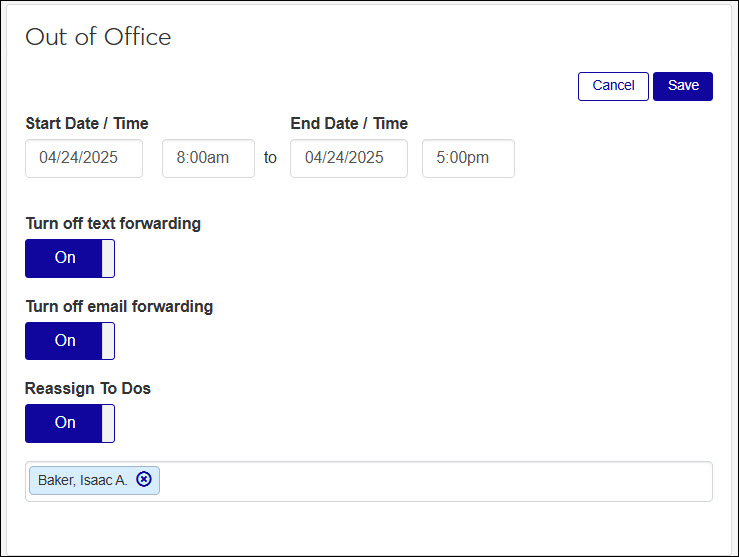
These settings let you configure your out-of-office preferences to ensure coverage and reduce delays while you're out. You can pause interaction forwarding and automatically reassign your To Dos while you're out of office to keep important tasks moving.
Hover over the User Profile and select My general settings to open the My General Settings page.
From the Out of Office options, click Edit. Out of Office options become available.
Use the Start Date/Time and End Date/Time options to choose the timeframe you want to disable interaction forwarding.
If you want to reassign To Dos during this timeframe, click the Reassign To Dos option to make it On, then start typing and select the individual you want to forward the To Dos to.
Under Out of Office, click the Save button.