Cast Appointment Blocks
Important
Information and features vary according to the roles to which you belong and the permissions associated with those roles. For more information, contact your module manager or your campus support team.
Reach this page from the Navigation panel. Click Academic Advising, Primary Advisor, and then Cast Appointment Blocks. Use this page to set up time slots of when you are available to meet with your advisees during an advising cycle. The wizard steps you through three steps:
General advising appointment information such as how long you generally want advising appointments to last, where you want to hold meetings, and any general information.
Adding appointments to your calendar by adding them to the days and times convenient for you. A progress bar lets you know how many appointments you have set up to easily see how many remain to be added to the calendar. If your advising administrator requires you to set up extra "buffer" appointments to ensure there are enough available time slots, those are included in the appointment count.
Publish your calendar to make the appointments available to advisees to select using your Online Campus Solution. Advisees are sent an email notification to let them know the appointments are available to select and you receive a notification as advisees accept the appointments.
Tip
Did you know that you can configure select groups of students to have permissions to edit their academic plan in Campus Portal? This can save a lot of time meeting with students. If desired, it can be set up to require the advisor to approve the changes, or not. A System Administrator will need to do the setup. For more information see My Academic Plan Setup and Student Plan Approval.
Note
Your advising administrator may have selected general advising appointment information such as duration or description. You can update this information as needed.
On the J1 Web main Navigation panel, click Academic Advising.
Use this page to set up time slots of when you are available to meet with your advisees during an advising cycle.
Select Primary Advisor and then Cast Appointment Blocks. The Cast Appointment Blocks page opens. It works like a wizard, letting you fill in information page by page.
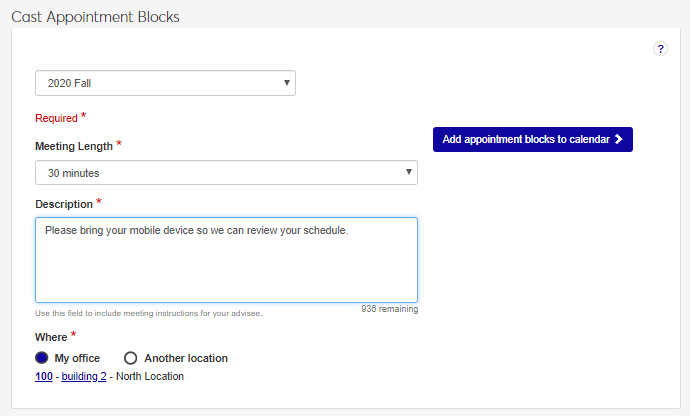
In the Meeting Length drop-down list, update or select how long you want advising appointments to typically last.
In the Description field, enter or update any general information you want to include for advisees when they see the meeting information. This information will appear to all of your advisees who can accept advising appointments. For example, you may want to request advisees bring a copy of their catalog or their laptop or tablet.
Using the Where options, use your office as the meeting location as defined on the Campus Locations page, or select Another location to search for an available campus facility. Some facilities may require location approval before your appointments can be scheduled and published to students.
Click Add appointment blocks to calendar. The calendar appears.
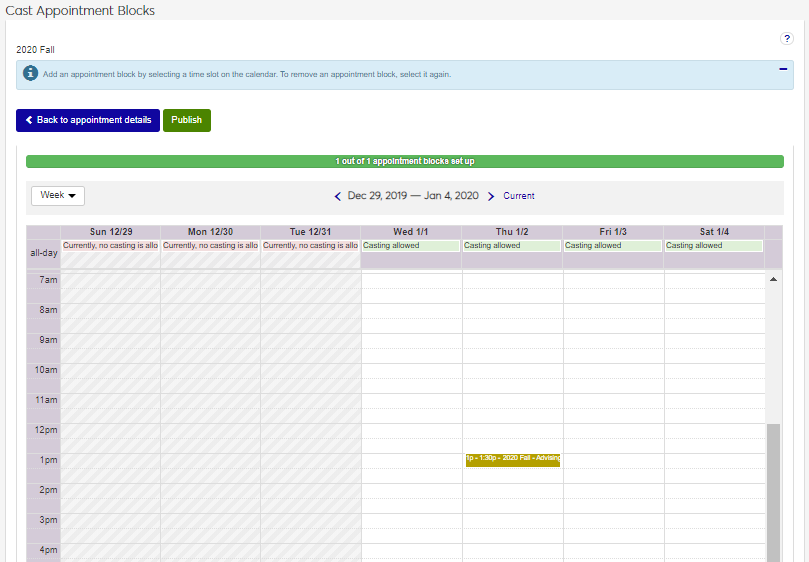
Click on a day/time within the casting allowed dates to add an advising appointment to the calendar.
Tip
Casting allowed dates reflect the begin and end dates of the advising cycles.
To remove an appointment, double-click on it and select Remove.
Use the progress bar to monitor how many appointments have been set up and how many remain to be set up. Once all the appointment time slots have been added to the calendar, the Publish option is available.
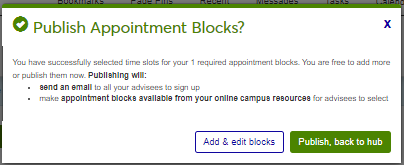
Click Publish. Several things happen:
The Success window appears.
Appointments become available in your Campus Portal.
Advisees receive an email notification letting them know the appointments are available to select. You will receive a notification as advisees accept the appointments.
Your advising administrator has the option to enter general advising appointment information that will be used for all advisors when setting up their appointments. You can select a different meeting length, description, location as needed.
Casting allowed are the days that fall within the advising cycle dates set up by your advising administrator. You can set up advising appointments outside the advising cycle using your Home page or Advising hub calendars.
Once you publish the appointments, your advising students associated with the advising cycle receive an email notification to let them know they can go to your online campus solution (Campus Portal and CRM) and select them.
The publish option isn't available until the required number of appointments have been added to the calendar.
No! Options are now available that allow students and advisors to collaborate on academic plans online. For more information, see Student Plan Approvals.
If the year/term/subterm isn't available to choose from, ensure there are begin and end dates for the web group. (Web groups sometimes have the label "Registration Control Group" or "Tel/Web Group".)
If the web group isn't available to select, ensure at least one advisee is a member of the web group.