Data Display
Important
Information and features vary according to the roles to which you belong and the permissions associated with those roles. For more information, contact your module manager or your campus support team.
The Display Data Access page lets you determine how sensitive information appears throughout the system. From this page, you can create data masks for bank account numbers, salaries, and social security numbers (SSN). If your school is licensed for Texas State Reporting, you can also configure data masking for Texas faculty salaries.
When J1 Web roles are associated with data masks, users in those roles see data according to the data mask.

Priority Order
Each data display access list includes a Priority Sort Order column to indicate the order that data masks appear in the list. Priority order also determines which data mask users see when they are assigned to multiple roles with different data masks. The data mask with the highest priority is displayed.
Notice
Jane is assigned to a person management role, and the person management role is associated with two SSN data masks. Data mask 1 has a priority of 7 and data mask 2 has a priority of 4. When Jane sees a SSN in the system, it will be displayed with data mask 2.
Desktop Location
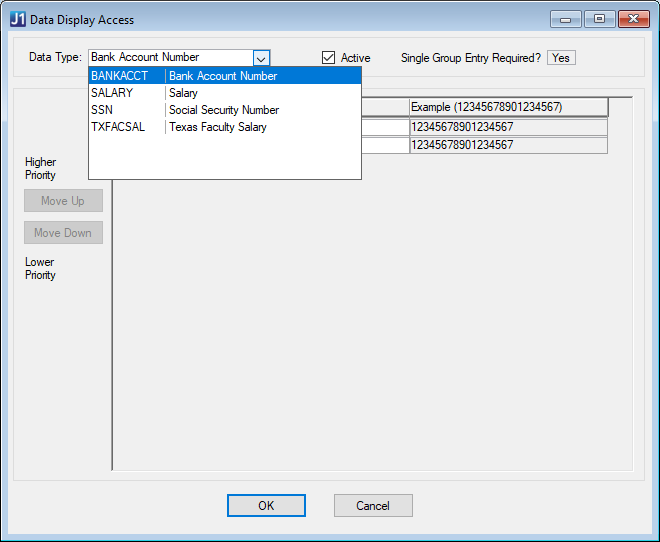
You can manage data display access in Desktop from the Data Display Access window.
Caution
Because permissions are handled differently in J1 Web and Desktop, data masks and role associations defined in J1 Web only impact how data is seen J1 Web. For additional information about setting up data display access in Desktop, contact your campus support team or see the Desktop help for the Data Display Access window.
Database Location
Data mask definitions are saved to the MaskFormat table.
Permissions Required
To access the Display Data Access page, you must be in a User Management role with "Can view data display access" permission. To associate J1 Web security roles with data masking templates, you'll need "Can manage data display access" permission.
From the Core User Management hub options, select Data Display Access. The Display Data Access page opens.
Select one of the following options from the Display Data Access drop-down.
Bank Account Number
Salary
Social Security Number
Texas Faculty Salary (only available for schools with the Texas State Reporting license)
Use Quick Filters and column sorting to find data masking templates.
Click the Manage Associations button to view a list of roles that see data according to the selected data mask.
On the Display Data Access page, select Bank Account Number from the Display Data Access drop-down.
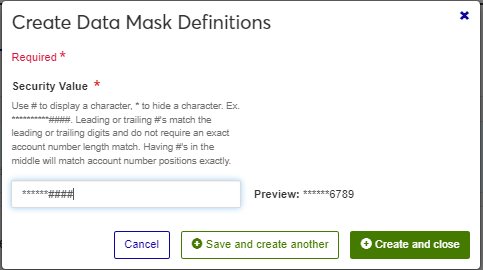
Click Create data mask. The Create Data Mask Definitions pop-up opens.
Enter a Security Value that represents how the bank account number will be displayed (up to 30 characters). Allowable characters are * (masked character) and # (visible character).
Use the Preview to see how the data will be displayed.
Click Save and create another or Create and close.
On the Display Data Access page, select Salary from the Display Data Access drop-down.
Click Create data mask. The Create Data Mask Definitions pop-up opens.
Click the Security Value option to Hidden or Displayed. The Preview updates based on your selection.
Click Save and create another or Create and close.
Note
There can be one Hidden and one Displayed data mask for salaries. After those are created, no additional data masks can be created.
On the Display Data Access page, select Social Security Number from the Display Data Access drop-down.
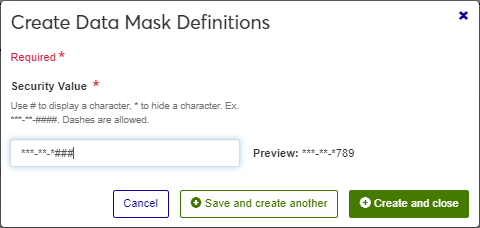
Click Create data mask. The Create Data Mask Definitions pop-up opens.
Enter a unique Security Value that represents how the social security number will be displayed (up to 11 characters including dashes). Allowable characters are * (masked character), # (visible character), and dashes.
Use the Preview to see how the data will be displayed.
Click Save and create another or Create and close.
Note
Available with the Texas State Reporting license.
On the Display Data Access page, select Texas Faculty Salary from the Display Data Access drop-down.
Click Create data mask. The Create Data Mask Definitions pop-up opens.
Click the Security Value option to Hidden or Displayed. The Preview updates based on your selection.
Click Save and create another or Create and close.
Note
There can be one Hidden and one Displayed data mask for salaries. After those are created, no additional data masks can be created.
From the Priority Order section, select Edit priority order. The Edit Priority Order options appear.
Use the following options to order the security values according to priority:
From the Sort By drop-down, select Security Value, and then select Ascending or Descending from the Order drop-down. You can further refine the order by dragging and dropping security values to where you want them in the list.
To drag and drop an item, hover the cursor over the up and down arrow icon
 for the item being moved until it turns into a hand icon. Then click and hold the left mouse button down and drag the item to where you want it.
Click the Update button. The Edit Priority Order options close and the options will appear in the new order.
On the Display Data Access page, select one of the following options from the Display Data Access drop-down.
Bank Account Number
Salary
Social Security Number
Texas Faculty Salary (only available for schools with the Texas State Reporting license)
Click the Edit icon
 for the data mask you want to update.
In the Edit Data Mask Definitions pop-up, update the Security Value as needed.
Click Update.
On the Display Data Access page, select one of the following options from the Display Data Access drop-down.
Bank Account Number
Salary
Social Security Number
Texas Faculty Salary (only available for schools with the Texas State Reporting license)
Click the Manage Associations button for a data mask. The Manage Associations pop-up opens.
To add associations:
Click the Add Associations link.
In the Security Role field, start typing the name of a J1 Web role and select it from the options that appear.
Repeat Steps a and b for each role you want to add.
To remove associations, click the Remove icon
 next to a security role.
Click Update.
Select the checkboxes next to the rows you want to export.
From the Options drop-down, select Download to Excel. The Download to Excel pop-up opens.
Select options for the Excel format and data columns.
Click Download. Your .xlsx or .zip file is saved in the file location that you have set in your browser settings.
Data is displayed according to the data mask with the highest priority. For example, Jane is assigned to a person management role, and the person management role is associated with two SSN data masks. Data mask 1 has a priority of 7 and data mask 2 has a priority of 4. When Jane sees a SSN in the system, it will be displayed with data mask 2.