Receipts
Important
Information and features vary according to the roles to which you belong and the permissions associated with those roles. For more information, contact your module manager or your campus support team.
The Receipts page lists the receipts in your system and the batches they are included in. By default, the list displays suspended (S) and unposted (U) receipts, and you can use the receipt filter to view receipts based on different criteria. From this page, you can access receipt details, create new receipts, and generate receipt PDFs and the payments received report. You can also view and add comments to receipts.

Permissions Required
To access the Receipts list, you must be in a Receivables Management role with at least "Can view receipts" permission. To generate the Payments Received report, you must have the "Can generate reconciliation report" permission. For additional information about permissions to work with receipts, see the Receipts section of Receivables Management Permissions.
Desktop Location
Receipt information is also listed in Desktop on the Receipt Entry window. The reconciliation report can be generated from the Desktop Checks Received Groups window (right-click a receipt group and select "Checks received").
Locked Receipts
A receipt batch (RC) is automatically created when a new receipt is entered, and multiple receipts can be included in the same batch. When an RC batch is locked by another user, all the receipts in that batch are locked and cannot be edited, regardless of their status. If you have unlock permissions for receipts, you can unlock the receipt from the Receipt List page and make edits on the receipt details page as needed.
Tip
The system updates the ID Number / Name field when you enter a full ID number and press Tab to move to the next field.
From the Receivables Management Hub options, select Receipts. The Receipt List page opens.
Use the Receipt Filter to narrow down the list of results.
To view one receipt, click the Receipt Number to open the receipt details page.
To view multiple receipts, select one or more receipts from the list and click Open. The details page opens for the first receipt in the list, and you can select other receipts to view from the receipt number drop-down.
On the Receipt List page, click the Reconcile button. The Reconcile Receipts pop-up opens.
Click in the Select Batches to Reconcile field, and select one or more receipt batches. Required.
Tip
You can also select receipts before clicking the Reconcile button. If you do, the selected receipts' batch numbers appear in the "Select Batches to Reconcile" field.
Click Generate PDF. The Payments Received List opens in a new browser window.
On the Receipt List page, select one or more receipts from the list.
Click the More button and select Generate report. The Generate Report? pop-up opens.
Review the list of receipts to be generated. Click the Remove icon to
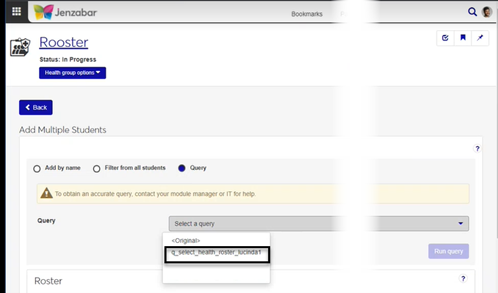
Select the Receipt Layout. "Original" is the default layout, and any customized versions of the receipt layout are available for selection.
Note
Reports customized for Desktop cannot be used in J1 Web, and customizations must be made to the J1 Web version of the d_ar_receipt file. For additional information about customizing reports for J1 Web, see Working with Reports in J1 Web.
Select a File Format. The default selection is PDF, and you can select multiple formats.
Click Yes, generate. If only the PDF file format is selected, the receipt opens in a new browser tab. If another file format is selected, the receipt downloads as a zip file.
Warning
J1 Web does not currently support certain features when the A/R Configuration is set up for Open Items. If your school is configured for Open Items, Jenzabar recommends that you continue entering receipts in Desktop until the Open Items functionality is fully available in J1 Web.
On the Receipt List page, click the Create receipt button. The Create Receipt page opens.
Complete the steps to create a receipt.
On the Receipt List page, click the Comments icon
 . The comment pop-up opens.
Review the existing comments, or click New comment to enter or attach additional information about the receipt.
To edit comments you've made, click the Edit icon
 , make updates, and click Save.
Warning
Unlocking a receipt batch discards any unsaved changes and prevents updates made by other users on the receipt details page.
On the Receipt List page, select a receipt with the Lock icon
 .
.Click the More button and select Unlock. The Unlock Batches? pop-up opens.
Review the receipts listed in the Ready to Unlock and Unable to Unlock sections.
Click Yes, unlock.
Note
Any general convenience fee transactions associated with the receipt are also deleted when the receipt is deleted.
On the Receipt List page, select one or more receipts.
In the More drop-down, click Delete. The Delete Selected Receipts? pop-up opens.
Review the selected receipts, which are separated into two categories.
Ready to Delete (for receipts that can be deleted)
Unable to Delete (for receipts that can't be deleted, either because they are in use or are protected by the system)
Click Yes, delete.
Important
Access to the folders where Jenzabar-provided original reports are stored is controlled by your institution. For more information, contact your campus support team or see Working with Reports in J1 Web.
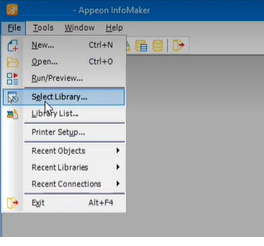
Open InfoMaker.
Click File > Select Library.
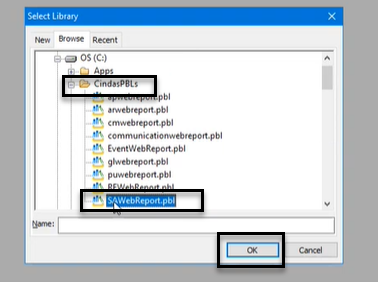
On the Select Library pop-up, navigate to the shared folder where Jenzabar-provided original reports and queries are stored.
Select the PBL (PowerBuilder Library) file that contains the report or query you want to customize.
Click OK.
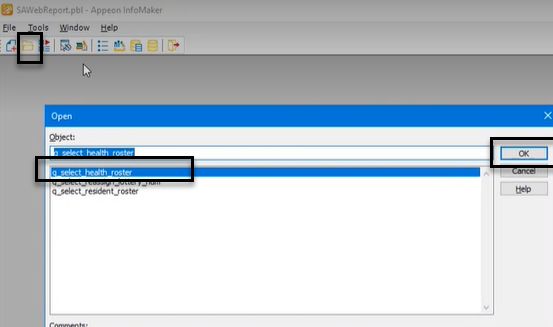
Click the Open icon.
On the Open pop-up, in the Object section, select the report or query you want to customize.
Click OK.
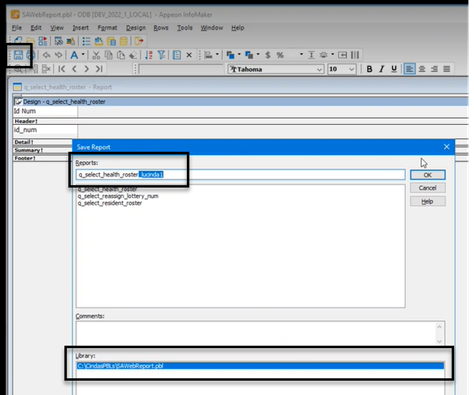
Customize the report or query as needed.
Save the customized version in the shared folder by adding a unique, easily identifiable extension to the file name.
Tip
By default, InfoMaker saves the customized version in the same folder that you opened the original version from. Confirm the file path is correct in the Library section.
On the corresponding report page in J1 Web:
Customized versions of queries will display in the Query or Data Set drop-down.
Customized versions of reports will display in the Report Layout drop-down.
You may not have the appropriate permissions. To view batch information, you must be in a General Ledger Accounting Receipt Batches role with the "Can view batches" permission.
Receipts cannot be deleted if any of the following conditions are met:
The receipt contains posted miscellaneous charges.
The receipt has been posted.
The receipt is in a batch that has been summarized or is locked by another user.
The receipt has transactions that were applied to a reversed payment plan payment.
The receipt has transactions related to an allocation transaction.
The original report layout includes the following information.
Source Code
Group Number (Receipt batch number)
ABA Number
Check #
Amount
Receipt #
Payer ID Number
Payer Name
Additionally, the report groups the check, cash, and credit totals as well as the number of checks for users and the receipt subsidiary code.
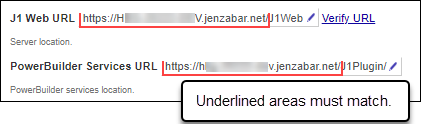
Verify the PowerBuilder Services URL is entered correctly in System Administration, System Settings, Product Installs and Sign page.
The URL must use HTTPS and not HTTP
The URL subdomain and domain must match the J1 Web URL
If the location where you store J1 Web reports is not the default installation location (C: > Jenzabar > Reports), verify the J1 Web server has permission to access the location. Detailed steps are available in the help topic Working with Reports in J1 Web.
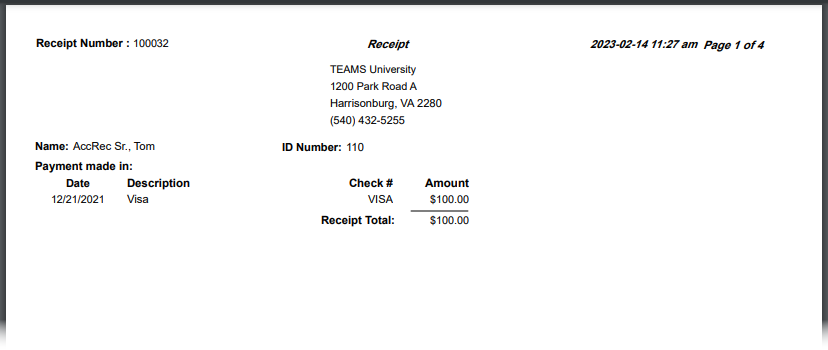
The default receipt report includes the following information.
Receipt Number
Payer Name
Payer ID Number
Payment Date
Description
Check #
Amount
Receipt Total
The receipt report used in J1 Web is different from the one used in the Desktop application, and any customizations made in the Desktop version of the report are not available for J1 Web. You'll need to recustomize the latest version of the d_ar_receipt report in InfoMaker and copy it to the J1 Web server to make it available from the Report Layout drop-down. For additional details about customizing reports for J1 Web, see Working with Reports in J1 Web.
Follow the steps to Customize the Receipt Report Layout above. The original report name is d_ar_receipt in the ARWebReports.pbl. For additional assistance, contact your campus support team.