Create a Place
Important
Information and features vary according to the roles to which you belong and the permissions associated with those roles. For more information, contact your module manager or your campus support team.

There are two ways to add a new place:
From the Facilities hub, Hub options drop-down, select Create place.
From the Facilities hub home page, Buildings and Places block, Select category drop-down options, select the type of place you'd like to create and wizard steps you through the rest of the process.
The Create Place wizard guides you through creating a new place. The wizard has the following sections: General Information, Contacts & Scheduling, Physical Characteristics, and Confirm & Finish.
Tip
As you are creating places, keep the following tips in mind.
Enter as many known details as possible. A place may have multiple uses and the more information known about it can help determine how it can be used.
Use simple, but unique names. Use names that make the space easy to identify for users across campus. If a learning hall has multiple classrooms, enter the room numbers.
Consider when spaces within the place will need scheduling availability. When setting up availability for a place, consider when any related spaces will be available. For example, you want to ensure an instructional building is available during hours its related classroom spaces are being used for classes.
Each type of place has unique characteristics and scheduling options. For example, a place will have a number of availability options whereas an online space is always available all day every day and cannot be updated.
In this section, you can enter general information about the place such as status (e.g., active or planning), the type of place (building or rec center), the region on campus where it is located, and marketing information.
The status you select for a place impacts scheduling availability.
Available campuses vary according to the active locations on the Campus locations page.
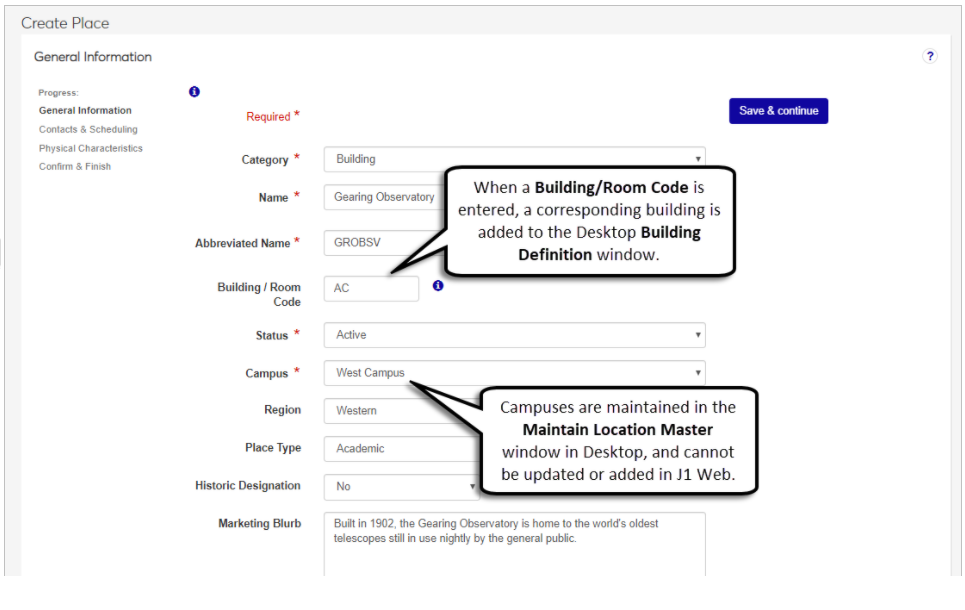
You can enter a place Building/Room code so that the place is available in the Desktop application. This can be useful for planning where classes will be instructed or advisors have their offices. If you do not enter a code for a place, Desktop codes cannot be entered for any of the spaces within it.
The Marketing Blurb will be visible to anyone who can view information about the space in J1 Web or the Campus Portal's Event Requests feature.
In this section, you can associate Web users to the place as contacts, coordinators, and scheduling approvers. Scheduling approvers are responsible for reviewing and approving/denying any requests to schedule the place for meetings, appointments, and events. They will be assigned tasks when requests are made and can view all requests from the Pending Location Approvals block.
If your school has a Campus Portal and an Events license, you can selected the Promoted checkbox to add the place to the main page of the Event Requests feature.
Mark places as Visible in Event Request Feature to allow Campus Portal users to request the location for an event via the Event Request feature. This allows an entire place, such as a library or athletic facility, to be requested with the Campus Portal Event Request feature.
Spaces can be marked as Visible in Event Request Feature even if their parent place is not. This allows spaces to be scheduled even if the entire place cannot be scheduled. For example, a concert hall is not available in the Event Request feature, but one of its auditoriums can be requested and scheduled.
In this section, you can enter and select the defining characteristics of a place such as available equipment, prohibited items, accessibility, etc. Available characteristics vary according to the type of place being created. For example, a building can have characteristics related to number of floors, total square footage, internet availability, etc.
On this page, you can review and update all of the information you entered for the place. You can update or add information by clicking the edit icons and saving.
Tip
Once you have created the place, if you plan to create spaces and want to organize them into distinct sections of your place, you may want to go ahead and set up areas within the place before you begin creating spaces. For more information, see Manage Areas.
Note
For this example, we will create a building. Options and steps will vary slightly according to the place category you select.
Select the place type from the Category drop-down.
Enter a descriptive and easily identifiable place Name.
Select the Campus where the place is located.
Use the Status drop-down to select the place’s status.
Add an Abbreviated Name.
Enter a unique Building/Room Code to create a corresponding building on the J1 Desktop Building Definition window. This ensures the new place can be used in J1 Desktop.
Select an optional Region. If regions have not been defined or are inactive, they aren't available to select.
Select an optional Historic Designation.
Tip
Places with historic designations may have unique requirements or limitations. If you are not sure if a place has a historic designation, select Unknown.
Select an optional Place Type (e.g., academic or athletic facility).
Enter an optional place summary/description in the Marketing Blurb field. This will be available to anyone who can view information about the place in J1 Web and in the Event Requests feature if your school has a Campus Portal.
Enter any additional place information in the Notes/Comments field.
Click Save & continue to open the Contacts & Scheduling page.
Enter a name in the Contact Name field and select the name from the drop-down.
Note
Only J1 Web users can be entered as a contact. If a user's name does not appear, verify they are an active J1 Web user (J1 Desktop Users window) and are assigned to a J1 Web role (J1 Web System Administration).
Enter the contact's phone number in the Contact Phone.
Enter an optional Lobby Phone field for buildings with a common lobby and a main contact number.
Enter the place address in the 911 Address fields.
Select the Available for Scheduling checkbox if the place can be reserved for scheduling. The scheduling options appear. If you do not wish for this place to be scheduled, deselect the Available for Scheduling checkbox and skip to step 11.
Enter place promotional information. If your school does not have a Campus Portal or J1 Web Events licensing, skip to step 7.
Select the Visible in Event Request Feature checkbox if you want the place to be available in the Campus Portal Event Requests feature. The Promoted checkbox appears.
Tip
Only check the Visible in Event Request Feature checkbox if users should be able to request the entire place for an event via the Event Requests feature in your Campus Portal. This options is ideal for places such as a Campus Quad or a chapel.
Select the Promoted checkbox if you want the location to be added to the main page of the Campus Portal's Event Requests.
Enter a name in the Place Coordinator field and select a name from the drop-down. Depending upon your school's set up, this could also be the point of contact.
Select the Place Coordinator is also Place Scheduling Approver checkbox if the place coordinator is also responsible for approving schedule requests. If a different person is responsible for approving scheduling, type the approver's name and select it from the drop-down.
Add an Additional Resources Manager if someone will be responsible for resources related to the building (e.g., equipment, cleaning crews or supplies, etc.).
Note
Only J1 Web users can be entered as place coordinators, place schedule approvers, and additional resources managers. If a user's name is not appearing, verify they are an active J1 Web user (J1 Desktop Users window) and are assigned to a J1 Web role (J1 Web System Administration).
Enter Scheduling Summary details for places marked as Available for Scheduling. You can designate specific date ranges of availability and create as many time slots as needed. To update a place's availability dates:
Click the Date Range Edit icon.
Select the Start and End dates for when the place is available for scheduling. If the place will be available for scheduling indefinitely, select No End Date.
Click Save.
Designate specific week day and time ranges for place availability in the Day/Time Range.
Click the Daily All Day Edit icon.
Select a Day Range from the options and use the checkboxes to select the appropriate week days.
Select a Time Range.
Enter a Start Time and End Time or keep the All Day selection.
Click Save.
Add additional date ranges by clicking Add another day/time range and repeating the steps above.
Enter the maximum number of people that can occupy the place at one time in the Maximum Capacity field.
Enter the total square footage of the building in the Square Feet field. This is typically measured from the outside and includes all interior spaces.
Enter in the number of floors, including basement levels, in the Number of Floors field.
Use the remaining options to define the place’s physical characteristics of the place (e.g., handicap accessibility, central air conditioning, internet access, smoking limitations, or prohibited items).
Use the edit icons to enter or select your changes and click the Save button.
When you are finished reviewing and making any updates, click the Save & finish button or the Save & create another link.
If you click Save & finish, the Place page for the newly created place appears. If you click Save & create another, the new place is created, a Place page is created, and the General Information page of the Create Place wizard appears where you can begin the process of adding another place.
Review the information you entered for the place.
Click the section name link at the top of the page jump to a particular section.
Click the Edit icon next to the information you want to update.
Tip
Updating the place category may change characteristic options.
Use the edit icons to enter or select your changes and click the Save button.
Click the Save & finish button or the Save & create another link after reviewing place details.
If you click Save & finish, the Place page for the newly created place appears.
If you click Save & create another, the new place is created and the Create Place wizard opens to the General Information page.
Only the fields marked with a red asterisk are required when you initially create a place. If you aren't able to finish entering in the rest of the place's details, you can come back at any time to finish.
To finish entering the place's information, go to the place's main page, click the Place options drop-down and select Review place details. The Review Place Details page appears with an Edit details button that allows you to edit all of the place's information and scheduling availability.
Verify the user is an active Web user (Desktop Users window).
Verify the user is assigned to a Web role (Web System Administration).
If your school is licensed for Campus Portal and J1 Web Events, you can choose to promote a place in the Campus Portal's Event Requests feature.
As long as a place is available for scheduling, you can mark it as Visible in Event Request Feature which will display the place in the Event Requests feature and will allow users to search for it when looking for a location at which to book their event. If you wish to promote the place in the Event Requests feature, you can mark it as Promoted.
These settings can be set when creating the place or, if the place has already been created, can be edited on the place's Overview block or Review Place Details page in the Contacts & Scheduling section.
Online locations are always considered active. They cannot be inactivated, demolished, or sold.
Online locations are considered schedulable at all times. Their scheduling information cannot be changed.
Online locations do not have the traditional characteristics of a building or place. For example, an online location doesn't have handicap access or a certain number of floors.
Depending upon your role and related permissions, you can update information about the place at any time. For example, a place's scheduling availability may be impacted due to remodeling.
To update place information, characteristics, or scheduling availability, access the place's page and select View all place details where you can use options to make updates to scheduling availability.