Manage Interactions
Important
Information and features vary according to the roles to which you belong and the permissions associated with those roles. For more information, contact your module manager or your campus support team.
Activate/deactivate interactions
Add/send interactions
Copy existing interactions to create new ones
Create new interactions
Find and review the interactions you have access to
Preview interaction templates
Select multiple interactions and create a new automation plan
Update existing interactions
Note
Editing an existing interaction can skew analytics if the interaction has already been sent/added. If you need to update an interaction that has been sent/added, Jenzabar recommends copying it to create a new one and making the changes to the copied version.
View detailed information about when the interaction was applied
To work with interactions, users must belong to the Communication Management Base role with interaction permissions enabled.
Name/Description shows the name of the interaction and links to the interaction's page where you can view more detailed information about the interaction. The Queued icon (
 ) means the interaction is scheduled to go out.
Interaction Use indicates how the interaction is used
Non-Templated indicates the interaction will be available when creating a new communication throughout the system using "Create new communication" and "Send email" options. These interactions are not included in automation plan and not sent out according to a schedule. For example, when an advisor sends an email to their advisees, they choose a code to associate with the email. Jenzabar provides several default internal use only interactions.
Internal Recording Purposes Only indicates the interaction will be used to record information that occurred outside of the system. Use these interactions to copy and paste the content of an external communication into the system and apply it to constituent records.
Templated Interaction indicates the interaction will be sent from the system manually or automated via a schedule. These interactions can be reused repeatedly.
System Event indicates the interaction will be sent/applied when a selected event occurs in J1 Web as opposed to being based on a schedule. For example these interactions can be created to send an email to advisors when a "W" grade is entered for one of their advising students. Additional system event options will be available in future releases.
Type: Chatbot, document, email, note, notification, phone call, text,* or To Do
Status
Active means the interaction can be scheduled and sent. Active interactions cannot be deleted. Deactivating an interaction prevents it from going out in the schedules it is associated with.
Inactive means the interaction cannot be scheduled and sent. Inactive interactions can be deleted.
Tip
Stripes mean an interaction is incomplete or inactive.
Interaction Owner identifies the primary department on campus that created/owns the interaction.
Modules Allowed Access to the Interaction identifies the Module Access Codes associated with this Interaction. These codes control which roles can view the interaction based on their Interaction Access Code configuration in System Administration.
Show in Communication Feed indicates the interaction should show in the Communication Feed on an individual/ organization’s J1 Web page. The interaction will always appear in the Interaction Inventory even when this option isn’t selected.
Do not allow duplicate interaction for a record controls whether a recipient can receive the interaction more than once if it is used across multiple communication plans.
When an interaction is deactivated, it cannot be sent/applied. If a deactivated interaction is a part of a set, it is not removed from the set, it is just skipped until it is reactivated. To view a list of automation plans the interaction is associated with, click on the interaction's hyperlinked name.
Access the Communication Management, Interactions page.
Select the checkboxes of the interactions you want to activate/deactivate.
From the Options drop-down, select Activate or Deactivate.
Note
Interactions may take a few minutes to be applied/sent. When you click Save and apply, the interaction is saved to the database and then queued up to send/apply. If you are sending an interaction to 5,000 recipients or if there are other processes occurring in the system, it may take a few minutes.
Access the Communication Management, Interactions page.
Use the available filter options to find the interaction you want to apply/send.
From the Actions menu, select Apply. The Apply interaction page appears.
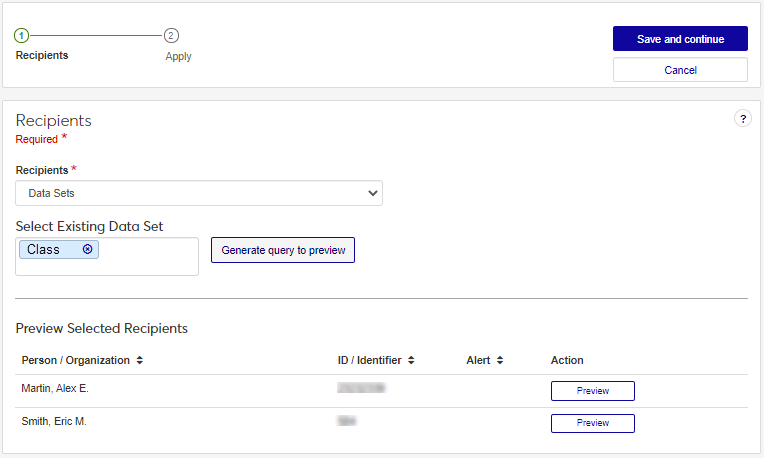
To use a data set query to select recipients:
From the Recipients drop-down, select Data Sets.
From the Select Existing Data Set field, select the data set you want to use.
Click Generate query to preview. Recipients meeting the query criteria are shown in the Preview Selected Recipients area.
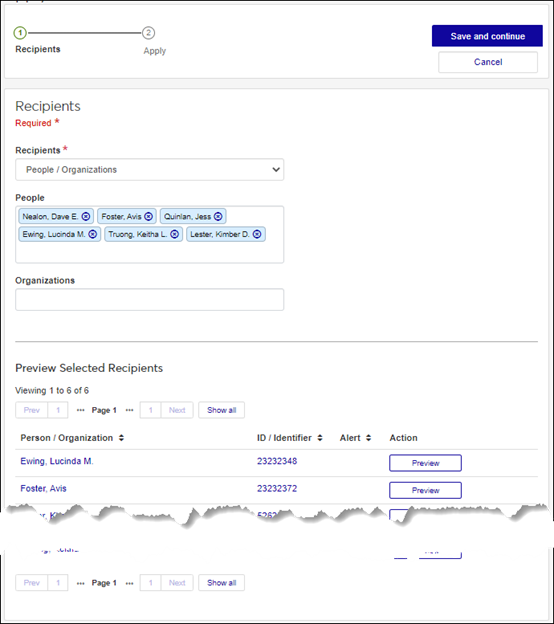
To select recipients by name:
From the Recipients drop-down, select People / Organizations. People and Organization options appear.
Start typing the name of the individuals/organizations you want to apply the interaction to and select from the options that appear. As you select individuals/organizations, they appear in the Preview Selected Recipients section.
To remove an individual/organization, click the x icon next to their name in the Recipients section.
To preview the interaction as it will appear to the recipients, click Preview.
Click Save and continue. The Apply Interaction page appears.
To proceed and apply the interaction to the recipients immediately, select Send now and click Save and apply.
To apply the interaction at a later time, select Schedule. Select the Date and Time you want to send the interaction from the options that appear. Click Save and queue. Scheduled interactions can be viewed from the Schedules page, Queued Interactions tab.
Note
Copied interactions inherit the basic information of the original interaction. Information can be updated except for the type.
Access the Communication Management hub, Interactions page.
Use the available filter options to find the interaction you want to copy.
From the Actions menu, select Copy. The Copy Interaction page appears.
Follow the steps to define the interaction based on the interaction type you've copied.
Note
For specific steps, see the Define Interactions page.
Access the Communication Management, Interactions page.
Click Define Interaction. The Define Interaction page appears.
Click a link below for detailed steps on creating Chatbot, document, email, note, notification, phone call, text and To Do interactions:
Note
Only active, standard, and system event interactions can be added to a plan.
Access the Communication Management, Interactions page.
Select the checkboxes of the interactions you want to use to create a new plan.
From the Options drop-down, select Create a new plan. The Define Automation Plan page appears.
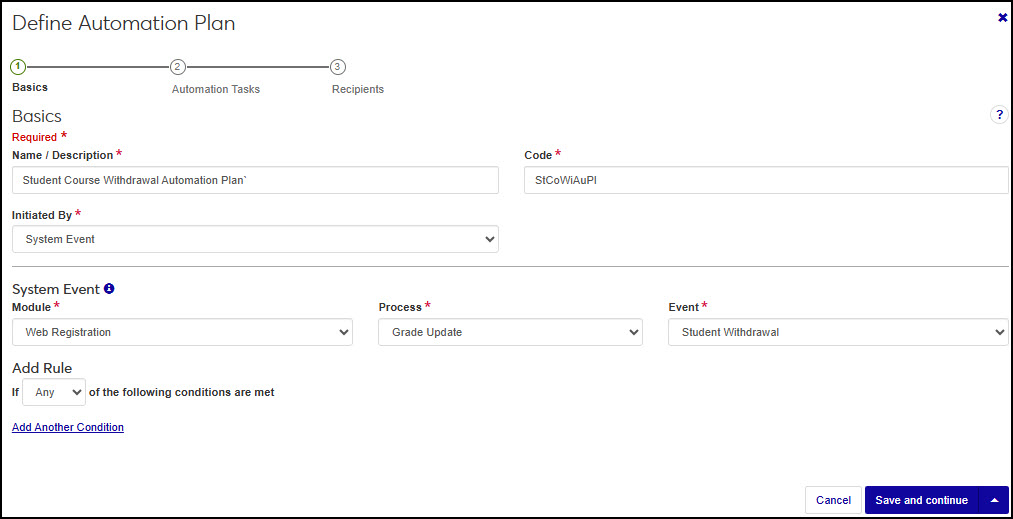
In the Name/Description field, enter a recognizable name or description for the automation plan.
In the Code field, enter a unique code.
From Initiated By drop-down select Kickoff Date, Recurring Schedule , System Event, or Workflow.
If you select Kickoff Date:
When you use a kickoff date, the automation plan will be sent on the date you specify, but will not recur. For example, your school might be remodeling the student center and you may need to set up a communication plan with communications that make students, faculty, and staff aware of impacts and timelines.
Select the date and time. This is when the first interaction in the set will be sent.
Click Save and continue. The Add Automation Tasks step appears.
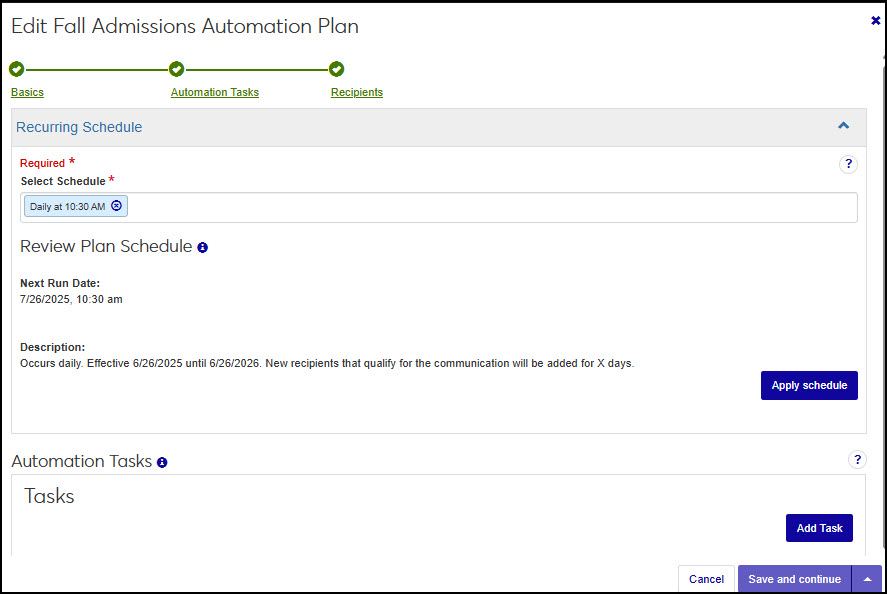
If you select Recurring Schedule:
Automation plans based on a schedule start the plan when a particular date is reached. The timeframe it takes for the whole plan to run depends on how many tasks are included and if you stagger/delay sending them. For example, a plan might start April 1st and include 10 interactions with each being delayed by 3 days. That means it will take the plan won't be completed in its entirety until April 30th.
Each time the schedule runs, a new instance of the plan begins and the first task is sent/ applied again.
Note
You can set a time frame for the recipient query to run and add recipients to the plan. During this time, the query checks to see if recipients have been added or if individuals now meet the criteria required to receive the interaction.
Click Save and continue. The Automation Tasks step appears.
In the Select Schedule field, start typing and select the schedule you want to associate with the automation plan.
In the Last date the recipients can be added to the plan field, enter a number between 0 and 365. This defines when you no longer want new recipients to receive the communications.
Notice
Last date new recipients may be added to the list is the Start Date + Number of Days. For example August 15, 2024 Start Date + 30 days = September 21, 2024 for the last date recipients can be added.
Click Save and continue. The Add Automation Tasks step appears.
If you select System Event:
This option means the system will start sending communications in the plan when something occurs in J1. For example, when a prospective student emails, you might send them a response with information about the school, assign a task to an admissions counselor to reach out, and text the student advocates president to have them reach out as well.
Note
The module, process, and event are dependent on your school's licenses and system version. New processes are available with more recent releases.
Select a Module.
Select the Process associated with the plan.
Select the Event in the process that initiates the plan.
Click Save and continue. The Automation Tasks step appears.
Interactions you selected are shown.
Note
Indicators let you know an interaction is being used in another set. You can still include it in the set being created, but consider the recipients to ensure the same interaction is sent to them multiple times.
If needed, add other interactions.
Use the up and down icon
 to drag and drop items in the order you want them to be sent and/or occur. The first item will be sent/applied on the first time the plan runs.
Note
If a rule excludes an item, the second item in the list will be sent/applied.
Because the first item in the plan is the first to be sent/applied, the Schedule and Days to Delay options aren’t available.
Use Days to Delay to specify the number of days after the initial item is sent or applied before sending or applying the subsequent items. Interactions and tasks are kicked off at the same time every day. If the first item is an interaction that runs at 9am and you delay the third item by 2 days, it will run at 9am 48 hours later.
Note
This option is not available for Daily schedules. Daily schedules limit you to the Send with previous or Delay by 1-day options.
To add rules:
Rules let you configure exceptions. For example, you can specify recipient groups and send tailored interactions to specific groups like biology majors and English majors.
Note
Use rules to account for variations as opposed to building multiple plans.
From the Rules column, click Edit & view to see rule options.
Click Add Rule.
For interactions you can specify what actions are performed such as skipping other interactions or stopping the plan all together.
Skip Interaction means the recipient won't receive the specified interaction. Instead, they will receive the next communication in the set, and the Days to Delay setting will calculate when to send based on when the previous communication was sent.
Stop Set indicates the recipient will not receive this communication or any other communication following it.
Note
If the recipient’s condition changes before the set completes, the recipient will pick back up where the communication was stopped.
Select if Any or All of the following conditions are met.
From the Variable field, select from the query data fields.
Note
The data fields vary based on the query selected when the interaction was defined. For example, if you create an email interaction that uses the Student Details query, variables might be student name and major.
You can add as many rules as you want, and each rule can have multiple conditions.
If ANY is selected, the OR operation determines if the condition is true.
If ALL is selected, the AND operation is used.
Interactions, updates, and workflows are evaluated against the rules applied to them and if the conditions are met, the specified action is applied.
From the Operator drop-down, select a conditional operator (e.g., is not, greater than, equals, etc.).
In the Enter Condition field, type the condition that applies the rule (e.g., biology to check for biology majors).
To add additional rules, click Add Another Condition and repeat steps c - g.
Click Done.
Click Save. to close the Edit & View Rules section.
Click Save and continue. The Recipients step appears.
To make the plan ready for sending/applying, click the Status option to make it active.
Click View Recipients to preview the list of recipients that will be impacted by the automation plan. This is a dynamic list that may change due to recipient changes in status or contact information or criteria.
Click Save & finish. The automation plan is created and available from the Automation Plans page. If you made the plan active, it will begin according to the kickoff date, schedule, system event, or workflow and criteria you selected.
Only incomplete and inactive, unused interactions can be deleted.
Access the Communication Management, Interactions page.
Use the available filter options to find the interaction for which you want to view the run history.
From the Actions menu, select Delete. The confirm delete pop-up window appears.
Click Yes, delete. The interaction is deleted.
If filter options aren’t appearing, click the No filters applied link. You can filter interactions in several ways:
Searching by specific word using the Keyword filter
Using a filter or combination of filters to view interactions (e.g., keyword, name/description, type, etc.)
Using the column headings to sort interactions
Note
Only active, standard, and system event interactions can be previewed.
Only active, standard, and system event interactions can be previewed.
Use the available filter options to find the interaction you want to preview.
From the Actions menu, select Preview Template. The preview appears.
Access the Communication Management, Interactions page.
Use the available filter options to find the interaction you want remove from the queue.
Tip
To quickly find queued interactions, select Yes from the Queued filter option.
From the Actions menu, select Access queue. The Schedules page, Queued Interactions tab appears.
Find the interaction you want stop from being applied/sent.
From the Actions drop-down, select Stop and remove. The confirmation pop-up window appears.
Click Yes, stop and remove. The confirmation pop-up window closes and the interaction is not applied/sent.
Run history shows detailed information about when an interaction was run, how long it took to run, and if there were any issues. This option is only available once an interaction has been sent.
Access the Communication Management, Interactions page.
Use the available filter options to find the interaction for which you want to view the run history.
From the Actions menu, select Access run history. The Run History page appears where you can review every instance the interaction was run and see any potential issues. For more information, see Run History.