Enter Time
Use the Timecard Entry page to enter, view, edit, and submit the time for your worked and non-working hours. If you have multiple positions, you can enter your time for each position. Once finalized, your timecard goes to your assigned supervisor for approval.
Important
If you use the clock in/out format to enter time, you cannot clock in and out on this page. Use the timecard block on the Employee Hub to clock in and out.
Note
Your supervisor also has access to your timecard, and if they need to make changes, the changes are updated on this page in real time. For this reason, you might see changes to your time or leave requests while you are on this page.
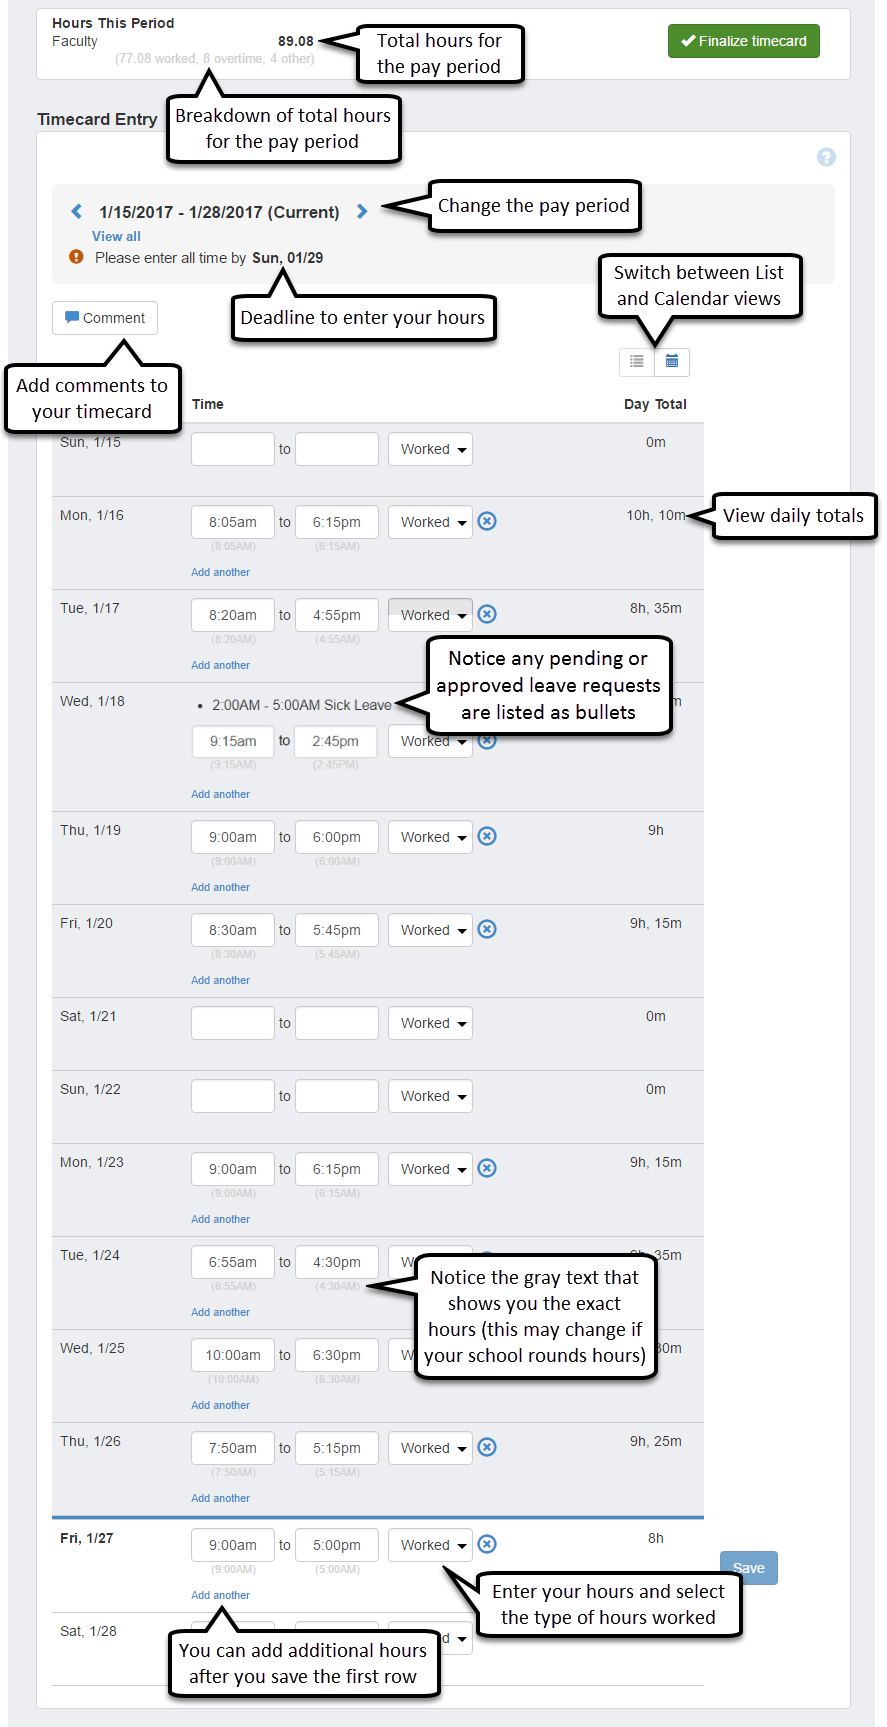
You can view your timecard entry page as list or calendar. You can switch between the two views by selecting the List or Calendar icon in the top right corner of the Timecard Entry page.
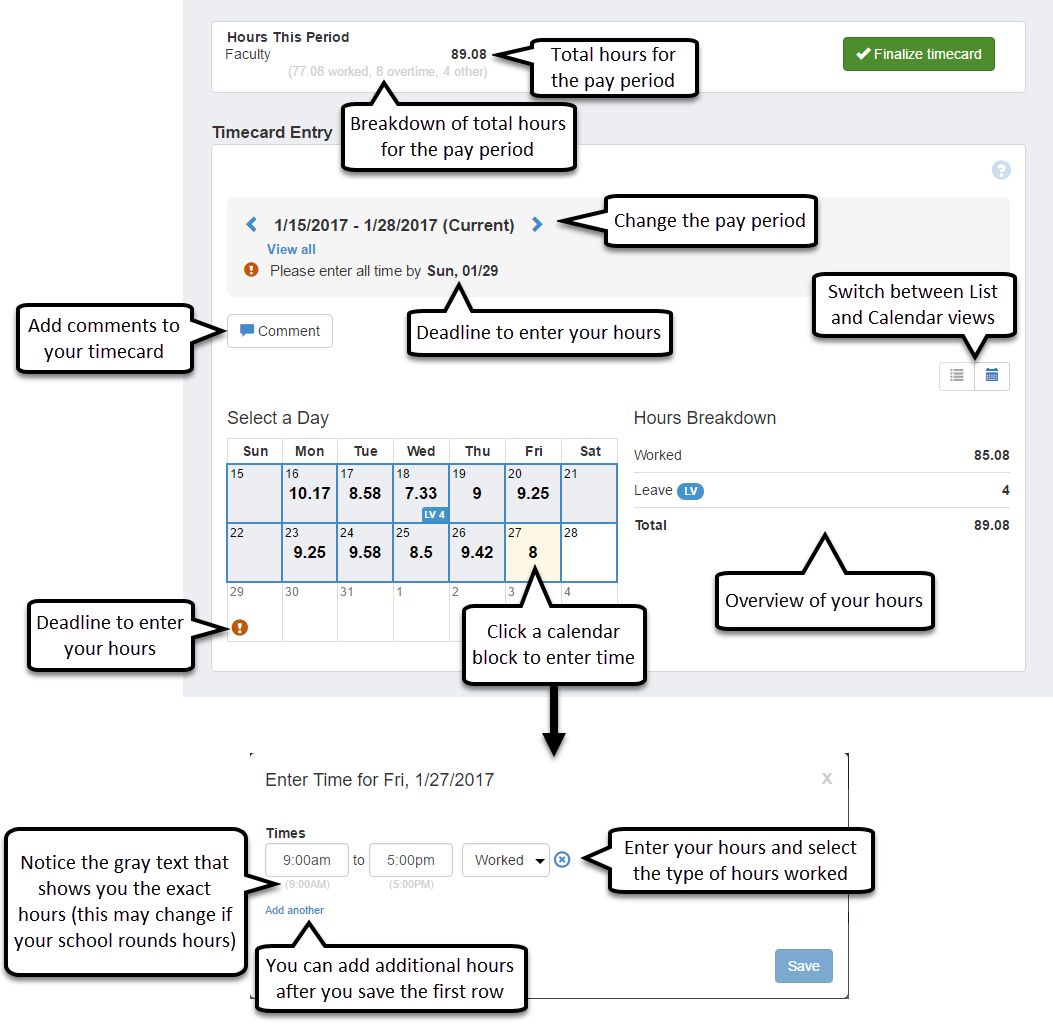
The way your timecard appears depends on the timecard format selected for your position and whether or not your school uses the leave request feature. Your HR Administrator sets up your timecard in one of four ways: clock in/out, hourly, daily, or period summary.
Note
The following examples are shown using the List view.
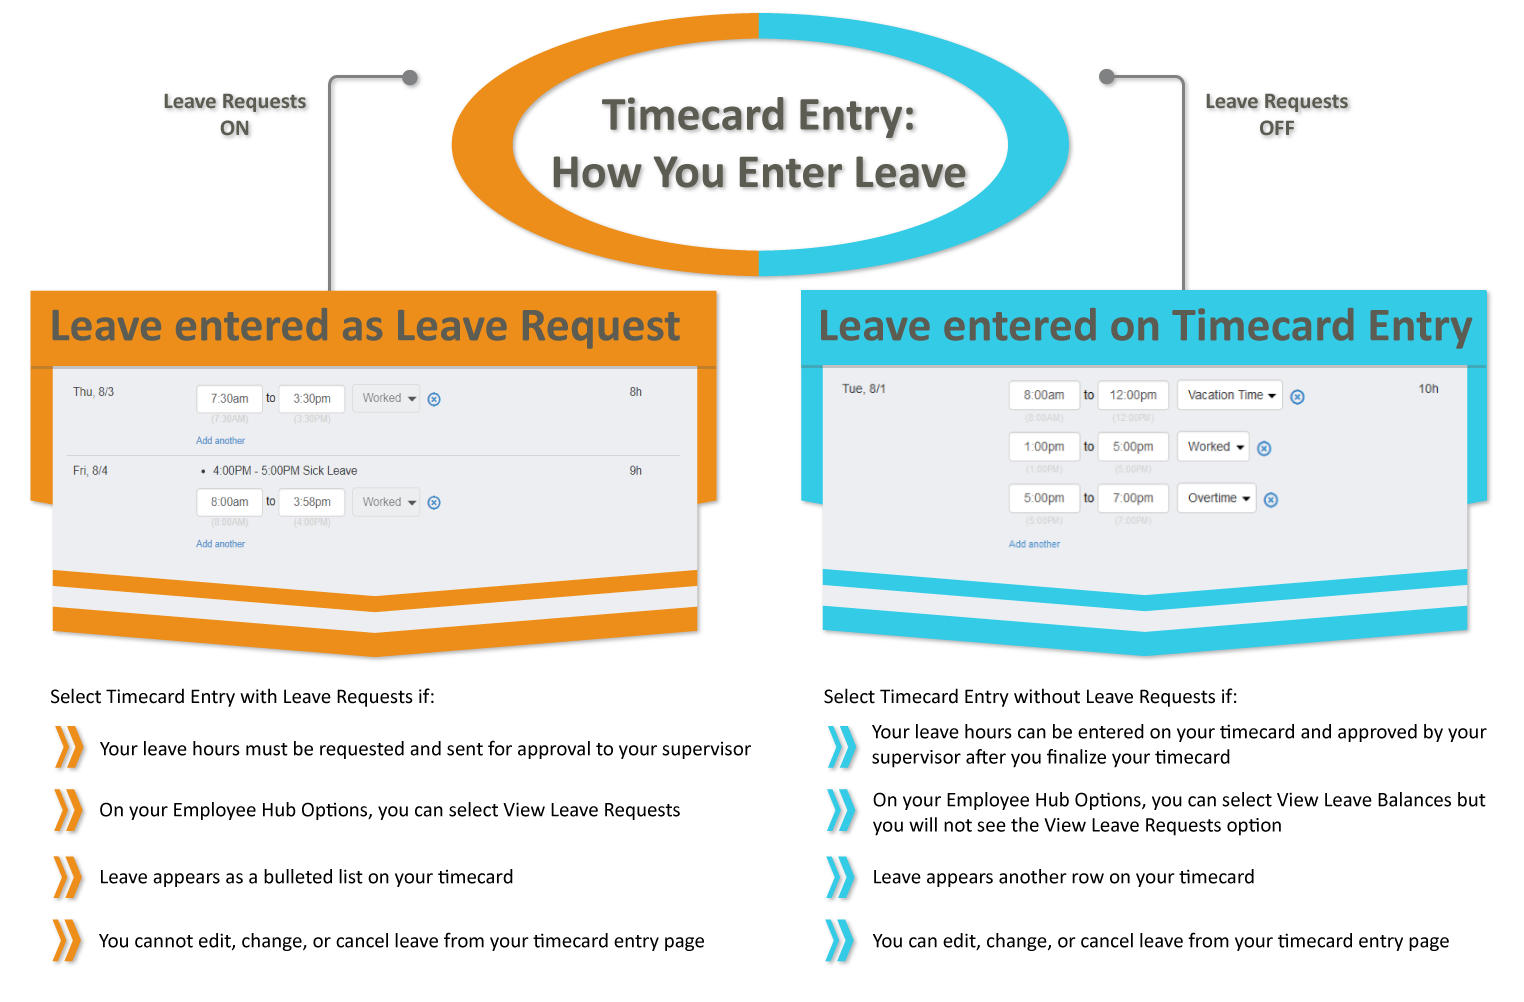
Depending on how your school sets up the leave request feature, you may see a different screen than what is shown in the Help. If you're unsure how you enter your leave hours, take a look at the graphic below to determine if your position records leave hours on the Timecard Entry page, or if you need to request leave from the Leave Requests page.
Note
If you use the clock in/out format to enter time, you cannot clock in and out on this page. Use the timecard block on the Employee Hub to clock in and out.
If your timecard is set up for Hourly entry, enter your start and end times to show the exact number of hours you worked.
When entering hours on your timecard, use the drop-downs to pick the time.
To enter your time manually, you can enter hours 1-24 or 1-12 and us a or p to designate a.m. or p.m. For example, typing 13 or 1p enters 1:00pm in the Time field.
Note
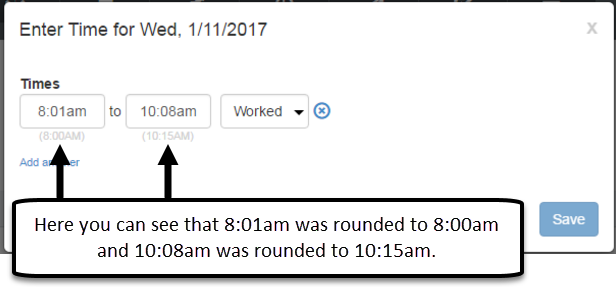
Your supervisor determines if and how hours are rounded.
If your timecard is set up for Daily Total entry, enter your total time worked for each day in the pay period.
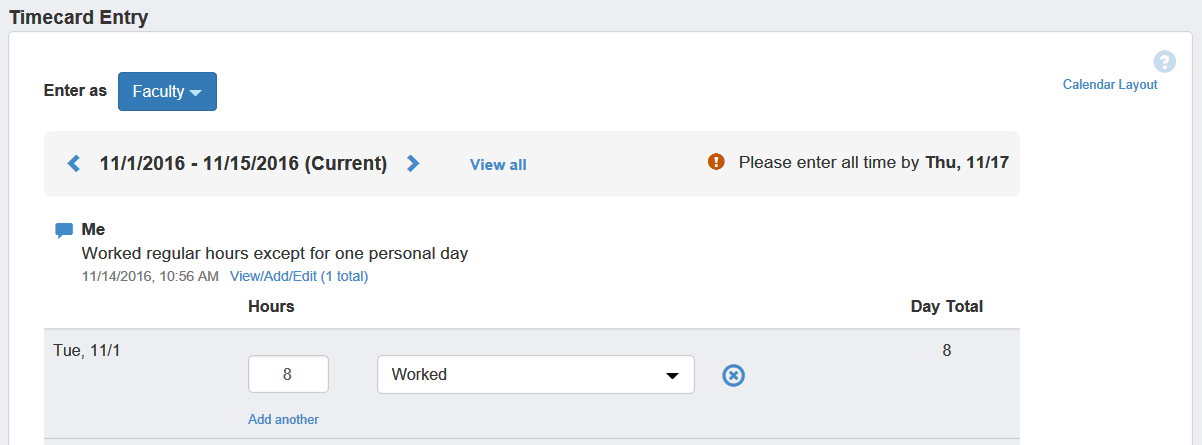
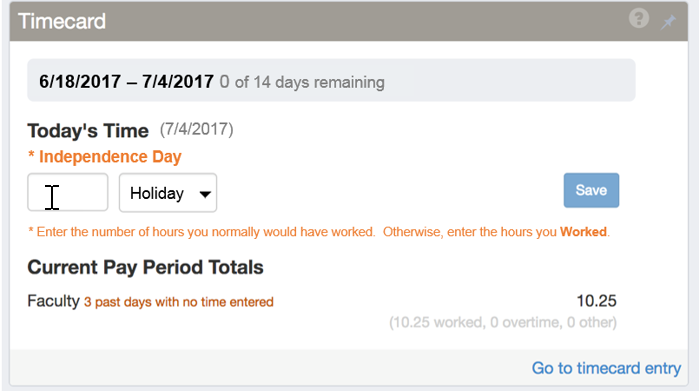
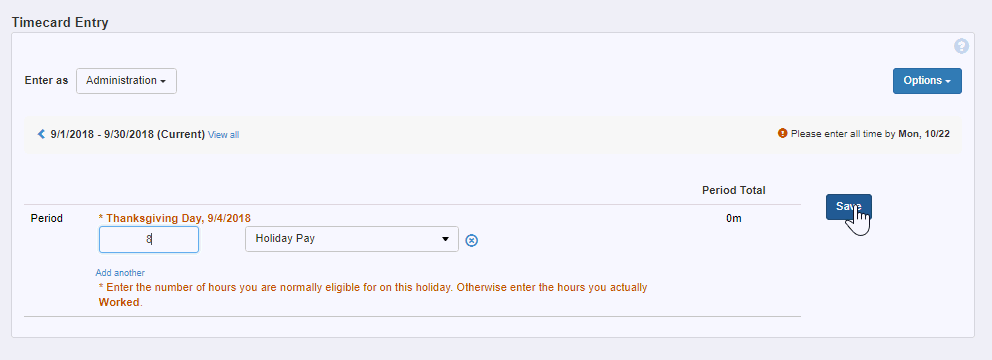
If your timecard is set up for Period Summary entry, enter your time worked for the entire pay period.
You can add comments to your timecard as notes for yourself, or for your supervisor to see as they review your hours. Comments will appear at the top of your timecard, below the pay period date range.
Note
Comments can only be viewed or added from the Timecard Entry page. They will not appear on the Timecard block on the Employee Hub.
If you do not have any comments on your timecard, you see the Comment button that you can click to write new comments.
If you have multiple comments on your timecard, you see the most recent comment listed and a link that shows you the number of total comments. To view all of the comments on your timecard click the link.
Note
If you enter time using the clock in/out, hourly, or daily method, you can comment on individual days in the pay period or your entire timecard.
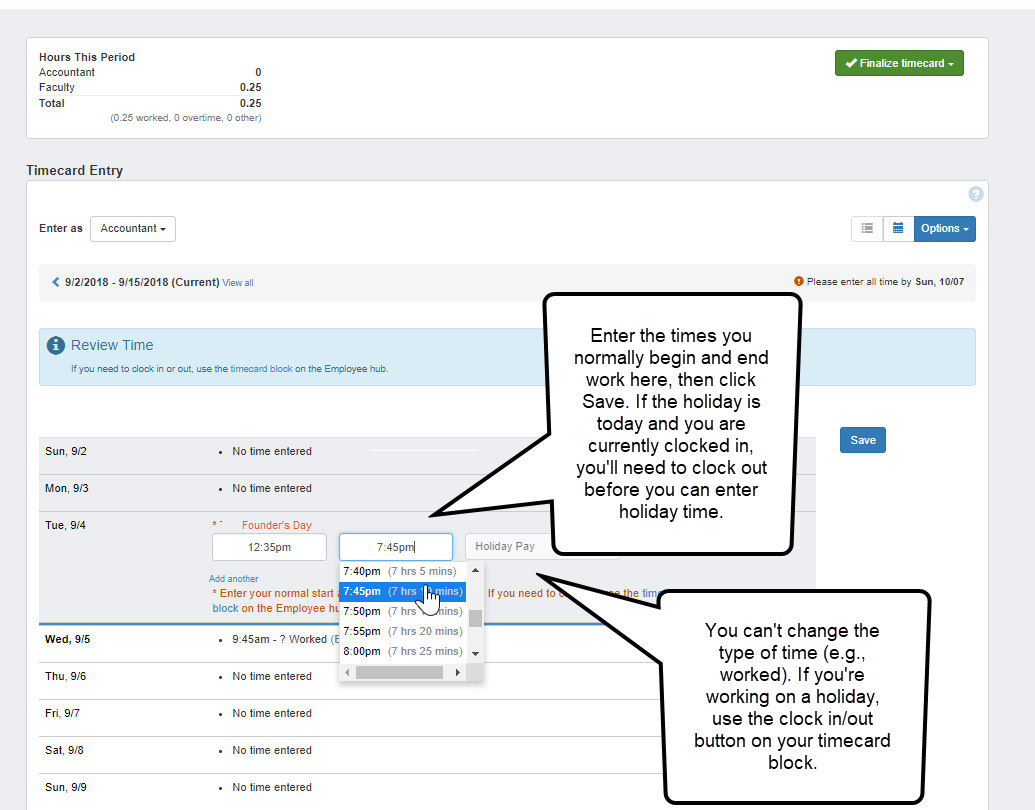
If the current pay period contains a holiday, the holiday name displays on your timecard entry page or the timecard block on your Employee hub.
Tip
If you record your time using the clock in/out format, you need to clock in and out using the timecard block on your hub page.
From the Hub options, select Enter Time. The Timecard Entry page appears displaying your current pay period. The Hours This Period banner displays your positions and how many hours you have entered for each so far.
If you have more than one position, select the position you want to add time for from the drop-down.
Note
This drop-down does not appear if you have only one position.
To enter or update the number of hours you worked, type the number in the Hours field.
Note
If your timecard has been finalized, you will not be able to enter your time. Contact your supervisor if you need to make changes to a finalized timecard.
To enter or update your non-working hours, type the number in the other hours worked, then select the type of leave you want to apply to the non-working hours (Sick, Vacation, Personal, etc.) for that date.
Note
You can enter Hours Worked and other hours for the same day. The total hours entered for a given day cannot exceed 24.
To enter more than one type of hours for one day, click the Add another link. Enter the number of hours and select the type of leave or overtime in the fields that appear.
To remove or edit time that you've entered, delete the number for the day/period you want to remove hours from.
Click Save. The saved rows turn green and the number in the Hours This Period banner is updated.
To enter or update time for another position, repeat steps 2-7.
Tip
If you record your time using the clock in/out format, you need to clock in and out using the timecard block on your hub page.
From the Hub options, select Enter Time. The Timecard Entry page appears displaying your current pay period.
If you are not already on the calendar view, select the blue Calendar icon in the top right corner of the Timecard Entry page.
To enter or update the number of hours you worked, click a day on the calendar and enter your time in the Hours fields.
Note
If your timecard has been finalized, you will not be able to enter your time. Contact your supervisor if you need to make changes to a finalized timecard.
To enter or update your non-working hours, type the number in the other hours worked, then select the type of leave you want to apply to the non-working hours (e.g., Sick, Vacation, or Personal) for that date.
Note
You can enter Hours Worked and other hours for the same day. The total hours entered for a given day cannot exceed 24.
To enter more than one type of hours for one day, click the Add another link. Enter the number of hours and select the type of leave or overtime in the fields that appear.
To remove or edit time that you've entered, delete the number for the day/period you want to remove hours from.
Click Save.
To enter or update time for another position, repeat steps 3-7.
From the Hub options, select Enter Time. The Timecard entry page appears.
Under Timecard Entry, go to the pay period you want to comment on using the < > arrows.
Note
If you have more than one position, select the position you want to add time for from the drop-down.
Click the Comment button in the Options drop-down.
Note
If you enter time using the clock in/out, hourly, or daily method, you can comment on individual days in the pay period or your entire timecard.
In the pop-up Timecard Comments window, type your comment.
Tip
The maximum length of a comment is 1,000 characters.
Click Save to finish and post your comment.
From the Hub options, select Enter Time. The Timecard entry page appears.
Under Timecard Entry, go to the pay period you want to comment on using the < > arrows.
Note
If you have more than one position, select the position you want to add time for from the drop-down.
If you have comments on a timecard, instead of seeing the Comment button under the pay period dates, you will see the most recent comment and a link to View/Add/Edit and the number of total comments in parentheses.
Note
If you enter time using the clock in/out, hourly, or daily method, you can comment on individual days in the pay period or your entire timecard.
Click the View/Add/Edit link to open the Timecard Comments window and see all of the comments on your timecard.
To change your view of the Timecard Entry page, click the List or Calendar icon.
Note
Calendar view is not available if you use period summary to enter your time.
From the Hub options, select Enter Time. The Timecard entry page appears.
Under Timecard Entry, ensure the period you want to view time for is selected, or use the arrows to select that period.
View the number of hours you've entered so far in the Hours This Period banner next to your position title.
Note
If you have more than one position, each position and its number of entered hours will be listed.
From the Hub options, select Enter Time. The Timecard entry page appears.
To scroll through available pay periods:
Under Timecard Entry, click the left or right arrow (left for past or right for future) to scroll through pay periods until you get to the one you're looking for.
Click Current to return to the current pay period.
To choose from a list of available pay periods:
Under Timecard Entry, click View all to see a list of all available pay periods in chronological order.
Click on the date range of the pay period you're looking for.
Note
If you have a leave eligible position and your administration requires you to submit a request for time off for supervisor approval, use the following procedure.
Tip
Although you can enter multiple days on your request, if your supervisor needs to deny one of the days, then they must deny the entire request. Therefore, you may want to submit separate requests for multiple days off, especially if you are requesting leave for non-consecutive days. If you enter each day individually, your supervisor can approve or deny each entry separately.
We recommend that if you are entering multiple leave requests, especially if they are non-consecutive days, that you enter them individually.
On the Employee Hub dashboard, go to your Timecard block.
Note
You can also enter a Leave Request from the Leave Request and the Timecard Entry pages.
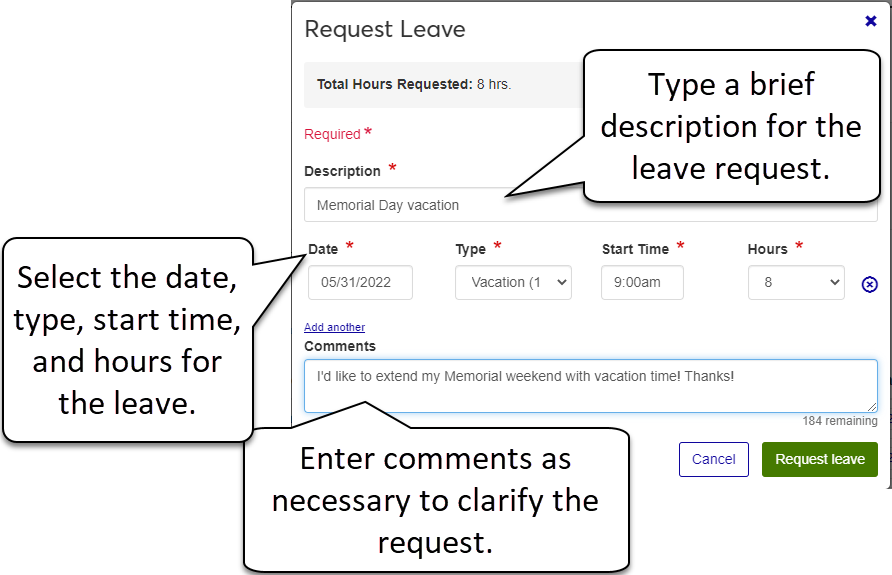
To start a new request, click Request Leave.
On the Request Leave pop-up, enter the following information.
Description: enter a short title or date range for your leave request, something to help remind you what/when the request is for (this field has a limit of 60 characters).
Tip
If you enter time using the clock in/out, hourly, or daily method, you can comment on individual days in the pay period or your entire timecard.
Date: enter a day for the request. You can enter only one day on a row. If your request spans multiple days, you can enter more than one day using the Add another link (see step 4).
Type: from the drop-down, choose the type of leave (vacation, holiday, sick, personal, etc.) you are requesting.
Start Time: select a start time for the leave to begin (such as 8:00 am or 12:00 pm).
Hours: from the drop-down, select the number of hours you are requesting off (for example, if you are taking a whole day, select 8).
Comments: if applicable, enter comments to help your leave approver better understand the request.
If your request spans more than one day, use the Add another link to add a row and repeat step 3 for each additional day.
After completing the form, click Request leave. After submitting your request, the Leave Requests page lists your request with a status of Pending.
Once you submit a leave request, the system also does the following:
Updates your calendar.
Updates your supervisor's calendar.
Sends a task to your supervisor.
Updates any associated timecard entry, if applicable.

If your timecard has been finalized, approved, or unapproved, a banner displays on your timecard block to let you know the status. Click the timecard status link to see details about who worked with your timecard and when.
No, but if your timecard is still in supervisor review, your supervisor can edit it for you.
Yes. You will receive a cautionary message, but you can submit it.
Yes. Depending on your school's policies, you may have a deadline to enter and finalize your timecard. If you do not finalize your timecard by the deadline, your supervisor can do it for you.
Important
Once your supervisor approves your timecard you cannot edit it.
If you think your timecard was finalized in error, please contact your supervisor.
No. The List and Calendar views both allow you to enter your time; you will just see your days and hours displayed in a slightly different way.
Once your supervisor approves your timecard, you get a system message indicating that the timecard was approved. Your Timecard Block and Timecard page are also updated.
Important
Once your supervisor approves your timecard you cannot edit it.
When you go to the Timecard Entry page, you will see a message on the top right of the page letting you know when all time needs to be entered by.
No, you need to clock in and out on your timecard block. You can enter holiday time on this page.
If you have more than one hourly/workstudy position, overtime is calculated based on your highest paid position.
Note
Overtime is not calculated for employees who have a salaried position in addition to hourly and/or workstudy positions.
If you have multiple positions, such as Accountant and Faculty, when your supervisor reviews your timecards for each position they may make a comment on the Faculty timecard while simply approving the Accounting timecard. When you go to your Timecard Entry page, the first timecard you will see is Accounting. In order to see the comment your supervisor made, you need to click the Enter as drop-down box and choose your Faculty position. Then your comments will appear at the top of your timecard.
If you still do not see the expected comment, make sure you are in the correct pay period. You can use the < > arrows to change pay periods.
If you only have one position and one timecard that your supervisor could have commented on, make sure you are looking at the correct pay period. You can use the < > arrows to change the pay period.
If you still do not see the comment, let your supervisor know.
Your position must be eligible for paid holiday leave to have Holiday leave available when you enter time. Contact your HR administrator if you think there is an error in the types of leave available to you.
Important
If you have more than one position with different benefits, make sure you are entering time for the position with Holiday leave available.
This thin blue line between the current day and next day helps you find "today" on the list of days for the current pay period on your timecard.
When you finalize a timecard, the system:
Sends a task to your supervisor for approval.
Locks your timecard to prevent you from editing it further.
Your HR Administrator sets up an allowed number of hours for each pay period. If you go over that number of hours you will get a warning. You can still submit your timecard, but your supervisor will also see the warning and can edit or approve your hours.
Notice
If the average work week is 40 hours and the pay period is normally 80 hours, the administrator may set the maximum allowed hours for the pay period at 85 hours. If you work 86 hours, you would receive the warning that you have entered more than the normally allowed hours for the pay period.
Tip
If your hours go over the allowed number, this would be a good time to go back into your timecard and add comments that explain why you spent more time at work for this particular pay period to help your supervisor understand your increased hours.
If your school has chosen to round hours, when you enter your hours on your timecard you may see grey text under your entry that show you how your hours will appear in the system. Depending on your school, your hours may be rounded up or down to the nearest 5-, 15-, or 30-minute interval.
When a timecard doesn't exist for the current pay period this page displays your past timecards. If you think you should have a timecard for the current period, contact your HR administrator.