Create Recurring Payment
Important
Information and features vary according to the roles to which you belong and the permissions associated with those roles. For more information, contact your module manager or your campus support team.
Use the Create Recurring Payment page to enter details for vendor payments that are made on a recurring basis. After a recurring payment is defined, you can make updates as needed and create recurring payment invoices that are used to print checks and generate e-Payments.
Permission Required
To create recurring payments, you must be in the following roles or copies of them with the noted permissions.
Procurement - Accounts Payable role with the "Can view vendors" and "Can create recurring payments" permissions
General Ledger Accounting Accounts Payable Batches with the "Can view batches" permission
You must also be in a General Ledger Accounting GL Account access role with permission to access GL accounts associated with recurring payments. For more information about permissions, see Roles and Permissions to Work with Recurring Payments.
Desktop Location
In Desktop, recurring payments are created from the Select/Create Regular Payments window by clicking New.
Database Location
Information in the header fields is saved to the REG_PAYMNTS_CTL table. Detail information is saved to the REG_PAYMNTS table.
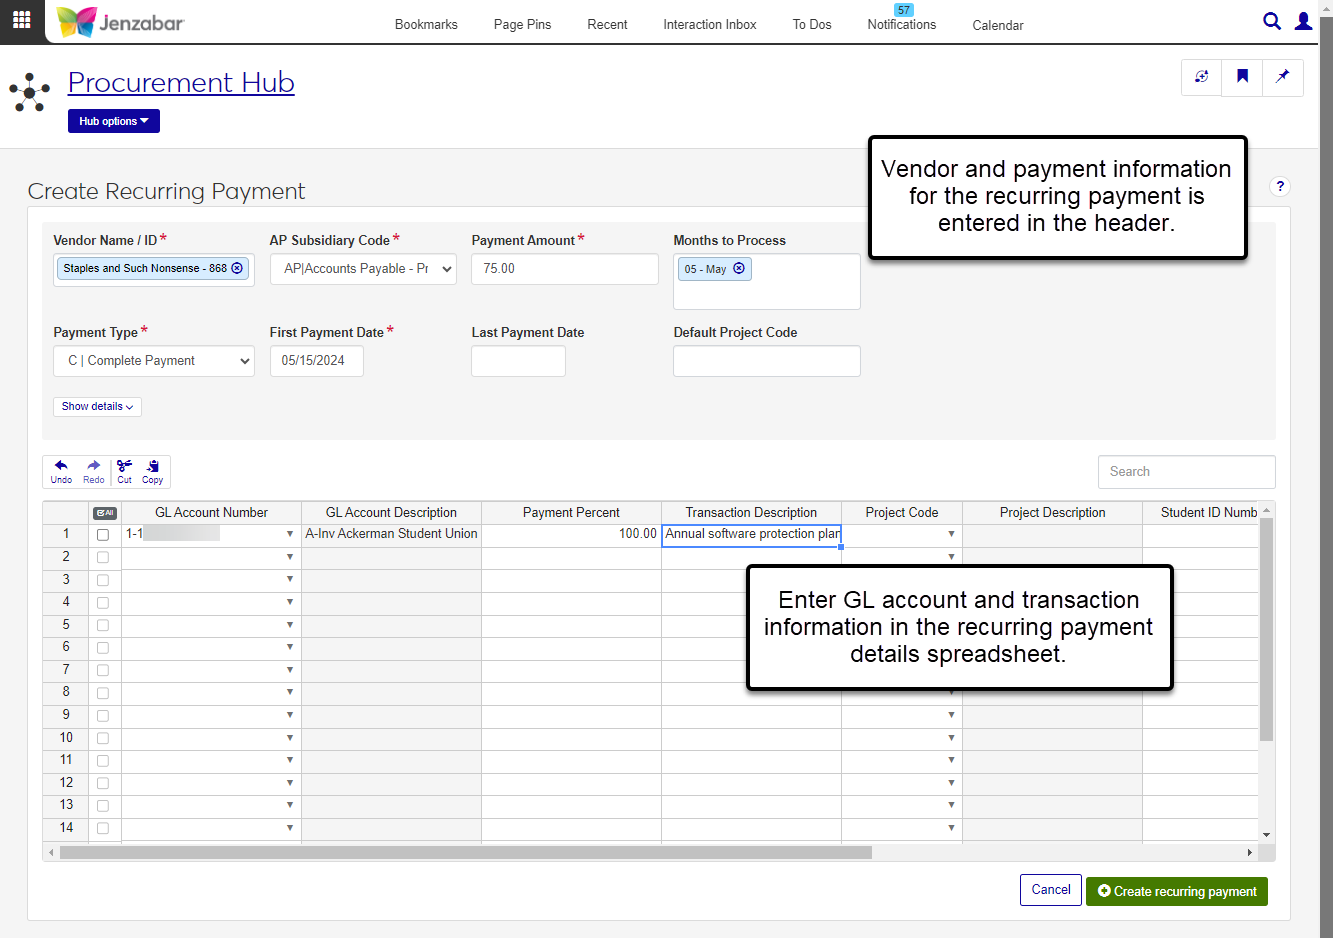
Header Fields
The following fields are in the recurring payment header.
Detail Columns
The following columns are for the recurring payment details.
Access the Create Recurring Payments page in one of the following ways:
On the Recurring Payments tab of the Recurring Payments page, click the Create recurring payment button.
From the Finance Procurement Hub options, select Create recurring payments.
Enter header information.
Enter and select a Vendor Name / ID. Required.
Select an AP Subsidiary Code. Required.
Enter the Payment Amount. Required.
Click in the Months to Process field and select the months in which the payment should be made.
Select a Payment Type from the following drop-down options. Required.
C | Complete Payment: when this option is selected, the invoice amount is calculated by multiplying the Payment Amount by the Payment Percent.
I | Interest Payment: select this option to calculate the invoice amount based on the Current Principal Amount, Interest Rate, and the number of days between the Last Payment Date and the Transaction Date entered when the recurring payment invoice is created.
R | Reinvest Interest: this option is not currently used.
Enter the First Payment Date. Required.
Enter or select values for the following optional fields. Some fields may be necessary if you've selected the Interest Payment Payment Type.
Last Payment Date
Default Project Code
Beginning Principal Amount
Current Principal Amount (required for interest payments)
Maturity Date
Fixed Payment Type (options are Complete Payment, Interest Payment, and Reinvest Interest)
Interest Rate (required for interest payments)
Student Name / ID
AR Subsidiary Code (only enabled when a Student Name / ID is selected)
Enter payment transaction information in the following columns in the details spreadsheet.
GL Account Number (required)
Payment Percent (required)
Transaction Description (required)
Project Code
Student ID Number
AR Subsidiary Code
Click Create recurring payment. The information saves and the Recurring Payment Details page opens.
Recurring payments are used to create invoices; creating a recurring payment does not generate a check or e-Payment for the selected vendor. The invoices created from the recurring payment can be selected in the Create Payment process, which is where checks and e-Payments are created.
For more information about the process to create recurring payment invoices, see Recurring Payments.
For more information about the payment process, see Create Payment.