Transcript Requests in J1 Web
Important
Information and features vary according to the roles to which you belong and the permissions associated with those roles. For more information, contact your module manager or your campus support team.
Use this page to view, edit, create, download, and track the status of transcript requests. You can also process the requests to create the transcripts.
Requests can be for either Electronic Transcripts (Etrans) or PDF. The requests may come from inside your school or from outside institutions such as the National Student Clearinghouse (NSC).
You can sort the information by clicking some of the column headings. You can narrow the list by using the Transcript Request Filter.
This list has many fields for each transcript request row. Use the Expand icon  to see all the fields.
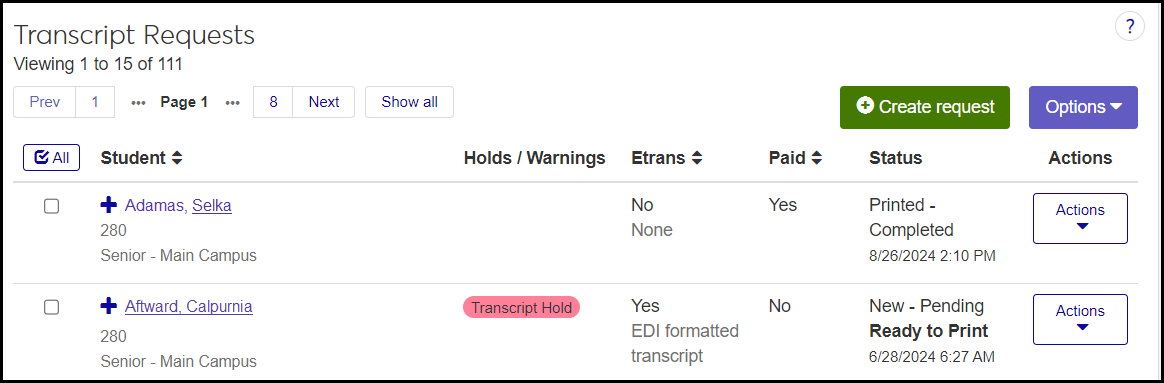
Student: The student's full name, ID Number, Classification (such as Sophomore), and Location (such as Main Campus)
Holds: If this is blank, the student doesn't have a transcript hold.
Warning: If the student has a nonblocking transcript hold, an amber badge says "Transcript Warning". The transcript can still be processed.
Stop: If the student has a blocking transcript hold, a red badge says "Transcript Hold". The student must take care of the hold before the transcript can be processed.
Tip
However, a user with the "Can override student holds" permission can process the transcript anyway.
Etrans: Visible only if your school has the Electronic Transcript license. Yes or No. If Yes, the Transcript Type is shown (as defined on the Transcript Type Definitions page). If No, the Transcript Type says None.
Paid: Yes or No.
Status Reason, Status, Ready to Print, and Date: These are shown together in the Status column. They are populated automatically.
Status Reason: Defined on the Transcript Status Reason Definitions page
Status: Defined on the Transcript Status Definitions page
Ready to Print: Part of the Transcript Request Status definition
Date and Time default to the date and time the request was created. You can change them in the Edit pop-up.
Destination ID: The person or organization to receive the transcript.
Destination Organization: Visible only for Etrans requests. Select from the drop-down of organizations associated with the Destination ID organization selected above.
Destination Address Code: Examples: LHP (Legal, Home, Permanent) or CUR (Current). The codes associated with the Destination ID are available to select in the drop-down on the Create pop-up.
Destination Address: 6 lines. Autopopulated when you select an Address Code, but can be edited.
Destination Email Address
Number of Copies: Per destination
Division Group: Defined on the Division Group Definitions page. You usually want AL (All Divisions).
Student Cluster: Defined on the Cluster Definitions page
Requester / ID: The person or organization asking for the transcript.
Requester Address Code: Examples: LHP (Legal, Home, Permanent) or CUR (Current)
Requester Address: 6 lines. Autopopulated when you select an Address Code, but can be edited.
Requester Email Address
Reason for Request: Up to 512 characters
Delivery Date: Populated when the transcript is delivered.
Request Source: Visible only if your school has the Electronic Transcript license. Examples: JFA - Jenzabar Financial Aid or NSC - National Student Clearinghouse
Comments: Up to 512 characters
Provider Last Request Date / Time: The date and time of the most recent request by a provider (such as NSC).
Override Request: The field can be filled only by the NSC. If they request an override, the transcript is delivered regardless of holds.
Etrans Generation Details: Visible only if your school has the Electronic Transcript license.
Source Organization: As defined on the Transcript Organization Definitions page
Destination Organization: Example: IPEDS 785409
Transcript Originating Source: Example: *Local
Transcript Source Contact: As defined on the Transcript Contact Definitions page
Functional Acknowledgment Request: For Etrans only. Select Yes or No. Yes means your school requests the destination organization to send a TS 997 to let you know the transcript arrived. Not all institutions automatically generate and send these.
Stored Procedure Name: An optional stored procedure to generate the transcript.
Tip
If you customize the stored procedure, create a new version and append text to the name. The system looks for stored procedures with names that start with the standard name.
Sequence Number: The count of all requests in your organization. Automatically assigned to requests. Newer requests have larger numbers. When a request has more than one destination, each destination is counted as an individual request with its own Request ID.
Transcript Division: This is the division requested by NSC in an NSC transcript request. If this is blank, the system generates a transcript for all divisions.
Request Tracking ID: This is an identifier for NSC requests. It's generated automatically.
Institutional Transcript Notes
Your school can create notes to place on every transcript. And you can specify where on the transcript it appears. All notes defined on the Institutional Transcript Note Definitions page appear on all transcripts. For more information, see the Institutional Transcript Note Definitions page topic.
Desktop Location
You can work with requests in Desktop using the Transcript Requests window and the Transcript Report window.
Database Location
The information is stored on the Transcript Request table (transcript_request).
Student: transcript_request.id_num (displays the associated name)
Student's Location: location_master.loc_desc
Holds: hold_tran.id_num
Warnings: holds_def.hold_transcript = W
Stops: holds_def.hold_transcript = H
Etrans: transcript_request.elec_transcript (visible only if school has Electronic Transcript license)
Paid: transcript_request.paid_sts
Status: trans_request_status_def.descr
Reason: trans_request_status_reason_def.descr
Ready to Print: trans_request_status_def.ready_to_print
Status Date: transcript_request_status.trans_request_status_date
Destination ID: transcript_request.sent_to_id_num
Destination Organization: transcript_request.org_cde (visible only if Etrans is selected)
Destination Address Code: transcript_request.sent_to_addr_cde and AddressCodeDef.Description
Destination Address: addr_block_line_1 through addr_block_line_6
Destination Email Address: transcript_request.DestinationEmailAddress
Number of Copies: transcript_request.num_of_copies_num
Division Group: division_group_def.div_grp_desc
Student Cluster: cluster_def.cluster_desc
Requester / ID: transcript_request.requestor_id_num
Requester Address Code: transcript_request.requestor_addr_cde and AddressCodeDef.Description
Requester Address: requestor_addr_line_1 through requestor_addr_line_6
Requester Email Address: ranscript_request.RequesterEmailAddress
Reason for Request: transcript_request.req_for_reason
Delivery Date: transcript_request.DeliveryDate
Request Source: APISourceDefinition.Description (visible only if school has Electronic Transcript license)
Comments: transcript_request.transcript_req_com
Provider Last Request Date / Time: transcript_request.ProviderLastRequestDateTime
Override Request: transcript_request.OverrideRequest
Etrans Generation Details
Source Organization: org_master_org_code.org_cde (for originating school)
Destination Organization: org_master_org_code.org_cde (for destination school)
Transcript Originating Source: etrans_src_org_profile_def.src_org_profile_name for the transcript_request.etrans_src_org_profile_def_appid
Transcript Source Contact: etrans_src_cntct_profile_def.src_cntct_profile_name for the transcript_request.etrans_src_cntct_profile_def_appid
Functional Acknowledgment Request: transcript_request.func_ack_requested
Stored Procedure Name: transcript_request.etrans_sproc_name
Request Tracking ID: transcript_request.seq_num_2
Transcript Division: Stored in transcript_request.div_cde. Displays division_def.div_desc.
Request ID: transcript_request.appid
To make transcript requests and transcript generation work, make sure the settings and definitions on the following pages are complete.
Repeat, Transcript, and GPA Settings
Transcript Request Status Definitions
Transcript Request Status Reason Definitions
Institutional Transcript Note Definitions
On the Transcript Requests page, when you process a request, the Generate Official Transcript pop-up opens to let you generate the transcript. This pop-up is available from the following pages, too, where you can generate transcripts directly without first making a transcript request. A request is automatically added to the Transcript Requests page.
Student Summary page: Person options drop-down, Student, Transcripts, Generate official transcript
Manage Student General Information: Options drop-down, Generate official transcript
Several permissions affect transcripts and transcript requests.
Registrars role (and roles copied from it):
Can view transcript requests
Can manage transcript requests
Registration Reporting Manager role (and roles copied from it):
Can generate official transcripts
Registration Override and Access Control role (and roles copied from it):
Can override student holds
Can override student warnings
Person Management role (and roles copied from it):
Can view additional name information (for legal and transcript names)
Can view SSN information
Note
Also, the user must be in a role associated with the SSN mask in use. This association is made on the Display Data Access page.
Registrars role (and roles copied from it):
Can manage institutional transcript note definitions
Can manage transcript contact definitions
Can manage transcript organization definitions
Can manage transcript request status definitions
Can manage transcript request status reason definitions
Can manage transcript type definitions
Can manage individual transcript notes
Registration Module Manager role (and roles copied from it):
Can manage repeat, transcript, and GPA settings
Can manage institutional transcript note definitions
Can manage transcript contact definitions
Can manage transcript organization definitions
Can manage transcript request status definitions
Can manage transcript request status reason definitions
Can manage transcript type definitions
Can manage individual transcript notes
In the Registration Operations hub, click the Hub options drop-down.
Select Hub options and then Transcript requests. The Transcript Requests page opens.
Tip
You can also access the page in the following ways:
Use the global search. Select System Page, and enter "Transcript". Select Transcript Requests.
Start from an individual student's Summary page. Click the Person options drop-down, and select Student, Student, and Transcript requests. The Transcript Requests page opens filtered to that student.
To sort the list, click the column headings that have the Sort icon
 . Click again to reverse the sort order.
To narrow the list, use the Transcript Request Filter.
See see all the fields for a row, click the Expand icon
.
Click the Create request button. The Create Transcript Request pop-up opens. It's a 3-page wizard. Use the Fields information above to guide your selections.
On the first page, Request Details, enter your request information.
Student / ID and Number of Copies per Destination are required fields.
To enter a student, begin typing their name or ID, and select from the list.
Click the Continue button.
On the second page, Transcript Requester, all fields are optional, but some may be important for tracking the request.
Enter the information.
Note
Requester field: If the person or organization is in the system, enter part of their name or ID, and select them from the drop-down. If the selected person or organization has any addresses in the system, then you'll be able to select the address code that you want to use. The address then populates automatically. (If you enter a name manually, you'll need to enter the address manually, too.)
Click the Continue button.
On the third page, Transcript Destination, none of the fields are required, but they may be necessary to deliver the transcript.
Enter the information.
Warning
For etrans requests, the Destination / ID must be an organization whose Organization Code has an Organization Code Type with a FICE code.
Click the Create and close button. The transcript request is created.
Warning
This doesn't automatically process and send the transcript. See Process a Transcript Request below.
Click the Actions drop-down for a request, and select Edit request. The Edit Details pop-up opens.
Edit the fields as needed, using the Fields information above for guidance. The Number of Copies per Destination field can't be blank.
Click the Update button.
Click the Actions drop-down for a request, and select Electronic file detail. The Electronic File Detail pop-up opens showing the requester, the destination, the etrans type (EDI or XML), and whether the file has been generated.
To return to the Transcript Requests page, click the Close button.
Click the Actions drop-down for a request, and select Status tracking. The Status Tracking pop-up opens. There's a row for each change in status.
To close the pop-up, click the Close button.
Delete Transcript Requests
Select the checkboxes next to the rows you want to export.
From the Options drop-down, select Download to Excel. The Download to Excel pop-up opens.
Select options for the Excel format and data columns.
Click Download. Your .xlsx or .zip file is saved in the file location that you have set in your browser settings.
Find a request row that's not an Etrans request but does have a Ready to Print status.
Click the Actions drop-down, and select Process PDF transcript. The Generate Official Transcript pop-up opens.
Edit the options:
Save a copy to Document Master: Select this checkbox to make a copy of the transcript available in your school's Document Storage system.
Tip
To edit the Doc Storage Note, click the Edit icon
 . Up to 511 characters. Enabled only if Save a copy to Document Master is selected.
The current date and time are defaulted, but you can edit them.
If you want this note on all the transcripts in this list of requests being processed, select the checkbox for Add this note for all students on this Generate Transcript list.
Include Destination Address on Transcript: If unselected, the destination address is not on the transcript.
Save copy of PDF to network location: Select this to make a copy available at the location that's designated on the Repeat, Transcript, and GPA Settings page. (The location is listed here in the PDF save location from settings field.)
Address Priority List: Select one from the drop-down.
Divisions to Include: If this field is empty, then courses from all divisions appear on the transcript. If the field is editable, you can select one or more divisions to include on the transcript.
Generate transcript for students with holds: Select the checkbox to generate transcripts even for students with transcript holds. (Appears only if the student has holds.)
Generate transcript for students with warnings: Select the checkbox to generate transcripts even for students with transcript warnings. (Appears only if the student has warnings.)
Layout: The original report layout is provided by Jenzabar. If your school has created others, you can select one.
To see a preview in another browser tab, click Preview PDF transcript.
To generate and deliver the PDF transcript, click Generate PDF transcript. The transcript is processed in the background. You'll be notified when it's complete. Go to the Notification Center to find the notification.
Find a request row that's an Etrans request and has a status of Ready to Print.
Click the Actions drop-down, and select Process Electronic Transcript. The Generate Official Transcript pop-up opens.
Edit the options:
Save a copy to Document Master: Select this checkbox to make a copy of the transcript available in your school's Document Storage system.
Tip
To edit the Doc Storage Note, click the Edit icon
. Up to 511 characters. Enabled only if Save a copy to Document Master is selected.The current date and time are defaulted, but you can edit them.
If you want this note on all the transcripts in this list of requests being processed, select the checkbox for Add this note for all students on this Generate Transcript list.
Etrans file save location from settings: This location is designated on the Repeat, Transcript, and GPA Settings page.
Divisions to Include: If this field is empty, then courses from all divisions appear on the transcript. If the field is editable, you can select one or more divisions.
Generate transcript for students with holds: Select the checkbox to generate transcripts even for students with transcript holds. (Appears only if the student has holds.)
Generate transcript for students with warnings: Select the checkbox to generate transcripts even for students with transcript warnings. (Appears only if the student has warnings.)
Click the Generate Etrans file button. The transcript is processed in the background. You'll be notified when it's complete. Go to the Notification Center to find the notification.
Select the checkboxes for one or more requests.
Click the Options drop-down, and select Process transcript and then PDF. The Generate Official Transcript pop-up opens. It lists only the requests that are ready to print and are not etrans. (It ignores any requests where Etrans = Yes or the status is not Ready to Print.)
Edit the options:
Save a copy to Document Master: Select this checkbox to make a copy of the transcript available in your school's Document Storage system.
Tip
To edit the Doc Storage Note, click the Edit icon
.Include Destination Address on Transcript: If unselected, the destination address is not on the transcript.
Save copy of PDF to network location: Select this to make a copy available at the location that's designated on the Repeat, Transcript, and GPA Settings page. (The location is listed here in the PDF save location from settings field.)
Address Priority List: Select one from the drop-down.
Divisions to Include: If this field is empty, then courses from all divisions appear on the transcript. If the field is editable, you can select one or more divisions.
Generate transcript for students with holds: Select the checkbox to generate transcripts even for students with transcript holds. (Appears only if one or more requests are for students with holds.)
Generate transcript for students with warnings: Select the checkbox to generate transcripts even for students with transcript warnings. (Appears only if one or more requests are for students with warnings.)
Layout: The original report layout is provided by Jenzabar. If your school has created others, you can select one.
To see a preview in another browser tab, click Preview PDF transcript.
To generate and deliver the PDF transcript, click Generate PDF transcript. The transcript is processed in the background. You'll be notified when it's complete. Go to the Notification Center to find the notification.
Select the checkboxes for one or more requests.
Click the Options drop-down, and select Process transcript and then Electronic. The Generate Official Transcript pop-up opens. It lists only the requests that are ready to print and are etrans. (It ignores any requests where Etrans = No or the status is not Ready to Print.)
Edit the options:
Save a copy to Document Master: Select this checkbox to make a copy of the transcript available in your school's Document Storage system.
Tip
To edit the Doc Storage Note, click the Edit icon
.Etrans file save location from settings: This location is designated on the Repeat, Transcript, and GPA Settings page.
Divisions to Include: If this field is empty, then courses from all divisions appear on the transcript. If the field is editable, you can select one or more divisions.
Generate transcript for students with holds: Select the checkbox to generate transcripts even for students with transcript holds. (Appears only if one or more requests are for students with holds.)
Generate transcript for students with warnings: Select the checkbox to generate transcripts even for students with transcript warnings. (Appears only if one or more requests are for students with warnings.)
Click the Generate Etrans file button. The transcript is processed in the background. You'll be notified when it's complete. Go to the Notification Center to find the notification.
You need to process a transcript to get it delivered. See the instructions above to Process a Transcript Request.
The transcript is generated with the "Unofficial Transcript" watermark in either of the following cases:
The student has a transcript hold, and either of the following is true:
The Generate transcripts for students with holds checkbox is unselected.
You don't have the "Can override student holds" permission.
The student has a transcript warning , and either of the following is true:
The Generate transcripts for students with warnings checkbox is unselected.
You don't have the "Can override student warnings" permission.
Otherwise, the official transcript is generated.
The student's electronic transcript is generated if both of the following are true:
The Generate transcripts for students with holds [or warnings] checkbox is selected.
You have the "Can override student holds [or warnings]" permission.
If both aren't true, the electronic transcript isn't generated for that student.
The Registrars role views and makes requests. The Registration Reporting Manager role generates official transcripts. The Registration Override and Access Control role overrides holds and warnings. (So to print a transcript with a hold, you need both the Registration Reporting Manager and the Registration Override and Access Control roles.)
When a student has a transcript hold (not a warning), it's possible to withhold a term from the transcript. For more information, see the Partial Transcripts help topic. Note that federal regulations don't allow withholding a term except under certain circumstances, so make sure you're in compliance.
Follow the instructions above for editing a transcript request. You can select a different Status from the drop-down.
From a student's Summary page:
Click the Person options drop-down.
Select Student, Transcripts, and Unofficial transcript. The transcript opens as a PDF in a browser tab. From there you can download it or print it.
Request ID counts all the requests made for transcripts of all students in your school. Request Tracking ID (Seq #) counts the requests made for an individual student. So Request ID 5000 is the 5000th request your school received—all students combined. But students Mary Haqqim and Julio Schmidt might each have a Request Tracking ID (Seq #) 4; that is, the 4th request for each of their transcripts.