Sanction Definitions
Important
Information and features vary according to the roles to which you belong and the permissions associated with those roles. For more information, contact your module manager or your campus support team.
Sanctions are penalties, such as suspension or fines, assigned for conduct or vehicle violations. On this page, you can create, edit, and delete sanctions used in your institution. The sanctions defined here will appear in drop-down menus for users associating them with violation types and may appear on some reports.
To define and edit Sanction Definitions, you must be in the Student Life Module Manager or Student Conduct Administrator role (or a role copied from one of them) with the "Can manage sanction definitions" permission enabled.
You can manage these definitions in Desktop on the Sanction Definition window (found under Settings - Student Life). Definitions edited in J1 Web are changed in Desktop and vice versa.
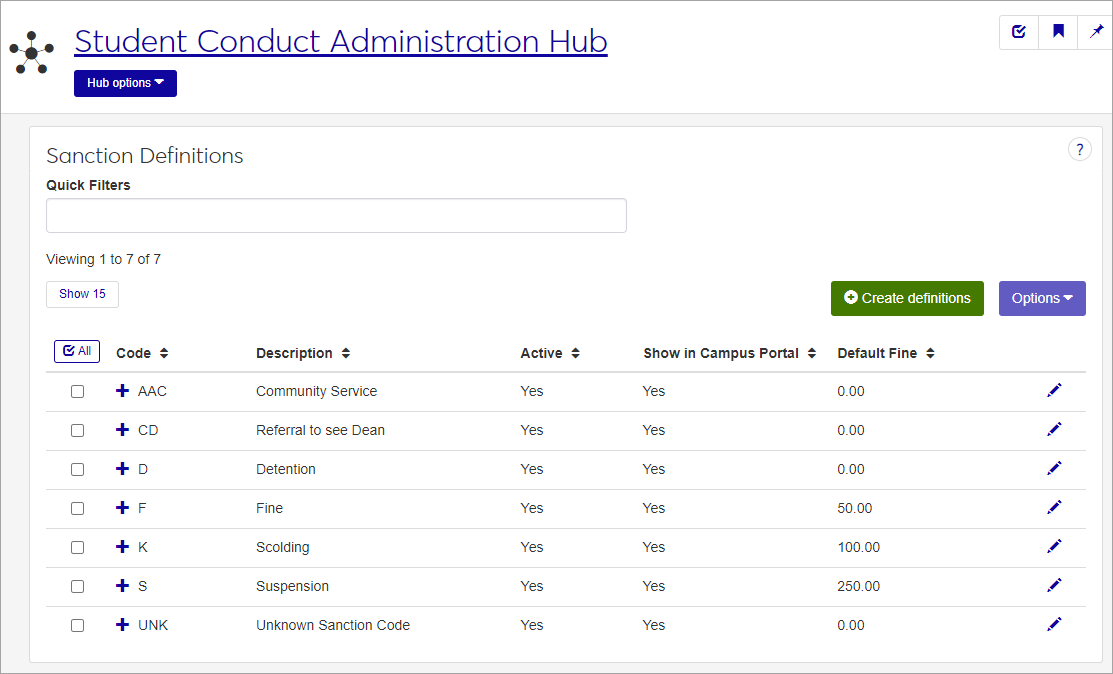
In the Student Conduct Administration hub, click the Hub options drop-down and select Manage definitions > Sanction definitions. The Sanction Definitions page opens, displaying a list of existing definitions.
Click the plus sign beside any definition to expand the row and see more information.
To narrow the list, enter characters, words, or phrases in the Quick Filters field and select Add '[your search term]' when it appears. You can enter more than one filter term at a time.
To sort the list by a particular column, click the column heading.
Tip
You can also use the page search in the upper right corner of J1 Web. Just start typing the name of the definition page you want, and select it in the results.
Click the Create definitions button. The Create Sanction Definitions pop-up opens.
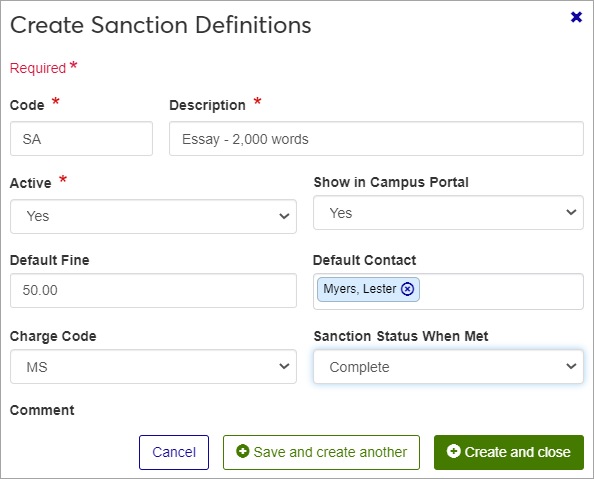
Required fields are indicated by a red asterisk.
Enter a unique Code. This required 3-character code identifies a sanction that can be associated with a violation. Once saved, this code cannot be changed.
Enter a Description for the code. Be sure to use something that will be easily understood by other users. The description will be displayed when users work with conduct and vehicle violations; it will also appear on relevant reports.
The description can contain a maximum of 60 characters.
Select Yes or No from the Active drop-down. Codes set as not active will not be available as options in drop-down menus when users enter incident reports.
Select Yes or No from the Show in Campus Portal drop-down to indicate whether or not you want this sanction code to be displayed in certain features in Campus Portal.
Enter a Default Fine, if applicable. The default fine is the amount charged to a student when this sanction is assigned to them.
Start typing the name or ID number of the person you want to be listed as the Default Contact Name / ID for this sanction. This should be the person who can be contacted regarding this sanction.
Select the Charge Code from the drop-down. The charge code is used to identify a predefined miscellaneous charge code that will be associated with this fine.
From the Sanction Status When Met drop-down, select the option that will appear when a sanction is completed or met. When a fine is paid in Accounts Receivable, the sanction status is automatically set to the status you select.
Enter an optional Comment.
Click Save and create another to save the definition and clear the fields so you can create another. Click Create and close to close the pop-up and return to the Sanction Definitions page. The new definition is added to the list.
You can edit all fields except the Code.
Click the Edit icon for the definition you need to edit. The Edit Sanction Definition pop-up opens.
Edit the available fields as needed.
Click Update to save your changes.