Residence Life Applicant Groups
Important
Information and features vary according to the roles to which you belong and the permissions associated with those roles. For more information, contact your module manager or your campus support team.
Applicant groups are a convenient way to assign priority to certain groups for housing selection. You might want to separate applicants into groups by year (first/second/third, etc.), by program (athletics), or other criteria. You may create separate groups for resident students and commuters, or you may have both in the same group. Using applicant groups allows you to create an application form specific to this group, assign them time slots to select rooms separate from other groups, and even designate which residence bedrooms are available for them to select.
Notice
For example, students on the football team may need to check in to housing several weeks earlier than the general residents. Creating a separate applicant group for them allows you to set aside certain spaces for them to select from, and to have an earlier room selection process.
Note
Even if you do not plan to create separate applicant groups, you will still need to create one applicant group in order to use the Student Housing features such as the housing application, roommate requests, and room selection.
Resident vs. Commuter Students
Applicant groups may be designated as residents or commuters. Residents are students who will live in student housing, while commuters will not be a part of the room assignment process, but may be included in other aspects of sessions.
Applicant Group Summary Page
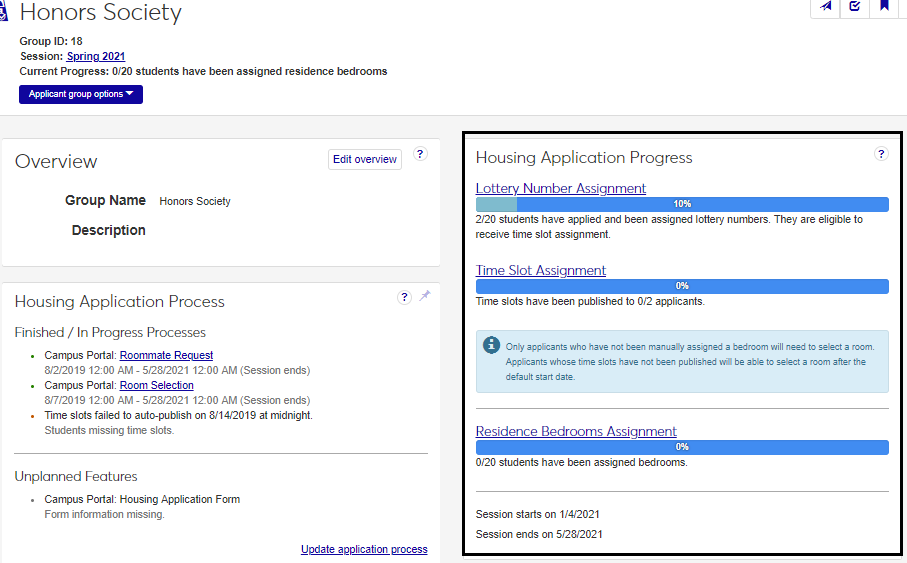
This is the home page for the applicant group that allows you to view and edit important information related to the group and the housing process.
The Overview block is found on the Applicant Group summary page. To reach it, select the session, then select the applicant group you want to work with. Click Edit overview to change the group name or description.
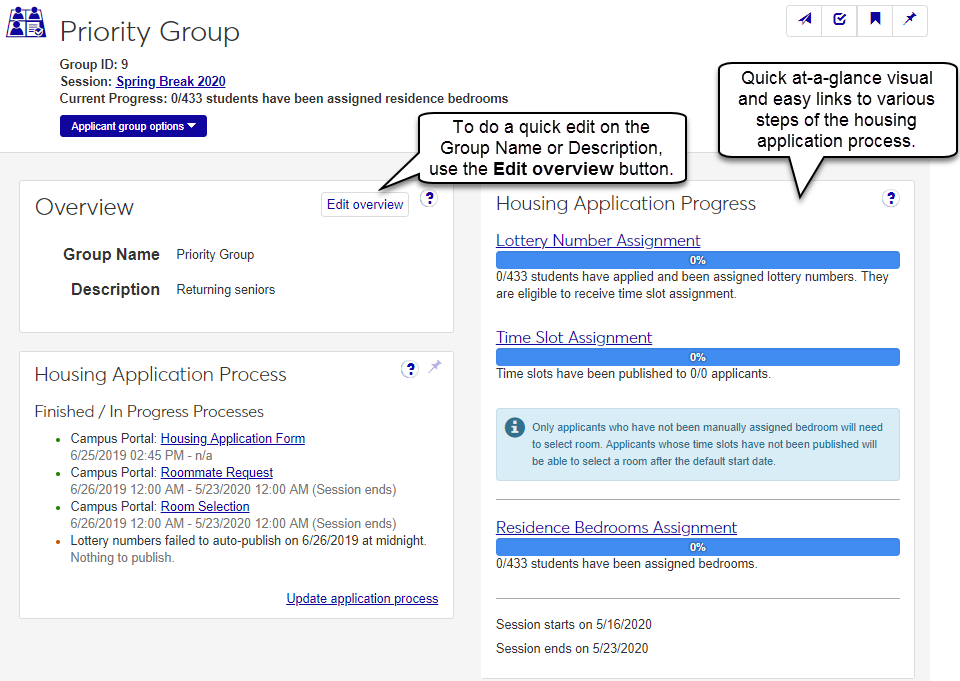
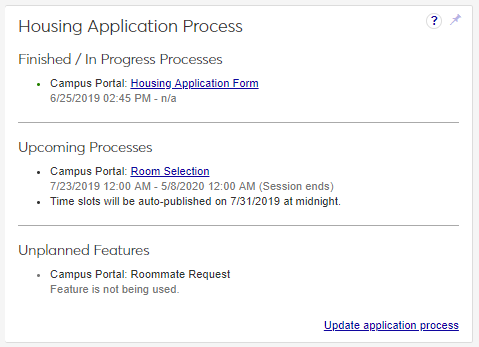
The Housing Application Process block provides a high-level view of the features being used for this Housing Application Process. Each section has a link to the specified feature in the campus portal (if used), as well as information about when that feature is available. In the example below, the housing application and the room selection feature are being used, but not the roommate request feature. This means the user will need to assign roommates manually.
The Housing Application Progress block provides an overview of how many students have completed each step of the housing cycle. Each heading is a link to the corresponding tab on the Manage Housing Application and Assignment page.
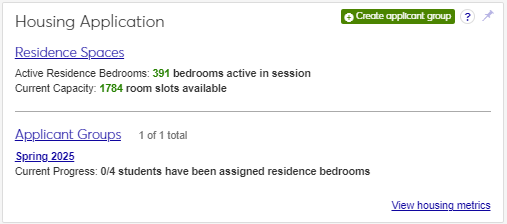
On the session summary page, click the Create applicant group button in the Housing Application block. The Create Applicant Group wizard opens to the Group Basics step.
Enter a Group Name for the group.
Select the Student Type (e.g., Resident or Commuter).
Note
You may choose to have an applicant group of only residents (students who live in campus housing), only commuters (students who do not live in campus housing), or a group with both. When you create a new applicant group, you can select whether it will be a resident or commuter group. This setting only sets the initial status for each student in the applicant group; it is not a group setting, so you can change any individual's status at any time. Resident/commuter status can be changed by updating the student details on the Session roster page, or when you submit the student application.
Tip
You can create custom student types using Manage Student Types, available by selecting Session options > Manage student types from the Hub options drop-down on the Residence Life Administration Hub page. For more information on Student Types, see Manage Student Type Definitions.
Add a Description of the group (e.g., Freshman 2024). The description can contain a maximum of 1,000 characters.
Click Save & continue to move to the Group Roster step.
Add students to this housing applicant group roster by selecting the Add by name, Filter from all students, or Query options.
Note
You can add multiple students to the applicant roster by using a query. Jenzabar provides the default query (q_select_resident_roster) and you can customize queries as needed. For more information about using queries, contact your campus support team.
Note
Custom queries must start with the default "q_" filename and must be stored in the Jenzabar Reports directory. This directory is set up as a part of the upgrade\installation process that defaults to C:\Jenzabar\Reports\.
Note
You cannot access InfoMaker directly from J1 Web to edit your queries. See the InfoMaker Resource Center on MyJenzabar.net, or contact your campus support team to learn more about customizing queries.
When you have selected your students, click Add to roster to move the selected students to the roster.
When your roster is complete, click Save & finish.
Your applicant group is now created, but you'll need to complete several more steps before the group will be ready to broadcast to students. You will complete some of these steps in J1 Web Student Life and some in Campus Portal.
For a step-by-step guide to setting up the application form, roommate requests, and room selection features, see Student Housing Step-by-Step.
To add applicants to an existing Applicant Group:
On the session summary page, click the Session options drop-down and select Housing options > View applicant groups. The View Applicant Groups page opens.
Click the name of the group you want to edit. The applicant group summary page opens.
From the Applicant group options drop-down, select Manage housing application and assignment. The housing application page opens.
Select the Lottery Number Assignment tab.
Add students to the applicant group roster by using the Add student or Add multiple students options.
To add a single student, begin typing the student's name or ID in the Add student field. When the student's name appears in the list, select it and click Add student.
To add multiple students, click the down arrow on the Add student button and select Add multiple students. Select the Add by name, Filter from all students, or Query option buttons to find and select students to add to the roster. Click Add to roster to move names from the search field to the roster below.
On the session summary page, click the Session options drop-down and select Housing options > View applicant groups. The View Applicant Groups page opens.
Click on the name of the group you want to edit. The group's summary page opens.
Select Manage housing application and assignment from the Applicant group options drop-down. The housing application page opens.
Select the Lottery Assignment Number tab.
To remove a single student from the roster:
From the Actions drop-down in the student's row, select Remove from roster. The Remove from Group Roster pop-up opens, asking you to confirm that you want to remove this student from the group roster.
Click Yes, remove.
To remove multiple students from the roster:
Select the checkbox next to each student you want to remove from this applicant group.
From the Options drop-down, select Remove from roster. The Remove from Group Roster pop-up opens, asking you to confirm that you want to remove the selected students from the roster.
Click Yes, remove.
Warning
An applicant group can only be deleted if no students on the roster have a submitted application. After a student has applied, you will no longer see the option to delete the applicant group.
On the session summary page, click the Session options drop-down button and select View applicant groups. The View Applicant Groups page opens.
Click on the name of the group you want to delete. The applicant group's summary page opens.
From the Applicant group options drop-down select Delete applicant group. The Delete Applicant Group? pop-up opens, asking you to confirm that you want to delete this applicant group.
Click Yes, delete.
On the session summary page, under the Session options drop-down button, and select View applicant groups (nested in the Housing options sub-menu).
On the View Applicant Groups page, click on the name of the group you wish to review/edit.
On the Applicant group summary page, click on the Applicant group options drop-down button and select Manage housing application and assignment. The Housing Process Definition page opens, with options to set up and manage housing applications, roommate requests, and room selection/assignment.
For more information about the housing application process, see Student Housing Step-by-Step.
Applicant groups are a convenient way to assign priority to certain groups for housing selection. You might want to separate applicants into groups by year (first/second/third, etc.), by program (athletics), or other criteria. You may create separate groups for resident students and commuters, or you may have both in the same group. Using applicant groups allows you to create an application form specific to this group, assign them time slots to select rooms separate from other groups, and even designate which residence bedrooms are available for them to select.