Automation Plans
Important
Information and features vary according to the roles to which you belong and the permissions associated with those roles. For more information, contact your module manager or your campus support team.

Starting with version 2023.2, interaction sets were renamed automation plans.
Starting with version 2024.1, automation plans were moved from the Communication Management hub to the Workflow hub and recipients were no longer continuously evaluated and added throughout the plan's timeframe. Recipients are now only selected when the plan kicks off. This means additional recipients are not added until the next time the plan runs.
The Automation Plans page lets you view, create, edit, activate/deactivate, and delete automation plans. An automation plan is a group of tasks triggered in a specific sequence and timeframe. Tasks can include interactions (e.g., emails, notifications, and To Dos), rules based updates, stored procedures, holds, and workflows.
Notice
When a student is accepted, you might send out an automated congratulatory email. Then, two months before the semester begins, you may send a text letting them know the registration period is about to open. You may send another text inviting incoming freshman who've indicated an interest in a Computer Science major to the Computer Science Department mixer.
Delay options let you stagger delivery if you don't them to ensure everything isn't sent/applied all at once.
Tip
Example: New Student Welcome Automation Plan
Welcome to Jenzabar University (Email Day 1)
Resident Student Housing Policy (Email Day 2)
Commuter Student Policy (Email Day 2)
Missing Financial Aid Information (Text Day 5)
New Student Orientation Details (Email Day 6)
Thanks for Attending Orientation (Text Day 10)
Once defined, plans are added to the automation plan list. Incomplete plans remain inactive until all steps of the define set process are complete.
Note
Inactive plans are skipped at the next scheduled date until reactivated.
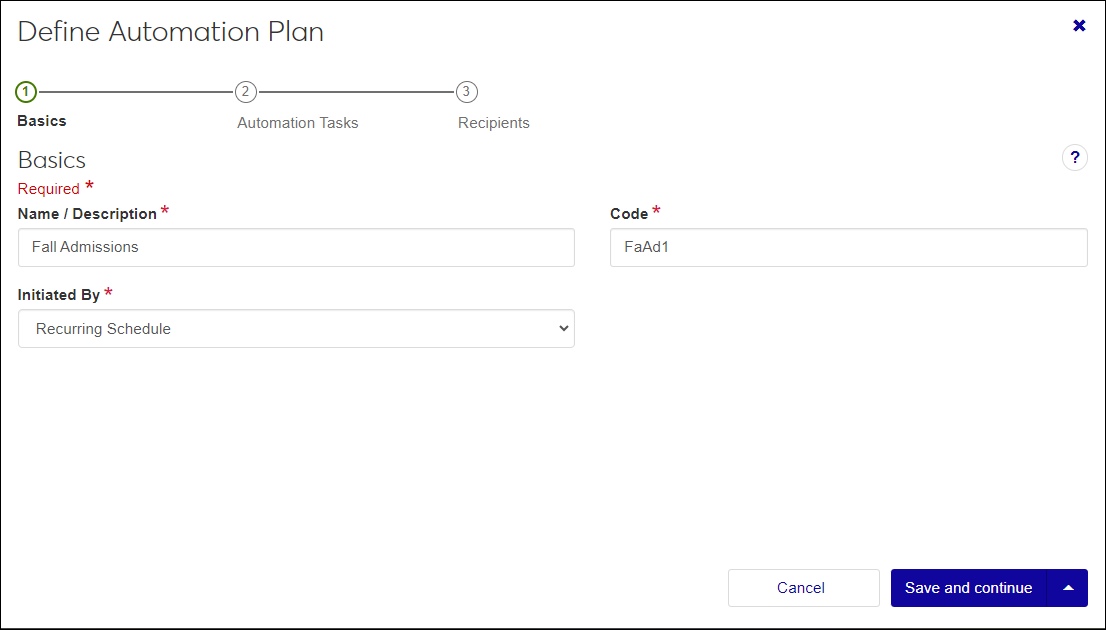
Define the basics.
Add a descriptive name, create a unique code to identify the plan, and determine what initiates communications in the set. There are three options for initiating the plan.
Kickoff Date lets you select a specific date and time when the first interaction in the communication plan should be sent. This is good for communication plans that are sent repeatedly but at varying times.
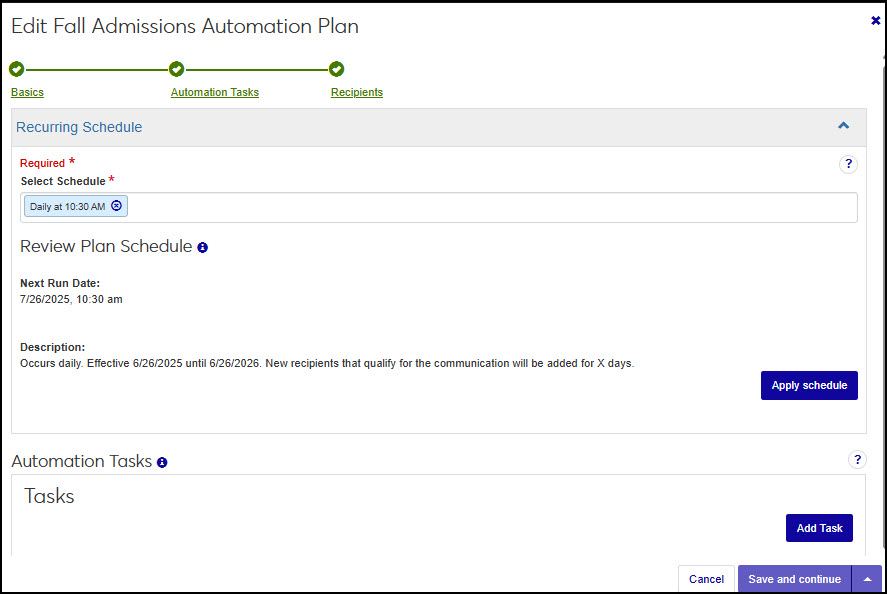
Recurring Schedule repeat at regular intervals over time and are useful for communication plans that are sent regularly, such as fall communications for the start of the semester. The first interaction in the plan will be sent out based on a schedule you defined (e.g., 30 days before Fall term).
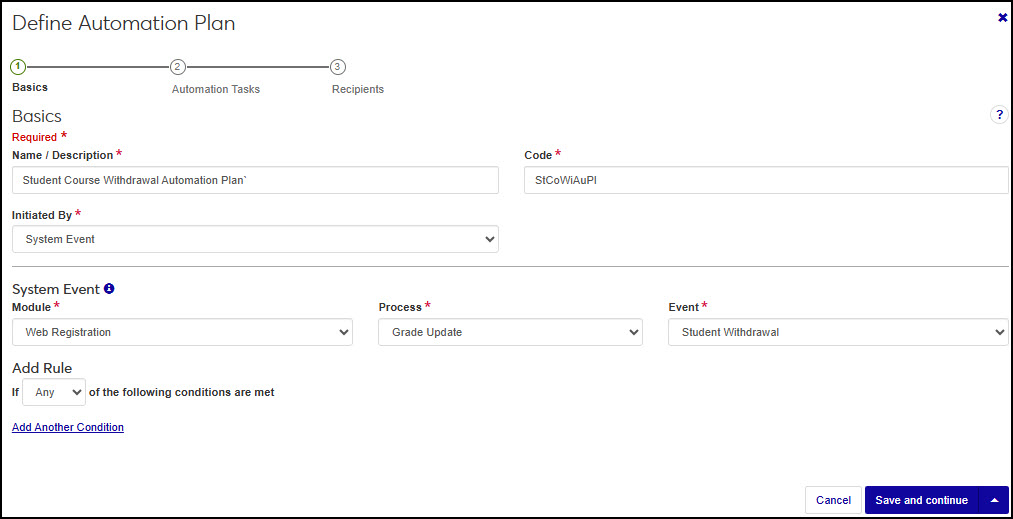
System Event sends the first interaction based on an event (e.g., when a donation is processed). You can select the module, process, and system event that kick off the automation plan on the Basics step. For example, when a student withdraws from a course
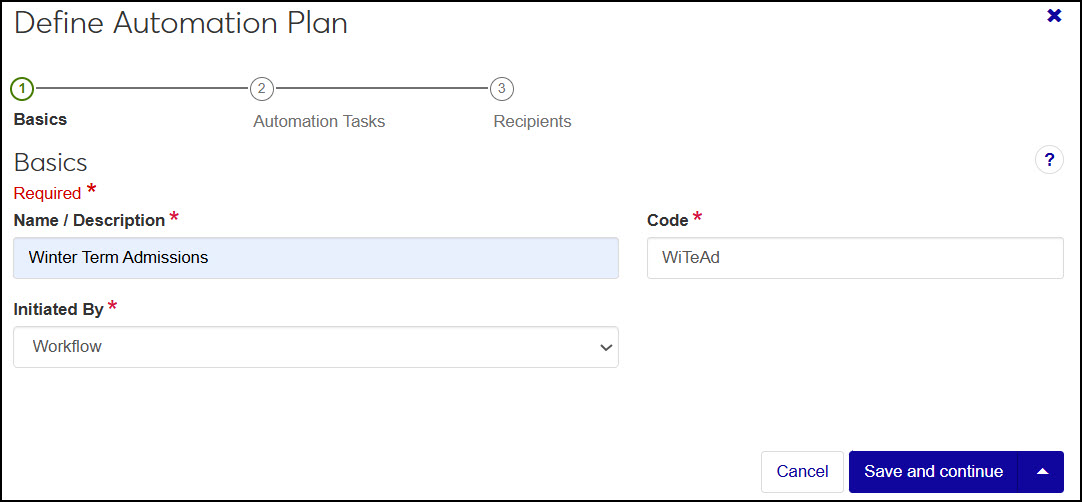
Workflow plans are initiated when certain criteria are met within a workflow. These automation plans are added to your school's workflows as a part of a stage or item rule. For example, if a prospective student submits an application, the associated automation plan could assign a "contact prospective student" to do to an admissions officer and send an informational email to the student life office.
Select when the automation plan is initiated and add tasks.
For recurring schedule automation plans, choose a schedule to determine when the first interaction will be sent. Schedules are managed from the Campus-Wide Definitions hub, Schedules page. Only one schedule can be associated with an automation plan.
For kickoff date automation plans, specify the date and time the automation plan will start.
Select the tasks to be included in the plan. Tasks can be interactions such as emails, notifications, and To Dos. Other tasks include rules based updates, stored procedures, holds, and workflow. You can select as many tasks as you need and order them according to how they should be sent/applied. Once the first task is sent/applied, you can determine when subsequent tasks will be sent/applied. For example, you can send a course dropped email when the plan starts followed by running a rules based update a day later
Rules let you further refine the list of indviduals impacted. For example, you can add a rule that skips an email if the recipient has not submitted part of an application or skip a rules based update for a select group. The options to apply rules are based on the data merge queries managed from the Campus-Wide Definitions hub, Data Sets page.
Add recipients.
Use a query to select recipients, or add people or organizations individually. Recipient queries are managed from the Campus-Wide Definitions hub, Data Sets page.
Define interaction templates, if interactions will be included.
Define interaction schedules, if the plan will be sent according to a recurring schedule.
If filter options aren’t appearing, click the No filters applied link. You can filter in several ways:
Search by specific word using the Keyword filter
Use a filter or combination of filters to view by code, interactions in the plan, date range, progress, schedule name, status, and system event
Sort by the column headings
Tip
To save filter criteria for reuse, click Save as. Enter a name for the filter and click Save. Set as default reuses the filter every time you access the page.
Access the Workflow hub, Automation Plan page.
Use the filter options to find an automation plan.
To activate, click the Inactive option.
To deactivate, click the Active option.
Caution
When an automation plan is deactivated, all new communications and workflows are halted. Scheduled communications and workflows may be impacted.
Select View details from the Actions drop-down to see the list of interactions in the plan.
Access the Workflow hub, Automation Plan page.
Click Define automation plan.
In the Name/Description field, enter a recognizable name or description for the automation plan.
In the Code field, enter a unique code.
From Initiated By drop-down select Kickoff Date, Recurring Schedule , System Event, or Workflow.
If you select Kickoff Date:
When you use a kickoff date, the automation plan will be sent on the date you specify, but will not recur. For example, your school might be remodeling the student center and you may need to set up a communication plan with communications that make students, faculty, and staff aware of impacts and timelines.
Click Save and continue. The Automation Tasks step appears.
Select the date and time you want the automation plan to start.
Click Apply kickoff date.
Proceed to Step 10.
If you select Recurring Schedule:
Automation plans based on a schedule start the plan when a particular date is reached. The timeframe it takes for the whole plan to run depends on how many tasks are included and if you stagger/delay sending them. For example, a plan might start April 1st and include 10 interactions with each being delayed by 3 days. That means it will take the plan won't be completed in its entirety until April 30th.
Each time the schedule runs, a new instance of the plan begins and the first task is sent/ applied again.
Click Save and continue. The Automation Tasks step appears.
In the Select Schedule field, start typing and select the schedule you want to associate with the automation plan.
Click Apply Schedule.
Proceed to Step 10.
If you select System Event:
This option means the system will start sending communications in the plan when something occurs in J1. For example, when a prospective student emails, you might send them a response with information about the school, assign a task to an admissions counselor to reach out, and text the student advocates president to have them reach out as well.
Note
The module, process, and event are dependent on your school's licenses and system version. New processes are available with more recent releases.
Select a Module.
Select the Process associated with the plan.
Select the Event in the process that initiates the plan.
To add a condition that further controls the plan when the event occurs, use the Add Rule options. For example, if the plan is kicked off when a grade is updated, rules let you specify if it should only run for students withdrawing from Art 101.
Click Save and continue. The Automation Tasks step appears.
Proceed to Step 10.
If you select Workflow:
These automation plans are added to your school's workflows as a part of a stage or item rule and are initiated when certain criteria are met within the workflow. For example, if a prospective student submits an application, the associated automation plan could assign a "contact prospective student" to do to an admissions officer and send an informational email to the student life office.
Click Save and continue. Automation Tasks step appears.
From the Modules Allowed Access field, select the modules that can see this workflow as an option when defining their workflows. Users in roles with permission to this module code will be able to view, track, and associate this workflow.
Proceed to Step 10.
From the Automation Tasks section, click Add Task. Add Task options appear.
Tip
You can add as many tasks as you need.
Interactions section lets you choose the documents, emails, notes, notifications, phone calls, texts, and To Dos you want to include in the plan.
Select an interaction type, locate the one you want, and click Add to plan. Only active interactions are available.
Note
Indicators let you know an interaction is being used in another plan. You can still include it, but consider the recipients to ensure the same interaction is not sent to them multiple times.
Other Tasks section lets you add attributes, automated advisor assignments, holds, rules based updates, stored procedures, and workflows you want to run as a part of the plan.
Select an other task type, define the parameters (these vary by option), and click Add to plan.
Use the up and down icon
 to drag and drop items in the order you want them to be sent and/or occur. The first item will be sent/applied on the first time the plan runs.
Note
If a rule excludes an item, the second item in the list will be sent/applied.
Because the first item in the plan is the first to be sent/applied, the Schedule and Days to Delay options aren’t available.
Use Days to Delay to specify the number of days after the initial item is sent or applied before sending or applying the subsequent items. Interactions and tasks are kicked off at the same time every day. If the first item is an interaction that runs at 9am and you delay the third item by 2 days, it will run at 9am 48 hours later.
Note
This option is not available for daily schedules. Daily schedules limit you to the Send with previous or Delay by 1-day options.
To add rules:
Rules let you configure exceptions. For example, you can specify recipient groups and send tailored interactions to specific groups like biology majors and English majors.
Note
Use rules to account for variations as opposed to building multiple plans.
From the Rules column, click Edit & view to see rule options.
Click Add Rule.
For interactions you can specify what actions are performed such as skipping other interactions or stopping the plan all together.
Skip Interaction means the recipient won't receive the specified interaction. Instead, they will receive the next communication in the set, and the Days to Delay setting will calculate when to send based on when the previous communication was sent.
Stop Set indicates the recipient will not receive this communication or any other communication following it.
Note
If the recipient’s condition changes before the set completes, the recipient will pick back up where the communication was stopped.
Select if Any or All of the following conditions are met.
From the Variable field, select from the query data fields.
Note
The data fields vary based on the query selected when the interaction was defined. For example, if you create an email interaction that uses the Student Details query, variables might be student name and major.
You can add as many rules as you want, and each rule can have multiple conditions.
If ANY is selected, the OR operation determines if the condition is true.
If ALL is selected, the AND operation is used.
Interactions, updates, and workflows are evaluated against the rules applied to them and if the conditions are met, the specified action is applied.
From the Operator drop-down, select a conditional operator (e.g., is not, greater than, equals, etc.).
In the Enter Condition field, type the condition that applies the rule (e.g., biology to check for biology majors).
To add additional rules, click Add Another Condition and repeat steps c - g.
Click Done.
Click Save. to close the Edit & View Rules section.
Click Save and continue. The Recipients step appears.
To make the plan ready for sending/applying, click the Status option to make it active.
From the Recipients options, select one of the following:
If Data Setis selected:
Note
If you use a data set, the system automatically adds and removes recipients from the automation plan based on the data set criteria.
Recipients removed from the list do not receive future communications in the plan. For example, if recipients are based on a specific major and the recipient changes majors.
In the Select Existing Data Set, start typing a query name and select it from the options.
Click View recipients to see recipients at this point in time.
If People or Organizations is selected, start typing the name of the individual or organization and select it from the drop-down.
Click View recipients.
Click View Recipients to preview the list of recipients that will be impacted by the automation plan. This is a dynamic list that may change due to recipient changes in status or contact information or criteria.
Click Save & finish. The automation plan is created and available from the Automation Plans page. If you made the plan active, it will begin according to the kickoff date, schedule, system event, or workflow and criteria you selected.
Note
Plans can only be deleted if they are inactive and have never been used. Once an automation plan has been processed, it cannot be removed from the system.
Access the Workflow hub, Automation Plans page.
Use the filter option to find the plan being deleted.
Select the checkbox for the set you want to delete.
From the Options drop-down, select Delete.
Click Yes, delete in the confirmation pop-up.
Note
The Name / Description ,Code , and Initiated By cannot be changed.
Access the Workflow hub, Automation Plans page.
Use the filter options to find a plan.
From the Actions drop-down, click Edit.
If the plan is active, click Yes, edit set in the confirmation pop-up.
Make the desired changes to the Basics, Schedule/Kickoff Date, Automation Tasks, and Recipients sections.
Tip
For full details about updating the different sections, see How to Define an Automation Plan.
Click Save & finish .
Access the Workflow hub, Automation Plans page.
Use the filter options to find a plan.
From the Actions drop-down, click Run plan now.
Click Yes, run now in the confirmation pop-up.
Access the Workflow hub, Automation Plans page.
Use the filter options to find the set you want to view more information about.
From the Actions drop-down, select View Summary. The Summary window appears.
Links access information about the interactions in the set and interaction recipients.
View information about the schedule associated with the set and when it will next run.
Click the Close button to close the Summary window.
Automation plans must have an inactive status and be tied to an inactive schedule before they can be deleted. When a plan is deleted, it is permanently removed from the system.
With version 2024.1, important updates were made to how recurring schedule automation plans work. To prevent unintended behavior, any recurring schedule plans created before 2024.1 were disabled during the upgrade.
What changed?
Starting in 2024.1, automation plans no longer continuously continuously evaluate and add new recipients during the active schedule window. Now, recipients are selected only when the plan begins to run. No new recipients are added until the next schedule runn. As before, recipients who no longer meet the criteria are removed immediately.
To support this change, new advanced options were added that determine how recipients who previously received the recurring automation plan are managed.
What do you need to do if you see this indicator?
Open the plan and select Edit.
Access the Recipients step to review and apply the new settings.
Once updated, reactivate the plan.