Fixed Assets
Important
Information and features vary according to the roles to which you belong and the permissions associated with those roles. For more information, contact your module manager or your campus support team.
Fixed Assets allows you to create new assets, review and accept new assets entered in the Accounts Payable module, maintain and process depreciation, and inventory and track assets through their life cycle.
Note
If you are not using the AP module to create assets when invoices are entered for the purchase, you can use this window to create new assets.
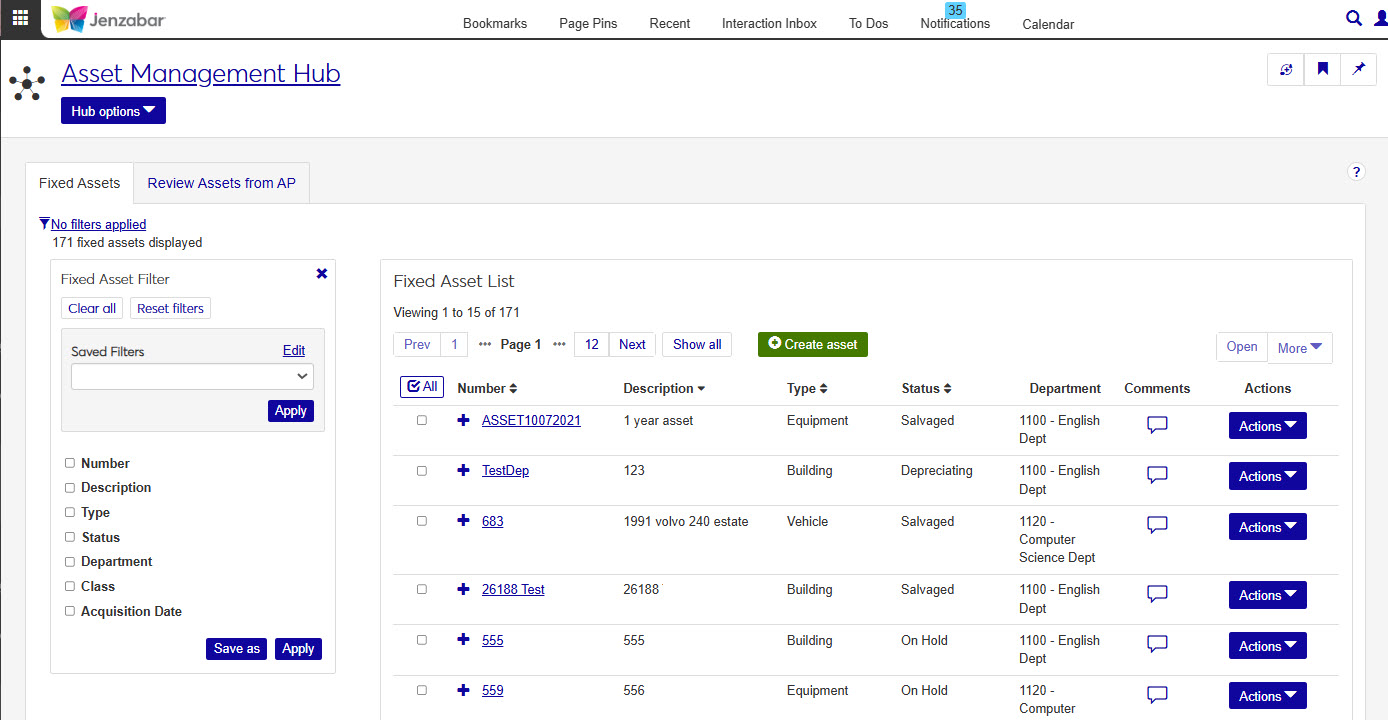
Fixed Assets Tab
The Fixed Assets tab shows you a list of all assets associated with your school and allows you manage the assets in one convenient location.
Note
Assets that appear on the Fixed Assets tab are already approved.
There are several permissions used to work with Fixed Assets. Depending on what you want a user to be able to accomplish, you will need some combination of the following:
Role | Role Permissions |
|---|---|
Asset Management Fixed Asset Access > Fixed Asset Management | Can view assets Can edit assets Can create assets Can delete assets Can download to Excel |
Asset Management Fixed Asset Access > Fixed Assets from Accounts Payable | Can submit assets Can approve and deny assets |
Tip
If a user doesn't have access to any of the Fixed Assets from Accounts Payable permissions, they will not see the Review Assets from AP tab.
Use the filter to expand or limit the fixed assets displayed in the list. Filter options include:
Number
Description
Type
Status
Department
Class
Acquisition Date
The fixed assets list displays fixed assets available in your school's database based on the search criteria selected in the filter.
Click the Create asset button to open the Create Asset popup.
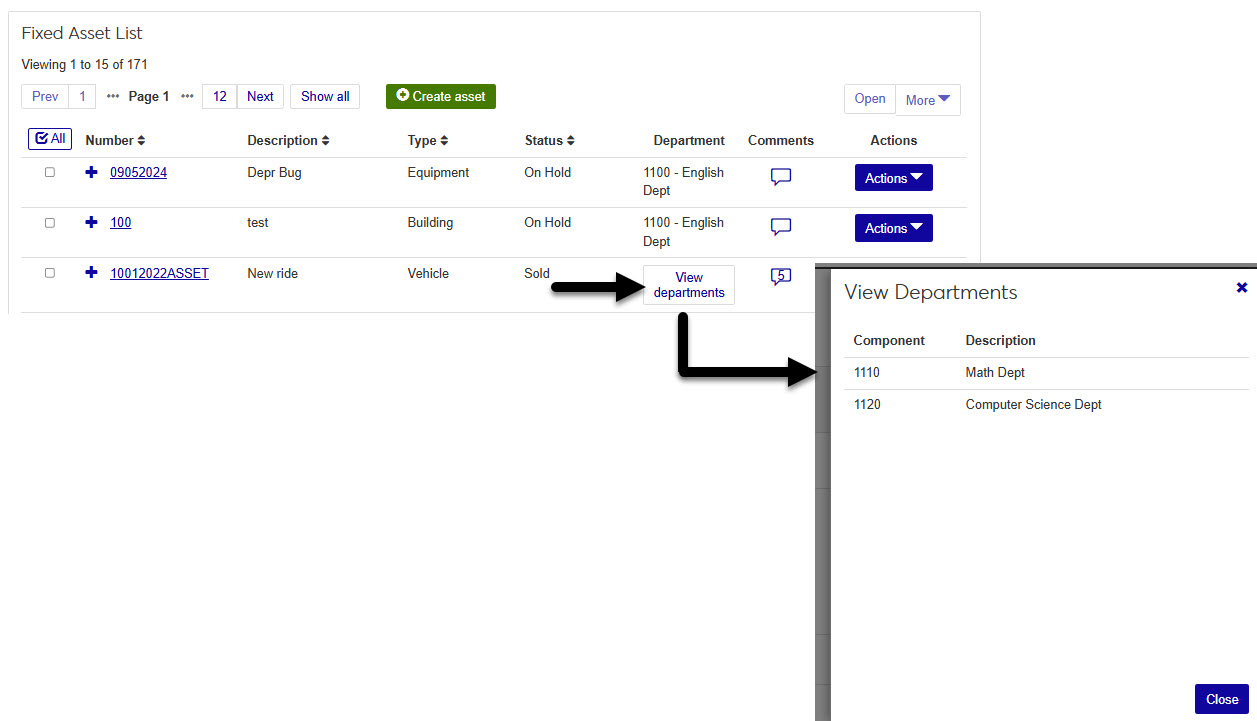
The list contains the following information for each asset: Number, Description, Type, Status, Department, and Comments.
Tip
Click the Departments button to view all the departments associated with this asset.
Class, Acquisition Date, Cost, Accumulated Depreciation, Previous Depreciation, Current Book Value, Purchased Outright, and Condition information can be viewed by clicking the plus sign at the beginning of each fixed asset's row.
Fixed Assets from AP Tab
The Review Assets from AP tab on the Fixed Assets page allows you to review and Approve or Deny assets added through the J1 Web Accounts Payable (Procurement hub) module.
Tip
If your school is licensed for Fixed Assets, Accounts Payable, and Procurement, you can associate invoice line items from the Invoices page with an existing asset in the Fixed Asset Number column.
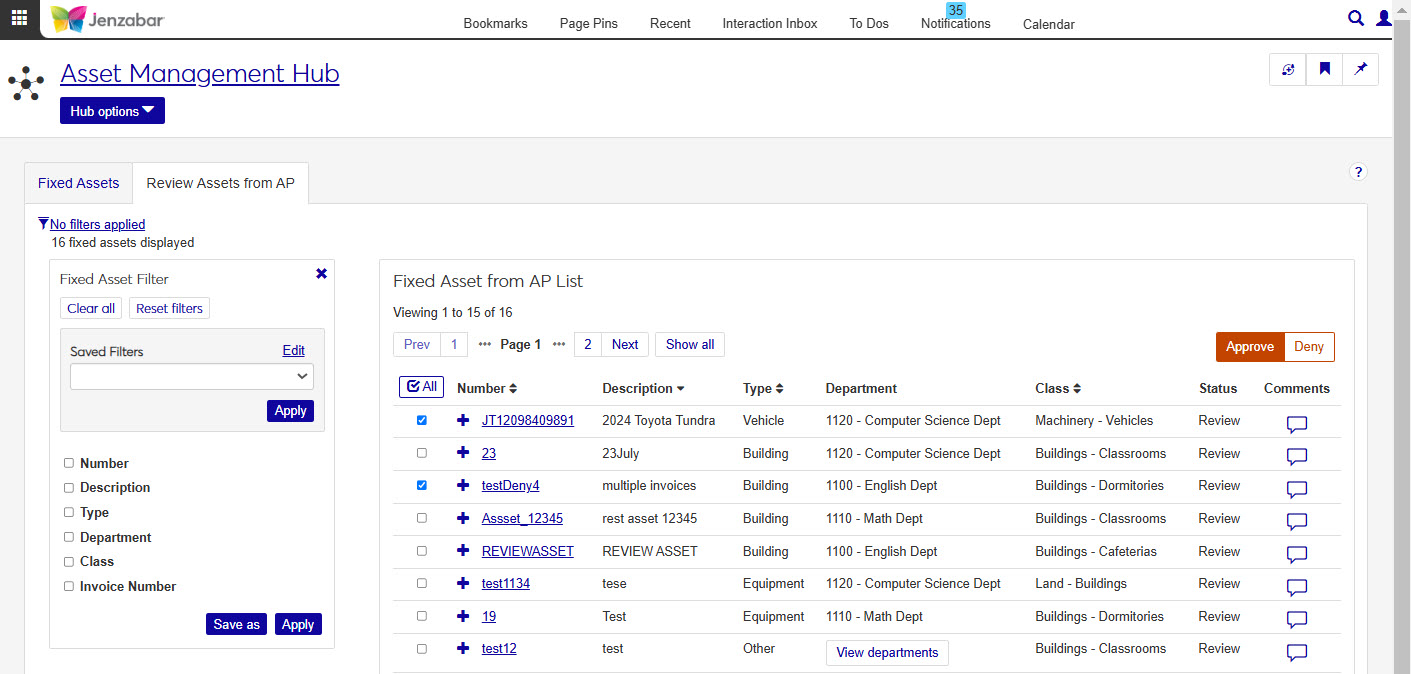
Use the filter to expand or limit the fixed assets displayed in the list. Filter options include:
Number
Description
Type
Department
Class
Invoice Number
The Fixed Assets from AP list displays fixed assets created from invoices in your school's Accounts Payable or Procurement module.
You can search using the filter options. When you located the asset you're looking for, select the checkbox next to the asset row which will activate the Approve and Deny buttons.
The list contains the following information for each asset: Number, Description, Type, Department, Class Status, and Comments. Invoice Number can be viewed by clicking the plus sign at the beginning of each fixed asset's row.
Once assets are approved, they will move to the Fixed Assets tab and can be managed there.
Click the Comments icon
 .
. From the Comment popup, you can read the existing comments, mark them all as read, and add your own comments.
Click New comment and enter your text.
If you want to upload an attachment, click Attach, locate the file, then click Open.
Click Add to save your text and/or attachment.
Click the Create Asset button on the Fixed Assets List.
Enter information about the new fixed asset. Fields with an asterisk are required.
Number*: Enter a number to identify the new fixed asset, maximum length is 15 characters and it must be unique. The fixed asset number is stored in ASSET_MASTER.ASSET_NUMBER.
Description*: Maximum length is 60 characters. The fixed asset description is stored in ASSET_MASTER.ASSET_DESCRIPTION.
Type*: Choose Building, Equipment, Other, or Vehicle from the drop-down menu.
Status*: Choose On hold (default selection) or CIP from the drop-down menu.
Department*: Choose a department from the drop-down menu. Options include all departments displayed on the Asset Department window in the Desktop application. They are in order by the department number.
Class*: Choose a class from the drop-down menu. Options include all classes displayed on the Asset Department window in the Desktop application.
Acquisition Date: Enter a date, or select one from the provided calendar. The date must be within the current fiscal year.
Cost*: Enter the cost of the fixed asset. By default, the amount is set to 0.
Purchased Outright*: Choose Yes or No (default selection) from the drop-down menu.
Condition*: Choose New (default selection) or Used from the drop-down menu.
Liability Account Number*: Enabled only when the Purchased Outright selection is set to No. Options in the drop-down menu include all liability accounts where the fixed asset account type is "debt".
Liability Account Description: Automatically populated when the liability account number is selected. This field is read-only.
3. Click Save and create another to save this asset and create another one. When finished, click Save and close. The pop-up closes and the Fixed Asset details page displays. If you created multiple fixed assets, each page opens. You can use the drop-down menu to switch between assets.
Select or more assets using the checkbox at the beginning of the row.
Click the Open button.
The Fixed Asset page opens displaying all the asset's information.
Tip
Use the All checkbox to select all assets in the list.
Note
If you opened more than one asset, a message displays (e.g., Viewing 1 of 2 fixed assets). Use the drop-down menu beside the message to choose which asset you want to view.

Click the plus sign at the beginning of the row to display more information.
Warning
The delete process can't be undone.
Click the More button, and choose Delete from the drop-down menu. If only one asset was selected, and it can't be deleted, the Delete button is not enabled.
A warning message displays. Content of the message varies depending on which assets were selected.
If the assets can be deleted, they are listed in a Ready to Delete section of the message. To remove an asset from the list, click the remove icon at the end of the asset's row.
If the assets can't be deleted, they are listed in an Unable to Delete section. Only assets with a status of On hold, CIP, or Review can be deleted.
To delete the assets listed in the Ready to Delete section, click Yes, delete. Click Cancel to close the message without deleting any assets.
The message closes, and a confirmation message displays at the bottom of the Fixed Assets page letting you know how many assets were deleted.
Select one or more assets using the checkbox at the beginning of the row.
Click the More button, and choose Download to Excelfrom the drop-down menu.
Tip
Learn more about downloading to Excel.
Warning
The delete process cannot be undone.
From the Asset Management hub, select Fixed Assets.
In the Fixed Assets List, select the checkboxes next to the assets you want to delete.
Click More and choose Delete from the drop-down menu.
A warning message reminds you that the delete process cannot be undone.
Click Yes, delete to delete the asset OR
Click Cancel to close the message and return to the asset details page.
Note
If the deleted asset was the only one open, the asset is deleted and you're returned to the Fixed Assets list page.
If more than one asset was open, the chosen asset is deleted and the Fixed Asset details page is refreshed. The deleted asset no longer appears in the drop-down menu that lists the open assets.
From the Asset Management hub, select Fixed Assets.
At the top of the page, click the Review Assets from AP tab.
In the Fixed Assets from AP List, select the checkboxes next to the assets you want to approve.
Click Approve.
In the Approve Fixed Assets? pop-up window, review the assets in the Ready to Approve section, and the Unable to Approve if necessary.
Choose an asset status of On Hold or CIP for how the assets will be added to the asset list.
Click Yes, approve.
From the Asset Management hub, select Fixed Assets.
At the top of the page, click the Review Assets from AP tab.
In the Fixed Assets from AP List, select the checkboxes next to the assets you want to deny.
Click Deny.
In the Deny Fixed Assets? pop-up window, review the assets in the Ready to Deny section, and the Unable to Deny if necessary.
Tip
This process cannot be undone. Any denied assets will be deleted, and the asset submitter will need to reclassify transactions tied to the assets.
Click Yes, deny.
The fixed asset's cost minus accumulated depreciation and previous depreciation.
Accumulated depreciation for an asset is calculated by subtracting any previous depreciation amounts from the sum of all depreciation amounts.
There are two reasons no fixed assets show in the list:
There are no fixed assets in your school's system to display. If this is the case, you'll see the message "Currently, no fixed assets exist."
There are no fixed assets to display based on the criteria defined in the filter. If this is the case, you'll see the message "There are no fixed assets matching your current filter selections."
Why is there a department listed for some assets, but a link for others?
If an asset is associated with more than one department, the column on the listed assets will have a button link. When you click the link, a Departments pop-up will open with a list of all departments. If you don't have access to a department displayed on the list you'll see a warning icon.