Division Group Definitions
Important
Information and features vary according to the roles to which you belong and the permissions associated with those roles. For more information, contact your module manager or your campus support team.
Use this page to manage definitions for groups of divisions. Division groups can save time creating transcripts and grade reports. Instead of creating them one division at a time, you can create them for a division group.
For example, if Undergraduate and Graduate divisions run grade reports at the same time, you could put them in one division group, while putting Medical and Law in another group, if their reporting schedule coincides. You may also want to create division group with all divisions in it.
Tip
You must create at least one division group, even if you have only one division. For example, if you have only an Undergraduate division, then create one division group called "Undergraduate" or "All".
Division Groups are also useful when a student is in more than one division. On their Student Information pages, you can select a division group to represent their several divisions.
Desktop Location
You can manage the definitions in Desktop, too, on the Division Group Definition window. Changes you make in Desktop apply to J1 Web and vice versa.
Database Location
The definitions are stored on the Division Group Definition table (div_grp).
When they're selected on the Student Information Details page, General Information tab, they're saved in the Degree History table (student_master.div_grp_cde).
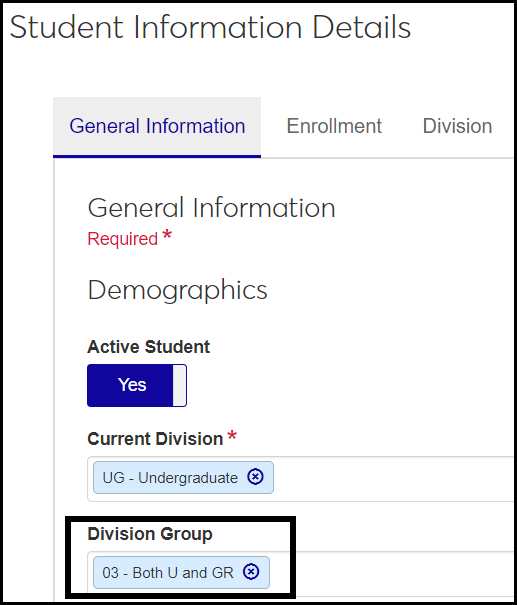
The definitions are used on Student Information Details page, General Information tab, under the Demographics heading. They're available to select in drop-downs when you edit the page.
In Desktop, the definitions appear on the Student Information window, Student tab, Student Master subtab, Division group.
Code: Required and must be unique. Up to 2 characters. Appears in drop-downs with Description, but doesn't appear in the field after it's selected.
Description: Required. Up to 30 characters. Appears in drop-downs with Code, and appears in fields after it's selected.
Division Group Associations: The divisions that belong to the group. The Manage associations button shows the number of associated divisions. Clicking it opens the Manage Associations pop-up where you can add or remove divisions from the group.
Permission to manage division group definitions is available in these roles:
Registrar
Registration Module Manager
The permission required is "Can manage division group definitions".
From the Registration Administration hub, click Hub options.
Click Manage Definitions, and select Division group definitions. The Division Group Definitions page opens.
To filter the definitions, enter a phrase in the Quick Filters field. To remove a filter, click its Remove icon
 .
.To temporarily sort the definitions, click the heading of the column you want to sort on. Click once for ascending order and again for descending order. The definitions are sorted for this viewing of the page, but the next time you view or refresh the page, it will return to its default sorting.
To view, add, or remove divisions from a group:
In the Division Group Associations column, click the Manage associations button for any row. The Manage Associations pop-up appears with a list of associated divisions.
To remove a division from the group, click the Remove icon
.To add a division to the group, click in the Division field under Add Associations. Begin typing the name of the Division, and select it from the list that appears. You can add more than one. Click the Update button.
Click the Create definitions button. The Create Division Group Definitions pop-up appears.
In Code, enter up to 2 characters. Required. Must be unique. Appears in drop-downs with Description, but doesn't appear in the field after it's selected.
In Description, enter up to 30 characters. Required. Appears in drop-downs with Code, and appears in fields after it's selected.
Click Create and close or Save and create another.
To view, add, or remove divisions from a group:
In the Division Group Associations column, click the Manage Associations button for any row. The Manage Associations pop-up appears with a list of associated divisions.
To remove a division from the group, click the Remove icon
.To add a division to the group, click in the Division field under Add Associations. Begin typing the name of the Division, and select it from the list that appears. You can add more than one. Click the Update button.
Click the Edit icon
 on the row of a definition. The Edit Division Group Definition pop-up opens.
You can edit the Description. Up to 30 characters. Required.
Click Update.
Select the checkboxes next to the rows you want to export.
From the Options drop-down, select Download to Excel. The Download to Excel pop-up opens.
Select options for the Excel format and data columns.
Click Download. Your .xlsx or .zip file is saved in the file location that you have set in your browser settings.
Yes.
Use Division Group to Control Which Divisions a Student Can Register In
Division Group (student_master.div_grp_cde) is a field on the Student Information Details page, General Information tab, under the Demographics heading. The options in the drop-down are defined on the Division Group Definitions page.
A division group is some combination of your existing divisions. You may have reasons to put Undergraduate and Graduate in a division group together, but Continuing Education and Parent Education in another division group. You may want to make an All Divisions group.
You can use division to allow a student to register for courses in more than one division. For example, if you want a student to be able to register for both undergraduate and graduate courses (but not Continuing Education), you create a division group with those parameters, and assign the student to it.
Tip
If you want to allow all students to register for courses in all divisions, use the "Allow alternate division" setting. See instructions below.
On the Division Group Definitions page, create the division groups you need. For example, if you need some students to be able to register for both undergraduate and graduate courses, create a division group associated with both those divisions.
On a student's Student Information Details page, General Information tab, click the Edit details button.
In the Division Group drop-down, select the group that has the divisions you want.
Click the Done Editing button. The student is now permitted to register in the divisions included in the group. This works for students registering themselves on the Campus Portal or staff registering students in J1 Web or J1 Desktop.
Access the the Campus Portal (JICS) Settings page.
In the Campus Portal Registration Configuration category, select the Allow alternate division checkbox. All students can now register in all divisions.