Activity Seasons
Important
Information and features vary according to the roles to which you belong and the permissions associated with those roles. For more information, contact your module manager or your campus support team.
The Activity Seasons page is where users create activity seasons and manage the rosters, staff positions, and years and terms associated with them.
To manage activity seasons, you must be in a Student Activities User by Activity role (or a role copied from it) with all permissions enabled.
Activity seasons are used throughout the Student Activities module when users create activity, roster status, and staff position definitions.
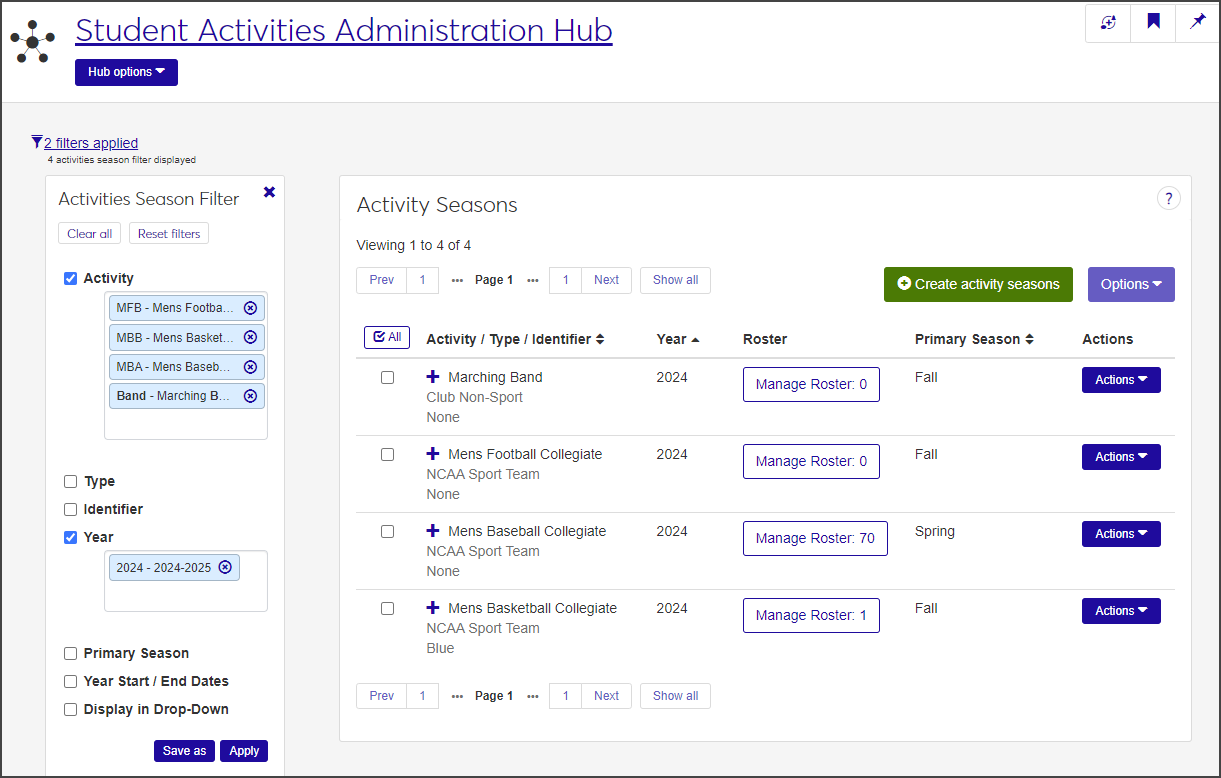
For each activity season, the Activity Seasons page includes the following columns. Click the plus sign for a row to see all columns.
Column | Description |
|---|---|
Activity / Type / Identifier | The specific activity, the activity type (e.g., sport, music organization, student government, etc.), and the team identifier. The team identifier is a way to identify the location a team is associated with. For example, if a college has two campuses and each one has a basketball team, the team identifiers might be "East" and "Main" to indicate which campus the team is associated with. |
Year | The calendar year in which the season is active. |
Roster | The Manage Roster button in the Roster column displays the number of participants currently on the activity's roster. Click the button to view the full roster, add participants, and send communications to those on the roster. |
Primary Season | The primary season during which this activity takes place. |
Actions | The options in the Actions drop-down enable you to copy or edit an activity season; manage associated years and terms; manage the activity roster; manage staff positions; and manage user-defined fields. |
Description | A brief description of the activity. |
Year / Term | The Manage associations button in this column displays the number of Year / Terms already associated with the activity season. Click the button to add or delete associations. |
Year Start Date | The beginning date of the activity season. |
Year End Date | The end date of the activity season. |
Staff Positions | The Manage Staff Positions button in this column displays the number of staff positions currently associated with the activity season. Click the button to add or delete staff positions, download the staff positions roster to an Excel file, or send communications to all or selected staff on the list. |
Display in Drop-Down | Indicates if the activity season is displayed on related drop-down menus. |
User-Defined Fields | This column is only visible if you have permissions to manage user-defined fields. User-defined fields allow you to capture information that isn't recorded by other areas of the system. Click the User-Defined Fields button to edit. |
On the Student Activities Administration Hub page, select Activity seasons from the Hub options drop-down. The Activity Seasons page opens.
To filter the list:
In the Activities Season Filter, select the checkbox next to the category you want to filter the list by (e.g., Activity or Year). You can select more than one category.
Select or enter a value for the filter category.
Click Apply.
To save a filter and set it as your default filter:
After you create the filter, click Save as.
Enter a name for the filter in the Save the Current Filter As ... field.
Select the Set as default checkbox.
Click Save.
Click the plus icon next to an activity season to see additional information.
On the Activity Seasons page, click Create activity seasons. The Create Activity Season pop-up opens.
Required fields are indicated by a red asterisk.
Begin typing the activity in the Activity/Type/Identifier field and select the correct activity when it appears.
Select the appropriate year from the Year drop-down.
From the Primary Season drop-down, select the primary season in which the activity takes place.
Click in the Year / Term Associations field and select the year and term of the activity season (for example, 2024-2025 - Fall). You can select more than one.
Click in the Year Start field and use the pop-up calendar to select the start date of the activity year.
Click in the Year End field and use the pop-up calendar to select the end date for the activity year.
Year End is not required, but if you do include it, make sure it is later than the Year Start date.
Enter a brief Description of the activity season. The description can contain a maximum of 60 characters.
Select Yes or No from the Display in Drop-Down menu. If you select No, the activity season will not appear as an option in related drop-down menus. The field defaults to Yes.
To save time, you can import the staff or participant roster (or both) from an existing activity season so you don't have to enter it manually:
Under Copy Options, select the Copy from previous Activity Season Year / Term checkbox to enable the field below it.
Click in the field and select the activity season year and term you would like to copy from.
Select the Copy Participant Roster or Copy Staff checkbox (or both) as needed. The selected roster will be copied to the new activity season.
When you have finished creating the season, click Create and close.
On the Activity Seasons page, select Edit from the Actions drop-down for the season you need to edit. The Edit Activity Season pop-up opens.
All fields except Activity / Type / Identifier and Year can be edited.
Make changes as needed.
Note
To edit Primary Season or Year / Term Associations, you need to first remove the existing values, then select a new option from the drop-down.
Click Update to save the changes and close the pop-up.
To save time and effort, you can create a new activity season by copying an existing one that is similar and modifying it as needed.
On the Activity Seasons page, select Copy activity season from the Actions drop-down for the season you want to copy. The Copy Activity Season pop-up opens.
The Activity / Type / Identifier, Primary Season, Description, and Display in Drop-Down fields autofill with the values from the season you're copying.
Required fields are indicated by a red asterisk.
To change the Activity / Type / Identifier, click the Remove icon next to the existing value, then begin typing a new activity in the field and select the correct option from the list when it appears.
Click in the Year field and select the year from the list.
To change the Primary Season, click the Remove icon next to the existing value, then select a new option from the list.
Click in the Year / Term Associations field and select an option from the list. You can select more than one.
Click in the Year Start and Year End fields and use the pop-up calendars to select start and end dates for the year.
Note
The start date is required, but the end date is optional.
Click in the Description field and edit it as needed.
Select a new option from the Display in Drop-Down menu, if you need to change it.
Under Copy Options, select the Copy Participant Roster or Copy Staff checkbox (or both) if you want to import the participant roster or staff roster from the activity season you are copying.
Note
Copy from previous Activity Season Year / Term is selected by default and cannot be changed.
When you are done, click Copy.
From the Activity Seasons page, you can add or remove students from the activity roster, edit roster data, download the roster to an Excel file, and send communications to selected participants.
On the Activity Seasons page, click the Manage Roster button for the activity you need to add participants to, or select Manage associated roster from the Actions drop-down. The Manage Roster window for the activity opens.
Click the Add button on the toolbar. The Add Participant / ID window opens.
Note
To see all the columns, use the horizontal scrollbar at the bottom of the spreadsheet.
Click in the Participant / ID field and begin typing the name or ID number of the participant you want to add, then select the correct name when it appears in the list. Repeat for each participant you need to add.
Click Add to close the window and add the new participants to the list.
For each newly added participant, click the down arrows in the Activity Roster Begin and Activity Roster End columns and select the start and end dates for the roster. Activity Roster Begin is required.
If the participant received a scholarship for this activity, select the checkbox in the Scholarship Received column.
If the participant received a scholarship, select a value from the Scholarship Value column. Scholarship values are defined in the Sports Scholarship Value Definitions page in the Registration Administration Hub.
If the participant received a scholarship, enter the percentage of the scholarship in the Scholarship % column. Use numerals between 1–100 with no more than one decimal place. Do not include a % sign.
If the scholarship is funded through financial aid, select the funding source in the Financial Aid Fund of Scholarship column.
If the activity is a sport and it is the student's primary sport, select the Is Primary checkbox.
Select the participant's team level (e.g., Varsity or Junior Varsity) in the Team Level column. Team levels are defined in the Sport / Activity Level Definitions page.
Select the participant's Eligibility Status (e.g., Eligible, Suspended, Ineligible). This column is required.
Enter a Priority Order in the field. This indicates the ranked order of importance of the activity for this student. The value must be a number and cannot include decimals. This column is required.
Note
Example: The student on the roster is the quarterback of the football team as well as the holder for field goals. Being quarterback is the higher priority, so quarterback is ranked 1 and holder is ranked 2.
If you have the permissions necessary and need to edit user-defined fields, click the User-Defined Fields button and edit the fields as needed.
Refer to User-Defined Forms for more information.
When you are done, click the Save button on the toolbar.
To associate participant types to the student you just added to the roster:
Remain in the Manage Roster window and click the Associations button in the Participant-Type Association column. The Manage Season Participant Types window opens.
Existing participant type associations are listed under Existing Associations.
To remove an existing association, click the Remove icon for the participant type you want to delete.
Click in the Participant Type field under Add Associations and select an option from the list. You can add more than one association at a time.
Click Update to close the window.
Click the Save button on the Existing Roster toolbar.
Click Close to close the Manage Roster window and return to the Activity Seasons page.
Columns that are grayed out cannot be edited.
On the Activity Seasons page, click the Manage Roster button for the activity you need to manage, or select Manage associated roster from the Actions drop-down. The Manage Roster window for that activity opens.
Select or enter new values for participants as necessary.
When you are done, click the Save button on the toolbar.
Click Close to close the window and return to the definitions page.
You can send either email or text messages to selected participants from the Manage Staff window. All recipients receive separate but identical messages.
Note
Text messaging is available with Communications Plus.
On the Activity Seasons page, click the Manage Roster button for the activity you are working with, or select Manage associated roster from the Actions drop-down. The Manage Roster window opens.
Select the checkbox next to the name of each participant you want to send the communication to. Click the All button to select all participants listed.
Select Send communication from the Options drop-down. The Create New Communication window opens.
Required fields are indicated by a red asterisk.
To send an email communication:
Select Email from the Communication Type drop-down.
Click in the Interaction Code, Name / Description field and select the correct option from the list. The interaction code classifies the content of the communication.
The From field autofills with the email address of the user who is logged in, but you can click the Remove icon to remove that sender and enter another email address in the field.
Note
The To field autofills with the email addresses of the participants you selected. Selected recipients who are missing an email address are noted.
The Contact Type field autofills with Institutional Priority. To change it, click the Remove icon to delete the existing contact type, then click in the field and select another option from the list.
Enter a Subject.
Compose your message in the Body field. Use the formatting toolbar to do things like change the font or insert a bulleted list.
When you are done, click Send. The participants will receive separate but identical emails.
To send a text communication*:
*Available with Communications Plus
Select Text from the Communication Type drop-down.
Click in the Interaction Code, Name / Description field and select the correct option from the list. The interaction code classifies the content of the communication.
Click in the Select 'From' Number field and select the number you want the message to originate from.
Enter your message in the Body field. Click the emoji icon to insert an emoji. You can enter up to 1,599 characters, but try to limit your message to 160 characters to avoid sending the message in multiple parts.
When you are done, select Send or Send and close timed session from the Send drop-down.
On the Activity Seasons page, select Manage associated Year / Terms from the Actions drop-down for the activity you need to update, or expand the row and click the Manage associations button in the Year / Term column. The Manage Associated Year / Term window for the activity season opens.
The year/terms already associated with the activity season are listed under Existing Year / Term Associations.
To add an association, click in the Year / Term field under Add Year / Term Associations and select an option from the list. You can select more than one option.
To remove an existing association, click the Remove icon next to the year/term you want to delete.
When you are done, click Update.
On the Activity Seasons page, select Manage associated staff positions from the Actions drop-down for the activity you need to update, or expand the row and click the Manage Staff Positions button. The Manage Staff window for that activity opens.
Staff positions already associated with the activity season are listed in the Existing Staff spreadsheet.
To add a new staff position, click the Add button on the toolbar. The Add Staff / ID window opens.
Begin typing the staff member's name or ID number in the Staff / ID field and select the correct name when it appears in the list. You can add more than one staff member at a time.
When you are done, click Add to return to the Manage Staff window. The new staff member is added to the top of the spreadsheet.
Double-click in the Staff Position column and select the correct position from the list.
Enter the priority order in the Priority Order column.
Double-click in the Staff Start Date and Staff End Date columns and use the pop-up calendars to select the start and end dates of the staff position.
If your permissions allow you to update user-defined fields, click the User-Defined Fields button to open the User-Defined Fields window, update the UDEFs as necessary, and click Close to return to the Manage Staff window.
When you are done, click the Save button on the toolbar.
Click Close to close the window and return to the Activity Seasons page.
You can send either email or text messages to selected staff members from the Manage Staff window. All recipients receive separate but identical messages.
Note
Text messaging is available with Communications Plus.
On the Activity Seasons page, select Manage associated staff positions from the Actions drop-down for the activity season, or expand the row and click the Manage Staff Positions button. The Manage Staff window for that activity opens.
Select the checkbox next to each staff member you want to send the communication to. You must select at least one recipient.
Select Send communication from the Options drop-down. The Create New Communication window opens.
Required fields are indicated by a red asterisk.
To send an email communication:
Select Email from the Communication Type drop-down.
Click in the Interaction Code, Name / Description field and select an option from the list. The interaction code classifies the content of the communication.
Click in the From field and select the email address of the person you want the email to come from.
Note
The To field autofills with the email addresses of the staff members you selected. If any selected recipients are missing an email address, their names are listed here as well.
The Contact Type field autofills with Institutional Priority. To change it, click the Remove icon to delete the existing contact type, then click in the field and select another option from the list.
Enter a Subject.
Compose your message in the Body field. Use the formatting toolbar to do things like change the font or insert a bulleted list.
When you are done, click Send. The staff members will receive separate but identical emails.
To send a text communication*:
*Available with Communication Plus.
Select Text from the Communication Type drop-down.
Click in the Interaction Code, Name / Description field and select the correct option from the list. The interaction code classifies the content of the communication.
Click in the Select 'From' Number field and select the number you want the message to originate from.
Enter your message in the Body field. Click the emoji icon to insert an emoji. You can enter up to 1,599 characters, but try to limit your message to 160 characters to avoid sending the message in multiple parts.
When you are done, select Send or Send and close timed session from the Send drop-down.
Select the checkbox next to each definition you want to delete. You must select at least one to enable the Delete button.
Click Delete on the toolbar. The Delete Definitions? pop-up opens.
The Delete Definitions? pop-up lists the selected definitions in two categories:
Ready to Delete: Definitions that can be deleted.
Unable to Delete: Definitions that cannot be deleted, either because they're in use or are protected by the system.
If you decide not to delete a definition listed under Ready to Delete, click the Remove icon for that definition to remove it from the list of definitions to be deleted.
When you are sure you want to delete all the definitions listed under Ready to Delete, click Yes, delete.
User-defined fields allow you to capture information that isn't recorded by other areas of the system. If you have the necessary permissions, you can view or update user-defined fields.
Note
If you do not have the permissions necessary to manage user-defined fields, the User-Defined Fields button is not visible.
Click the plus icon for the definition you want to edit.
Click the User-Defined Fields button. The User-Defined Fields window opens.
Edit the existing user-defined fields as needed.
When you are done, click Save.
For more information on managing user-defined fields, see User-Defined Fields.
Why can't I see Activity seasons on the Hub options drop-down?
You might not have the necessary permissions to view and create activity seasons. Make sure you are in a Student Activities User role (or a role copied from it) with all permissions enabled.