Major / Minor Definitions
Important
Information and features vary according to the roles to which you belong and the permissions associated with those roles. For more information, contact your module manager or your campus support team.
Use this page to manage definitions of majors and minors.
You can mark a definition as a major, a minor, or both. Many of your programs might be available as both a major and a minor, but this allows you to limit some programs to only a major or a minor.
Tip
Make only one definition for each program, even if it can be used as both a major and a minor. For example, if Botany can be both a major and a minor, make one Botany definition, and mark it as both a major and a minor.
The majors and minors can include programs that aren't offered at your school. For example, they may be programs offered at other schools. These may be useful for faculty records, records of past students, and transfers.
You can associate minors with majors. For example, if your Computer Science major requires a Math minor, you can can associate the the Math definition with the Computer Science definition.
Desktop Location
You can manage the definitions in Desktop, too, on the Major/Minor Definition window.
Database Location
The definitions are stored on the Major Minor Definition table (major_minor_def).
The definitions are used in the Student Information pages. A student's majors and minors are listed on the student's Student Information Details page, on the Program tab. In Edit mode, you can assign up to 4 majors and 4 minors to the student.
The definitions are used for faculty in Desktop on the Faculty Information window, Faculty Degree History tab. (Faculty Information is planned for a future release of J1 Web.)
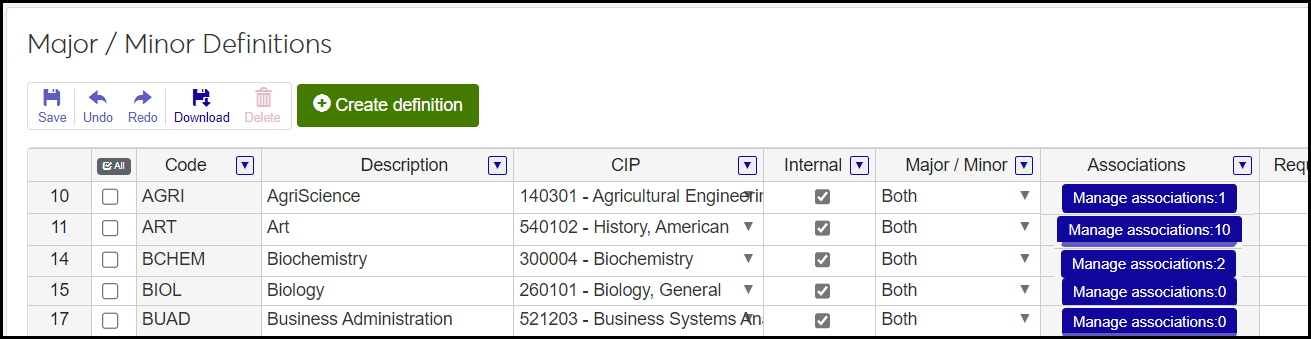
The fields are shown in a spreadsheet format. That's because your school may have many definitions, and there are many fields for each one. The format allows for easy sorting and filtering. The Code and Description columns stay visible when you scroll to the right.
Field | Note |
|---|---|
Code | Up to 5 characters. Required. Not editable for existing definitions. Must be unique. |
Description | Up to 50 characters. Required. |
CIP | Select from the drop-down. Not required. The options in the list come from the CIP Definitions page. Inactive CIP codes are marked as inactive in the list. |
Internal | This checkbox is selected by default. Internal means that the major or minor can be assigned to a student on their Student Information Details page. If other majors, minors, or concentrations are associated with this definition, you can't deselect the checkbox. If you remove the associations, then you can deselect the checkbox. Deselect the checkbox only for a program you don't want to able to assign to a student. Examples include programs your school no longer offers or programs offered by other schools that you want to track for faculty, graduate students, or transfers. |
Major / Minor | Defaults to Major, but you can select Minor or Both. Required. In the Major Minor Definitions database tables, the values are stored as M (for Major), N (for Minor), and B (for both). For existing definitions, you may not be able to edit this field if the definition is already associated with other majors or with concentrations. |
Associations | Definitions marked as Minor or as Both can be associated with definitions marked as Major or Both. Click the Manage associations button to view, add, or remove associations. Associations are not required. |
Requires English | This checkbox is selected by default. You can deselect it if the major or minor does not require proficiency in English. |
CIP Code Extension | Select from the drop-down. Not required. The options in the list come from Desktop in the Maintain Table Values window, Column Name cip_cde_ext (CIP Code Extension for Majors or Certifications). In the database, it's stored in the Table Detail table (table_detail). Available to differentiate certifications that share a CIP Code by state or locality for reporting purposes. |
Program Type | Select from the drop-down. Not required. The options in the list come from Desktop in the Maintain Table Values window, Column Name prog_type (Program Type for Majors or Certifications). In the database, it's stored in the Table Detail table (table_detail). |
Start Date | Not required, but can't be after the End Date. |
End Date | Not required, but can't be before the Start Date. |
Prior Program Name | Up to 50 characters. Not required. If the major or minor had a previous name, this may be required for state reporting in some states. |
CTE Perkins Program | This checkbox is unselected by default. Select it if this program receives federal funding through the Career and Technical Education (Perkins Act) program. |
Program Category | Select from the drop-down. Not required. The options in the list come from Desktop in the Maintain Table Values window, Column Name prog_category (Program Category on Courses, Major, Certifications). In the database, it's stored in the Table Detail table (table_detail). |
Degree Code | Select from the drop-down. Not required. The options in the list come from the Degree Definitions page. |
TEACH Grant Eligible | This checkbox is unselected by default. Select it if the program is eligible for TEACH grant funding. See the "Teach Grant" topic in Desktop help for more information. |
Institutional Division | Select from the drop-down. Not required. The options in the list come from the Institutional Division Definitions page. |
Gainful Employment | This checkbox is unselected by default. The Gainful Employment report is not currently required by the federal government, but if your school tracks gainful employment for its own purposes, you can select this to mark the program for tracking. |
Medical / Dental / Internship / Residency | This checkbox is unselected by default. It's intended for Gainful Employment reporting, which is not currently required by the federal government. But you can select it if your school tracks gainful employment for its own purposes. |
Part of Teacher Prep Program | This checkbox is unselected by default. Select it if you want to designate the major or minor as part of a teacher education program. |
IDD Support Program | This checkbox is unselected by default. It's used for Texas state reporting (CBM0C1) and indicates majors and minors for students with intellectual and developmental disabilities. |
Ministry Related | This checkbox is unselected by default. You can select it to indicate a major or minor related to religious occupations. |
Alternate CIP | Select from the drop-down. Not required. Select an option if the major or minor has a second CIP code. The options in the list come from the CIP Definitions page. Inactive CIP codes are marked as inactive in the list. |
Permission to manage CBE competency definitions is available in these roles:
Registrar
Registration Module Manager
These are the permissions available:
Can view major / minor definitions
Can create major / minor definitions
Can delete major / minor definitions
Can edit major / minor definitions
From the Registration Administration hub, click Hub options.
Click Manage Definitions, and select Major / Minor Definitions. The Major / Minor Definitions page opens.
To search for specific definitions, enter text in the Search field, and press Enter key. Click the Remove icon
 to remove the search.
To edit the order of definitions, click a row number. The hand icon appears.
Click and drag it to the new location.
Use Ctrl + click or Shift + click to grab several rows at a time.
Click Save. This saves your new order in these ways:
Their order on this page
Their order in drop-downs anywhere users can select from this list of definitions
Their priority order if these definitions are used in calculations or rules where priority matters
To temporarily sort the definitions, click the heading of the column you want to sort on. Click once for ascending order and again for descending order. The definitions are sorted for this viewing of the page, but the next time you view or refresh the page, it will return to its default sorting.
To filter the definitions, select the Filter icon
 on a column heading. Follow the prompts in the filter pop-up, and click OK.
You can edit some of the fields. When you're finished, click the Save button.
To delete a definition:
Right-click the row,
Select Remove row.
Click the Save button.
To create a definition:
Right-click in the grid.
Select either Insert row above or Insert row below.
Fill in all the required fields.
Click the Save button.
The Association column of each row shows the number of majors associated with the definition. Click the Manage associations button in the row. The Manage Associations window for that definition opens.
Note
The Manage associations button is enabled only if the Internal checkbox is selected and the definition is marked as either Minor or Both.
To add an association, enter the name in the Add Associations field. (You can type a partial code or description, and then select from the drop-down.) Enter as many associations as you wish.
To remove an association, click the Remove icon
. The major is not deleted, but only disassociated from this definition.
Select the checkbox for any rows you want to download.
Click Download. The Download to Excel pop-up opens.
Select options for the Excel format and data columns.
Click Download. Your .xlsx or .zip file is saved in the file location that you have set in your browser settings.