Setting Up Facilities for Student Life
Important
Information and features vary according to the roles to which you belong and the permissions associated with those roles. For more information, contact your module manager or your campus support team.
For more information on J1 Web facilities, see the online help for Facilities.
Before Residence Life Admins can designate staff on-call zones or assign student housing, the places and spaces they use must be activated or created. The J1 Web Facilities hub manages your campus facilities. The image below gives you a quick look at the terminology that Facilities uses.
Warning
Places and spaces for your school must be set up before you can use them in Residence Life.

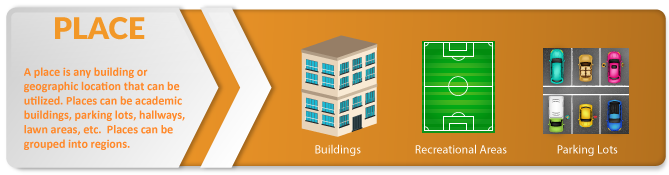
What are Places and Spaces?
Places are defined in J1 Web as any buildings or geographical locations available to your school. Places can be instructional buildings, athletic/recreational facilities, dorms, roadways or walkways, natural areas, agricultural fields, administrative buildings, etc. Places are grouped by regions. They can contain multiple spaces.
Note
Buildings available on the Desktop Building Definition window are also available as places in J1 Web. Any rooms (spaces) associated with those buildings in the Desktop are also available and correlated in J1 Web. Conversely, buildings created in J1 Web can be made available in the Desktop application. When Desktop buildings first appear in Facilities, they have a Place page and are considered Temporarily Inactive, which means they are not available for scheduling. Access the building's Place page to make it Active and available for use as well as to enter additional information.
Tip
We highly recommend that you create an "Offsite" Campus in the Maintain Location Master window in the Desktop application. This will allow your school to create places in J1 Web where your school might hold off-campus events.
 |
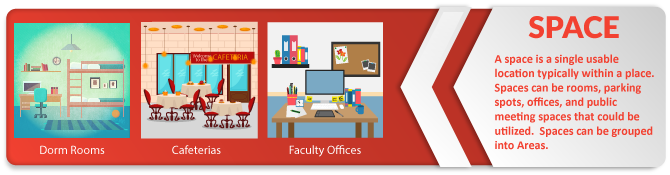
Spaces are defined as rooms, areas, and sections within a larger place. Spaces can be classrooms, meeting rooms, offices, the bookstore, lounges, etc. A space can be further divided into individual sub-spaces (for example, when a large conference room is divided into separate sections). Spaces can be grouped into areas within their place.
Note
Rooms available on the Desktop Room Definition window are also available in J1 Web. Any buildings associated with those rooms in the Desktop application are also available and correlated in J1 Web. When Desktop rooms first appear in Facilities, they have a Space page and are considered Temporarily Inactive, which means they are not available for scheduling. Access the Space page for the room to make it Active and available for use as well as to enter additional information.
 |
Set Up J1 Desktop Spaces and Places in J1 Web
If your facilities were originally set up in J1 Desktop, there are a few steps you must take to set them up as Residence Life spaces in J1 Web. If you need to create new places and spaces, see Create a Place below.
All facilities default to the Temporarily Inactive status when they are first viewed in J1 Web. To set these places to Active:
Log in to J1 Web with a role that has Facilities Management functionality allowed and open the Facilities hub.
Click on View places, from either the Overview block or the Hub options drop-down.
Find and click on the name of the place you want to edit.
Click on View all place details from the Overview block or Review place details from the Place options drop-down.
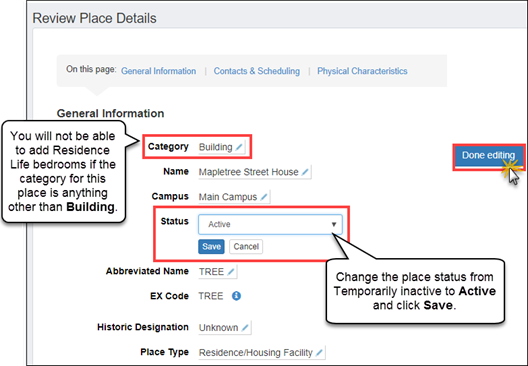
On the Review Place Details page, click the Edit details button, then click the pencil icon next to the following attributes to edit them:
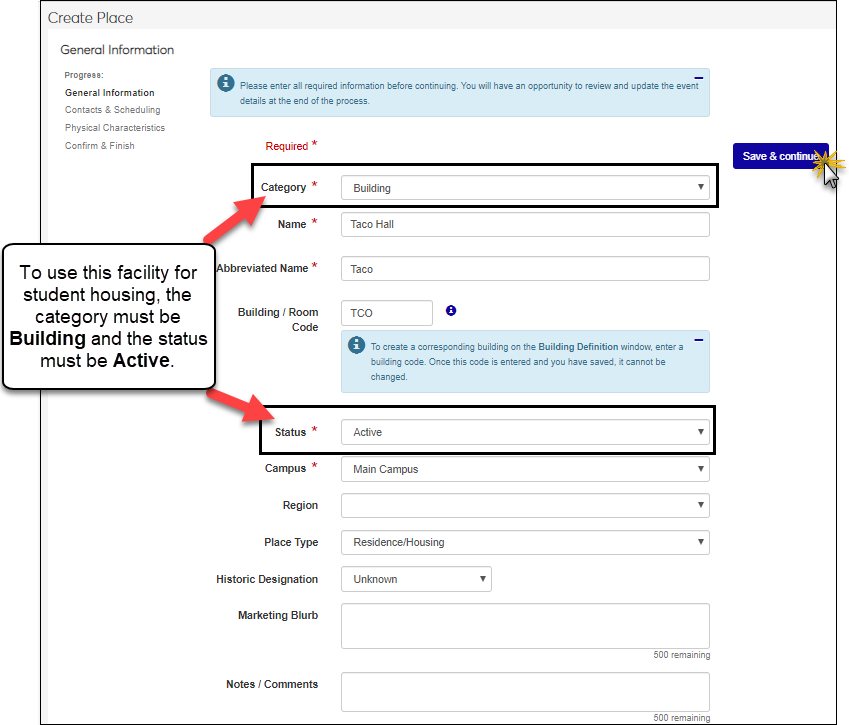
Ensure that Category is set to Building.
Change Status to Active.
Be sure to Save after each edit.
Edit any other fields as appropriate. You can set the Place Type if you like, but this is used for sorting and does not affect how the place can be used.
Click Done editing when you are finished.
Note
At this point, the place (building) has been activated, but the spaces (rooms) still need to be activated. If this building had bedrooms set up in J1 Desktop, the place will have spaces when you view it in J1 Web. Continue with the steps below to activate or add bedrooms, suites, and other residence life spaces for this place.
Log in to J1 Web with a role that has Facilities Management functionality allowed and open the Facilities hub.
Go to the Place summary page for the building.
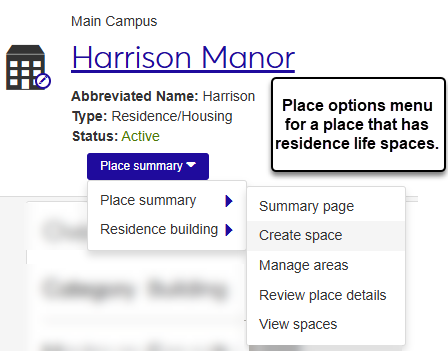
Click on the Place options drop-down menu. Note that when there are one or more residence spaces already in a place, the Place summary menu shows two sections. The Place summary sub-menu shows details about the place or spaces within related to the Facilities hub. The Residence building sub-menu focuses on properties related specifically to Residence Life, such as using this space in a residence suite.
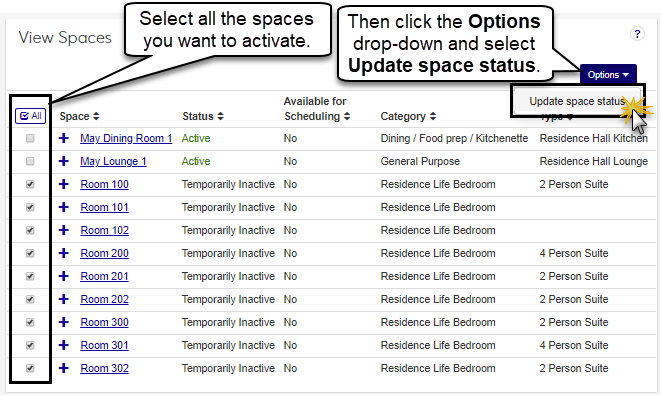
Select View spaces from the Place options menu.
Select all of the spaces you want to activate, then click the Options drop-down menu and select Update space status. The Update Spaces Status pop-up window opens.
Select Active from the drop-down menu and click Update.
The spaces are now active and available to use in residence life suites or for student assignment. This might be a good time to review and edit any of the details for these spaces.
On the Facilities hub, you can create a place either from the Hub options drop-down menu or from the Places block.
From the Facilities hub, click Hub options and select Create place.
From the Facilities hub summary page, click the Select category drop-down menu on the Places block and select the category of the place you'd like to create.
Follow the wizard as it steps you through the rest of the process.
Note
Complete as much information about the place as possible. This allows other users searching for a place to search by a wider range of criteria.
Tip
Enter as many known details as possible. A place may have multiple uses, and the more information known about it, the easier it is for users to determine how it can be used.
Use simple but unique names. Use names that make the space easy to identify for users across campus. If a learning hall has multiple classrooms, enter the room numbers.
In the examples below, a residence bedroom is being created. Because a bedroom has characteristics that differ from those of, for example, a restroom or a classroom, options and steps will vary slightly depending on the category of space you are creating.
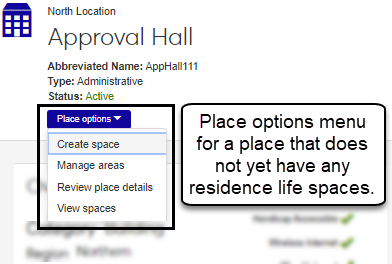
In the Facilities hub, navigate to the Place summary page, click the Place options drop-down, and select Create space. The Create Space wizard opens.
Note
Note that if the place does not yet have any residence spaces set up, the Place options drop-down does not have any sub-menus. If the place does have residence spaces set up, the drop-down is labeled Place summary and has two sub-menus. In this case, to create a new space, select Place summary > Create space.
Create Space Wizard Step One: General Information
In the example below, we'll walk you through the process for creating a bedroom space. Make sure to complete all required fields and add additional information as needed. Required fields are indicated by an asterisk.
Note
The general Information fields vary depending on the type of space being created; the fields for creating a bedroom space will not be the same as those for creating a classroom space.
From the Category drop-down menu, select Residence Life Bedroom.
Tip
Spaces will not be available to assign to residents unless the category is set as Residence Life Bedroom in the Facilities hub. To change this setting, you will need to belong to a role with the Can edit spaces permission enabled.
In the Name field, enter a unique name for the space.
From the Status drop-down menu, select Active.
In the Abbreviated Name field, enter a summarized name for the space.
In the Building/Room Code field, enter a brief unique code to create a corresponding room on the J1 Desktop Room Definition window. This ensures the new space can be used in J1 Desktop.
From the Space Type drop-down menu, select the general classification of the space. For this example, we are setting up a bedroom. If the space is a restroom, designate whether it is available to the public (Public Restroom checkbox) and if it is gender-specific (select from the Space Gender drop-down).
Tip
Residence Life spaces can be set to session-specific gender and smoking restrictions or set to use the default created here.
If needed, enter a brief summary of the space in the Marketing Blurb field. The summary will be available to anyone who can view information about the space in J1 Web and in the Campus Portal.
In the Notes/Comments field, enter any additional information about the space, as necessary.
Click Save & continue. The Contacts & Scheduling page opens.
Create Space Wizard Step Two: Contacts & Scheduling
The Contact Name and Contact Phone fields show contact information for the place. To update the contact name, start typing the name of the person who can be contacted regarding the space and select the name from the list that appears as you type.
Note
Only J1 Web users can be entered as a contact. If a user's name does not appear, verify that they are an active J1 Web user (J1 Desktop Users window) and are assigned to a J1 Web role (J1 Web System Administration).
In the Main Phone field, enter a phone number specifically for the space. For example, a residence bedroom may have a phone number separate from the building's number.
If this space can be reserved for scheduling, select the Available for Scheduling checkbox. In this example, the space cannot be scheduled.
For more information on scheduling options for spaces that can be scheduled, see the Facilities hub online help.
Click Save & continue. The Physical Characteristics page opens.
Create Space Wizard Step Three: Physical Characteristics
The fields and drop-down options on the Physical Characteristics page let you define handicap accessibility, smoking limitations, prohibited items, internet access, and central air conditioning availability.
Note
The Physical Characteristics options available vary according to the type of space being created; for example, spaces such as restrooms do not have audio/visual characteristics.
Complete the fields as necessary for the space you are creating. None of the fields are required, but the more information you include, the better.
When you have finished entering information, click Save & continue. The Create Space details review page opens.
Review Details, Save, and Finish
Review the information you entered for the space.
To update information for any field, click the Edit icon next to the detail you want to update. The field becomes editable.
When you are done editing the field, click Save.
When you are finished reviewing and making any updates, click Save & finish or Save & create another.
If you click Save & finish, the Space page for the newly created space opens. If you click Save & create another, the new space is added to the place, a Space page is created, and the General Information page of the Create Space wizard opens so you can begin the process of adding another space.
In the Facilities hub, go to the Place summary page (or the space summary page).
From the Place summary drop-down menu, select Place summary > Review place details (or Review space details).
Click the Edit details button.
To update a field, click the pencil icon next to the information you want to update to make the field editable.
After you are done editing the field, click the Save button.
When you are finished reviewing and making updates, click Done editing.
Note
A residence life suite combines multiple spaces into one unit. The only space types that can be added to a suite are:
Residence life bedrooms
Dining / Food prep / Kitchenette (designated as a residence life space)
General purpose (designated as a residence life space)
Restrooms / Locker rooms / Showers (designated as a residence life space)
Warning
Before you create a suite, you must create the spaces that will go into the suite. All non-bedroom spaces (dining/restrooms, etc) must have the This is a Residence Life Space checkbox checked.
To begin creating a suite, go to the Place summary page for a building that already has appropriate spaces created (bedrooms, restrooms, kitchens, etc.).
Click the Place summary drop-down menu and select Residence building > Create residence suite. The Create Residence Suite wizard opens.
On the Residence Suite Basics page, enter a Name for the suite, an Abbr. Name (abbreviated), and an optional description. When you are finished, click Save & continue.
On the Residence Spaces in Suite page, select Yes or No from the Smoking Allowed Suite? drop-down menu. If you select No, you can only select non-smoking spaces; if you select Yes, you can only select spaces that allow smoking.
Click in the Select Residence Bedrooms field to see an auto-populated drop-down list of available rooms. Choose one or more bedrooms to add to the suite.
From the Select other residence spaces drop-down menu, first choose the type of space you want to add (for example, a restroom or a kitchen), and then choose from the available drop-down options in the field on the right.
When you are finished, click Save & finish to add the suite. The Suite summary page opens. From here you can add or edit details as needed.