Import Processing Queue
Important
Information and features vary according to the roles to which you belong and the permissions associated with those roles. For more information, contact your module manager or your campus support team.
Note
This feature, introduced in 2024.1, currently supports only admissions-related tables. Additional data imports will be possible as more tables become available in future releases.

The Import Processing Queue page lets you process inbound data. Data can be imported into the system using FormFlow forms and file uploads. You can review incoming data as well as upload and process content.
Importing and processing file data:
At this time only XLS, XLSX, and CSV files can be uploaded.
Must include all the columns defined in the selected template, with column names matching exactly.
Can be used as a source to create People/Organization data sets. These data sets can be leveraged throughout the system to select groups of people for several features including reporting, sending communications, processing, etc.
Processing form data:
At this time only FormFlow forms submitted via the Campus Portal are supported.
Forms are managed from the Campus Portal. For it to be available in J1 Web, the form's Record in ERP setting must be Yes (Campus Portal, FormFlow - Forms, Manage forms, Tools, J1 Mapping Tool).
During processing, the system evaluates and cleans the data as needed. Duplicates, invalid values, and indidivuals without IDs are listed, and you can choose to create new records, update existing entries, or modify the incoming data before completing the import process.
Note
You can only process data that has been associated with a template you have access to. Access is granted using module access codes assigned at the data template level and enabled via role membership.
Note
FormBuilder form data is not supported.
Audit logs allow you to see what data was imported, when, and by whom.
Manual processing is when you upload your .csv, .xls, or .xlsx file to add multiple entries, such as people, communication contacts, invoices, or prospective transfer courses at once.
During the manual upload process, you'll select a data mapping template that defines how imported data maps to specific tables and columns within Jenzabar One. These templates are managed on the Data Mapping Templates page and access to them is controlled by module access codes. This ensures only users with the appropriate permissions can use them and see the data associated with them.
Data can also be automatically imported into the system from forms and scheduled data imports associated with a template that allows automated processing. Any duplicate or invalid data from these automated imports appears on this page, where you can compare existing system data with the imported information and choose to update existing entries, create new records, or modify the incoming data as needed.
Previously, data was imported using separate Desktop tools: the Import Utility window for file imports and Process Internet Submissions window for imports from online forms. The Data Mapping Templates and Import Processing Queue pages replace these features in a centralized J1 Web Data Management hub.
With J1 2024.1, you can continue using the Desktop Import Utility and Process Internet Submissions features but import data will be stored in separate locations in the database.
During the manual and automatic import processes, any potential duplicate or invalid data is flagged. You can then compare the existing data in the system with the imported information and choose to update existing data, create new records, or modify the data being imported.

Capitalization requirements convert incoming data to title case for Name and Address fields that require it.
You can upload data from .xls, .xlsx, and .csv files.
Files being uploaded must include the columns listed in the data mapping template. Not all of this information must be filled in to complete the import process, but the columns must exist in the file.
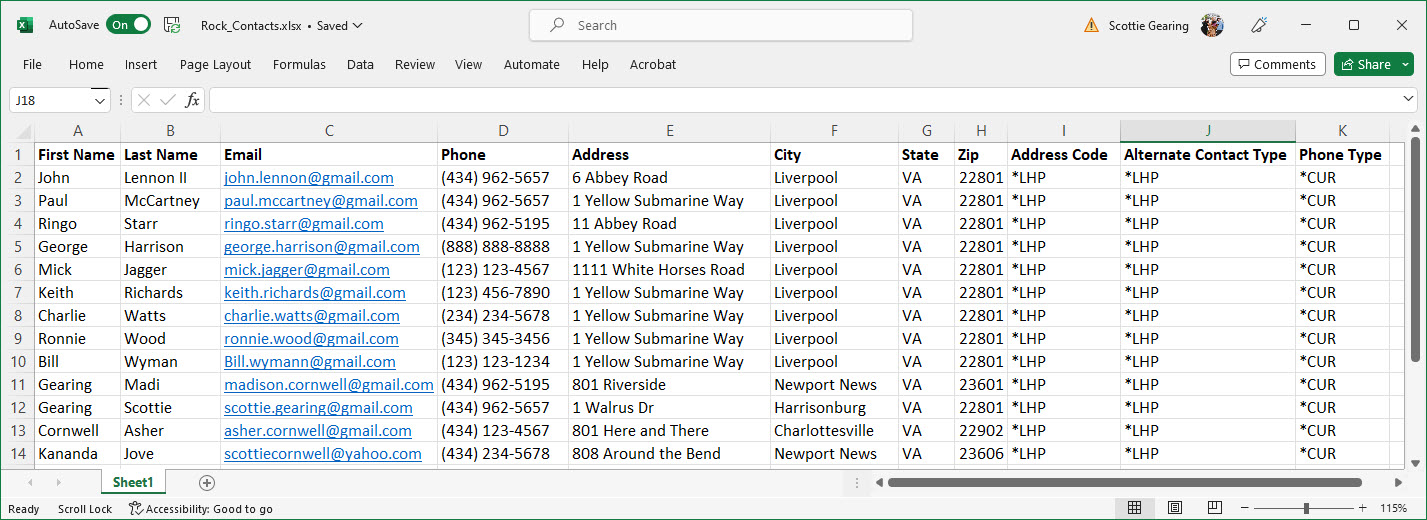
If you are using the Jenzabar-provided "Contact Import" data mapping template to import communication contacts, your file must include the following columns:
First Name
Last Name
Email Address
Phone Number
Phone Type
Address
Address Code
City
State
Zip
Alternate Contact Type
Note
Not all of this information must be filled in to complete the import process, but the columns must exist in the file.
Previously, the Submission and Submission Response tables handled bringing data into the system. The Data Management hub uses a new database architecture to handle inbound data coming into the system via J1 Web. Users who still use the Desktop Import Utility and Process Internet Submissions features can continue to access those tables.
To minimize performance impacts, J1 Web processed data immediately goes into an archive table. Archive details can be viewed from the Audit data option.
To access the Import Processing Queue page, users must belong to a Data Management role with the appropriate Imports permissions enabled.
You can only process data associated with templates you have access to, which is granted by module access codes at both the template and role levels.
If filter options aren’t appearing, click the No filters applied link. You can find pending imports in several ways:
Searching by specific word using the Keyword filter.
Using a filter or combination of filters (e.g., keyword, locked by, source, template, etc.).
Using the column headings to sort by ascending or descending order.
Note
File upload steps may vary slightly according to your operating system and version.
Access the Import Processing Queue page.
Click the Import button. The Import window appears.
Click the Choose file button.
Browse your computer or network to find the appropriate .csv, .xls, or .xlsx file and select it.
From the Data Mapping Template drop-down, select the template that will define how the imported data will map to specific tables and columns within Jenzabar One. //if clients created their own import source for comm contacts pre-24.1, does it have to be recreated?//
Note
The file must include columns in the template. Not all of that information must be filled in to complete the import process, but the columns must exist in the file.
To review existing templates and access options for creating and updating templates, click the Manage Templates link.
For some imports, you'll be asked to select a Source. This source is associated with every person that gets created in the system so you know how they came to be added. For example, if you import an SAT list from the College Board, you can associate "SAT List" with those individuals.
Click the Import button. Data is imported.
Records with invalid or duplicate data are listed for you to review with options for you to update existing records, create new records, or modify the incoming data.
Access the Import Processing Queue page.
Find the file or form data you want to process. Use the filters to help your search.
From the Actions drop-down, select Process.
Records with invalid or duplicate data are listed for you to review with options for you to update existing records, create new records, or modify the incoming data.
When you import and process new data, the system checks for duplicates and lets you choose whether to create a new record, update existing information, or modify the incoming data.
Access the Import Processing Queue page.
From the import queue, find the record you want to resolve.
Note
Select Possible duplicate contact from the search field under Contacts to Import to only show contacts that are potential duplicates.
From the Actions menu, select Process. The Potential Duplicates window appears.
To update existing system information:
Click the Update button. A confirm update window appears. Click Yes and the Potential Duplicates window window appears.
The information included in the import file is shown on the left-hand side of the window. Existing information the system that matches is shown in the Possible Matches section.
Select the match you want to review and update.
Click the Update button. The Update Existing Person window appears.
Compare the existing system information with the information in the import file.
If you want to keep existing information, select the option in the Existing Information column. If you want to update the information, select the option in the New Imported Information column.
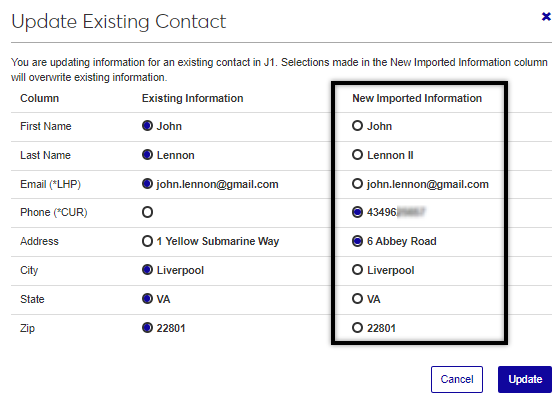
Click the Update button. Information in the system is updated.
To create a new record, click the Create a new external person button. The contact's status is updated to Create new allowing the contact to be imported into the system as a unique record.
Yes, Desktop data processing will be supported until the Desktop processing functionality is discontinued.
No, data imported into J1 Web via the import processing queue is only available in J1 Web.
There are several reasons why you might not be able to process data:
Verify you belong to a Data Management role with appropriate import permissions enabled.
Ensure you belong to a role with the module access code permissions enabled.
Check for a lock icon in the row you are trying to process. The lock icon indicates that another user is processing the data, locking the row to prevent multiple imports of the same data.
No, multiple users can process multiple imports at the same time. When a user goes to process a row, it is locked to other users to prevent duplicate efforts.