Attendance Report Definitions
Important
Information and features vary according to the roles to which you belong and the permissions associated with those roles. For more information, contact your module manager or your campus support team.
Use this page to view, edit, create, download, and delete attendance report types for faculty to use on the Course Roster page.
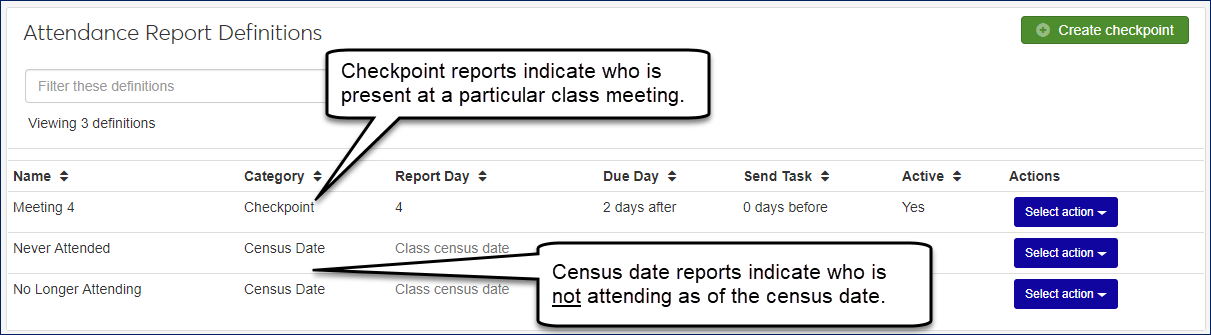
There are two categories of attendance reporting, Checkpoint and Census Date.
Checkpoint reports allow faculty to report who is present for specified class meetings, such as the 1st meeting or the 5th. Registrars can define as many checkpoint report types as you need.
The Census Date category tells who is not attending as of the census date. Census Date reports are defined by default, and there are two types. One type reports those who have never attended, and another type who is no longer attending.
Clicking the Create definitions button opens the Create Checkpoint pop-up. Here you define a checkpoint by its Report Day—a day faculty take attendance. You also select the day that faculty must send in their report and the day you want a task sent to the faculty.
Tip
The button and the pop-up it launches are labeled 'Create Checkpoint' by default, but you can edit the label on the Registration Settings page. Then the button and the page will reflect your edit.
The Report Day is the class meeting being reported. Select '1' for a report on the first class meeting, or '8' for the eighth class meeting.
The Due Day is the number of calendar days after the Report Day that the report is due. Select '3 days after' if you need faculty to submit by the third day after the Report Day. (In this example, if the Report Day is September 1, then the Due Day is September 4.)
The Send To Do day is the day you want faculty to receive the task to take attendance and submit the report. Select '2 days before' to have the task arrive two days before the Report Day.
You can edit existing report definitions, and you can delete checkpoints.
The settings for Attendance Reporting are on the General Settings page.
You can't create Census Date definitions. Jenzabar provides two: No Longer Attending and Never Attended.
On the Registration Administration hub, click Hub options, and select Manage attendance report definitions. The Attendance Report Definitions window opens.
Click the Create definitions button. The Create Attendance Report Definition pop-up opens.
For a Code, we recommend something like "5th Meeting" or "Day 2".
Enter the Report Day; that is, the day attendance will be taken. It should match the Name.
Select the Due Day and the Send To To day.
Set Active to Yes unless you have a reason to make it inactive.
Click Create and close. The new definition appears in the list.
You can't delete Census Date definitions.
Select the checkbox for one or more checkpoint definitions.
Click the Options drop-down, and select Delete. A prompt asks you to confirm.
Click Yes, delete.
On the row for a definitions, click the Edit icon
 . The Edit Attendance Report Definition pop-up opens.
Make your edits. You can edit the following fields:
Code (such as No Longer Attending or Never Attended for Census Date definitions, or CP1 and CP2 for Checkpoints. You can edit the code even for the Census Date definitions provided by Jenzabar.)
Due Day (select from the drop-down)
Send To Do (select from the drop-down)
Active (click to change between Yes and No)
Click Update.
Select the checkboxes next to the rows you want to export.
From the Options drop-down, select Download to Excel. The Download to Excel pop-up opens.
Select options for the Excel format and data columns.
Click Download. Your .xlsx or .zip file is saved in the file location that you have set in your browser settings.
You can't delete Census Date report definitions because they're provided by default. However, you can deactivate them on the Registration General Settings page.
You can delete Checkpoint report definitions if no one has submitted that kind of report yet.