Create a Meeting
The Create Meeting page allows you to enter meetings details for general and advising meetings. Depending on user roles and permissions, one or both meeting categories are available.
Tip
You can create an advising meeting from the calendar center, but it is also convenient to create advising meetings directly from the advising calendar. Advising meetings created from the advising calendar cannot be changed to general meetings.
General Meetings
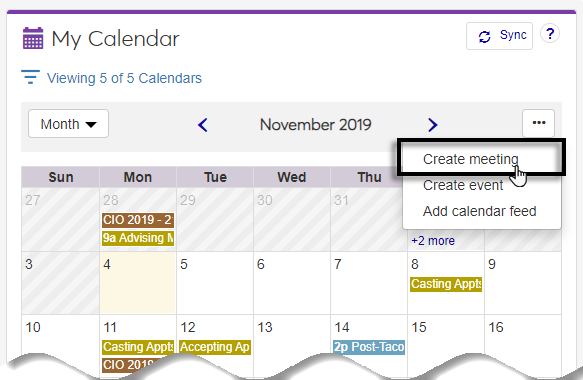
The Create Meeting page for general meetings is accessed from the calendar by selecting Create meeting from the drop-down or from the Browse Locations page after a location, date, and time are selected and saved. When the page opens, the following fields are available.
Subject. This is a descriptive name for your meeting.
Category. The default category is general. You can change this to an advising meeting if you have the appropriate permissions, but the selected location is removed when the category changes.
Requester. The requester information auto-populates when you create the meeting.
Description. This is an optional field where you can add useful meeting details.
Location / Date / Time. These details are passed in from the Browse Locations page and can be updated by clicking the edit link.
After the required fields are filled in for a General Meeting, click Create meeting and one of the following actions occurs.
If the location does not require scheduling approval and there is no other conflict, the meeting is scheduled.
If the location requires approval, an approval To Do is sent to the location scheduling approver. If approved, you’ll receive a location approved message and the meeting is scheduled. If denied, you’ll receive a location denied message. You can edit the meeting and resubmit it for approval.
If the location requires approval and you are the location approver and there is no other conflict, the meeting is scheduled.
Advising Meetings
Advising meetings can be scheduled from the advising calendar, the calendar center and other calendars, and the Browse Locations page. The process for creating advising meetings is unique for each situation and is available for users with permissions to create an advising meeting.
Most advising meetings will be created from the advising calendar. Selecting the Create advising meeting drop-down option or clicking a time slot on the calendar opens the Create meeting screen with the following fields.
Subject. This field is set to Advising meeting and cannot be edited.
Category. The default category is Advising meeting and cannot be edited.
Requester. The requester information auto-populates when you create the meeting.
Attending Advisee. The name of the advisee that will be invited to the meeting.
Description. This is an optional field where you can add useful meeting details.
Location. The location defaults to the requester’s office. If an office location is not assigned, or if the meeting needs to happen in another location, choose a location that cannot be scheduled for another meeting (e.g., a coffee shop or the common area of an academic building).
Note
Advising meetings do not occur in schedulable locations, so they do not go through the location approval process.
Date. The meeting date. This information will be populated if you select a time slot on the advising calendar.
Time. Start and end times or select the All Day checkbox. This information will be populated if you select a time slot on the advising calendar.
After the required fields are filled in, click Create advising meeting to schedule your advising meeting.
You can create advising meetings from other J1 Web calendars. Selecting the Create meeting option from the drop-down opens the Create Meeting wizard. The first page is the Meeting Basics.
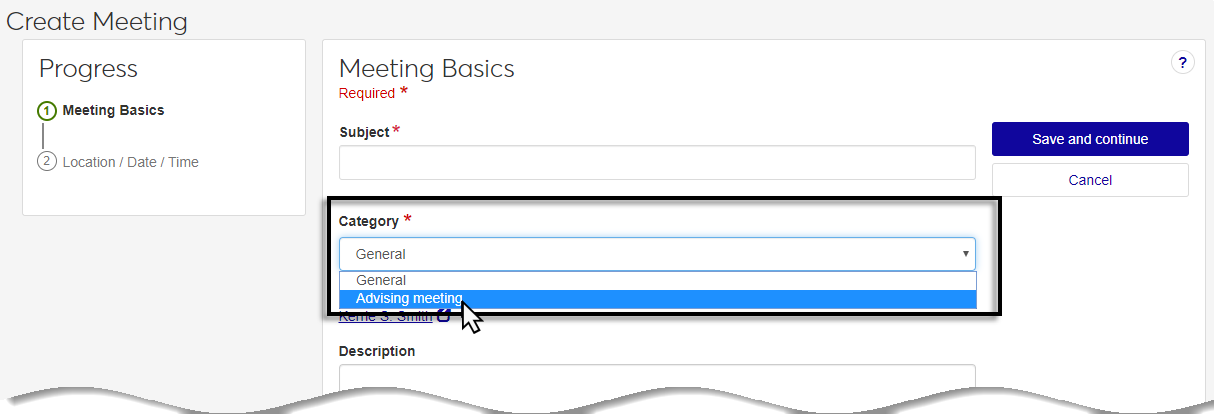
When you change the category to Advising meeting, the following fields are available.
Subject. This field is set to Advising meeting and cannot be edited.
Category. The category has been set to Advising meeting and can be switched back to General until the meeting has been saved.
Note
Changing the category to General allows you to edit the Subject.
Requester. The requester information auto-populates when you create the meeting.
Attending Advisee. The name of the advisee that will be invited to the meeting.
Description. This is an optional field where you can add useful meeting details.
Tip
You can also create a meeting by clicking the green plus for a time slot in the calendar. This action takes you to the Browse Locations page to create the meeting.
After saving the meeting basics, the Location / Date / Time page opens with the following fields for input.
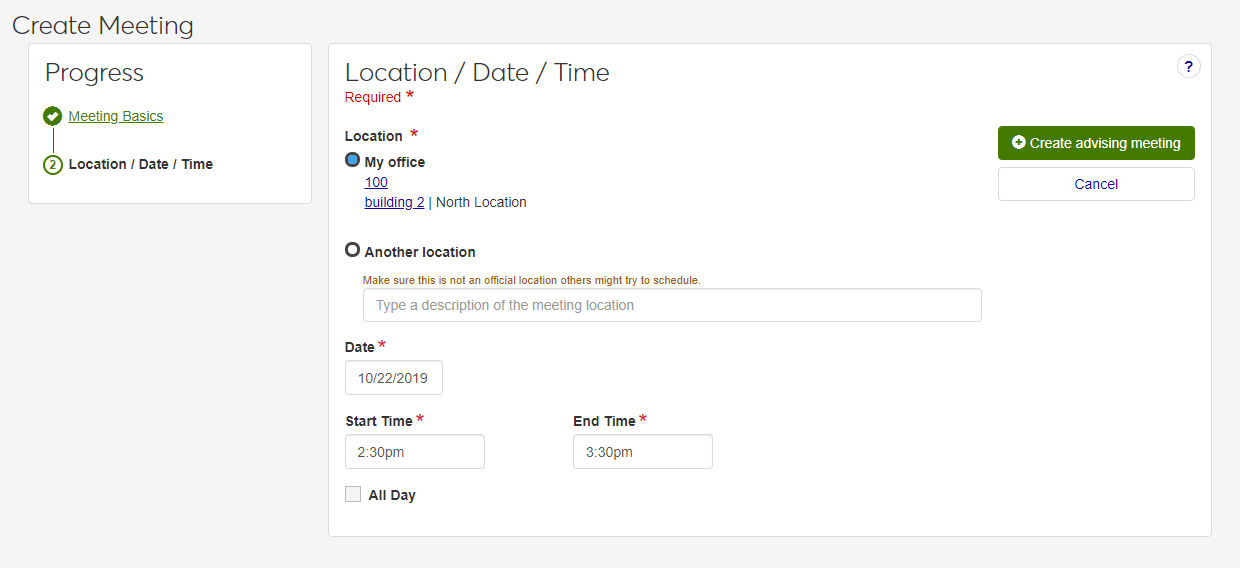
Location. The location defaults to the requester’s office. If an office location is not assigned, or if the meeting needs to happen in another location, choose a location that cannot be scheduled for another meeting (e.g., a coffee shop or the common area of an academic building).
Note
Advising meetings do not occur in schedulable locations, so they do not go through the location approval process.
Date. The meeting date.
Start Time. The meeting start time.
End Time. The meeting end time.
All Day checkbox. This can be used to give the meeting an all-day duration. Selecting this option removes the edit functionality for the start and end time.
Advising meetings can also be created from the Browse Locations page with the appropriate permissions. When you click the plus sign in a time slot from a non-advising calendar, the Browse Locations page opens to create the meeting. After location, date, and time information is saved, the Create Meeting page opens.
When you change the Category to Advising meeting, a warning that the selected location will be cleared opens. After confirming the warning prompt, the Create meeting page updates to include the following fields.
Subject. This field is set to Advising meeting and cannot be edited.
Category. The category has been set to Advising meeting and can be switched back to General until the meeting has been saved.
Note
Changing the category to General allows you to edit the Subject.
Requester. The requester information auto-populates when you create the meeting.
Attending Advisee. The name of the advisee that will be invited to the meeting.
Description. This is an optional field where you can add useful meeting details.
Location. The location defaults to the requester’s office. If an office location is not assigned, or if the meeting needs to happen in another location, choose a location that cannot be scheduled for another meeting (e.g., a coffee shop or the common area of an academic building).
Note
Advising meetings do not occur in schedulable locations, so they do not go through the location approval process.
Date. The meeting date. This information will be populated from the selection made on the Browse Locations page, but can be edited.
Time. Start and end times or select the All Day checkbox. This information will be populated from the selection made on the Browse Locations page, but can be edited.
Important
Create meeting options vary based on user roles and permissions. If you only have Create Meeting permissions, the create meeting option defaults from Browse Locations. If you have Create Meeting and Create Event permissions, you will see options to create both on the Browse Locations page.

Note
General is the default Category. You can change the category to Advising meeting, but the space/place location information will be cleared and replaced with the requester's office as the default location.
Select Create meeting from the calendar drop-down or by clicking a timeslot in the calendar.
Enter the required Subject and optional Description on the Meeting basics page.
Click Save and continue.
Select a Location from the Selected Location field or with the Locations filter.
Choose the date and time from the location's calendar or from the Selected Location/Date & Time section.
Enter the Start and End Date/Time or select the All Day checkbox
Select Save to close the Date and Time pop-up.
Click Create meeting.
Note
If you chose a meeting location that requires scheduling approval before it is reserved:
Your meeting request is sent to the facilities administrator responsible for approving scheduling requests. After it is approved, the meeting is scheduled and the location reserved. If your request is denied, you'll receive a notification message, and you can update your meeting information for another day/time/location.
Until your location is approved, the meeting is not scheduled and appears on your calendar as Awaiting Location Approval.
If you are in a facilities administrator role with calendar administrator privileges, your meeting is automatically approved.
See the Facilities Help for more information about location approval.
Select the location in the Selected Location field or with the Locations filter.
Select the date and time by editing the Selected Date / Time or by selecting a time slot on the location calendar.
Click Save and continue to open the Create Meeting page.
Change the Category to Advising meeting and click Proceed in the warning pop-up.
Note
When the Create meeting page updates with the new category, the Subject defaults to Advising meeting and cannot be edited.
Enter the required Attending Advisee name and an optional Description.
Update the Location, if needed. The location defaults to the requester’s office. If an office location is not assigned, or if the meeting needs to happen in another location, choose a location that cannot be scheduled for another meeting (e.g., a coffee shop or the common area of an academic building).
Enter Date and Time details.
Click Create advising meeting.

You can make changes to the time or location for meetings you have created.
You can only update meetings you created unless you are in a role with permission to update other users' meetings.