Housing Process Definition Tab
Important
Information and features vary according to the roles to which you belong and the permissions associated with those roles. For more information, contact your module manager or your campus support team.
You can reach the Housing Process Definition tab from the Applicant Group summary page; from the Applicant group options drop-down, select Manage housing application and assignment. This tab is where you can enter information from the housing application, roommate request, and room selection features that you set up in your campus portal. For more information on setting up these features in campus portal, see Setting up student housing.
Note
Note that all of the information on this page is relevant to this applicant group only. You will need to repeat these steps for each applicant group.
Housing Process Steps
If you are using the FormFlow housing application in the campus portal for this applicant group, complete the following steps:
Click the pencil icon to edit the housing application information. The Process Step 1: Housing Application pop-up opens.
Enter the URL for the application form in the J1 FormFlow Form Link field. This field is required.
Click Update.
If you are using the Roommate Request feature in the campus portal for this applicant group, complete the following steps:
Click pencil icon to edit the roommate request information.
Select Yes in the Use Roommate Request Feature field.
Choose whether or not to auto-publish lottery numbers to students. If yes, you'll be asked for the date and time you want them to auto-publish.
Note
Keep in mind that lottery numbers cannot be changed once they have been published to students. If you plan to reorder lottery numbers (based on seniority or GPA, for example) then you may not want to auto-publish, or if you do, set the date for after you plan to reassign lottery numbers.
Enter the URL for the campus portal roommate request feature.
Set start date and time (required).
Set end date and time (optional; will default to end of session if not specified).
Click Update.
If you are using the Room Selection feature in the campus portal for this applicant group, complete the following steps:
Click pencil icon to edit the room selection information.
Select Yes in the Use Room Selection Feature field.
Choose whether or not to auto-publish time slots to students. If yes, you'll be asked for the date and time you want them to auto-publish.
Note
Keep in mind that time slots cannot be changed once they have been published to students. If you plan to change time slots then you may not want to auto-publish, or if you do, set the date for after you plan to work with the time slots.
Enter the URL for the campus portal room selection feature.
Set start date and time (required).
Set end date and time (optional; will default to end of session if not specified).
Click Update.
Students will submit this form to be included in the housing process. You will use FormFlow - Forms to modify an existing housing application template.
Note
Note that you will need to create a separate housing application for every applicant group in a session. Each housing application is linked to a specific applicant group.
Log in to Campus Portal as an Administrator.
If you want, add a page and/or tab where Student Housing portlets will be located.
Using the Global Portlet Operations site setting, ensure that appropriate settings are set to allow students to access FormFlow - Forms.
Use the page options to Add a new feature to this page.
Under General Purpose features, add FormFlow - Forms.
Return to the default page where the FormFlow portlet has now been added and click Manage Forms.
Click the link to Add form.
Select housing application as the template for the new form.
Click Create.
Next, you will customize the application for your school, assign it to the appropriate group of applicants, and ensure that payment information is set up. Be sure to review the form carefully and remove admin instructional sections that you do not want to students to see.
Note
Note that you will need to create a separate form for each Applicant Group.
Warning
Before publishing, be sure to add the Applicant Group ID and, if you want to accept payments with the application, set up the Payment Profile information, as well.
Set the Applicant Group ID
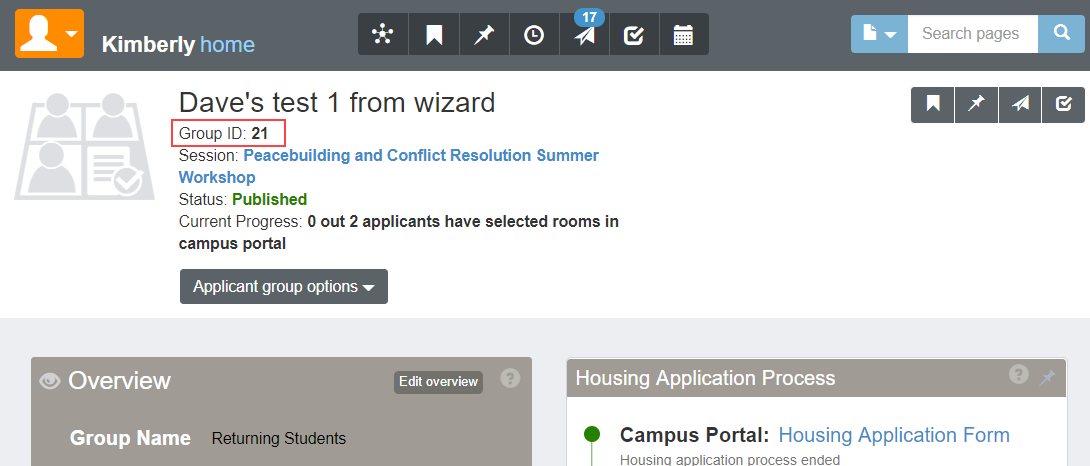
You will find the Group ID number on the Applicant Group summary page in J1 Web.
On the first page of the Housing Application, on the bottom left, right-click on the bottom of the Instruction page on your form and select Properties.
Go to the Settings tab.
In the Default Value field, replace default text with the Applicant Group ID.
Click Save Changes.
Set Start and End Dates for this Form
Within the Application form, click Form Settings.
Click the Settings tab.
In the Display on field, enter the time and date that you first want this form to be available to students.
Warning
The Display on date must be later than today's date. This will be validated in J1 Web, and you will not be able to publish the form if it is not later than today's date.
In the End on field, enter the time and date when you want this form to no longer be available to students.
Click Save settings.
Set Payment Profile (optional)
Tip
You only need to set the payment profile if you would like to collect an application fee or deposit at the time of form submission. Either way, you will need to edit the text of the form to change the application fee amount, or remove the reference to the fee.
Open the Housing Application form and click on the Tools drop-down.
Select Payment Profiles.
Click the Edit icon.
Complete the fields:
The Description can be changed to anything you would like the fee to be called.
The transaction code comes from your business department to ensure that the transaction is coded correctly.
The default fee is the amount that will be collected.
The email address should belong to the person who will contact the student when a payment does not go through, usually the housing manager or other staff member.
Click Save Profile.
Click Done.
Edit the Housing Application Fee
Go to the last page of the Housing Application form, Application Fee & Finish.
Edit or remove the form text to accurately reflect the fee associated with this application.
Right-click on the text and select properties.
Edit the text in the text field, if necessary.
Click Save changes.
Set Access Control for This Form
Tip
Setting access control for the form ensures that only students in a particular applicant group for this session will be able to access this form. This step is not required but is considered best practice to avoid allowing students to apply for housing (and possibly pay application fees) for sessions they are not a part of.
Create the Access Control List for the group that should have access to the form.
From the housing application form portlet, select Manage Forms and then click the Site Administrators link.
Click Data Sources.
Click the plus icon to add a new query.
Tip
Note that this process shows you how to create a query from scratch, but for future queries, it will be easier to copy and paste the Datasource query text from an existing Data source and just modify the group ID.
Type a name for your Access Control List in the Name field. Make sure it will let you know which applicant group ID it applies to. Example: Housing Applicant Group 80
Select the appropriate database in the Use Database field (in our example, it is EX).
Make sure Is Access Control List is checked.
Type (or paste) the following into the DataSource Query field:
select distinct nm.ID_NUM from SAApplicantGroupStudent ags
join Person p on (ags.StudentPartyAppID = p.AppID)
join NAME_MASTER nm on (p.NameMasterAppID = nm.APPID) where ags.saapplicantgroupappid = 80
Edit the last two characters, the applicant group ID, and change to the applicant group ID for the group that should have access to this form.
Next, you need to limit access to the form to only the Access Control List that you just created:
Open the housing application form and click Form Settings on the blue toolbar at the top of the form.
Select the Access/Security tab.
In the Limit access to field, find and select the new access control list that you created in the step above.
Click Save settings.
Customize the Form Fields as Needed
Review the form carefully, beginning on the first page, and remove any "admin instructions" that you don't want students to see.
Add or edit any form questions, and map fields appropriately. Instructions on using FormFlow can be found in the Help.
Copy Form URL into J1 Web
Copy the URL for the published form and paste into the Housing Process Definition tab for this Applicant Group in J1 Web.
Tip
If you have updated the form start/end date and time, the changes will automatically populate in J1 Web after you update the form link.
Students will use the Roommate Request feature to send, accept, or decline roommate requests.
Note
You will not be able to paste the link into J1 Web until after you have created your applicant group (in another step of this process). If you have not done that yet, you may find it easiest to paste the links you will need for that process (housing application form, roommate request portlet, and room selection portlet) into a document, so that you will have all of your links handy when you need them in J1 Web. Another option is to have two tabs open in your browser, one logged in to Campus Portal, the other logged in to J1 Web.
Add Roommate Request Feature to Campus Portal
Log into Campus Portal as an admin user.
On the page where you want to add the Roommate Request feature, click on the wrench icon and select Options
Click Add a new feature to this page.
Under the Students section, click Roommate Request.
The feature is now added to the page.
Copy the link address for the Roommate Request portlet and save it. You will paste this URL into the appropriate field under Roommate Request in the Applicant Group Housing Process Definition tab in J1 Web.
After roommate groups are established, students will use the Room Selection feature to choose a room or suite out of available options.
Note
You will not be able to paste the link into J1 Web until after you have created your applicant group (in another step of this process). If you have not done that yet, you may find it easiest to paste the links you will need for that process (housing application form, roommate request portlet, and room selection portlet) into a document, so that you will have all of your links handy when you need them in J1 Web. Another option is to have two tabs open in your browser, one logged in to Campus Portal, the other logged in to J1 Web.
Add Room Selection Feature to Campus Portal
Log into Campus Portal as an admin user.
On the page where you want to add the Room Selection feature, click on the wrench icon and select Options.
Click Add a new feature to this page.
Under the Students section, click Room Selection.
The feature is now added to the page.
Copy the link address for the Roommate Request portlet and save it. You will paste this URL into the appropriate field under Roommate Request in the Applicant Group Housing Process Definition tab in J1 Web.
On the Housing Process Definition tab of the applicant group's Manage housing application and assignment page, click the pencil icon beside the feature you want to turn on.
Add appropriate details for the feature. Note that all required fields must be completed in order to turn the feature on.
Click Update.
Lottery numbers are automatically assigned when a housing application is submitted for a student, either by the student in Campus Portal or by an administrator on the Lottery Number Assignment tab.
On the Applicant Group Roster page, select Swap with another resident from the Actions drop-down for the student. The Update Bedroom Assignment pop-up opens.
Swap with another resident is automatically selected in the Room Change field.
Click In the Select a Resident / Room Slot field and begin typing the name of the student you want to swap with. Select the correct name when it appears.
If needed, select a reason for the change or enter a comment.
If you want an email to be sent to the residents affected, select the email notification checkbox at the bottom of the window.
Click Update to save the changes and close the window.
Click the Email students button and select the Email all students option. The Create New Communication window appears.
Enter your message details, include any needed attachments, and click Send. Students will receive an individual copy of the email.
The housing application feature allows you to create and customize a FormFlow form for students to apply for housing. This form has powerful customization capabilities. It can be set up to collect any information you need from students, allow students to acknowledge policies and rules, and even collect application fees. The housing application is specific to one applicant group, but you can create a copy of it to be used with other applicant groups.If you decide not to use the housing application, you will need to manually submit an application for each student in the applicant group, providing some basic information about each one. This can be done on the Lottery Number Assignment tab, on the Manage Housing Application and Assignments page.
The roommate request feature allows students to request other students to join roommate groups. When one person in the roommate group selects (or is assigned) a room, all of the students in that roommate group are assigned to that room.If you decide not to use the roommate request feature, roommates will be determined by whoever selects or is assigned to the same room.
The Room Selection feature allows students to choose a room assignment from the available rooms in the Campus Portal. If you decide not to use the room selection feature, you will need to manually update each student's room assignment..
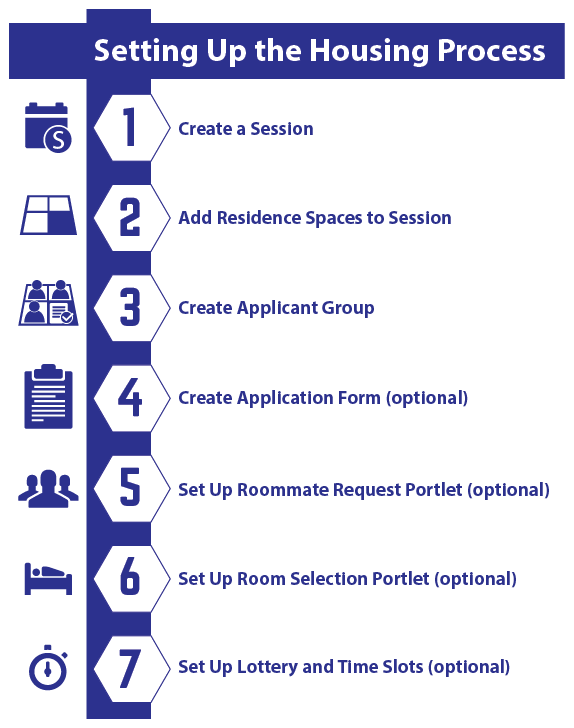
Below is diagram of a typical Residence Life Admin workflow. Although some steps may be performed or completed in a different sequence, the first step is usually to create a session.
Yes! This is simple but requires some extra setup.
On the Session summary page, click the Residence Spaces link on the Housing Application block to open the Manage Residence Spaces page. From here you can set the applicant group for the group you want to make this space available for.
If you are only going to change a small number of spaces, you can click on the plus sign beside the row to expand the details for that space and click the pencil icon next to Applicant Group to make it editable. Select a new Applicant Group and click Save.
If you have a larger number of spaces to change:
Select the checkbox beside each row you want to include.
Select Edit space details from the Options drop-down. The Edit Space Details pop-up opens.
Select Applicant Group Restriction from the Select a Detail to Update drop-down.
Click in the adjacent field and select the applicant group you want the spaces to be limited to. Now only applicants in the group you chose will be able to select these spaces.
Note that you can add multiple applicant groups. For example, if rooms are only available for juniors and seniors, enter those two applicant groups in the residence space details.
Keep in mind that adding the applicant group for certain spaces limits those spaces, but not others. For example, if you have a group of rooms where you want freshmen to be assigned, you will need to assign those spaces to the freshman applicant group (only freshmen can select them), AND assign any other spaces that freshmen are eligible to choose.