Manage Advisors
Use this page to supervise advisors and their advisees.
The Add person to advisor role button launches the Academic Advising Roles page in a new tab. From there, you can edit a role to add users.
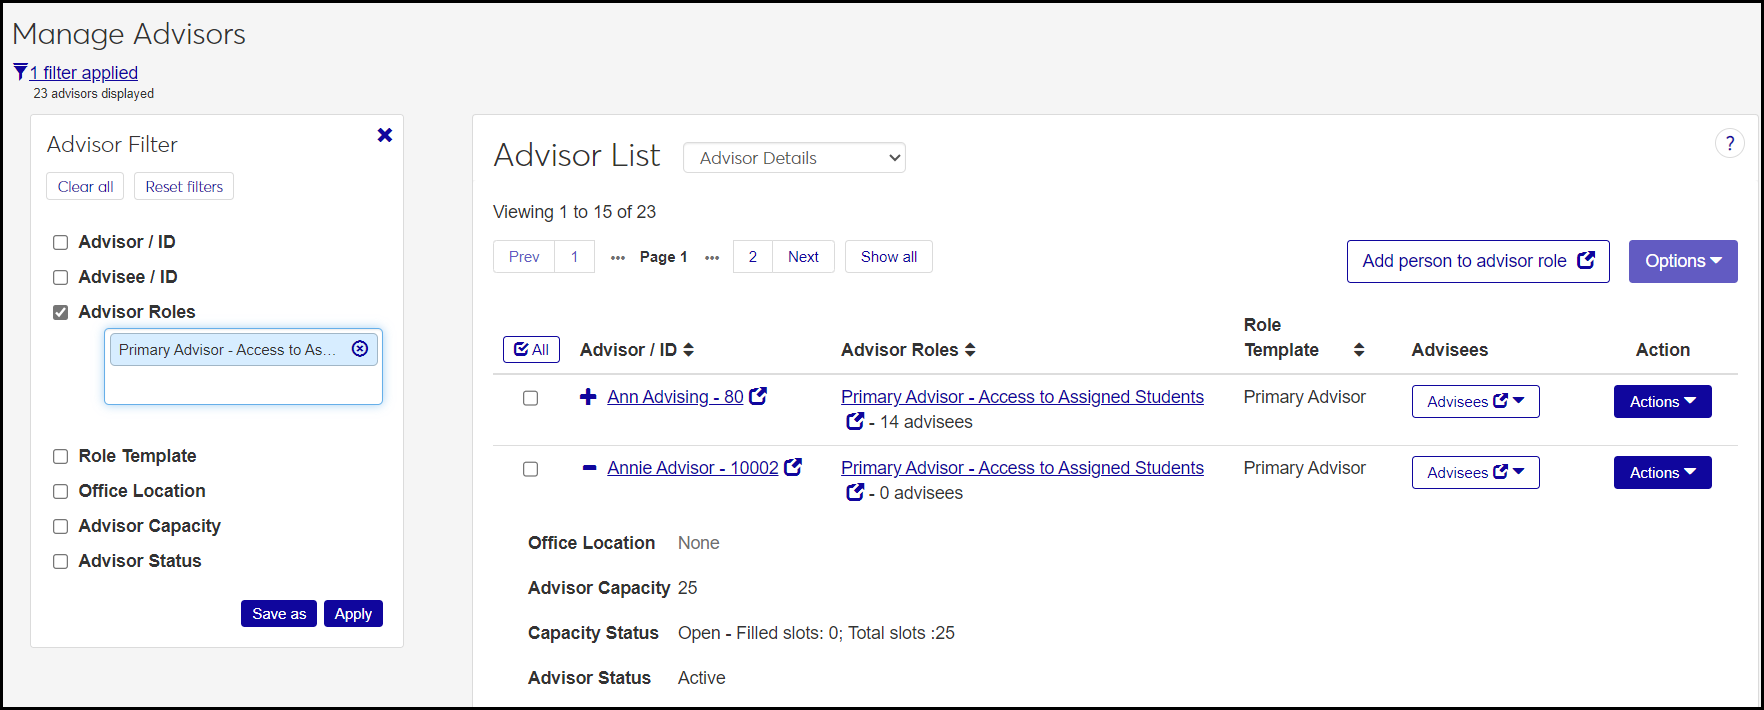
Advisor / ID: The name and ID are link to the advisor's summary page.
Advising Role: The advisor's primary and secondary advisor roles are listed, and each listing is a link to view and edit the role's permissions.
Capacity Status: Values are Open, Full, or Over capacity.
Slots: The number of advisees the advisor can have. Displays only for primary advisors. Integers 0–9999. Same number as in the Advising Capacity field.
Filled: The number of advisees assigned to the advisor.
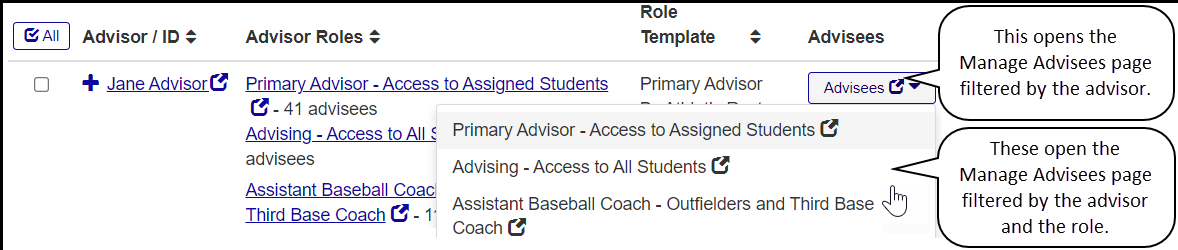
Advisees: This column is a list of links to the Manage Advisees page filtered according to this advisor and their roles. If you click Advisees, the Manage Advisees page opens filtered just by that advisor. If you click a role, the page opens filtered by the advisor and that role.
Advising Capacity: The number of advisees the advisor can have. Displays only for primary advisors. Integers 0–9999. Same number as in the Slots field.
Advisor Sets: The advisor sets the advisor is assigned to. You can add an advisor to a set using the Options drop-down. Advisor sets are managed on the Automated Advisor Assignments page.
Advisor Status: Active or Inactive. Displays only for primary advisors.
Tip
This is the advisor's status as an advisor. It's different from the advisor's Advising Relationship with each advisee.
Office Location: The advisor's office can be a link to place or space summary page.
Role Template: Each role's template is listed. This is especially useful for copied roles (rather than default roles), to help you use the filters to find advisors of a similar kind.
The Actions button appears on each advisor's row, allowing you to do the following for that advisor:
Edit Roles: Click this to pop open the Advisor Roles list for this advisor. You can add or remove roles. You can also jump to the role's Edit page where you can view and edit the role's permissions, users, and module access.
Send communication: The Create New Communication pop-up opens to guide you through creating and sending the communication.
View and edit advisees: Click this to pop open the Advisee List for this advisor. You can change the Advising Relationship to Active or Inactive. You can send communications to one or multiple advisees, and you can remove advisees from the advisor.
Call: Phones the advisor if the phone number is available and if calling is available from your device.
The Options button operates on all advisors whose checkboxes you select. These are the options:
Add to advisor set: Add the selected advisors to an advisor set. The Add to Advisor Set pop-up opens to let you select the advisor set to add them to.
Note
Only primary advisors can be added to an advisor set, so you must select at least one primary advisor. Secondary advisors aren't added to the list of selected advisors.
Tip
Manage advisor sets on the Automated Advisor Assignments page.
Download to Excel: Download the Advisor information to a Microsoft Excel spreadsheet.
Edit advisor settings: Change the Advising Capacity and the Advisor Status of the selected advisors. If some settings aren't available for some advisors, a message informs you of which advisors' settings will be updated and which won't. (Example: If you selected some secondary advisors, they won't be updated because secondary advisors don't have settings.)
Send communication: The Create New Communication pop-up opens to guide you through creating and sending the communication to the selected advisors.
Advisor / ID: NameMaster.first_name, NameMaster.last_name, NameMaster.id_num
Advisor Roles: advisor_stud_table
Office Location: advisor_master.
office_loc_cde
office_bldg_cde
office_room_cde
Advisor Capacity: advisor_master
Advisor Status: advisor_master.advisor_sts
Some of these features are available in Desktop on the Maintain Advisors window.
The permission needed for the Manage Advisors page is "Can manage advisors". It's available in the Academic Advising Module Manager role or roles copied from it.
From the Advising Administration hub, click Hub options.
Select Advisors and Advising Setup > Manage Advisors. The Manage Advisors page opens.
Click an advisor's name or ID to open their summary page.
Click the advisor's roles to view and edit their roles and permissions.
On an advisor's row, click Advisees to open the Manage Advisees page filtered to the advisor. In the Advisees drop-down, click any of the advisor's roles to open the Manage Advisees page filtered to the advisor and that role.
Click the Expand
 icon to see all the fields for an advisor.
On an advisor's row, click the Actions button.
Click Edit roles. The Advisor Roles pop-up opens.
To remove a role from the advisor, click the Remove icon
 . Click the Update button.
To edit a role's permissions, users, or module access, click the role's name. The Edit Role page opens.
Tip
Anywhere you see a role's name, it's a link to the Edit page for that role.
To add a role to the advisor, paste or begin typing a role's name in the Advisor Roles field. Select the role from the resulting list. Click the Update button.
Click the Add person to advisor role button. The Academic Advising Roles page opens.
On a role's row, click the Options drop-down, and select Edit.
Click the Users tab.
Click the Add to Role button.
In the Search Users by Name field, begin typing a name or ID, and select the person from the list.
Click the Add to Role button.
Click the Actions button for an advisor.
Click the Actions button, and select Send communication. The Create New Communication pop-up opens.
Select one or more advisors.
Click the Options button, and select Send communication. The Create New Communication pop-up opens.
Select one or more primary advisors.
Click the Options drop-down, and select Add advisor to set. The Add Advisor to Set pop-up opens with the selected advisors listed. (If you selected any secondary advisors, they're not listed because you can't add secondary advisors to advisor sets.)
Select an Advisor Set. The Advisor Set Preview appears.
Click the Update button. The advisor is added to the set, and the pop-up closes.
Note
If any of the selected advisors were already in the set, don't worry. They're not duplicated.
On an advisor's row, click the Actions drop-down, and select View and edit advisees. The Advisee List pop-up opens.
Use the Advisor Filter to narrow down the list.
If the Assignment column has a Locked / Unlocked button, you can click it to change it.
Note
If the button is disabled, it means the advisor set itself (as listed in the Assignment Method column) is locked. You can't edit a locked advisor set here. Advisor sets are maintained on the Automated Advisor Assignments page.
If the assignment method is manual, you can't lock or unlock the assignment.
To change the Advising Relationship of the advisor to any of the advisees, click the Active/Inactive button on the advisee's row.
To remove an advisee from the advisor, click the Remove icon
on the advisee's row.Select the checkboxes for any or all of the advisees, and click the Options drop-down for the following options:
Send Communication: The Create New Communication pop-up opens with the selected advisees in the To field. Follow the prompts, and click Send.
Lock (or Unlock) Assignments: The Lock (or Unlock) Assignments pop-up opens listing the assignments that will be changed and the ones that can't be changed. Click the Yes, lock (or Yes, unlock) button. The assignments are changed, and the pop-up closes.
Note
If the advisor set itself (as listed in the Assignment Method column) is locked, you can't change the assignment between locked and unlocked. Advisor sets are maintained on the Automated Advisor Assignments page.
Note
If the advisor assignment was made manually (rather than by the Automated Advisor Assignments feature), you can't lock or unlock the assignment. In that case, the options don't appear in the Options drop-down.
Remove Advisees: The Remove pop-up opens with the selected advisees listed. Click Yes, remove.
Set Advising Relationship to Active (or Inactive): The advising relationship status between the selected advisor and the selected advisees becomes Active (or Inactive).
Click the Actions drop-down.
Select Call [advisor's name]. If your device can make phone calls and the phone number is in the system, the advisor's phone is called.
Select one or more advisors.
Click the Options drop-down, and select Edit advisor settings. The Advisor Settings pop-up opens with the selected advisors listed.
In Select a Detail to Update, select either Advising Capacity or Advisor Status. (This is the faculty member's status as an advisor, not their advising relationship status with an advisee.)
In the next field, select a value.
To edit the other option, click Add another detail. Repeat steps 3 and 4.
Click Update.
Note
If you selected only one advisor, the Advisor Settings pop-up looks a little different. It has Advising Capacity and Advisor Status as individual fields rather than options to select.