Vehicle Incidents
Important
Information and features vary according to the roles to which you belong and the permissions associated with those roles. For more information, contact your module manager or your campus support team.
From the Vehicle Incidents page, you can review existing incident reports, create new reports, edit incident details, and download the list to an Excel file. You can also associate violations and sanctions to incidents.
To view and manage vehicle incidents, you must be in the Vehicle Administrator role (or a role copied from it) and have view and edit permissions enabled.
Most permissions for this role are designated as being for general incidents or restricted incidents (for example, "Can edit general incidents" and "Can edit restricted incidents").
General incidents are considered to be of a less sensitive status.
Restricted incidents are considered to contain sensitive data and should be viewed or maintained by specific personnel.
On the Desktop, you can find vehicle incidents under Violations and Sanctions > Vehicle Violation Inquiry.
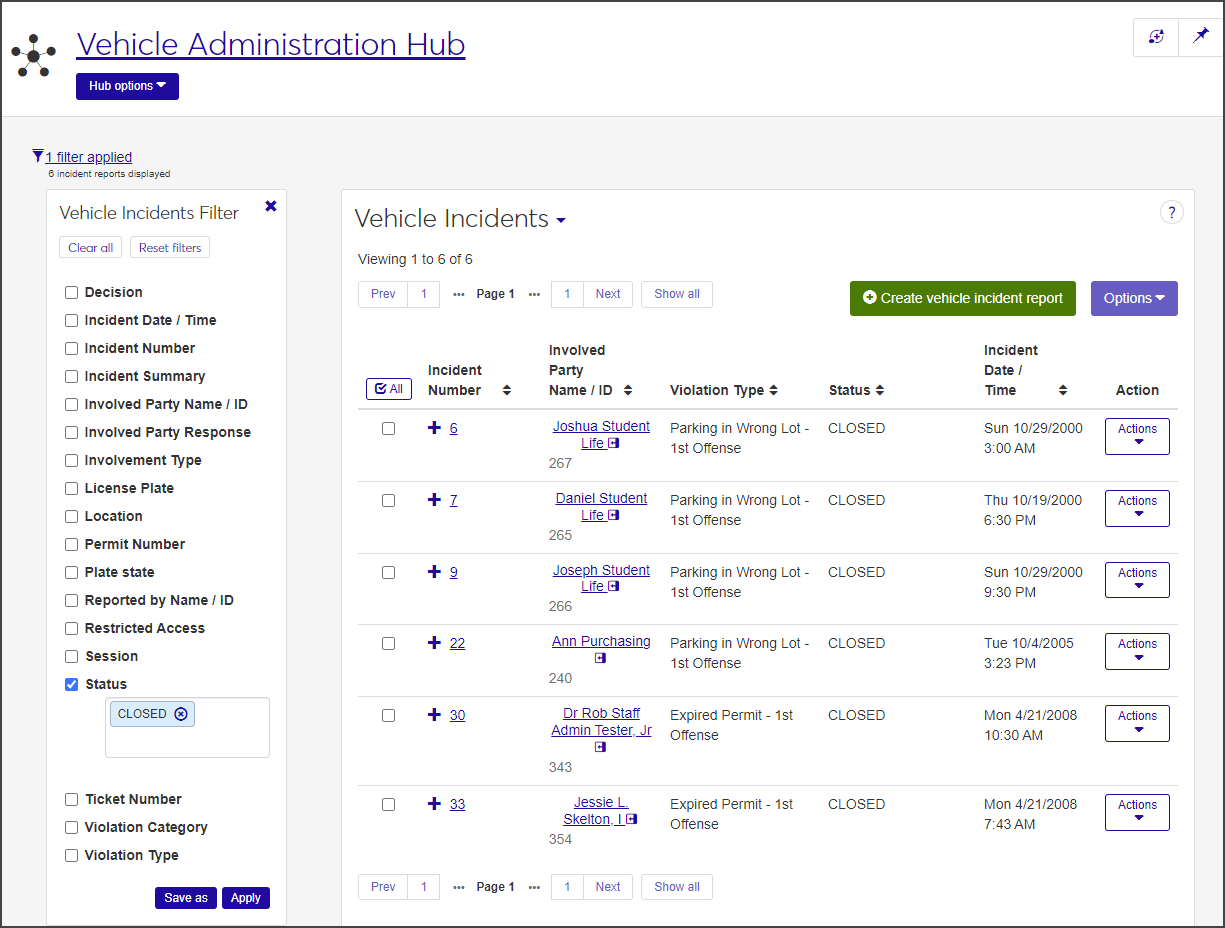
On the Vehicle Administration Hub page, select Vehicle incidents from the Hub options drop-down. The Vehicle Incidents page opens, listing all active vehicle incidents.
Tip
The page title is also a drop-down menu that enables you to move quickly between Vehicle Incidents and Vehicle Sanctions. Click on the arrow next to the title to select your option.
Click the plus sign next to an incident to see all columns.
To filter the list:
Select the checkbox next to one of the filter categories (for example, License Plate) in the Vehicle Incidents Filter. You can select more than one filter.
Select or enter the criteria by which you want to filter the list.
Click Apply.
If you know you'll use a particular filter often, you can save it and set it as your default filter:
After you create the filter, click Save as.
Enter a name for the filter in the Save the Current Filter As ... field.
Select the Set as default checkbox.
Click Save.
Even if you don't have all the information needed, complete the form to the best of your knowledge. The report can be edited later.
On the Vehicle Incidents page, click the Create vehicle incident report button. The Create Vehicle Incident Report window opens.
In the Reporter Information section, the Reported by Name / ID field autofills with the name and ID of the logged-in user. To change it:
Click the Remove icon next to the name.
Begin typing the new name in the field and select the correct name when it appears on the list.
If vehicle incident reports are set up to have the incident number created manually (see Manage Vehicle Settings), enter an Incident Number in the field. The number can include a maximum of 9 numerals.
If the incident number is set up to be generated automatically, the Incident Number field is not visible.
Some incident reports contain sensitive data and should be restricted to specific personnel. If this is the case, select the Restricted Access checkbox.
In the Vehicle Information section, select either License Plate or Permit Number to indicate how you want to search for the vehicle.
Begin typing the license plate number or permit number in the field and select the correct vehicle when it appears.
After you select the license plate or permit number, the following driver's information is displayed below the field:
involved party's name and ID (if the involved party is in your school's system, you can click the name to open the student's summary page)
if the driver has an active permit
driver's license state
plate expiration year
permit type
make, model, and year of the vehicle
If a ticket was issued, enter the number in the Ticket Number field.
Select an option from the Vehicle Violation Type drop-down. The available options are pulled from active Vehicle Violation Type definitions.
Default sanctions are applied automatically based on the violation type you select, but you can remove the default or add another sanction:
To remove a sanction, click the Remove icon next to the sanction in the Sanction Type field.
To add a sanction, click in the Sanction Type field and select a new sanction from the list.
Note
If you selected the Restricted Access checkbox in the Reporter Information section, the Sanction Type drop-down is not available.
To add another vehicle violation type, click the Add another vehicle violation type link and repeat steps 7 and 8.
In the Incident Description section, enter a brief account of the incident in the Incident Summary field. The summary can contain a maximum of 100 characters.
Click in the Incident Date / Time fields and select the date and time the incident occurred.
Select the Session from the drop-down. The field defaults to the currently active session but can be changed if other sessions are active (for instance, if spring and summer sessions overlap).
Begin typing the location of the incident in the Location field and select the correct option when it appears in the list.
Enter a detailed account of the incident in the Incident Narrative field. This field has no character limit.
Click Save and create another to save the report and clear the fields so you can create another. Click Report vehicle incident to save the report and close the window.
You can edit selected details for vehicle incidents individually or in a batch.
When you edit an individual incident, you can edit all fields except the Incident Number, Involved Party Name / ID, and Violation Type.
On the Vehicle Incidents page, select Edit vehicle incident details from the Actions drop-down for the incident you need to edit. The Edit Vehicle Incident Details window opens.
The Incident Number, Involved Party Name / ID, and Violation Types are displayed at the top of the window. These fields cannot be edited.
Update the editable fields as needed.
When you are done, click Update to save the changes and close the window.
When you edit incidents in a batch, you can update only the Decision Status and Involved Party Response fields.
On the Vehicle Incidents page, select the checkbox next to each incident you want to edit.
Select Edit vehicle incident details from the Options drop-down. The Edit Vehicle Incident Details pop-up opens, listing the selected incidents.
Note
Incidents with multiple violation types cannot be edited in a batch.
Select Decision Status or Involved Party Response from the Select a Detail to Update drop-down.
Select an option from the drop-down next to the Select a Detail to Update field.
To edit another detail, click the Add another detail link and repeat steps 3 and 4.
When you are done, click Update to save the changes and close the window. The details you edited are now updated for all selected incidents.
To associate violations and sanctions with a vehicle incident, you first need to create a violation, then associate sanctions to the violation.
On the Vehicle Incidents page, locate the vehicle incident you want to work with and click the plus icon next to it to expand the row.
Click the Manage associations button for the incident. The Vehicle Violation Associations window opens, listing any existing vehicle violations that are already associated with the incident.
The Vehicle Violation Associations window is a spreadsheet with a row for each existing violation. From here, you can create new violations, edit existing ones, copy violations, and associate sanctions to a violation.
Click Create violation. A new row is inserted at the top of the spreadsheet.
From the Violation Type drop-down, select a violation type from the list. This field is required.
Note
The next column, Sanctions, is empty when you create a new violation. After you save the violation, an Associations button appears in this column, allowing you to associate sanctions to the violation.
From the Involvement Type drop-down, select how the involved party was involved in the incident (e.g., Witness, Victim, Accused). This field is required.
Select an option from the Involved Party Response drop-down, if applicable. This field is optional.
Select an option from the Decision drop-down, if applicable. This field is optional and can remain blank.
In the Comment column, enter a brief optional comment. The field can contain a maximum of 100 characters.
From the Violation Category drop-down, select the appropriate vehicle violation category (e.g., Speeding or Parking) from the list. The options include all active Violation Category definitions. This field is optional.
To include this violation in the student's non-academic profile, select the checkbox in the Include in Non-Academic Profile Report column.
Enter the Ticket Number, if applicable. This field is optional. You can enter a maximum of 15 characters.
If you know the permit number and it is in the system, begin typing the number in the Permit / Number column and select the correct number from the list when it appears. This field is optional.
If you know the license number, enter it in the License Number column. This optional field can contain a maximum of 10 characters.
If you know the state where the license plate was issued, click in the Plate State column and either click the arrow and scroll to locate the state or begin typing the state in the field and select the correct one when it appears on the list. This field is optional.
If you have permissions to view and edit user-defined fields:
Click the User-Defined Fields button to open the User-Defined Fields window. From here, you can add, edit, and remove user-defined fields, which allow you to track unique information not captured by the standard fields.
See User-Defined Forms for more information.
Click Save to save the updates to the user-defined fields and return to the Vehicle Violation Associations window.
Click Save on the toolbar to save the violation.
From the Vehicle Violation Associations window, you can associate sanctions to a violation.
To apply sanctions to a violation, you must be in the Vehicle Administrator role and have permissions for editing and applying sanctions (general, restricted, or both).
On the Vehicle Incidents page, click the plus icon next to the incident you're updating to expand the row.
Click the Manage associations button. The Vehicle Violation Associations window opens.
In the Sanctions column, click the Associations button for the violation you need to update. The Edit Vehicle Sanction Associations window for the violation opens. Sanctions already associated with the violation are listed in the Vehicle Sanction Associations spreadsheet.
If you are adding a sanction to the violation, click Create sanction to add a new row to the spreadsheet. If no sanctions have been associated yet, you do not need to click the button and can skip to step 5.
From the Sanction drop-down, select the appropriate sanction from the list. This field is required.
If a fine is associated with the sanction, the amount autofills in the Fine column.
From the Sanction Status column, select the status (e.g., Complete or Paid). This field is optional.
If a fine did not autofill, you can enter an amount manually in the Fine column. This field is optional.
Click the down arrows in the Sanction Start Date and Sanction End Date columns and select start and end dates for the sanction. Neither field is required, but if you include a start date, it must be earlier than the end date.
If the sanction has been completed, click the down arrow in the Sanction Completed Date column and select the date.
To add the person who assigned the sanction:
Click the Associations button in the Sanction Assigned By column. The Manage Associations: Sanction Assigned By window opens.
Begin typing the name or ID number of the person who assigned the sanction in the Sanction Assigned By Name / ID field and select the correct name from the list when it appears.
Click Update to save the association and return to the Edit Vehicle Sanction Associations window.
To add a disciplinary contact:
Click the Associations button in the Disciplinary Contact column. The Manage Associations: Disciplinary Contact window opens.
Begin typing the name or ID number of the disciplinary contact in the Contact Name / ID field and select the correct name from the list when it appears.
Click Update to save the contact and return to the Edit Vehicle Sanction Associations window.
If the involved party has been contacted regarding the sanction, click the arrow in the Contact Date column and select the date of contact from the calendar.
If needed, enter an optional descriptive comment in the Sanction Text column.
If you have permissions to manage user-defined fields and need to edit them:
Click the User-Defined Fields button to open the User-Defined Fields window. From here, you can add, edit, and remove user-defined fields that allow you to track unique information not captured by the standard fields.
See User-Defined Forms for more information.
When you are done, click Save to return to the Edit Vehicle Sanction Associations window.
Click Save on the toolbar to save the sanction.