Emergency and Missing Persons Contacts Information
Important
Information and features vary according to the roles to which you belong and the permissions associated with those roles. For more information, contact your module manager or your campus support team.
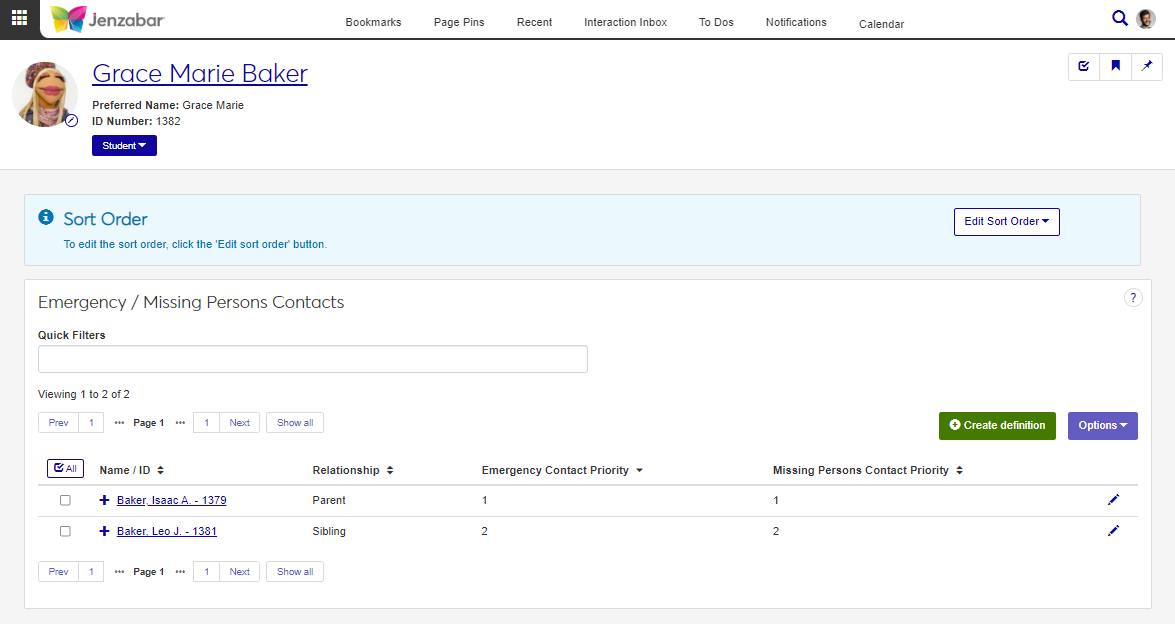
Use the Emergency / Missing Persons Contacts page to view, manage, and prioritize who should be contacted when a person has an emergency or is missing.
Desktop Location
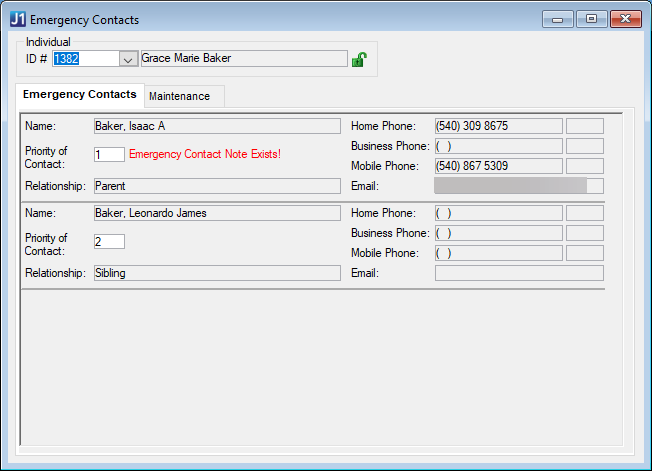
Emergency contact information can also be managed in the Desktop from the Emergency Contacts window. Updates made in J1 Web are visible in the Desktop and vice versa.
Database Location
Emergency and missing person contact information is saved to the CM_EMERG_CONTACTS table.
Permissions Required
You must be in a Person Management role with "Can view emergency contacts" permission to access the Emergency / Missing Persons Contacts page. To add, update, or delete contact information, you must also have "Can manage emergency contacts" permission.
Use the global search feature to navigate to a person's summary page.
From the Person options drop-down (or the Student drop-down, Person options), select Emergency contacts. The Emergency / Missing Persons Contacts page opens.
Use the Quick Filters and column sorting to view contact information.
Click the Expand icon
 for each person listed to see additional contact information.
From the person Emergency / Missing Persons Contacts page, click Edit Sort Order.
Select either Emergency Contacts or Missing Persons Contacts.
In the Edit Sort Order pop-up, use the Sort By and Order drop-downs, and/or drag and drop individual definitions to prioritize contacts.
Sort By and Order:
In Sort By, select a column to sort on.
From the Order drop-down, select Ascending or Descending.
Drag and Drop:
Hover your cursor over the vertical arrow icon
 until the cursor changes to a Hand icon
  .
.Click and hold while dragging the definition to the desired location.
Release the mouse button.
Click Update. The pop-up closes and the contact list updates to reflect your changes.
From the Emergency / Missing Persons Contacts page, click Create definition.
In the Create Contact Definition pop-up, select one of the following Contact Type options.
Emergency Contact
Missing Persons Contact
Both
From the Name / ID Search or Manual Entry options, select either Name / ID or Manual Entry.
When Name / ID is selected, select or enter information in the following fields. If the selected Name / ID has address and alternate contact information in the system, those options are available for selection. You can also manually enter contact information.
Field Name
Character Limit
Notes
Name / ID
n/a
Required.
Caution
Be sure to select the correct name from the list, especially if there are several records for the same name.
Relationship
60
Mobile Phone
20
Mobile Phone Extension
5
Enabled until a mobile phone associated with the Name/ID is selected. When a mobile phone number is selected, this field is disabled and displays the selected number's extension.
Home Phone
20
Home Phone Extension
5
Enabled until a home phone associated with the Name/ID is selected. When a home phone number is selected, this field is disabled and displays the selected number's extension.
Business Phone
20
Business Phone Extension
5
Enabled until a business phone associated with the Name/ID is selected. When a business phone number is selected, this field is disabled and displays the selected number's extension.
Email Address
60
Address Code
If a code is selected, the remaining address fields are autofilled and cannot be edited.
Address
60
Only enabled when an address code is not selected.
Address 2
60
Only enabled when an address code is not selected.
City
25
Only enabled when an address code is not selected.
State
n/a
Only enabled when an address code is not selected.
Zip
12
Only enabled when an address code is not selected.
Country
n/a
Only enabled when an address code is not selected.
When Manual Entry is selected, enter information in the following fields.
Field Name
Character Limit
First Name (Required)
15
Middle Name
15
Last Name (Required)
30
Prefix
n/a
Suffix
n/a
Relationship
60
Mobile Phone
20
Mobile Phone Extension
5
Home Phone
20
Home Phone Extension
5
Business Phone
20
Business Phone Extension
5
Email Address
60
Address
60
Address 2
60
City
25
State
n/a
Zip
12
Country
n/a
Enter optional Notes about the contact (up to 100 characters).
Click Save and create another or Create and close. The pop-up closes and the list updates.
Note
The Emergency Contact Priority and Missing Persons Contact Priority columns update based on the order the information was entered. Use the Edit Sort Order button to change the priority order.
Note
Editable fields vary depending on whether the contact definition was created manually or with a name/ID from the system. See the field descriptions in How To Add Emergency/Missing Person Contact Definitions.
From the Emergency / Missing Persons Contacts page, click the Edit icon
 for a row.
In the Edit Contact Definition pop-up, edit the desired fields.
Click Update. The pop-up closes and the contact list refreshes.
Select the checkboxes next to the rows you want to export.
From the Options drop-down, select Download to Excel. The Download to Excel pop-up opens.
Select options for the Excel format and data columns.
Click Download. Your .xlsx or .zip file is saved in the file location that you have set in your browser settings.
Missing Persons Contact Priority information is available in J1 Web only.