Manage Advisees
Advising Administrators use this page to see students listed with their advisors. You can send communications to advisees and advisors, and you can jump to summary pages for the advisee, their advisor, major, and academic plan. You can make advisees active or inactive.
The Advisee List may be very long, so you can use filters and/or data sets to narrow down the list.
The Data Set feature lets you select a predefined data set such as "Students with GPA Profiles". Available options include all data sets with the classification "Advisees". Data sets are defined on the Data Sets page (on the Campus-Wide Definitions hub).
Tip
For more details, see the How to Create Data Sets for the Manage Advisees Page instructions below.
The Advisees Filter lets you narrow the list by a number of Advising and Registration filters. Select any or all filters, and select values for them. For example, you could search for Accounting majors who have an academic plan.
Tip
If you select a data set, the filter narrows down the results of the data set. If you don't select a data set, the filter narrows down the complete list.
Notice
If you select the Students with GPA Profiles data set, and the Has Academic Plan = Yes filter, then the list is narrowed down to advisees with GPA Profiles who also have an academic plan.
Advisee / ID: The name and ID are a link to the student's summary page.
Primary Advisor: The name is a link to the advisor's summary page.
Advisee Status: This button toggles between Active and Inactive. It refers to the advisee, answering the question, "Is this student active in the advising system?"
Note
This is different from the Advising Relationship between an advisee and a particular advisor. Advising Relationship is set on the Advising Team pop-up.
Classification: This is the student's academic class such as First Year or Sophomore from the Student Information Details page.
Major: The major name is a link to the program's summary page. The academic year shown with the major is the Advising Requirement Year. It's stored on the Degree History table (degree_history.adv_tree_yr_cde).
Minor: If the student has a minor, the minor name is a link to the program's summary page.
Academic plan: If the student has a plan in place, a link to it appears.
FERPA: A badge lists the number of FERPA contacts the student has granted permissions to.
Graduation Stage: The advisee's stage or stages are displayed. Click them to pop up more information. The values are defined on the Graduation Stage Definitions page and stored in the Graduation Stage Definitions table (graduation_stage_def).
Holds: A badge lists the number of holds the student has.
Reload Progress: This is a Yes/No flag that's automatically set by changes on the Advising Trees page. When changes are made to an advising tree (such as a new required course in a program), the Reload Progress button is automatically switched to Yes for students in that program. This flags those students for recalculation in the Compute Student Progress process. After the process runs, the students' Reload Progress flags are switched back to No. The information is stored on the Advisee Master table (adv_master.reload_progress).
Tip
The Reload Progress flags are set when the Advising Trees page closes. This keeps the recalc process from being launched repeatedly when someone is making multiple changes to Advising Trees.
The Actions button appears on each advisee's row with the following options for that advisee:
Advising team: A pop-up lists their primary and secondary advisors. You can remove primary advisors. You can also change the advisee's Advising Relationship with primary advisors to Active or Inactive.
Communication Feed: A pop-up lists communications. Click the Expand arrow beside a communication to see more details. The pop-up shows attached documents you can click to view. You can also read comments and add comments. (Available only if the school is licensed for Communications Plus and the user has permission to view the Communication Feed.)
GPA profiles: The Student GPA Profiles page opens in a new tab with the advisee already selected.
Interaction Inventory: Opens the Interaction Inventory page in a new tab with the advisee already selected. (Available only if the school is not licensed for Communications Plus and the user has permission to view the Interaction Inventory.)
Send communication to all advisors: The Create New Communication pop-up opens to guide you through creating and sending the communication.
Send communication to primary advisors: The Create New Communication pop-up opens to guide you through creating and sending the communication.
Send communication to secondary advisors: The Create New Communication pop-up opens to guide you through creating and sending the communication.
Student aims: The Student Aims page opens in a new tab with the advisee already selected.
TSI student status: The Texas Success Initiative Student Status pop-up opens where you can view and edit the student's TSI information. Available only if your school has the Texas State Reporting license and you have the "Can manage TSI student status" permission. For more information, see the Texas Success Initiative Student Status topic.
The Options button applies to all advisees whose checkboxes you select. These are the options:
Assign to advisor: The Assign to Advisor pop-up opens. It lists the selected advisees, their Classification, Major, and Primary Advisor. You can start typing a name or number in the Advisor / ID field and select an advisor.
Send communication: The Create New Communication pop-up opens to guide you through creating and sending the communication to the selected advisees.
Set Advisee Status to Active: Active advisees are included in searches and reports.
Set Advisee Status to Inactive: Inactive advisees are excluded from searches and reports.
Use the Reporting and Processes button to open pop-ups that let you run these processes and reports on the advisees you've selected:
Compute Student Progress process
Synchronize Advisee Information process
Advising Worksheet report
Graduation report
Student Plan report
Advisee / ID: NameMaster.first_name, NameMaster.last_name, NameMaster.id_num
Primary Advisor: advisor_stud_table
Advising Status: adv_master.adv_stud_act
Advising Relationship: advisor_stud_table.advisor_table_sts
Classification: student_master.current_class_cde
Major: degree_history.major_1 (from the student's current degree)
Minor: degree_history.minor_1 (from the student's current degree)
Academic plan: AvStudentPlan
FERPA: Count of IDs with permission from the FERPA Permission (ferpa_permission) table
Holds: Count of holds from the Hold Transactions (hold_tran) table
Some of these features are available in Desktop on the Maintain Advisees window.
The permission needed for the Manage Advisees page is "Can manage advisees". It's available in the Academic Advising Module Manager role or roles copied from it.
To see the Texas Success Initiative pop-up, the user needs the "Can manage TSI student status" permission available in the following roles and roles copied from them:
Academic Advising Module Manager
Registrars
Registration Reporting Module Manager
From the Advising Administration hub, click Hub options.
In Advisees, select Manage Advisees. The page opens.
To narrow the list of advisees, use a data set and/or the Advisee Filter.
To use a data set, click the View Advisees by Data Set Expand arrow icon
 .
. Click in the Data Set field, and select an option.
Click the Select button. The data set is applied to narrow down the list.
To use the Advisees Filter, click the Filter icon
 . The filter expands.
Select a filter, and select an option from its drop-down. Some filters allow multiple selections.
Select more filters as desired. The data set may include Custom User Filters.
Click the Apply button.
Click an advisee's name or ID to open their summary page.
Click the primary advisor's name to open their summary page.
Click the Expand
 icon to see all the fields for an advisee.
Click an advisee's Major or Academic Plan to jump to its details.
To view an advisee's full advising team, click the Actions button, and select Advising team. The Advising Team pop-up opens. You can remove primary advisors and change their Advising Relationship to Active or Inactive. (This is the advisor's advising relationship to the selected advisee.) If the advising assignment was not set manually, and if the advisor set isn't locked, you can change the Locked vs. Unlocked status in the Assignment column.
Create a data set file using a third-party application (Bold Reports, InfoMaker, Rest API, Source, or SQL for example).
Note
Data sets are created by your school's IT team on the Data Sets page in the Campus-Wide Definitions hub. Ask them to create the data sets you need. (Jenzabar also provides a number of data sets.)
The first column must be the ID Number, and it must have the alias "[IdNumber]". This is the only required column.
Optional: If you want to add columns to filters on the Manage Advisees page, add them to your file. The aliases will appear as labels to the checkboxes.
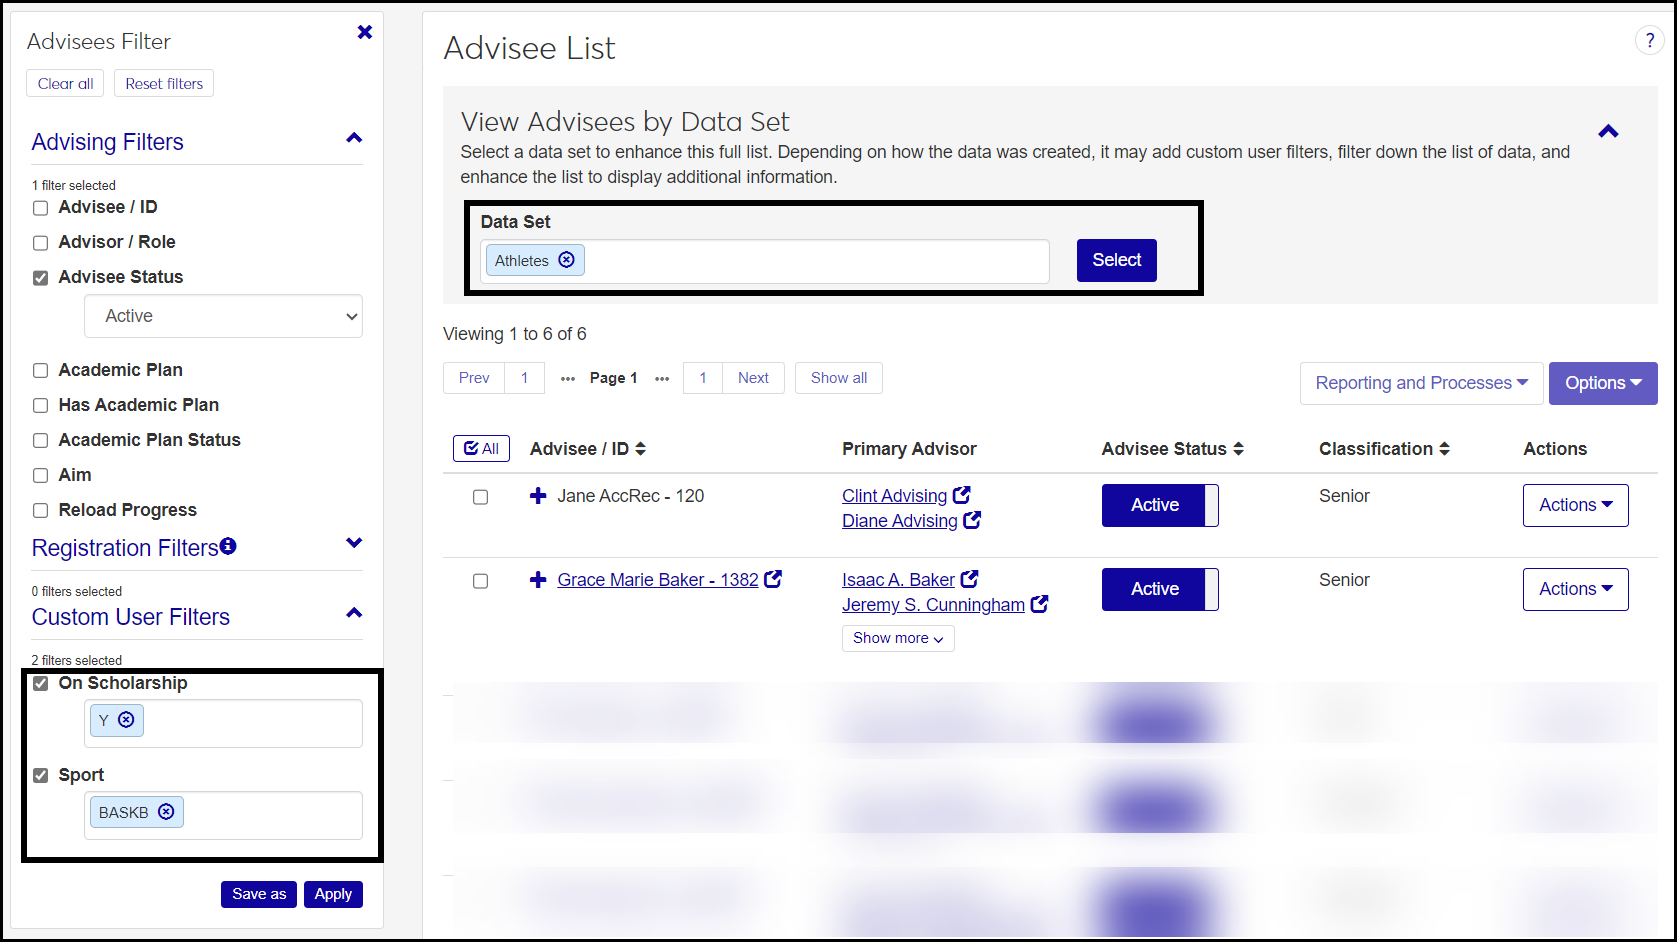
If you use SQL to make a data set for athletes, the statement might look like this:
select distinct id_num [IdNumber], sports_cde [Sport], sports_scholarship [OnScholarship]
from sports_tracking
The first column in the statement is "distinct id_num [IdNumber]".
Caution
The data set won't load on the Manage Advisees page unless this is your first column in the statement.
Because of the additional columns in this example statement, the Sport and On Scholarship columns appear on Manage Advisees in the Custom User Filters. In this example, the user is filtering by On Scholarship = Yes and Sport = Basketball.
From the Campus-wide Definitions hub, click the Hub options drop-down, and select Data Sets. The Data Sets page opens with the People/Organization Lists view selected.
Click the Create data set button.
In Name of Data Set, enter a name.
In Classification, select Advisees.
In Select Modules Allowed to Access the Data Set, select Advising.
In Type, select the type of file you've made for your data set (Bold Reports, InfoMaker, Rest API, Source, or SQL).
Click the Create data set button. Your data set is now available for the Manage Advisees page.
To view the details of your data set, click the Actions drop-down on the row of your data set, and select View Details. The View Details pop-up opens. To download the details, click the Download button.
Note
View Details and Download may not be available for every Type. They are available for InfoMaker and SQL.
Ask your school's IT team to create a data set in the Advisees Classification of students who don't have a primary advisor. They should make the data set available to the Advising module.
On the Manage Advisees page, click the View Advisees by Data Set drop-down.
In the Data Set field, begin typing the name of the data set, and select it from the list.
Click the Select button. The students who need a primary advisor appear.
To assign these students to an advisor manually:
Select the checkboxes for some students.
Click the Options drop-down, and select Assign to advisor. The Assign to Advisor pop-up opens.
In the Advisor / ID field, begin typing a primary advisor's name or ID, and select it from the list.
Click the Yes, assign button. The students are assigned to the advisor, and the pop-up closes.
To use automated advisor assignments for these students:
Note
The steps below represent a simplified scenario where you want to assign all unassigned students to a single advisor set. Your real-life scenarios will be more nuanced, but this gives you an idea of the steps.
On the Automated Advisor Assignments page, create an advisor set for assigning these students (or edit the rules for an existing set).
On the row of the advisor set, click the Actions button, and select Add assignment rules. The Assignment Rules pop-up opens.
Select the Data set radio button.
In the Data Set field, select the data set that's for students without a primary advisor.
Click Save. The pop-up closes. The students will be assigned to this set according to your Assignment Configuration settings. See the Automated Advisor Assignment topic for details.
Select one or more advisees.
Click the Reporting and Processes drop-down, and select a report or process. A pop-up opens with prompts to run the process or report.
Follow the prompts. For more information, see the help topic for each report or process.
Select one or more advisees advisees.
In the Options drop-down, select Assign to advisor. The Assign to Advisor pop-up opens listing the selected advisees, their classifications, majors, and primary advisors. If one or more of the advisees already have an advisor, a messages tells you so.
In the Advisor / ID field, begin typing a name or number, and select an advisor from the resulting list. Advisors are listed with their capacity (filled slots an total slots) and their capacity status (Open, Full, Over capacity).
Click the Yes, assign button. The advisor is added even if one or more advisees already have advisors.
Select one or more advisees.
Click the Options button.
Click Send communication. The Create New Communication window pops up.
For an individual advisee: Click the Active button in their row to Yes or No.
For multiple advisees at once:
Select the advisees.
Click the Options button.
Click either Set Advisee Status to Active or Set Advisee Status to Inactive. (This is the student's status as an advisee, not their advising relationship to an advisor.)
On an advisee's row, click the Actions drop-down.
Select Advising team. The Advising Team pop-up opens.
You can also remove an individual primary advisor by clicking the Remove icon
 on their row.
If there's a Locked or Unlocked button in the row, click it to change it.
Note
If you can't change it, it's because the advisor set is locked on the Automated Advisor Assignments page.
Note
The Assignment Method column lists the advisor set used to make the advisor assignment (as maintained on the Automated Advisor Assignment page). If the assignment was made manually, the column says Manual instead of the set name.
You can change an individual primary advisor's Advising Relationship by clicking the Active/Inactive button. (This is the advisor's advising relationship to the advisee, not the advisor's status as an advisor in general.)
To work with one or more primary advisors, select the checkboxes on their rows.
In the Options drop-down, select an option: Remove advisors, or Set Advising Relationship to Active, or Set Advising Relationship to Inactive. Your changes are saved automatically.
On an advisee's row, click the Actions drop-down.
Select Communication Feed. The advisee's feed pop-up opens.
Click the Expand arrow icon
 beside a communication to see more details. The pop-up shows attached documents you can click to view. You can also read comments.
To add a comment, click the New comment button.
To mark the comments as read, click the Mark all read button.
On an advisee's row, click the Actions drop-down.
Select GPA profiles. The Student GPA Profile page opens in a new tab. The advisee is selected, and any profiles the student has are displayed.
Click the Actions button for an advisee.
Click any of the following options. The Create New Communication pop-up opens.
Send communication to all advisors
Send communication to primary advisors
Send communication to secondary advisors
On an advisee's row, click the Actions drop-down.
Select Student aims. The Student Aims page opens in a new tab. The advisee is selected.
How do I find students with a Texas Success Initiative (TSI) aim?
Use the Advisees Filter: Select the checkbox for Aim, and type "TSI". Select TSI Texas Success Initiative. Click Apply. The list is narrowed down to only students with a TSI aim. To view their TSI information, click the Actions drop-down, and select TSI student status. For more information, see the Texas Success Initiative Student Status topic.