Student Refund Invoices
Important
Information and features vary according to the roles to which you belong and the permissions associated with those roles. For more information, contact your module manager or your campus support team.
From the Create Student Refund Invoices page, you can query the system to find students with an AR credit balance. When students are selected, you can create a refund invoice for some or all of the credit balance. You can then generate checks or e-Payments to pay the refund invoices via the Create Payment process in the Procurement Hub.
Selecting Students
Students can be added to the list individually or with a data set. Data sets use InfoMaker to query the database and determine which students to include. Jenzabar provides the AR Subsidiary Master Original data set by default, and you can update the query in InfoMaker if needed. For more information about updating the query, see Data Sets.
Permissions Required
To access the page, you must be in a Receivables Management role with the "Can create student refund invoices" permission. To access additional information about the student, you may also need to be in a copy of one or more of the following roles:
Person Management: grants access to general person information
Registration - Access to All Students: grants access to student information details
Receivables Management: grants access to student account activity and payment information
Desktop Location
You can also create student refund invoices from the Desktop Create Student Refund Invoices window.
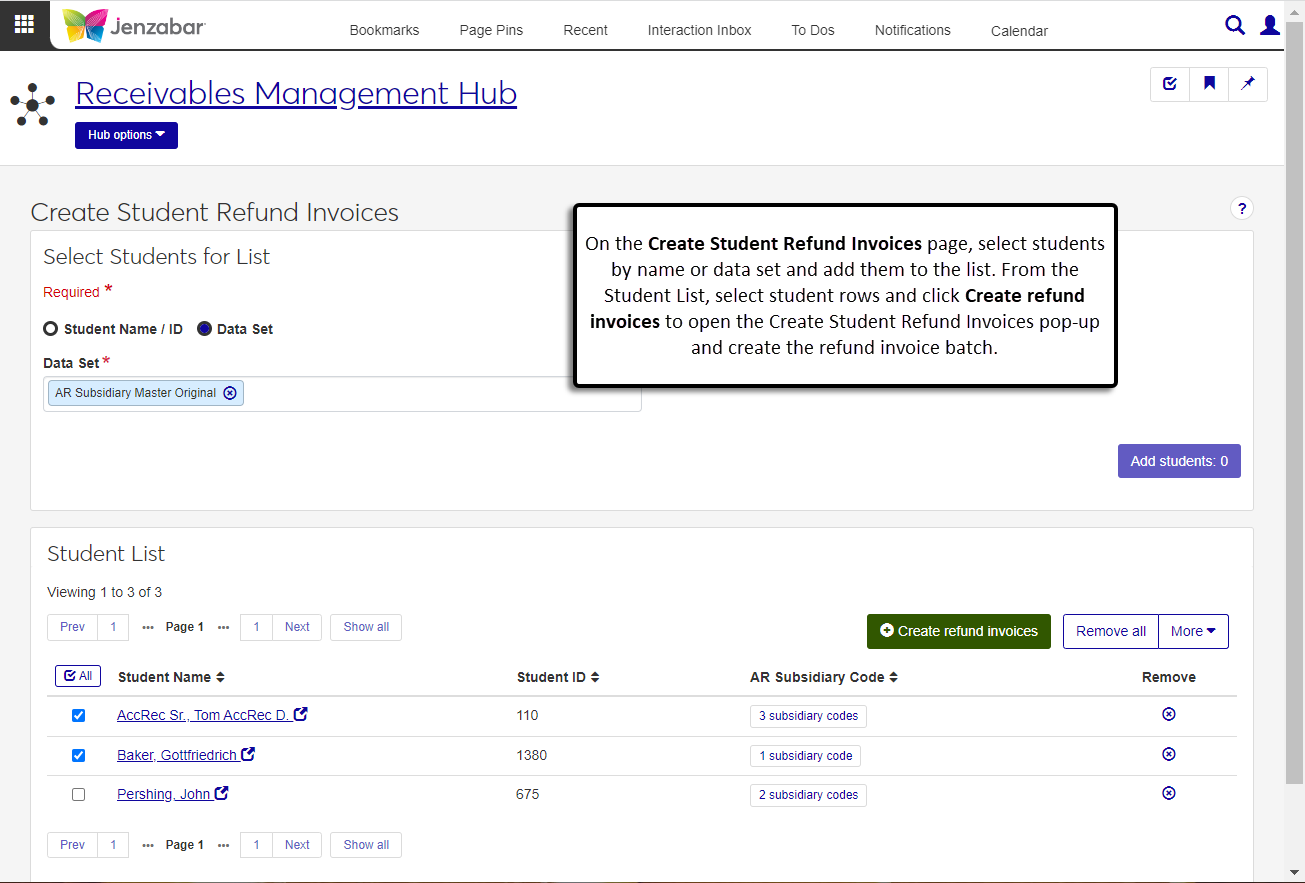
From the Receivables Management Hub options, select Create student refund invoices. The Create Student Refund Invoices page opens.
Select students to add to the list.
To select students individually:
Select the Student Name / ID option.
Enter the name, ID number, SSN, or birthdate of a student and select their name from the drop-down.
Add more students as needed. The Add students button updates to show the number of students.
To select multiple students with a data set:
Select the Data Set option. This option is selected by default.
Select from the options in the Data Set drop-down. Options are the default data set and any customized data sets you've added to the system. The Add students button updates to show the number of students.
Click the Add students button to populate the Student List.
Review the list of students and use the Remove column to delete students from the list.
Tip
To clear the list and select a different group of students, select all students. Click the More button and select Remove all.
Click the Select All button
 or select students one by one.
Click Create refund invoices. The Create Student Refund Invoices pop-up opens.
Review the selected students and click the Remove icon
 for any you don't want to create invoices for.
In the AP Subsidiary Code for Invoices Created, select the subsidiary code that will be used to pay the refund. Required.
Select the Report Layout. The Original is selected by default, and any customized layouts for the report are available for selection. Required.
Select the File Format. PDF is the default, and you can select one or more additional formats. Required.
Enter the Transaction Date for Invoices Created. Today's date is the default, but you can enter a different date. Required.
Enter the Payable Date for Invoices Created. Today's date is the default, but you can enter a different date. Required.
Select the Student Master Row Required checkbox to provide refunds only to students who have a row in the Student Master (STUDENT_MASTER) table.
In the Third Party Amount Options drop-down, select an option to determine how refund payments are handled when third-party payments are applied to the student's account.
Refund all to student (default): Refunds the total credit balance to the student. Use this if your organization does not handle third-party payments.
Only 3rd party checks: Generates one refund check for the third party for their share of the refund.
Separate refund checks: Generates two refund checks, one for the third party and one for the student.
Don't include 3rd party: Generates one refund check for the student for their share.
Enter the Percent of Balance to Refund. Default is 100, and you can enter any number between 0 and 100.
Note
This field is only visible for systems that are not configured for Open Items.
Select the Billing Period for the refund transactions.
Note
The importance of the Billing Period differs depending on whether you are configured for Open Items.
Configured for Open Items: The process checks to see if there are any open items that need to be closed out by the created invoices for the scheduled billing period. If open items exist, allocation transactions need to occur for the selected items.
Not configured for Open Items: The billing period is simply a value that is stored on the created invoices for grouping purposes on different reports (e.g., AR Aging Report).
Select the 1098-T Eligibility Payments checkbox if the refund payment transactions should be included in the 1098-T Box 1 calculation.
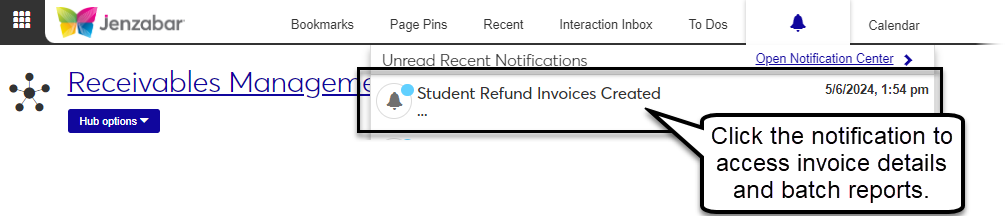
Click Create. An alert that the process has started appears. You can continue working in J1 Web and you'll see a notification pop-up when the process is complete.
To review the generated invoices when the process is complete:
Click the Student Refund Invoices Completed notification link from the Notifications drop-down in the global toolbar. You can also navigate to the Notification Center, select the notification titled "Student Refund Invoices Completed", and click the View Details icon.
In the Student Refund Invoices Completed pop-up, click the links to open the invoice batch details, process report, and batch validation report.
On the Create Student Refund Invoices page, add students to the list manually or with a data set.
Select one or more students from the Student List.
Click the More button and select one of the following options from the drop-down to open that page in a new tab.
Person information details. This page lets you view and manage name, contact, biograph, ethnicity/race, military service, and tribal information.
Student account details. This page lets you view and manage student account activity by subsidiary, payment plans, and electronic payment information.
Student information details. This page lets you view and manage information about the student's course, enrollment, program, and graduation.
Note
Information available on these pages is based on your role and permissions.
Checks and e-Payments for student refund invoices are generated in the Procurement Hub in the Create Payment process. For additional information, see Create Payment.
Note
To create payments, you must be in a Procurement - Accounts Payable role with the appropriate permission.