Create an Advising Cycle
Important
Information and features vary according to the roles to which you belong and the permissions associated with those roles. For more information, contact your module manager or your campus support team.
The four-step wizard walks you through creating a new advising cycle. You can share a draft or proposed version of the advising cycle with advisors/stakeholders for review before publishing and making it available to advisors. The following provides an overview of each step in the wizard.
Once you start creating the advising cycle, it is considered a draft and can be updated until it is published. This allows you to complete the wizard if you need to return and finish setting it up at a later time or need to make updates based on feedback from colleagues before publishing it and making it available to advisors.
Set Up Advising Cycle Basics
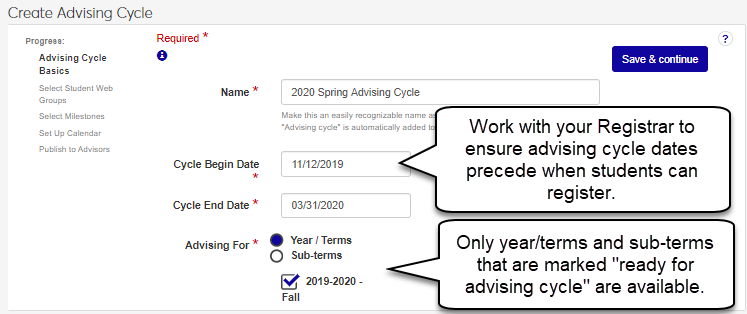
During this step, you can enter basic information about the advising cycle including the name, the start and end dates, and years/terms or subterms to be associated with the advising cycle. The years/terms/subterms available to be selected are determined by what years/terms or subterms are designated as Ready for Advising Cycle on the Year / Term / Subterm page, Year/Term Control for Registration Control Groups or Subterm Control for Registration Control Groups tabs.
Tip
Review your school's registration periods before setting up your advising cycles to guide what name and dates you use.
Select Student Web Groups
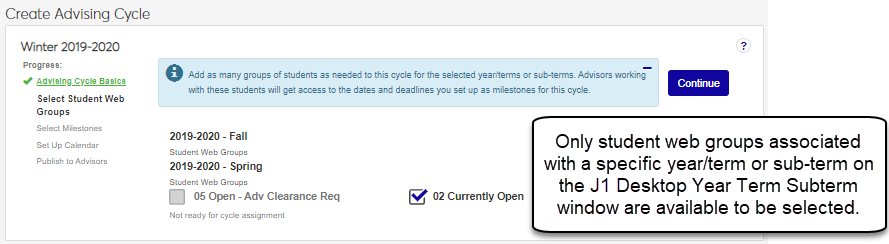
During this step, you can select which Registration Control groups will be associated with the new advising cycle. These groups determine which students will be associated with the advising cycles ( Student Information Details tab and/or Web Registration Group Definitions page).
Note
Registration Control groups are defined on the Web Registration Group Definitions page. Students are assigned to the groups on the Student Information Details page, Enrollment tab.
Tip
Registration Control groups are available only if the following is true about them on the Year / Term / Subterm page:
They're not already in the registration period.
They're not associated with another advising cycle.
They're designated Ready for Advising Cycle.
Select Milestones
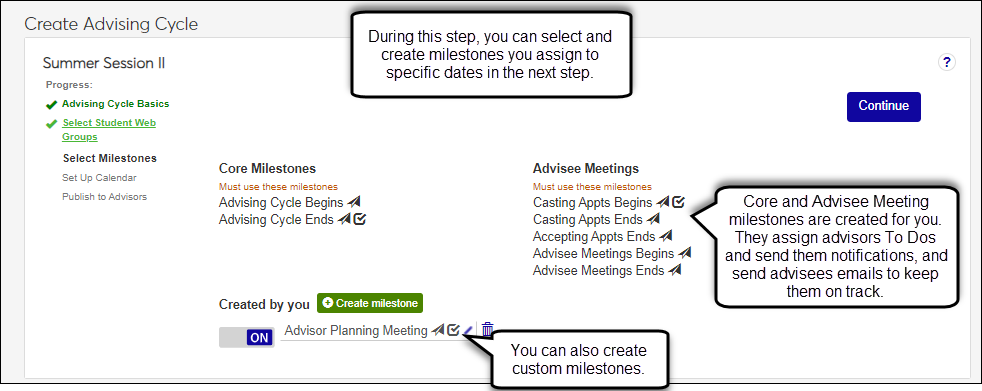
During this step, you can select standard milestones and create/enable custom milestones to be associated with the advising cycle. Custom milestones could be registration begin/end dates, course add/drop dates, or a reoccurring meeting you have with your advisors at the end of an advising cycle to discuss advising success. You can also determine if you want automated notifications and To Dos to be created for the milestones to help to keep advisors on target for meeting advising cycle goals.
Note
You will place these milestones on the calendar in the next step.
Tip
Custom milestones set up for one advising cycle can be used with other advising cycles.
Set Up the Advising Cycle Calendar
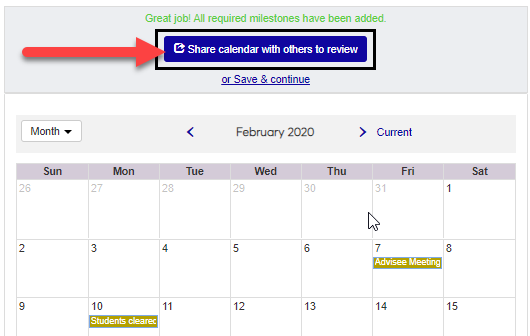
During this step, you can set the due dates for milestones using the calendar. Using the calendar helps show how the milestones will be laid out.
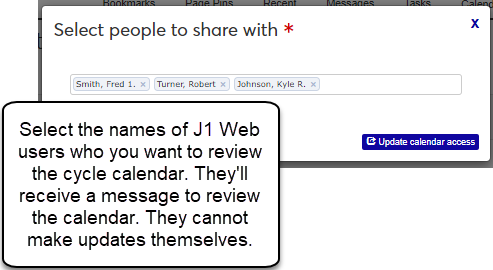
Share the Advising Cycle Calendar with Others (Optional)
During this step, you can share the calendar with other J1 Web users for review before publishing. This gives you an opportunity to get feedback on the cycle timeline and milestones, and make any needed updates before publishing and making it available to advisors.
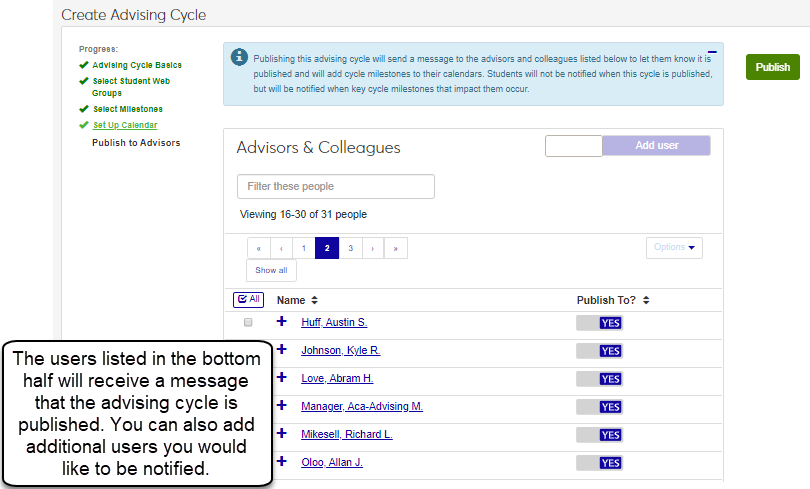
Publish to Advisors
During this step, you can publish the advising cycle and select the J1 Web users you want to notify. For example, you may want to notify your advisors to allow them to start planning their advising appointments. You do not have to notify advisors in order to publish the cycle.
On the Advising Cycles page, click the Create cycle button. The Create Advising Cycle page opens.
In the Name field, enter a unique name for the advising cycle being created. This name appears to students and advisors.
Tip
Use a name that is easily understandable by students and advisors.
You do not need to enter the words "advising cycle" as a part of the name. They are automatically added to the name you enter.
Click in the Cycle Begin Date field and select when the advising cycle will begin from the calendar pop-up. The earliest date you can select is the current date.
Click in the Cycle End Date field and select when the advising cycle will end from the calendar pop-up.
From the Advising For options, select Year/Terms or Subterms. The available year/terms or subterms appear.
Select the year/terms or subterms you want to associate the advising cycle with.
Tip
Only those year/terms or subterms designated as Ready for Advising Cycle on the Year / Term / Subterm page are available.
Click Save & continue. The Select Student Web Groups page appears.
Select the checkboxes of the student Registration Control groups to be associated with the advising cycle.
Note
Registration Control groups are also called Tel/Web groups, Web Registration groups, and Web groups. Students are grouped in them for the purpose of controlling when they can use the Campus Portal to register, drop, and withdraw.
Tip
Registration Control groups are available only if the following is true about them on the Year / Term / Subterm page:
They're not already in the registration period.
They're not associated with another advising cycle.
They're designated Ready for Advising Cycle.
Click Save & continue. The Select Milestones page appears.
Note
Core Milestones such as when the cycle begins and ends are required and cannot be deselected. Icons indicate To Dos and/or notifications are associated with these milestones. You can select when these milestones occur during the next step.
Advisee Meetings milestones determine when advisors are responsible for setting up their availability and meeting with advisees, and when advisees will be able to select available advising appointments. Icons indicate that advisors will automatically receive To Dos and/or notifications for these milestones. You can select when these milestones occur during the next step. The Advisor Meeting Status block allows you to monitor how many advisors have met with their advisees and ensure student registration is not impacted.
Created by you milestones allow you to create custom milestones such as registration dates or meeting with peer mentors. You can create as many milestones as you want and they can be used in other advising cycles.
To create a new custom milestone:
Click Add milestone. The New Milestone pop-up appears.
In the Name field, enter an easily identifiable name for the milestone. This name appears on your advisors' calendars.
To have messages/To Dos automatically associated with the new milestone, select the Send Messages and/or Create To Dos checkbox.
Click Add milestone. The New Milestone pop-up closes and the new milestone is available in the Created by you list.
To include custom milestones with the advising cycle:
Slide milestone option to On.
To delete a custom milestone:
Note
Only shared and draft advising cycles can be deleted. Once an advising cycle is published or completed, it cannot be deleted.
Click the Delete icon next to it. The delete confirmation pop-up appears.
Click Yes, delete. The milestone is deleted and no longer available for future advising cycles.
As each milestone appears at the top of the calendar, click on the calendar day when you want the milestone to occur. The milestone is added to the day. Red indicates a time frame where milestones cannot be added because it is outside the advising cycle timeframe.
Tip
You do not have to add the milestones in order. You can click through them and add them as you are ready.
To change a milestone date, click on it and then click the new date.
To notify advisors/ colleagues the advising cycle has been published, select Yes in the Publish to? column.
Tip
To select all the advisors/ colleagues at one time and chose them to either be notified or not:
Click All. All the advisors/ colleagues shown are selected.
From the Options drop-down, select Yes, publish to or No, don't publish to. The entire list of advisors/ colleagues will be selected to be notified or selected to not be notified at one time.
If there is an advisor/ colleague you want to notify who isn't listed:
Start entering their name in the field next to the Add user button.
From the list of matching names that appears, select the appropriate user.
Click Add user. Their name is added to the list of advisors and colleagues.
Click Publish. Several things happen:
The advising cycle has a published status and cannot be updated or deleted.
Advisors and colleagues who were selected to be notified receive a J1 Web notification letting them know the cycle has been published.
Advising milestones are added to the calendars within in the Advising Administration and Academic Advising hubs as well as on the calendars of those advisors/ colleagues who were selected to be notified when the cycle was published as well as those who were selected to review the advising cycle.
Advising cycles define a time period when advisors assist students with course planning and registration and direct them to college resources such as Learning Centers or Career Services for a selected year/term/subterm.
There are a few reasons a year/term or subterm might not be available:
The Registration Control group for the year/term/subterm may not be designated as Ready for Advising Cycle on the Year / Term / Subterm page.
The year/term/subterms may not fall within the time frame you selected for the cycle are available.
The year/term/subterm might already be associated with another advising cycle. Year/terms/subterms can only be associated with one advising cycle.
The registration period may already have started for the Registration Control group for the year/term/subterm.
Note
Registration Control groups are also called Tel/Web groups, Web Registration groups, and Web groups. Students are grouped in them for the purpose of controlling when they can use the Campus Portal to register, drop, and withdraw.
The web groups available to be selected are determined by which ones are associated with a specific year/term or subterm on the Year / Term / Subterm page, Year/Term Control for Registration Control Groups or Subterm Control for Registration Control Groups tabs.
Note
Registration Control groups are also called Tel/Web groups, Web Registration groups, and Web groups. Students are grouped in them for the purpose of controlling when they can use the Campus Portal to register, drop, and withdraw.