User-Defined Forms
Important
Information and features vary according to the roles to which you belong and the permissions associated with those roles. For more information, contact your module manager or your campus support team.
Use the User-Defined Forms page to view and configure user-defined forms and fields used by your organization.
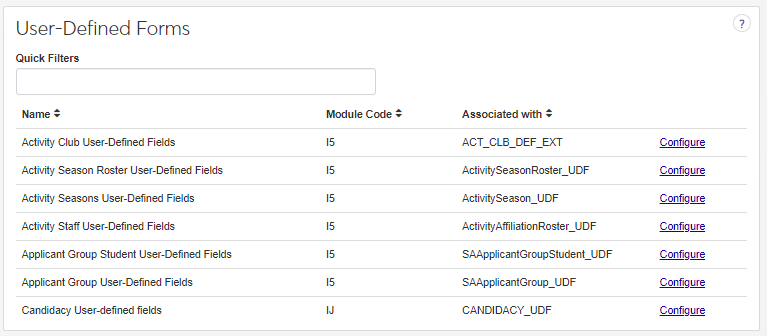
The User-Defined Forms list displays
The Name of the user-defined fields group. You can change the name on the Edit page.
The Module Code they are related to.
The database tables they are Associated with.
If you have the correct permissions, the Configure User-Defined Fields column contains an active link to configure the fields.
Note
The information in the Name column may have been changed by your institution.
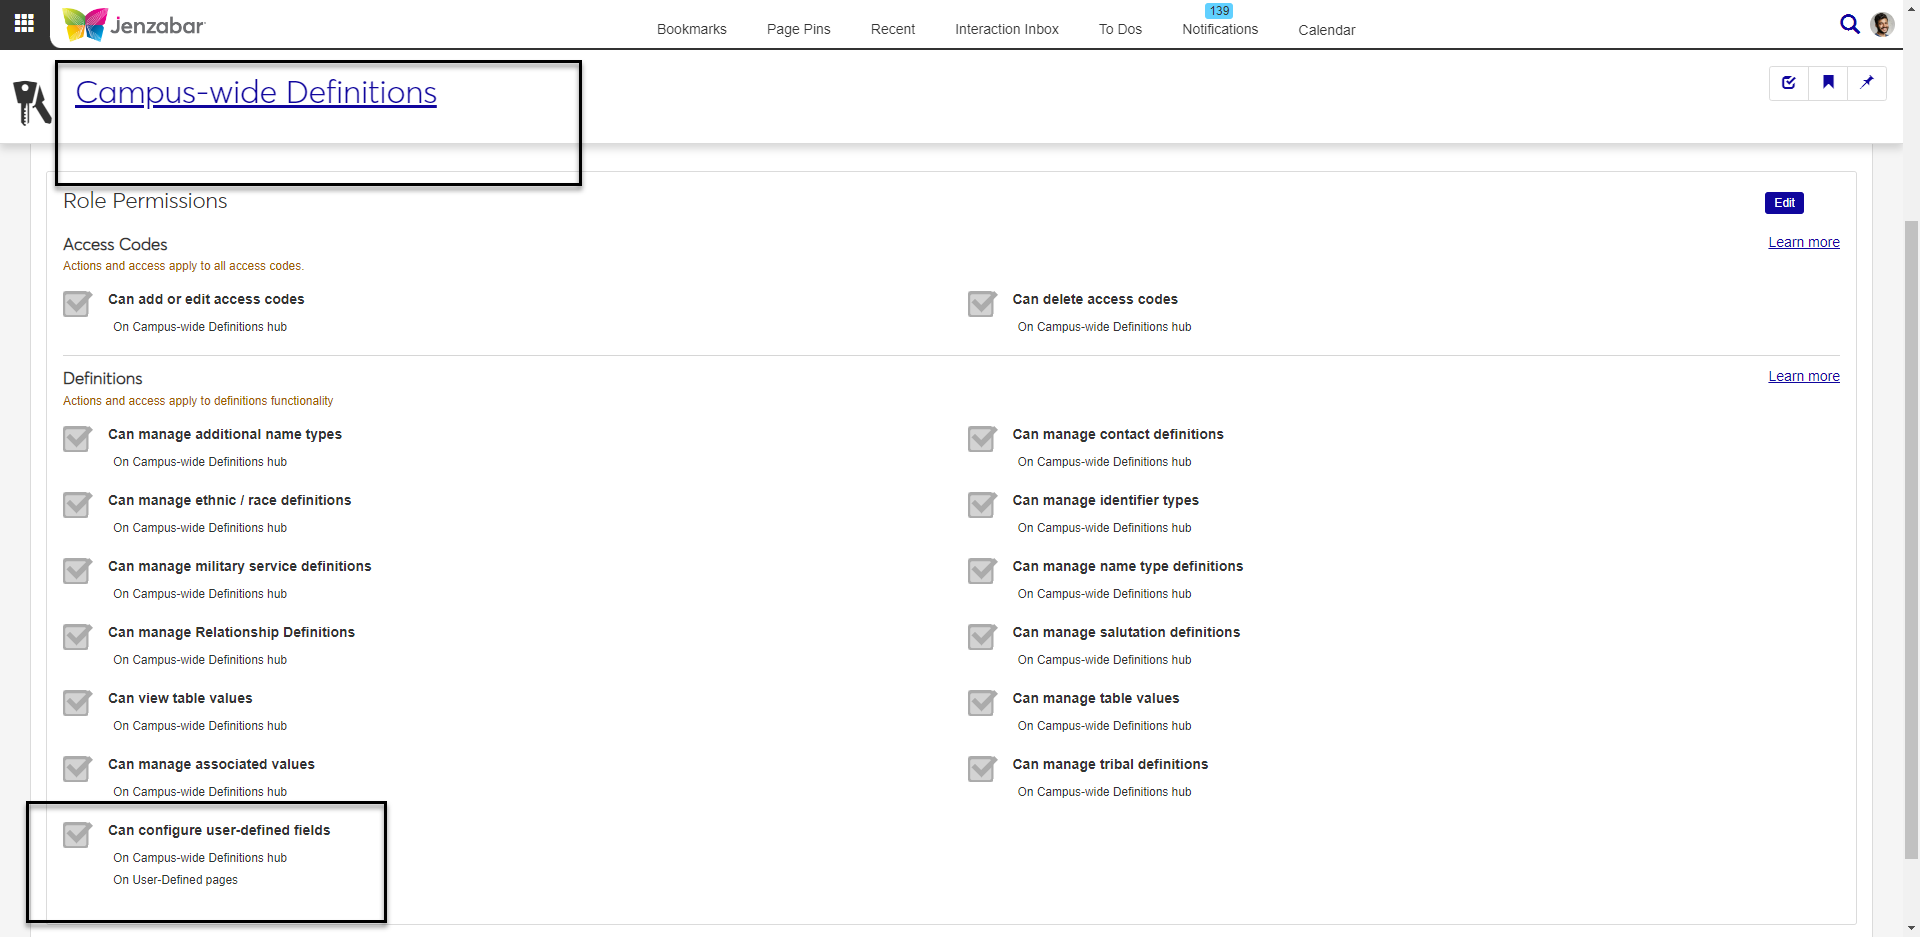
To access the Configure User-Defined Fields page, users need the Can configure user-defined fields permission in the Campus-wide Definitions role.
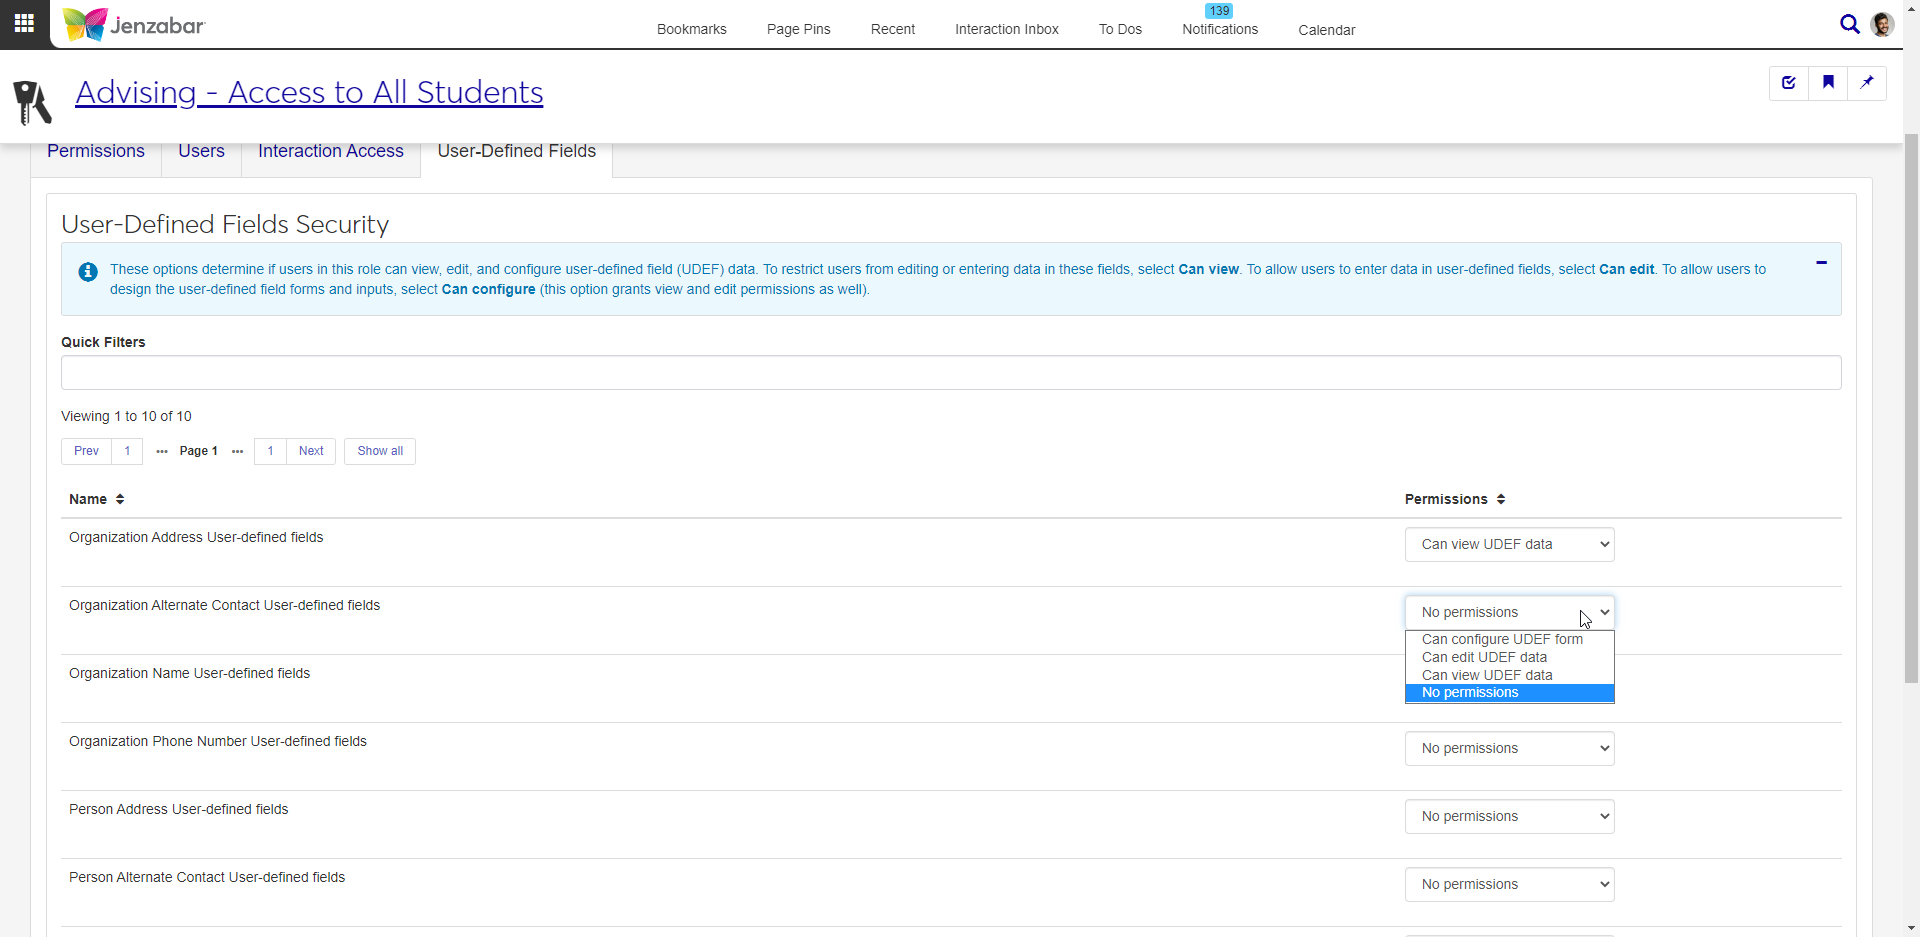
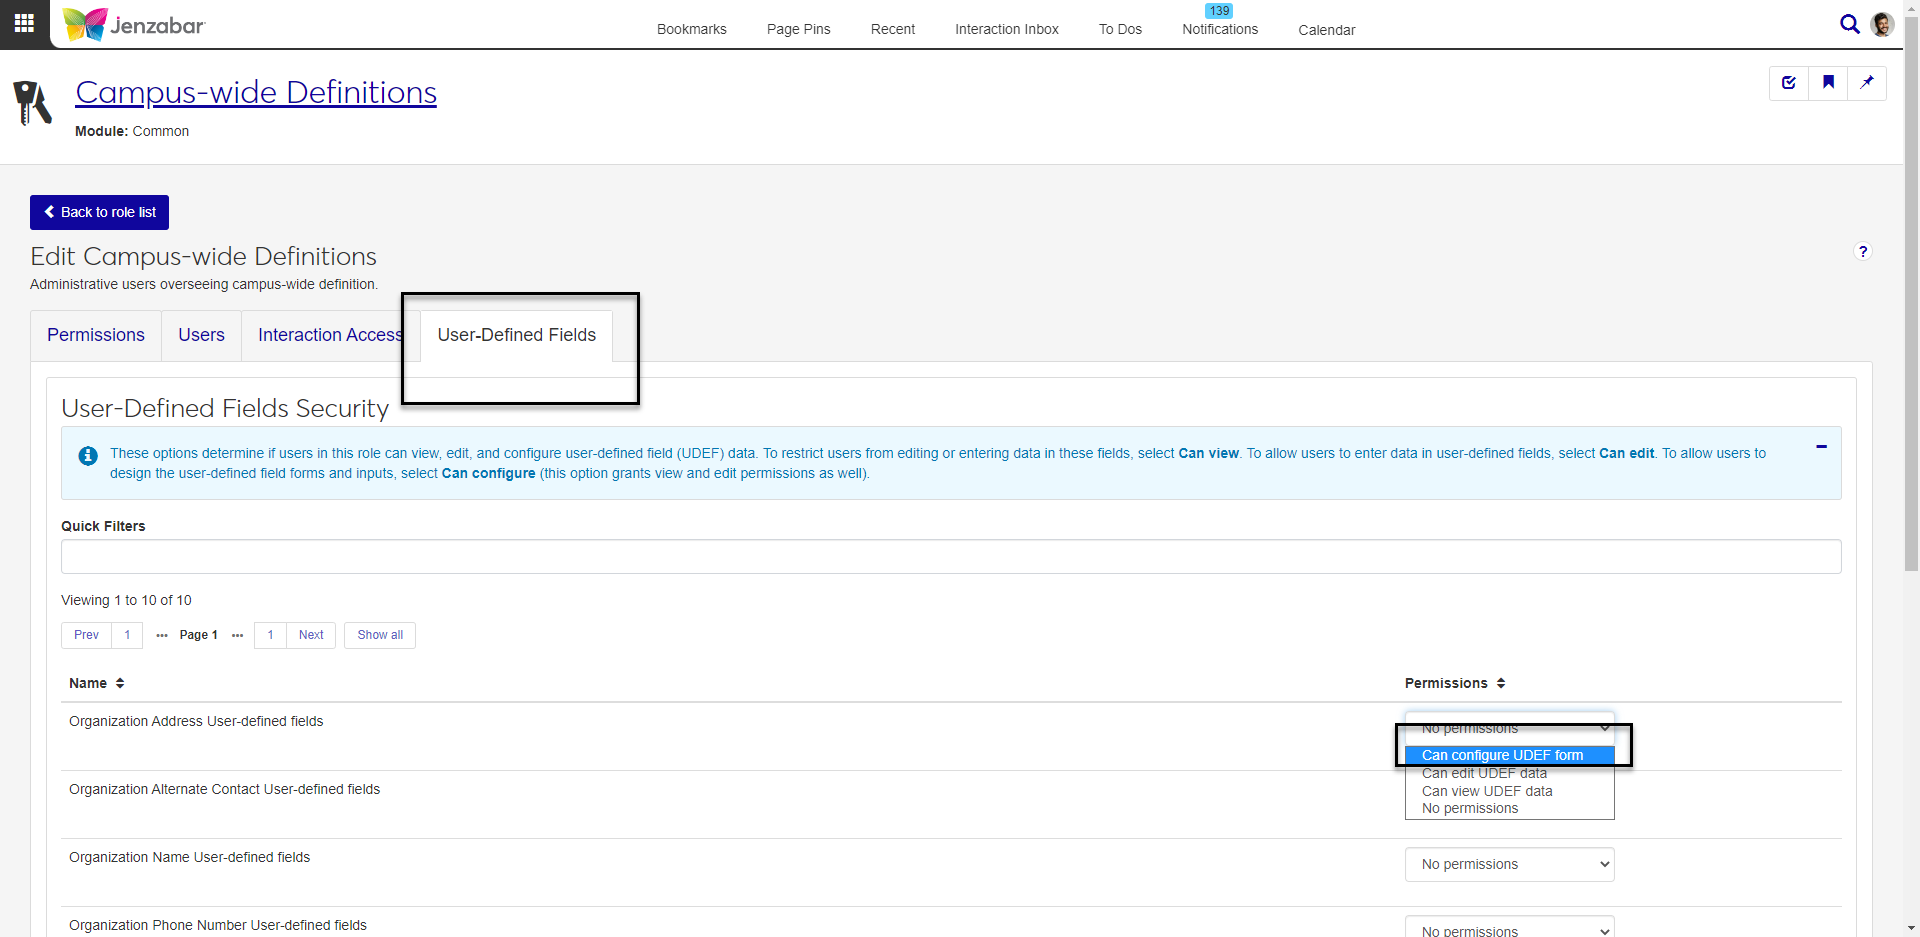
The ability to configure fields from this page, and where used throughout the system, is assigned by role-level permissions. For each role you want to give access to user-defined fields, click on the User-Defined Fields tab. Choose Can configure in the Permissions column for each user-defined fields group you want users to be able to configure.
Note
User-defined fields will be available in more areas of J1 Web with future releases.
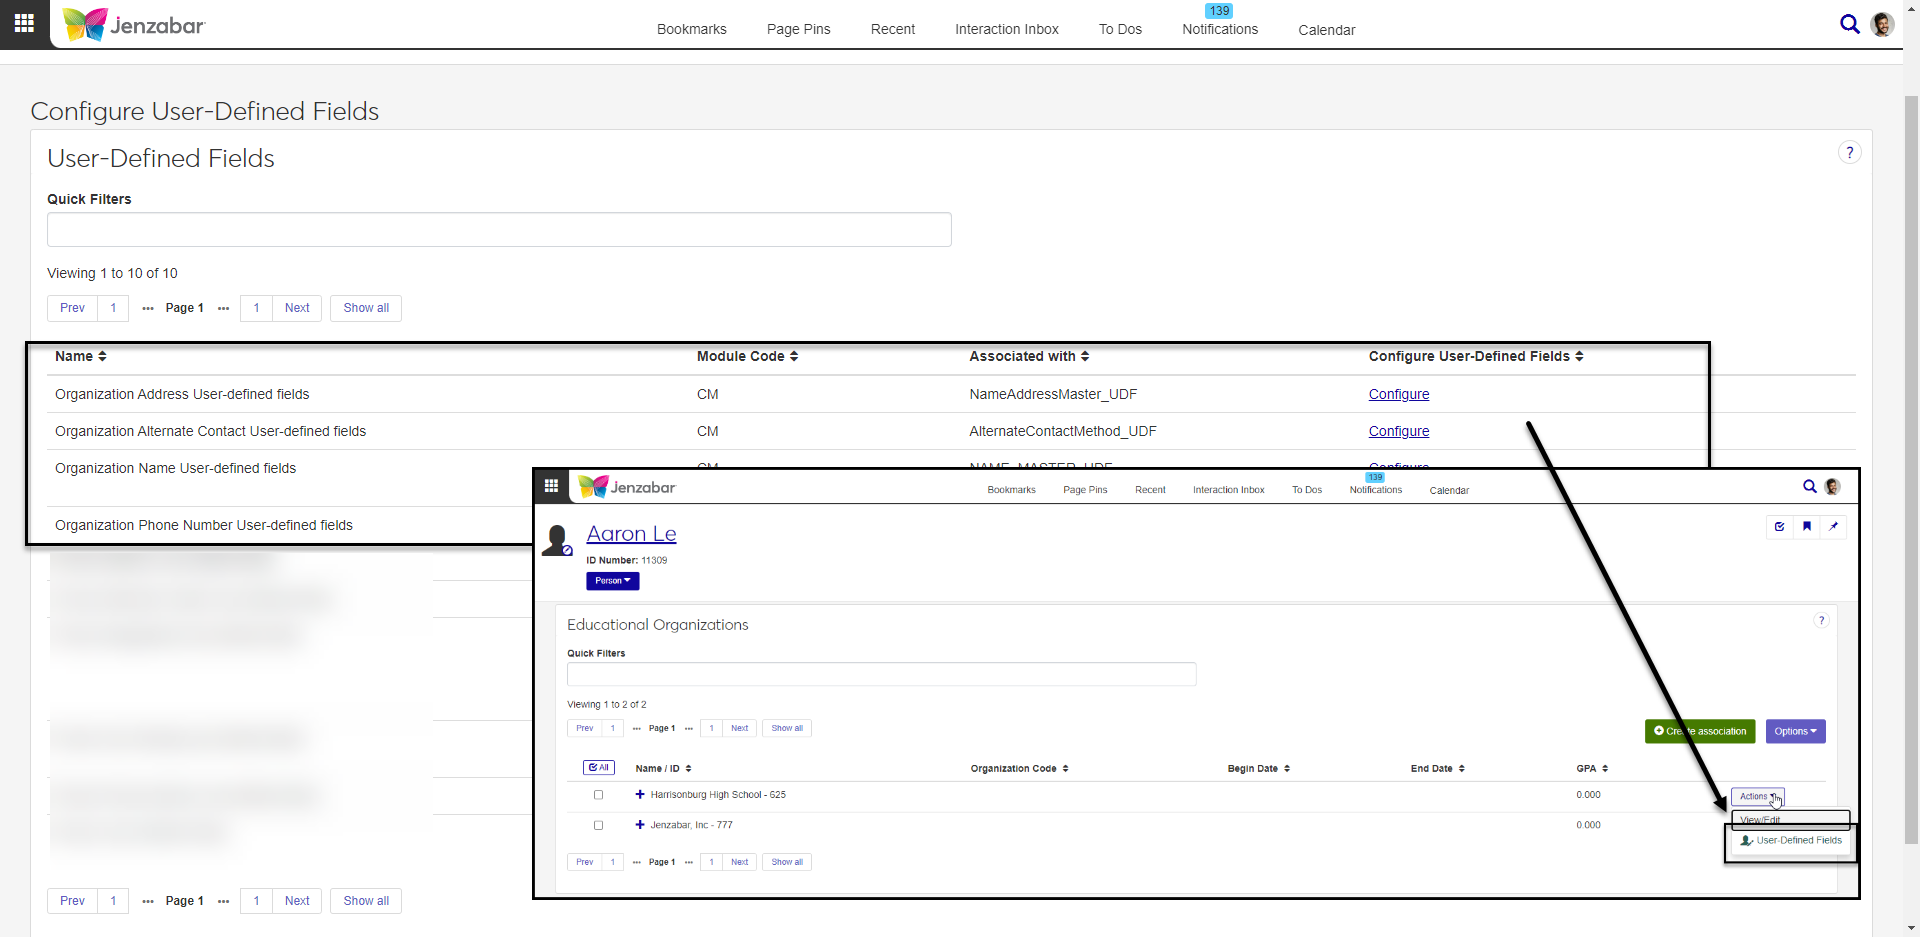
User-defined fields related to organization information are available for users to work with on Person pages > Educational Contacts.
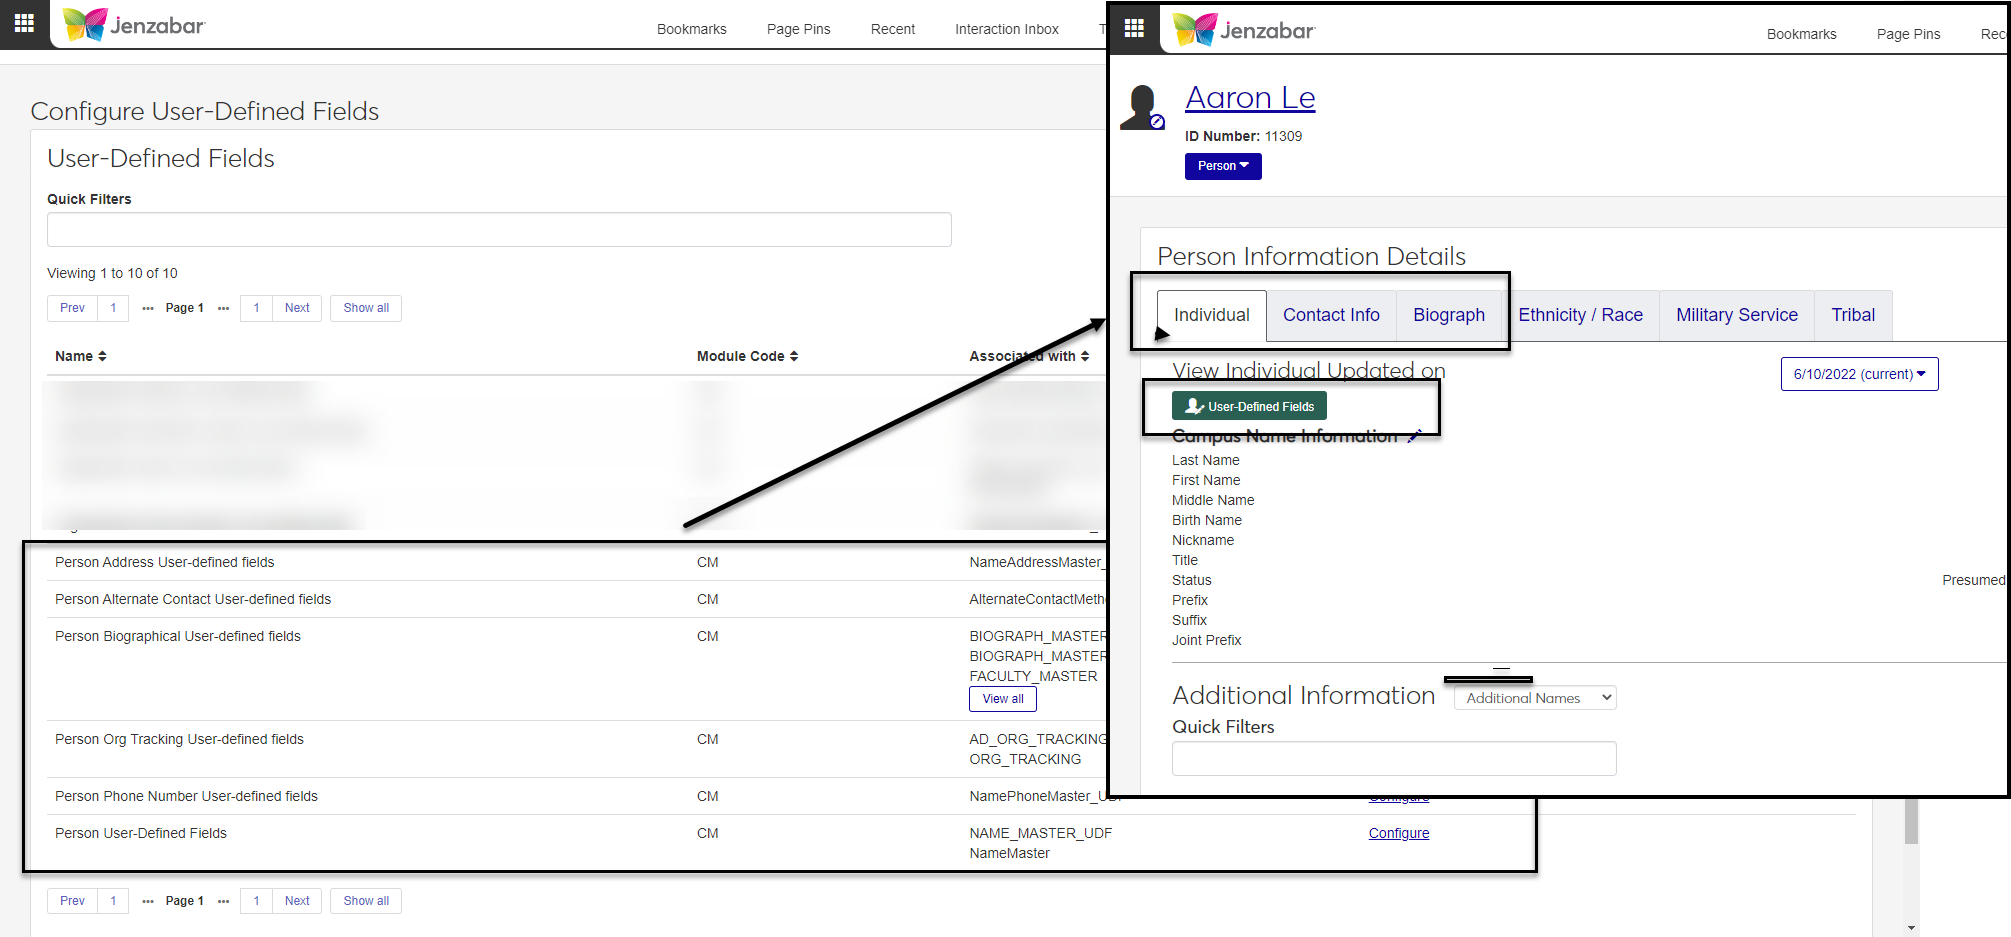
User-defined fields related to person information are available for users to work with on Person pages > Person Information Details, Individual, Contact Info, and Biograph tabs.
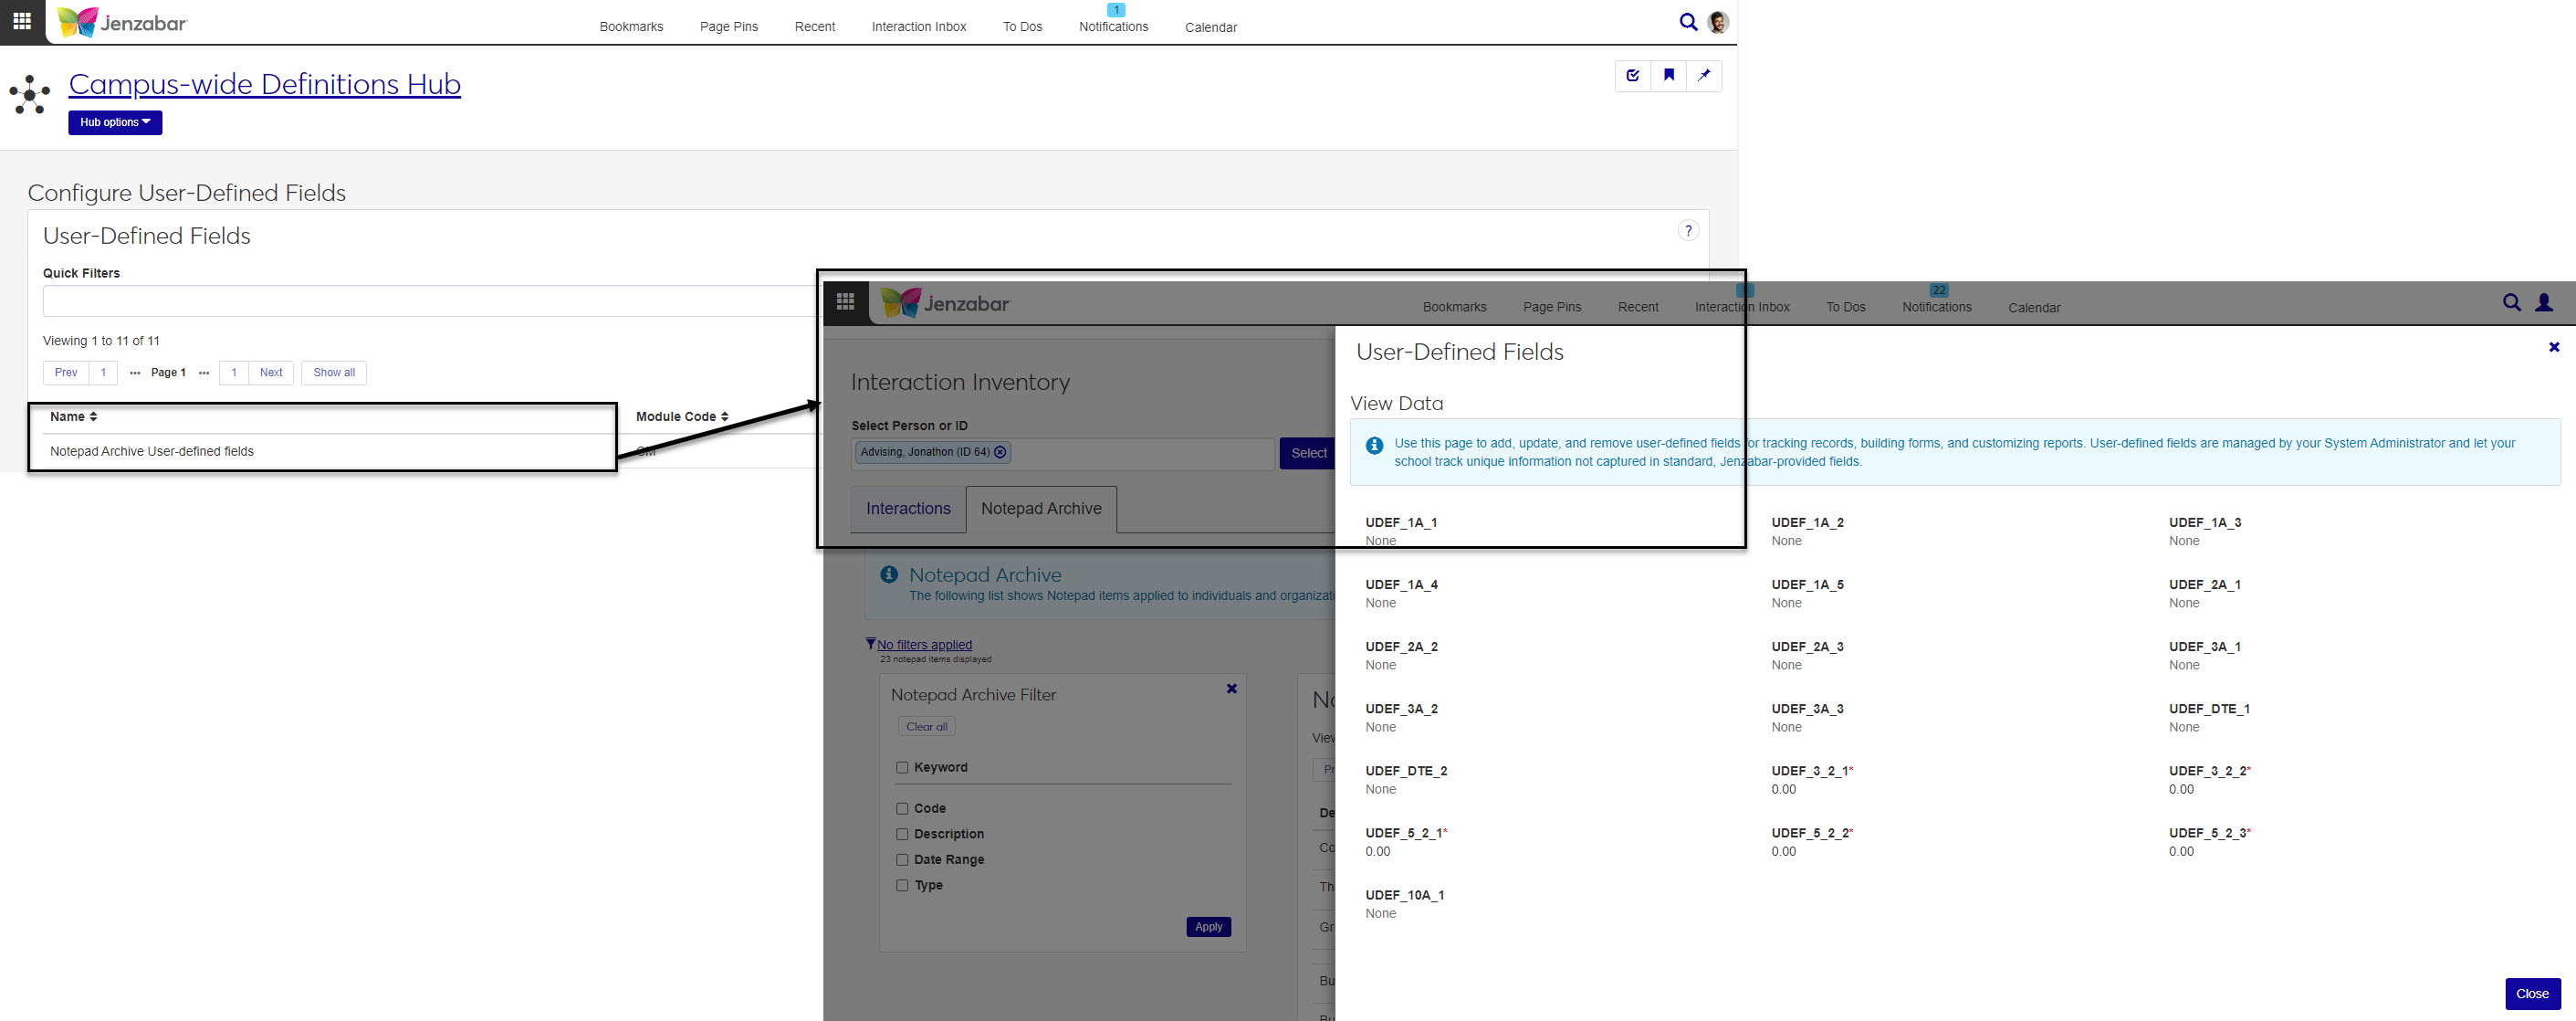
User-defined fields related to the Notepad Archive are available on the Interaction Inventory page, Notepad Archive tab.
Note
Changes are saved automatically.
Navigate to the Configure User-Defined Fields page: Core > Campus-Wide Definitions > Configure User-Defined Fields.
In the User-Defined Fields section, on the row for the user-defined fields you want to configure, click Configure in the Configure User-Defined Fields column. The Edit page displays.
To edit the name of the user-defined fields group:
Click in the field containing the name and edit as needed. This changes the information listed in the Name column on the Configure User-Defined Fields page, User-Defined Fields list.
Click Save.
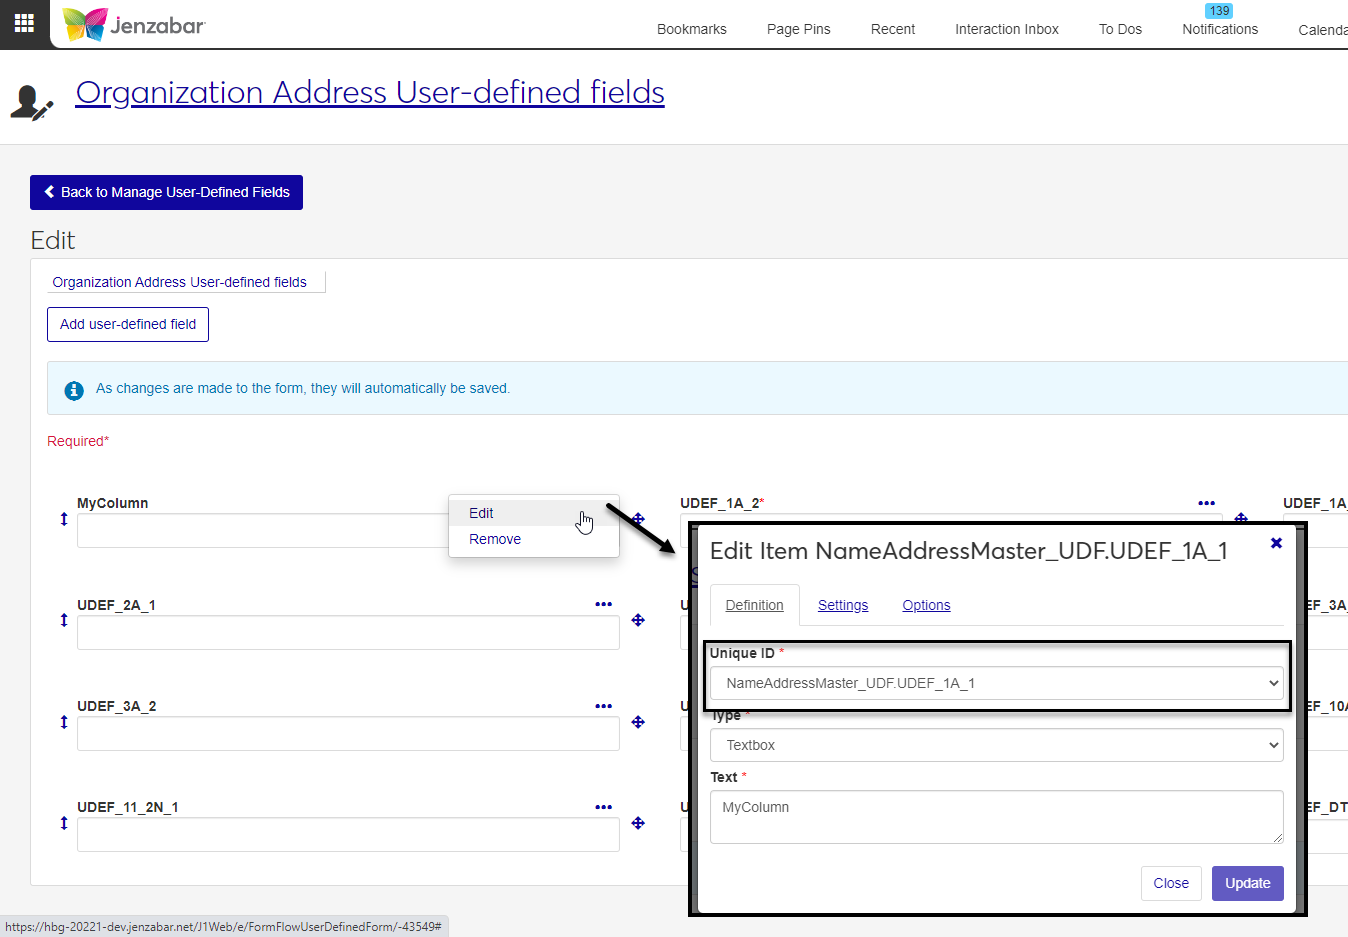
Click the ellipsis beside the field you want to edit and choose Edit from the drop-down menu. The edit pop-up opens.
On the Definition tab:
The Unique ID can't be edited.
Choose a Type from the drop-down menu. Options are Date/Time Picker, Drop-down, Essay, and Textbox.
In the Text field, enter the field name you want to display to users.
On the Settings tab:
Select Is Required to make the field required where used in the system.
Select Is Read Only to make the field read-only where used in the system.
If the Type is Date/Time Picker, select the checkboxes beside Display Date Picker and/or Display Time Picker to display either or both of those options to users.
If the Type is Textbox, choose a Validation from the drop-down menu.
Tip
For example, if you want users only to be able to enter non-negative numbers in the textbox, chose Non-negative from the Validation drop-down.
On the Options tab:
Tip
The Options tab displays if you selected Drop-down or Textbox in the Type field on the Definition tab.
Choose the Static Options or Query Options radio button.
Static options let you enter specific options that form users can select. They are specific to the form and populated from your J1 or external database. To add a static option
click the Add button.
Enter information in the Numeric, Value, and Text fields.
Choose the Selected checkbox to make this option the default in drop-down menus where available throughout the system.
Query options let you provide options for the users based on your J1 or external database. In the Query Options field, enter the name of a Jenzabar-provided query or one created by your institution.
Click Update.
Navigate to the Configure User-Defined Fields page: Core > Campus-Wide Definitions > Configure User-Defined Fields.
In the User-Defined Fields section, on the row for the user-defined field group containing the user-defined field you want to remove, Configure in the Configure User-Defined Fields column.
Click the ellipsis beside the field you want to remove and choose Remove from the drop-down menu.
On the Remove Item pop-up, click Yes to remove the user-defined field from this form and where it is used throughout the system.
Navigate to the Configure User-Defined Fields page: Core > Campus-Wide Definitions > Configure User-Defined Fields.
In the User-Defined Fields section, on the row for the user-defined field group that you want to add a user-defined field to, click Configure in the Configure User-Defined Fields column.
The Edit page displays. Click the Add user-defined field button. The New Item pop-up opens.
On the Definition tab:
Choose a Unique ID from the drop-down menu.
Tip
Options include user-defined fields that already exist in the database but do not yet display on this page. If you don't see any options in the drop-down menu, there are no new fields to add.
Choose a Type from the drop-down menu. Options are Date/Time Picker, Drop-down, Essay, and Textbox.
In the Text field, enter the field name you want to display to users.
On the Settings tab:
Select Is Required to make the field required where used in the system.
Select Is Read Only to make the field read-only where used in the system.
If the Type is Date/Time Picker, select the checkboxes beside Display Date Picker and/or Display Time Picker to display either or both of those options to users.
If the Type is Textbox, choose a Validation from the drop-down menu.
Note
For example, if you want users only to be able to enter non-negative numbers in the textbox, chose Non-negative from the Validation drop-down.
On the Options tab:
Note
The Options tab displays if you selected Drop-down or Textbox in the Type field on the Definition tab.
Choose the Static Options or Query Options radio button.
Static options let you enter specific options that form users can select. They are specific to the form and populated from your J1 or external database.
To add a static option click the Add button.
Enter information in the Numeric, Value, and Text fields.
Choose the Selected checkbox to make this option the default in drop-down menus where available throughout the system.
Query options let you provide options for the users based on your J1 or external database. In the Query Options field, enter the name of a Jenzabar-provided query or one created by your institution.
Click Update.
Note
Changes are saved automatically.
Navigate to the Configure User-Defined Fields page: Core > Campus-Wide Definitions > Configure User-Defined Fields.
Click Configure in the Configure User-Defined Fields column.
On the Edit page, select the arrow icon beside the field you want to move.
Drag and drop it to the new location.
The Unique ID (shown on the Edit pop-up) is made up of the table name.field name.
User-defined fields related to organization information are available for users to work with on Person pages > Educational Contacts.
User-defined fields related to person information are available for users to work with on Person pages > Person Information Details, Individual, Contact Info, and Biograph tabs.
User-defined fields related to the Notepad Archive are available on the Interaction Inventory page, Notepad Archive tab.
Access to user-defined fields is assigned by role-level permissions. For each role you want to give access to user-defined fields, click on the User-Defined Fields tab. There you can give varying degrees of access to each user-defined field group used in the system.